background image

8


Operation 


Operation Guide 


CAUTION: 


• 

THIS APPLIANCE IS FOR PROFESSIONAL USE AND IS ONLY TO BE USED BY QUALIFIED PEOPLE.


• 

ONLY QUALIFIED SERVICE PERSONS ARE TO CARRY OUT INSTALLATION, SERVICING OR GAS CONVERSION 

OPERATIONS.


• 

COMPONENTS HAVING ADJUSTMENTS PROTECTED (E.G. PAINT SEALED) BY THE MANUFACTURER SHOULD NOT 

BE ADJUSTED BY THE USER/OPERATOR.


1. 

These Gas Griddles have been designed to provide simplicity of operation and 100% safety 

protection. 

2. 

Improper operation is therefore almost impossible, however bad operation practices can reduce the 

life of the gas griddle and produce a poor quality product.  To use this appliance correctly please 
read the following sections carefully:- 


• 

Lighting the Pilot Burner. 

• 

Lighting the Main Burner.


• 

Setting the temperature you expected 


• 

Turning 'Off' the Main Burner / Pilot.


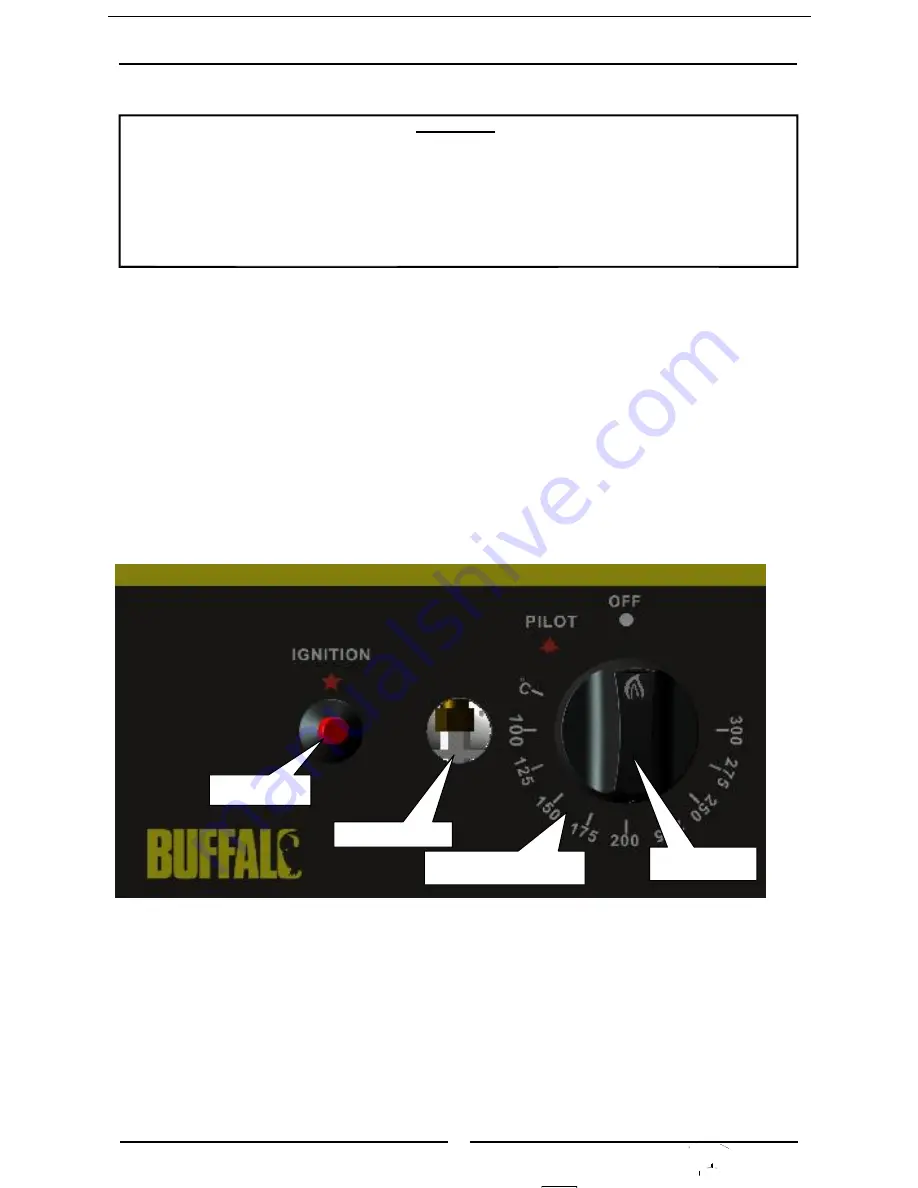
Description of Controls 


Viewing hole 

Temperature gradient 

Control dial 

Piezo igniter 

Содержание CD963

Страница 1: ...Gas Griddle Instruction Manual Model CD963 CD964...

Страница 2: ...ts Unpacking Location Clearances Assembly Gas Connection Commissioning Operation 8 Operation Guide Description of Controls Lighting the Pilot Burner Lighting the Main Burner Cleaning and Maintenance 1...

Страница 3: ...H READ THE INSTALLATION OPERATING AND MAINTENANCE INSTRUCTIONS THOROUGHLY BEFORE INSTALLING OR SERVICING THIS APPLIANCE WARNING INSTRUCTIONS TO BE FOLLOWED IN THE EVENT THE USER SMELLS GAS ARE TO BE P...

Страница 4: ...Gas Supply Requirements Natural Gas G20 Natural gas G25 Propane G31 CD963 CD964 CD963 CD964 CD963 CD964 Heat Input nett 14 Kw 21 Kw 14 Kw 21 Kw 14 Kw 21 Kw Gas Rate nett 1 45 m3 hr 2 2 m3 hr 1 7 m3 hr...

Страница 5: ...4 Dimensions Dimensions for Bench Models CD963 CD964 544 0 610 0 69 5 744 395 330 101 5 441 0 804 5 804 5 441 0 101 5 330 395 744 69 5 849 0 915 0...

Страница 6: ...coating from the exterior stainless steel panels Check equipment and parts for damage Report any damage immediately to the carrier and distributor Ensure that the 4 adjustable feet are fitted with th...

Страница 7: ...his is correct for the gas supply the appliance is being installed for The gas conversion procedure is detailed in this manual b Supply Pressure required for this appliance is shown in the Specificati...

Страница 8: ...e test point outlet and with one griddle burner operating at the High Flame setting 8 Turn off the mains gas supply and bleed the gas out of the appliance gas lines 9 Turn on the gas supply and the ap...

Страница 9: ...These Gas Griddles have been designed to provide simplicity of operation and 100 safety protection 2 Improper operation is therefore almost impossible however bad operation practices can reduce the li...

Страница 10: ...ate a single spark 3 Hold in the gas control knob for approximately 10 15 seconds then release The pilot burner should remain alight If not repeat these 3 steps 4 Pilot ignition can be viewed through...

Страница 11: ...NOTE DO NOT use abrasive detergents strong solvents or caustic detergents as they could corrode or damage the griddle In order to prevent the forming of rust on the griddle plate ensure that any dete...

Страница 12: ...s castings to cool and remove for cleaning NOTE In order to prevent the forming of rust on the griddle plate ensure that all detergent and cleaning material has been entirely removed after each cleani...

Страница 13: ...Appliance Both of them can be found on the Rating label located on the appliance Fault Possible Cause Remedy Pilot won t light No gas supply Blocked pilot injector Ensure gas isolation valve is turne...

Страница 14: ...e electrical connection lead from the rear of the piezo igniter fitted to the control panel 4 Unscrew and remove the injector A F from the main burner end clamp 5 Determine the correct injector size f...

Страница 15: ...23mm A F from the regulator 3 Un clip the plastic pin from the cap rotate the pin and re fit it back to the cap the correct way for the gas type to be used Either LP or NAT should be visible on the f...

Страница 16: ...or some reason it is not possible to get the appliance to operate correctly shut off the gas supply and contact the supplier of this appliance Gas Specifications Appliance Classification Category II2H...

Страница 17: ...description and quote model number and serial number which is shown on the rating plate Gas Conversion Kits Part name Code QTY Categories Country CD963 CD964 Main injector 40 G25 Only 1470544 2 3 I2L...

Страница 18: ...17 Explosion drawing...

Страница 19: ...9 Regulable feet N A 4 10 Base plate CD963 N A 1 Base plate CD964 N A 1 11 Body ass y lower CD963 N A 1 Body assy lower CD964 N A 1 12 Regulator AC127 1 13 Back plate CD963 N A 1 Back plate CD964 N A...

Страница 20: ...y Avonmouth Bristol BS11 8TB United Kingdom I the undersigned hereby declare that the equipment specified above conforms to the above Directive s and Standard s Ik de ondergetekende verklaar hierbij d...

Отзывы: