background image

BÜCHI Labortechnik AG

Appendix | 10

Operation Manual ProxiMate™

89/94

10

Appendix

10.1

Measurement results

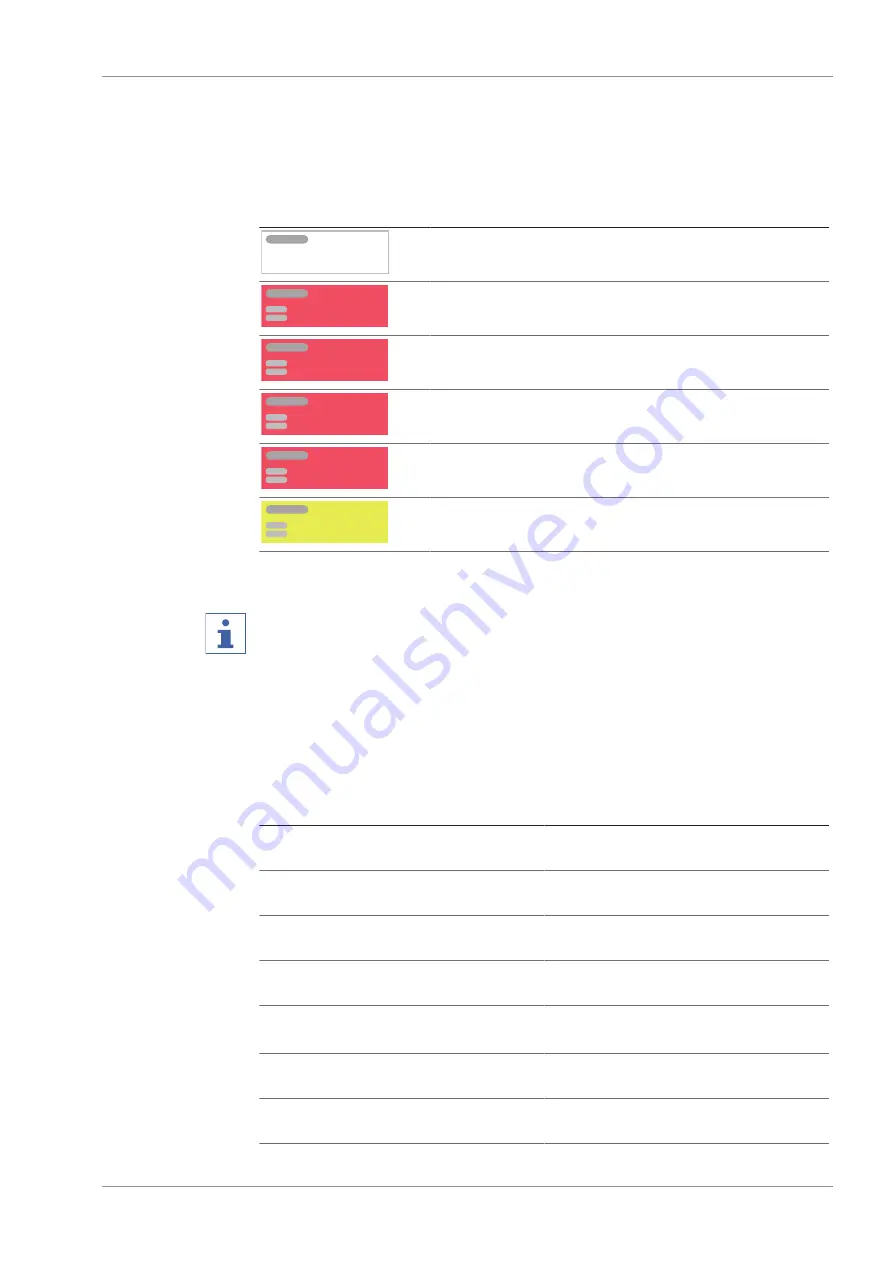
Measurement results are displayed after a measurement in the 

Start

 menu.

Measurement result

Explanation

xx.x %

—

The tested sample is in the specifications.

Invalid

—

The calibration model is missing.

Outlier

—

Mahalanobis outlier

! xx %

—

The predicted value is outside calibration range.

xx.x %

—

The predicted value is outside of the set limit.

xx.x %

—

The predicted value is outside the tolerance.

10.2

Folder locations

NOTE

Hidden folders

By default settings the following folder locations are hidden.

4

Start the software 

[Windows Explorer]

 on the instrument.

4

Navigate to folder options via the following navigation path: View 

 Folder Op-

tions 

 View

4

Activate the function 

[Show hidden files, folders and drives]

.

Explanation

Type

Folder

Calibration files

.cal

C:\ProgramData\BUCHI\NIR-
Wise\Calibrations

Data files for calibration

.tsv

C:\ProgramData\BUCHI\NIR-
Wise\Calibrations\Data

Device specific data files for calibration

.tsv

C:\ProgramData\BUCHI\NIR-
Wise\Calibrations\Local

Manually exported files with different
content

di-
verse

C:\ProgramData\BUCHI\NIR-
Wise\Export\Data

LIMS system files

.xml
.csv

C:\ProgramData\BUCHI\NIR-
Wise\Export\LIMS

Licence request file

.xml

C:\ProgramData\BUCHI\NIR-
Wise\Export\LicenseRequests

External References

.brf

C:\ProgramData\BUCHI\NIR-
Wise\References

Содержание ProxiMate

Страница 1: ...ProxiMate Operation Manual 11593981 D en...

Страница 2: ...to make changes to the manual as deemed necessary in the light of experi ence especially with respect to structure illustrations and technical details This manual is copyrighted Information from it m...

Страница 3: ...10 2 4 5 Data loss 10 2 4 6 Damage to the internal memory due to incorrect shutting down of the instrument 10 2 5 Personal protective equipment 10 2 6 Modifications 11 3 Product description 12 3 1 De...

Страница 4: ...e 21 5 3 Securing against earthquakes 21 5 4 Establishing electrical connections 22 5 5 Installing a USB device 22 5 6 Software settings 23 5 6 1 Apply for a licence 23 5 6 2 Import Licence 24 5 6 3 C...

Страница 5: ...rediction type of a property 49 6 8 6 Changing the Initial Wavelength Range Calibration model only 53 6 8 7 Changing the Postpredicted Value Calibration model only 54 6 8 8 Changing the Calibration Ba...

Страница 6: ...the desiccant cartridge 80 7 4 Changing the desiccant cartridge 82 7 5 Carrying out system tests 83 7 5 1 Carrying out a Baseline Correction Vector test 83 7 5 2 Carrying out a Comprehensive System Te...

Страница 7: ...contact 1 1 Warning notices in this document Warning notices warn you of dangers that can occur when handling the device There are four danger levels each identifiable by the signal word used Signal w...

Страница 8: ...result of a correctly carried out instruction Mark up Explanation Window Software Windows are marked up like this Tab Tabs are marked up like this Dialog Dialogs are marked up like this Button Buttons...

Страница 9: ...operated by suitably qualified laboratory staff These operating instructions are aimed at the following target groups Users Users are persons that meet the following criteria They have been instructed...

Страница 10: ...at are damaged 2 4 3 Instrument damage due to an incorrectly installed IP module An incorrectly installed IP module can cause material and moisture to enter the instru ment u Do not open the IP module...

Страница 11: ...ts u Use only genuine BUCHI accessories spare parts and consumables u Technical modifications to the device or accessories should only be carried out with the prior written approval of B CHI Labortech...

Страница 12: ...s includes the properties to be measured the calibrations used the standard operating procedure It is possible to Import or Export a file that contains all Application data to allow the same Applicati...

Страница 13: ...nt is averaged over a much larger sample area 3 3 Measurement modes 3 3 1 Diffuse reflection mode 1 3 2 Fig 1 Reflection mode up view geometry 1 Sample 2 Sensor 3 Light Non translucent materials can b...

Страница 14: ...tion 3 4 1 Front view 5 4 1 2 3 Fig 3 Front view 1 Control panel 2 On Off master switch 3 Up view window 4 Sample presentation area 5 Down view window NOTE The instrument is designed for stationary in...

Страница 15: ...h Advanced IP module 1 Cover lid down view lamp 2 Cover lid desiccant cartridge 3 USB socket 4 USB socket 5 Cable gland for network connection 6 Advanced IP module The instrument connections are lo ca...

Страница 16: ...IP module removed 6 1 2 3 4 5 7 8 9 Fig 5 Connections on the rear side 1 Reserve 2 Reserve 3 RJ45 network socket 4 RJ45 network socket 5 Reserve 6 Power supply connection 7 Reserve 8 USB ports max 5...

Страница 17: ...Switzerland Type xxx SN 10xxxxxxxx Volt xxx xxx VAC Frequ xx Hz Power xxxx W Built 20xx Made in Switzerland 6 5 4 1 3 2 7 8 9 10 9 Fig 7 Type Plate 1 Company name and address 2 Instrument name 3 Seria...

Страница 18: ...age life lamp 9000 h Display 10 4 in 3 7 2 Ambient conditions For indoor use only Max altitude above sea level 2000 m Ambient temperature 5 40 C 25 C Maximum relative humidity 80 for temperatures up t...

Страница 19: ...duct description 3 Operation Manual ProxiMate 19 94 Component Material of construction Seal Display 1K MS Polymer K rapop 225 Seals wire module FKM Housing USB Wi Fi Steel 1 4301 Cover USB Wi Fi PE HD...

Страница 20: ...d to the carrier u Keep packaging for future transportation 4 2 Storage u Make sure that the ambient conditions are complied with see Chapter 3 7 Tech nical data page 17 u Wherever possible store the...

Страница 21: ...n site must meet the following requirements Firm level and vibration free surface Minimum space requirement 260 mm x 435 mm x 500 mm W x D x H Take into account the maximum product dimensions and weig...

Страница 22: ...47 3 4 Use additional electrical safety features e g residual current circuit breakers to comply with local laws and regulations The power supply must fulfill the following conditions 1 Provide the ma...

Страница 23: ...Software settings 5 6 1 Apply for a licence NOTE The location of the destination folder is fixed See Chapter 10 2 Folder locations page 89 The following data is necessary for the licence request Arti...

Страница 24: ...the function Show hidden files folders and drives 4 Delete the demo license file from the following location c ProgramData BUCHI LicenseManager Licences Navigation path Licence Import Precondition R...

Страница 25: ...mode 5 Sample presentation ID u Select the name of the sample presentation you wish to calibrate u Enter the corresponding values u Place the white reference or empty sample presentation method in th...

Страница 26: ...e language of the instrument Navigation path General Precondition R The instrument is in administrator mode See Chapter 6 5 Log in administrator mode page 39 u Navigate to the view General via the nav...

Страница 27: ...he instru ment See Chapter 6 4 Status bar page 38 2 Menu bar Shows symbols representing the menus See Chapter 6 3 Menu bar page 28 3 Content area Shows current settings submenus or ac tions depending...

Страница 28: ...report Save Excel Saves the report as Excel file Save PDF Saves the report as PDF file Edit Allows the selected item to be edited New Creates a new application or prop erty Delete Deletes the selecte...

Страница 29: ...ing calibrations using the AutoCal function Exporting Measurement Data See Chapter 6 3 2 History menu page 32 Application menu Creating editing or selecting an application See Chapter 6 3 3 Applicatio...

Страница 30: ...s of the selected application 7 Shows the Standard Operation Pro cedure for the selected application 8 Note See Chapter Insert note page 32 9 Barcode See Chapter Insert barcode page 31 Control button...

Страница 31: ...is an absolute value Limits are defined in the Application The measurement is in progress Cancel measurement Insert sample ID The Sample ID is a label to identify the sample under analysis Navigation...

Страница 32: ...atory field Navigation path u Tap the button next to the Note The display shows a dialog with an alphanumeric input box u Enter a note u Tap the button OK The note is saved The dialog box closes Inser...

Страница 33: ...Enlarge Note Area 9 Barcode 10 Note 11 Add to calibration dataset button 12 Application name 13 Order number See Chapter 6 13 Creating a report page 68 Chapter 6 14 Exporting measurement data page 68...

Страница 34: ...Include in calibration dataset Auto Cal u Select the filter settings according to the requirements u Tap the button OK The dialog box closes The display shows the filtered measurements Deselect filter...

Страница 35: ...cation 2 Time and date 3 Order 4 Sample ID 5 Include in calibration dataset Auto Cal u Tap the button X of the selected filter u Tap the button OK The dialog box closes The display shows all available...

Страница 36: ...ble settings See Chapter 6 6 Editing an application page 40 Chapter 6 7 Deleting an application page 47 Chapter 6 8 Editing a property page 47 Chapter 6 9 Deleting a property page 65 Chapter 6 12 Impo...

Страница 37: ...only See Chapter 7 6 Carrying out a data backup page 84 Extended System Tests Procedure Carrying out different system tests administrator only See Chapter 7 5 2 Carrying out a Comprehensive System Tes...

Страница 38: ...rther infor mation about the tests carried out administrator only Calibrate BCV Procedure See Chapter 5 6 3 Calibrating a Baseline Correction Vector BCV page 24 administrator only Import External Refe...

Страница 39: ...seline Correction for Sample Presenta tion of current application defined Measuring White Reference Instrument initialization Lamp Pre Heating The instrument is heating the lamp The Status bar shows t...

Страница 40: ...w application Proceedings Navigation path Precondition R The instrument is in administrator mode See Chapter 6 5 Log in administrator mode page 39 u Navigate to the Application menu via the navigation...

Страница 41: ...is created 6 6 2 Changing the name of an application NOTE It is not possible to rename an application after it has been used once Proceedings Navigation path Precondition R The instrument is in admin...

Страница 42: ...surement views are avail able View Explanation Up The application uses the up view lamp Radiation is directed and collected from the underside of the sample through the sample cup Down The application...

Страница 43: ...5 Log in administrator mode page 39 u Navigate to the Application menu via the navigation path u Tap the function Edit on the function bar The display highlights the function Edit in green u Tap the n...

Страница 44: ...avigation path Precondition R The instrument is in administrator mode See Chapter 6 5 Log in administrator mode page 39 u Navigate to the Application menu via the navigation path u Tap the function Ed...

Страница 45: ...ete one rota tion Shorter measurement time does not allow a complete rotation of the sample Proceedings Navigation path Precondition R The instrument is in administrator mode See Chapter 6 5 Log in ad...

Страница 46: ...ap the button OK The dialog box closes The description is saved 6 6 11 Changing the selection ability of an application Change whether an Application can be selected by the user during operation The f...

Страница 47: ...on bar The display highlights the function Edit in green u Tap the name of the application you wish to remove The display highlights the application in green u Tap the function Remove on the function...

Страница 48: ...unction Edit on the function bar The display highlights the function Edit in green u Tap the name of the application that you wish to edit The display highlights the application in green u Tap the nam...

Страница 49: ...Precondition R The instrument is in administrator mode See Chapter 6 5 Log in administrator mode page 39 u Navigate to the Application menu via the navigation path u Tap the function Edit on the func...

Страница 50: ...redicted Value see Chap ter 6 8 7 Changing the Postpre dicted Value Calibration model only page 54 Slope see Chapter 6 8 18 Changing the Slope of a prop erty page 61 Bias see Chapter 6 8 17 Changing t...

Страница 51: ...la see Chapter 6 8 10 Changing the Formula Calcu lated Property only page 56 Slope see Chapter 6 8 18 Changing the Slope of a prop erty page 61 Bias see Chapter 6 8 17 Changing the Bias of a prop erty...

Страница 52: ...6 8 14 Changing the Metric Element Color only page 59 Slope see Chapter 6 8 18 Changing the Slope of a prop erty page 61 Bias see Chapter 6 8 17 Changing the Bias of a prop erty page 60 Target see Cha...

Страница 53: ...Select the wavelength range for initial calibration NOTE Changes in the project file replace the selection made here The following settings are available Wavelength type Explanation NIR only NIR wavel...

Страница 54: ...at a different moisture content A property moisture is necessary for carrying out this post prediction type See Chapter 6 8 8 Changing the Calibration Base Calibration model only page 55 Chapter 6 8...

Страница 55: ...administrator mode page 39 R The post prediction type Calibration Base Standard is selected u Navigate to the Application menu via the navigation path u Tap the function Edit on the function bar The d...

Страница 56: ...he function Edit in green u Tap the name of the application that you wish to edit The display highlights the application in green u Tap the name of the property that you wish to edit The display shows...

Страница 57: ...ument is in administrator mode See Chapter 6 5 Log in administrator mode page 39 u Navigate to the Application menu via the navigation path u Tap the function Edit on the function bar The display high...

Страница 58: ...ed 6 8 13 Changing the Metric Color only The following settings are available Type Explanation Lab Calculates the metrics in the L a b color space LCh Calculates the metrics in the L C h color space X...

Страница 59: ...ction Metric Element The display shows a dialog box with the selectable values u Select a value u Tap the button OK The dialog box closes The setting is saved The value for the Metric Element is saved...

Страница 60: ...he application that you wish to edit The display highlights the application in green u Tap the name of the property that you wish to edit The display shows the view Property u Tap the action Unit The...

Страница 61: ...e Chapter 6 5 Log in administrator mode page 39 u Navigate to the Application menu via the navigation path u Tap the function Edit on the function bar The display highlights the function Edit in green...

Страница 62: ...Sets the target value relative to which the tolerances are considered Proceedings Navigation path Precondition R The instrument is in administrator mode See Chapter 6 5 Log in administrator mode page...

Страница 63: ...22 Changing the Limit minimum of a property Sets the lower limit for the property Proceedings Navigation path Precondition R The instrument is in administrator mode See Chapter 6 5 Log in administrat...

Страница 64: ...ialog box closes The value for the Tolerance is saved 6 8 24 Changing the Tolerance minimum of a property Tolerance is a difference from the target value Sets the lower tolerance relative to the targe...

Страница 65: ...sponse to the confirmation question The property is deleted 6 10 Adding measurement data to a calibration 6 10 1 Performing a calibration update with AutoCal For performing the AutoCal function the fo...

Страница 66: ...data u Press the button Accept 6 10 2 Setting a reference value to a property Navigation path Precondition R The instrument is in administrator mode See Chapter 6 5 Log in administrator mode page 39...

Страница 67: ...r mode See Chapter 6 5 Log in administrator mode page 39 u Navigate to the Application menu via the navigation path u Tap the application you wish to export The display highlights the application in g...

Страница 68: ...een The result display shows the values u Tap the function Report on the function bar The display shows the report u According to the requirements tap Save Excel or Save PDF on the function bar The re...

Страница 69: ...ake sure that the sample carrier is clean NOTE Wrong measurement results due to overfilled petri dishes The sample material can fall out from overfilled Petri dishes This sample material can lead to a...

Страница 70: ...le fits The following specifications categories are possible Specifications cate gories Explanation see Chap ter Control button page 30 Explanation see Chap ter 10 1 Measurement results page 89 Within...

Страница 71: ...detergent rinse with clean water wipe dry with a lint free cloth Daily Glass up view u Wipe down the glass window with a damp cloth u If heavily soiled use ethanol or a mild detergent Daily Glass down...

Страница 72: ...e u Check function of the desiccant car tridge Chapter 7 3 Checking the des iccant cartridge page 80 u If necessary change the desiccant cartridge See Chapter 7 4 Changing the desiccant cartridge page...

Страница 73: ...ik AG Cleaning and servicing 7 Operation Manual ProxiMate 73 94 u Open the cover lid on the top of the instrument u Remove the seal and the cover lid u Press the ferrule u Turn the ferrule 1 4 turn co...

Страница 74: ...7 Cleaning and servicing B CHI Labortechnik AG 74 94 Operation Manual ProxiMate u Remove the defective lamp from the lamp socket u Disconnect the defective lamp u Connect the new lamp...

Страница 75: ...94 u Put the connected new lamp in the lamp socket u Make sure that the screw indicated is in the groove of the lamp socket u Put ferrule and spring on the lamp socket u Press the ferrule u Turn the f...

Страница 76: ...lamp replacement See Chapter 7 2 3 Confirm Lamp Re placement page 80 u Carry out a baseline correction vector calibration See Chapter 5 6 3 Cali brating a Baseline Correction Vector BCV page 24 7 2 2...

Страница 77: ...ng 7 Operation Manual ProxiMate 77 94 u Open the cover lid on the bottom of the instrument u Remove the seal and the cover lid u Press the ferrule u Turn the ferrule 1 4 turn counterclock wise u Remov...

Страница 78: ...peration Manual ProxiMate u Disconnect the defective lamp u Connect the new lamp u Put the connected replacement lamp in the lamp socket u Make sure that the indicated screw is in the groove of the la...

Страница 79: ...r lid on the instrument u Attach the cover lid with the tool pro vided u Change the desiccant cartridge See Chapter 7 4 Changing the desiccant cartridge page 82 u Confirm lamp replacement See Chapter...

Страница 80: ...system starts up The display highlights the status bar yellow After completion the startup phase the display highlights the status bar black u Navigate to the action Confirm Lamp Replacement via the...

Страница 81: ...ProxiMate 81 94 Color Describtion u Check the color of the window of the desiccant cartridge u If necessary change the desiccant cartridge See Chapter 7 4 Changing the desiccant cartridge page 82 u P...

Страница 82: ...cing B CHI Labortechnik AG 82 94 Operation Manual ProxiMate 7 4 Changing the desiccant cartridge u Open the cover lid for the desiccant cartridge u Remove the cover lid and the seal u Remove the used...

Страница 83: ...tridge in the instrument u Put seal and cover lid on the instru ment u Attach the cover lid 7 5 Carrying out system tests 7 5 1 Carrying out a Baseline Correction Vector test Navigation path Test BCV...

Страница 84: ...via the navigation path The display shows the dialog Extended System Test u Select check box Comprehensive System Test u Tap the button Start u Follow instructions on the display during the test u Co...

Страница 85: ...ur needs u Tap the button Start The instrument creates a zip file with the selected data u Save the data to an external data store 7 7 Cleaning the display The cleaning mode switches off the touch fun...

Страница 86: ...rror messages Error code Error message Solution 1000 Unspecified error u Restart the instrument u Contact BUCHI Costumer Service 1001 The communication with the in strument could not be estab lished T...

Страница 87: ...ite reference sig nal is not valid For more details see log files u Restart the instrument u Contact BUCHI Costumer Service 1500 Unknown error occurred while generating report 0 1 u Restart the instru...

Страница 88: ...e 9 2 Disposal The operator is responsible for proper disposal of the instrument u When disposing of equipment observe the local regulations and statutory require ments regarding waste disposal u When...

Страница 89: ...idden 4 Start the software Windows Explorer on the instrument 4 Navigate to folder options via the following navigation path View Folder Op tions View 4 Activate the function Show hidden files folders...

Страница 90: ...Underlines between words No numbers at the beginning of a name No C keywords No math functions Calculation conventions Symbol Operators Addition Subtraction Multiplication Division Math functions Loga...

Страница 91: ...ior written permission of BUCHI 10 4 1 Accessories Order no Image External White Reference 11067547 White reference spacer for down view 11067378 White reference spacer for up view 11067377 White refe...

Страница 92: ...041636 Transflectance cover 2 0 mm For measurement of crude palm oil Not suitable for use with robust cup 11067919 Transflectance cover for robust cup 11055998 Protection cover USB WiFi stick 1106658...

Страница 93: ...B CHI Labortechnik AG Appendix 10 Operation Manual ProxiMate 93 94 Order no Image Replacement Window HPSC 046246...

Страница 94: ...n zh India BUCHI India Private Ltd IN Mumbai 400 055 T 91 22 667 75400 F 91 22 667 18986 india buchi com www buchi com in en Indonesia PT BUCHI Indonesia ID Tangerang 15321 T 62 21 537 62 16 F 62 21 5...

Отзывы: