background image

Nitrogen Level Sensor

198 / 234

H172203_1_001

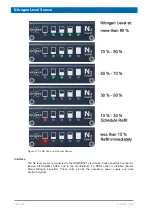
Figure 17.3: LED Code on N2 Level Sensor

Interface

The N2 level sensor is connected to the BSMS BSVT electronics (back panel RJ45 connector
labeled  NITROGEN  LEVEL)  and  to  the  CryoPlatform  if  a  BSNL  option  is  installed  (Bruker
Smart  Nitrogen  Liquefier).  These  units  provide  the  necessary  power  supply  and  data
interface signals.

Содержание NMR AV4 BSMS System

Страница 1: ...BSMS System for AVANCE NEO User Manual Version 001 Innovation with Integrity NMR...

Страница 2: ...eproduced stored in a retrieval system or transmitted in any form or by any means without the prior consent of the publisher Product names used are trademarks or registered trademarks of their re spec...

Страница 3: ...p Button 16 2 6 Location of the Safety Label 16 2 7 Basic Dangers 16 2 7 1 General Workplace Dangers 16 2 7 2 Dangers from Electric Power 17 2 7 3 Mechanical Dangers 19 2 7 4 Dangers from Gases Under...

Страница 4: ...Module 50 7 3 4 Part Numbers 51 7 3 5 Technical Data Summary 52 7 4 Troubleshooting 52 7 4 1 Diagnostics 52 8 ELCB 53 8 1 Introduction 53 8 2 Lock Parameters and Technical Data 53 8 3 Configuration an...

Страница 5: ...ecture Overview 86 10 5 1 Protection 87 10 5 2 Status LED s on the Front Panel 87 10 5 3 Measurements Provided for Diagnostic 88 10 5 4 GAB 2 Control State Machine 88 10 5 5 Front Panel Connectors 89...

Страница 6: ...O2000 128 12 8 3 CryoProbes 129 12 8 4 Solids Probes 2 Thermocouple Type T 130 12 9 BSVT and HT Solids Probe High Temperature 132 12 10 BSVT and HT Accessory High Temperature 133 12 11 BSVT and VT Gas...

Страница 7: ...and Troubleshooting 163 14 8 System Requirements 165 14 9 Ordering Information 165 15 VPSB DC and VPSB DC E 167 15 1 Introduction 167 15 2 Configurations 167 15 3 Technical Data 168 15 3 1 Technical D...

Страница 8: ...rdering Information 199 18 Radiation Shield Temperature Monitoring MAG RS 201 18 1 Introduction 201 18 2 Configurations and Installation 201 18 2 1 Connection to the Console BSMS 2 with BSVT 201 18 2...

Страница 9: ...elogs 214 23 Replacement of Parts 215 23 1 Returning the Unit for Repair 215 24 Dismantling and Disposal 217 24 1 Dismantling 217 24 2 Disposal Europe 217 24 3 Disposal USA and Other Countries 218 25...

Страница 10: ...Contents x H172203_1_001...

Страница 11: ...tained if such claims result from improper use 1 2 Policy Statement It is Bruker s policy to improve products as new techniques and components become available Bruker reserves the right to change spec...

Страница 12: ...echnical modifications The undertakings agreed in the supply contract as well as the manufacturer s Terms and Conditions and Terms of Delivery and the legal regulations applicable at the time of concl...

Страница 13: ...universities and research laboratories The system owner of the device must therefore comply with statutory occupational safety requirements In addition to the safety instructions in this manual the sa...

Страница 14: ...s preventing industrial disease and providing medical first aid in emergencies The system owner is responsible for providing facilities according to the local regulations for the prevention of industr...

Страница 15: ...hazards in the danger and working zone Unauthorized personnel who do not meet the requirements described in this manual will not be familiar with the dangers in the working zone Therefore unauthorized...

Страница 16: ...and avoid dangerous situations follow the safety instructions specified here as well as in the following chapters of this manual 2 7 1 General Workplace Dangers WARNING Risk to life from nonfunctional...

Страница 17: ...omponents may result in serious or fatal injury u Before working on the specified components ensure that they have been completely disconnected from the power supply u Allow 10 minutes to elapse in or...

Страница 18: ...k to life from contact voltage Absent or faulty protective earth conductor may result in contact voltage This may pose a risk of injury or death u Before the initial commissioning of the device connec...

Страница 19: ...to movements caused by stored pneumatic forces Pneumatically driven components may move unexpectedly due to stored residual forces causing serious injuries u Work on the pneumatics system must only be...

Страница 20: ...uids incorporating solvents contain toxic substances They must not be allowed to escape into the environment Disposal must be carried out by a specialist disposal company 2 9 Signs and Labels The iden...

Страница 21: ...arning label may be ordered using Bruker Part Number Z129088 Personal Protective Equipment Protective Goggles DIN EN 166 170 172 Protect the eyes from injury due to flying cold gases liquids and parts...

Страница 22: ...Safety 22 234 H172203_1_001...

Страница 23: ...p The arrow tips on the sign mark the top of the package They must always point upwards otherwise the content may be damaged Fragile Marks packages with fragile or sensitive contents Handle the packag...

Страница 24: ...trained personnel Establish potential equalization before opening Protect from Heat Protect packages against heat and direct sunlight Protect from Radioactive Sources Protect packages against radioac...

Страница 25: ...e the unit has to be returned to the factory When the packaging material is no longer needed dispose of it in accordance with the relevant applicable legal requirements and local regulations 3 4 Stora...

Страница 26: ...Transport Packaging and Storage 26 234 H172203_1_001...

Страница 27: ...introduction of the AVANCE III HD generation spectrometers have been delivered by default with the new Lock Transceiver combining the former L TX and L RX units and providing extended Lock features su...

Страница 28: ...case Lock The ELCB Ethernet based Lock Control Board incorporates the lock functions like the lock control algorithm and the H0 current source In addition this ELCB acts as communication gateway betw...

Страница 29: ...re control power supply and various sensor interfacing gas flow controls and fill level monitoring for the magnet helium and nitrogen level These functions are now provided by the SPB SPB E and VPSB b...

Страница 30: ...on is accessible by the service tool and additionally it is periodically transferred to the workstation to keep a detailed long term history for trouble shooting It is configurable how detailed the ac...

Страница 31: ...MS System H172203_1_001 31 234 4 2 1 Board Location Figure 4 3 Typical Configuration BOSS1 and Z Gradient Shown in Blue front side Figure 4 4 Typical SB Configuration Example Options Shown in Gray rea...

Страница 32: ...ng a LN2 level measurement device Note Empty slots must be covered with blind plates Figure 4 5 WB Configuration with SPB E VPSB DC E and Power Supply rear side Pos Part Number Description M1 Z13644 F...

Страница 33: ...48V unit is required if at least one of the following points apply More than one AV4 GAB 2 is installed More than one VPSB DC E is installed Wide bore WB systems which may require more than 250 W of...

Страница 34: ...tool It is no longer necessary to use a specific client software for service access any Web browser can be used the new concept provides a graphical user interface and is therefore much easier and com...

Страница 35: ...ent specific calibration routines that are necessary upon installation of a spectrometer e g for helium level measurement air pressure for lift and so on Variable temperature control if SPB E is insta...

Страница 36: ...rouble shooting This section provides also service access to the lock RF board L TRX Gradient Information and configuration of gradient amplifiers if AV4 GAB 2 are installed 2H TX control obsolete Pow...

Страница 37: ...l necessary functional units and power supplies These include ELCB Lock Control Board L TRX Lock Transceiver L 19F 19F Lock Extension AV4 GAB 2 Gradient Amplifier SCB20 Shim Current Board SPB Sensor a...

Страница 38: ...t directly to each AC DC power supply module of the chassis The PDU controls the power up down cycle of the individual PSMs and thus the chassis No operation without Fan Tray The chassis power supply...

Страница 39: ...GAB 2 X Slot 1 1 1 7 1 Slot 2 2 2 7 1 AV4 GAB 2 Y Slot 3 3 3 7 2 Slot 4 4 4 7 2 AV4 GAB 2 Z Slot 5 5 5 7 3 Slot 6 6 6 7 3 SCB20 B Slot 7 7 7 7 3 Slot 8 8 8 1 4 SCB20 A Slot 9 9 9 1 4 Slot 10 10 10 Ma...

Страница 40: ...V4 PCTRL Slot 26 5 AV4 PSM 48V 2 Slot 27 4 AV4 PSM 48V 1 Fan Tray 6 Fan Tray Backpla ne 6 Bpl Table 5 1 Slot Functions 5 2 3 Part Numbers Bruker Part No Description Z152144 AV4 BSMS CHASSIS Table 5 2...

Страница 41: ...Chassis itself If an FRU needs to be replaced contact your Bruker Service Representative Detected failures are reported with event messages Event messages are displayed on the TopSpin screen and can b...

Страница 42: ...Chassis Mainframe 42 234 H172203_1_001...

Страница 43: ...ontains six DC cooling fans The fans are controlled and supervised by an on board control print with I2 C bus interface It connects directly to the BSMS Chassis backplane user bus Control Functions Fa...

Страница 44: ...HU 4 5 cm Weight 2 5 kg 6 3 Troubleshooting The Fan Tray can be replaced as a whole FRU If an FRU needs to be replaced contact your Bruker Service Representative Figure 6 2 Fan Tray Fan Numbering for...

Страница 45: ...Fan Tray H172203_1_001 45 234 6 3 1 Diagnostics The fan status is supervised by the ELCB Software Alternatively it can be viewed on the Service Web page Figure 6 3 Service Web Fan Supervision...

Страница 46: ...Fan Tray 46 234 H172203_1_001...

Страница 47: ...Figure 7 1 BSMS Power Supply Modules Overview 7 2 System Description The basic power supply system of the AV4 BSMS Chassis consists of one or two AC DC and one DC DC power supply modules PSM Dependin...

Страница 48: ...ription 7 3 1 AV4 PSM 48V Power Supply Module The AC input connector is on the front panel the DC output connects to the backplane The supply status is indicated on the front panel The unit has no ser...

Страница 49: ...The supply status is indicated with one LED on the front panel The unit has no serviceable parts except three fuses Figure 7 4 PSM B Fuse Location Supply Fuse Part No Value 48V Input F1 F2 49216 8 AT...

Страница 50: ...4V input and most of the outputs connect to the backplane Additional features Power Switching Supervision Voltage Current Fuses I2C Active Bus Switch The supply status is indicated with three LEDs on...

Страница 51: ...9216 8 0 AT H 24V Section 3Slot 5 7 F8 49216 8 0 AT H 24V Section 3Slot 5 7 F9 49216 8 0 AT H 24V Section 4Slot 8 9 F10 49216 8 0 AT H 24V Section 4Slot 8 9 F11 49216 8 0 AT H 24V Accessory Connector...

Страница 52: ...are reported with event messages Event messages are displayed on the TopSpin screen and can be viewed on the ServiceWeb pages General information on trouble shooting error handling and failure reporti...

Страница 53: ...r a better performance for NMR experiments Since the new DSP has a much higher performance it provides faster handling of real time Lock Hold pulses which now may range down to a length of 100 microse...

Страница 54: ...B For frequencies of 600 MHz and above this range has been extended 60 dB to 10 dB on the hardware versions 6 and higher 3 This value is used for static drift compensation with manual evaluation defin...

Страница 55: ...ELCB H172203_1_001 55 234 Figure 8 1 ELCB Front Panel with LED s and Connectors...

Страница 56: ...h and the electronics that provides access to the ethernet A central control FPGA handles the access to the peripheral hardware actual BSMS 2 boards e g SCB20 GAB 2 SPB VPSB L TRX communicate over SSR...

Страница 57: ...part modelling the Lock behavior and controlling higher level functions e g locking in selecting the appropriate set of Regulator Coefficients compensating the drift and so on This part of the softwa...

Страница 58: ...has fulfilled the necessary criterion If the Lock In trial succeeds then the state machine steps through Try To Lock Temporary Locked and reaches in the end the state Steady Locked When the lock signa...

Страница 59: ...ests are performed H0 Current Measurement For detection of correct H0 coil connection it is possible to measure the current that actually flows through the shunt resistor If the H0 coil is not properl...

Страница 60: ...needs a sample containing a lock relevant solvent 8 4 7 Front Panel LED s during Start Up Figure 8 5 LED s Indicating Different States During Start Up 8 5 Bus Interface Since the ELCB is the master o...

Страница 61: ...s under the menu point Lock Control are normally handled by the TopSpin application over the CORBA interface It is however possible to invoke all of these functions by the Service Web Also the solvent...

Страница 62: ...24 hours is applied compensated while manual Drift Compensation is active It is possible to define the behavior for Locking out Lock Out Convention When the default option is selected Keep Field afte...

Страница 63: ...ommands provided by the TopSpin application bsms display started by command BSMSDISP can be invoked in this section 6 Automatic Phase Calibration of offset between FFA method and Lock level optimizati...

Страница 64: ...e currently selected nucleus 2 H or 19 F 2 The drift can be compensated automatically it is compensated according to the continuously estimated remaining drift rate Alternatively it is possible to com...

Страница 65: ...nsation of solvent specific effects defined in the edlock table 8 Lock SNR calculation time 9 Base Frequency for Shift 0 ppm related to Proton 10 If there is a L 19F option installed then the nucleus...

Страница 66: ...This factor is evaluated by the automatic H0 calibration invoked on the Field Lock Control Page It can be set manually e g for resetting the calibration default 1 0 5 There are three different algorit...

Страница 67: ...ts with reversed polarity 3 For service purposes the connection between the H0 current source and the H0 coil can be interrupted by means of opening a relay contact Figure 8 11 Configuration of Lock R...

Страница 68: ...lmost the complete spectrometer for correct operation it is sometimes difficult to find a Lock related error If it cannot lock in or if there are no Lock wiggles available on the Lock display there ar...

Страница 69: ...ELCB H172203_1_001 69 234 Figure 8 13 Lock RF Boards Diagnostics...

Страница 70: ...ELCB 70 234 H172203_1_001...

Страница 71: ...he current sources of the SCB20 are unified each current source provides a current ranging from 1 Ampere 130 000 current units to 1 Ampere 130 000 current units Since exchanging of Shim settings with...

Страница 72: ...onfigurations one SCB20 providing the necessary number of currents for BOSS1 and two SCB20 covering all other types of shim systems Configuration for a specific Shim System is done by loading a specif...

Страница 73: ...he H0 coil for the lock In normal configuration the SCB20 uses a common 10MHz clock that is distributed by the ELCB this clock is typically generated by the AV4 reference board It is possible to selec...

Страница 74: ...may notify the user about abnormal events Status Errors The SCB20 can perform the following checks Power voltages OK Short circuits disconnected lines at the current source output Current source statu...

Страница 75: ...with the ELCB is established Later on an active Error LED indicates that an error occurred e g short circuit over temperature and that in consequence the current sources have been shut down Ready LED...

Страница 76: ...control logic is implemented there The ELCB software provides the operational functions for the NMR application by a CORBA interface In addition there is a Web access available for service purpose set...

Страница 77: ...ditionally a Shim Power Supply Information which displays information about the current consumption due to the currently defined shim settings 9 5 2 Setup the Shim Functions Figure 9 5 Setup and Confi...

Страница 78: ...an then be entered under point 4 6 Time in seconds for softly starting up shutting down the Shim Subsystem 7 Normally the TopSpin application makes sure that there is an appropriate BOSS file loaded i...

Страница 79: ...compatibility 9 5 4 Part Numbers Bruker Part No Description Z102930 BSMS 2 SCB20 SHIM CURRENT BOARD Table 9 2 Part Numbers SCB20 9 5 5 Diagnostic and Troubleshooting The following diagram shows the s...

Страница 80: ...r limit of the Shim Coil is reached or if the power supply is at its limit It may be necessary to reset manually all currents to zero which can be easily done by the Shim Current Tool Additional infor...

Страница 81: ...der to get the actual hardware codes according to the following examples 302928 240 232 224 BOSS2 SB NON US 302923 240 232 184 BOSS2 SB PLUG Note1 In case of a connected BOSS1 Shim System the ELCB Ser...

Страница 82: ...load check is executed accordingly 3 Check ftp bruker ch for New BOSS files New BOSS files are published on the following ftp location ftp ftp bruker ch NMR download servtools bsmstool boss Check thi...

Страница 83: ...r future applications it is possible to connect the GAB 2 with any other device issuing the required real time gradient data It is however necessary that the connected device fulfills the LVDS interfa...

Страница 84: ...t 1 to Slot 7 If more than one GAB 2 is present then two PSM 48V Power Supplies are required Figure 10 1 Single AV4 GAB 2 in an AVANCE NEO Spectrometer The previous generation of integrated gradient a...

Страница 85: ...2 3 Channel AV4 GAB 2 in an AVANCE NEO Spectrometer The gradient channels are assigned as follows No of Installed GAB 2 s Left Position Middle Position Rightmost or Single Position 1 Z 2 Y Z 3 X Y Z T...

Страница 86: ...n TopSpin command line opens a window for definition of the preemphasis parameters Note The time constants by setpre are defined in milliseconds whereas the BSMS Service Web provides time constant set...

Страница 87: ...or output are protected against short circuits and erroneously connected cables The output current is limited high side current measurement and the temperature of the electronics is supervised In case...

Страница 88: ...in TopSpin This feature is accessible over the Service Web the logging buffer can be reset before running an experiment and the resulting information is displayed afterwards 10 5 4 GAB 2 Control State...

Страница 89: ...n detail in the block diagram Figure 10 5 88 Current flowing in the indicated direction induces a positive Z Gradient The monitor output is a simple coaxial connector e g for directly connecting a sco...

Страница 90: ...etting and logging of the real time gradient signals on the LVDS interface 10 6 2 Offset Re Calibration in the Field During production the GAB 2 is calibrated for minimum residual offset This calibrat...

Страница 91: ...feature provided by TopSpin see also Preemphasis 86 Alternatively the gains and time constants can be set also by the Service Web Figure 10 8 Preemphasis Settings Note The time constants Tau1 Tau3 are...

Страница 92: ...AB 2 92 234 H172203_1_001 10 6 5 Troubleshooting The following flow chart describes the suggested troubleshooting procedure in case of gradient problems Figure 10 9 Troubleshooting Procedure for GAB 2...

Страница 93: ...ble and measure at GAB 2 side Since the resistance of the gradient cable and coil is very low the measurement has to be made very carefully at best differential measurement 8 Connect an oscilloscope t...

Страница 94: ...cause for a GAB 2 error is reported to TopSpin by an error message One possible cause could be a missing power supply voltage It is helpful to check also the logging provided by the BSMS Service Web p...

Страница 95: ...and receiver Power amplifier with active quiescent current control Field upgradable by firmware Fast SSRB interface to ELCB Real time pulses also accessible via backplane connector On board over tempe...

Страница 96: ...L TRX L 19F 96 234 H172203_1_001 Figure 11 2 L 19F Block Diagram Figure 11 3 Block Diagram with Optional L 19F Unit...

Страница 97: ...g Together with the L 19F unit the on board 5W power amplifier should not be used for gradient shimming on 2H In spectrometer configurations with the L 19F unit a high power 2H amplifier is anyway man...

Страница 98: ...re Protection L TRX only The power amplifier and board temperature are monitored on board The ELCB can access the relevant sensors and act accordingly If the temperature reaches the limit of safe oper...

Страница 99: ...tput power min 5 W Output power for Lock operation FFA Mode 250 s pulse typ 28 dBm Lock Mode Lock pulse 60 20 dBm Output power resolution typ 0 1 dB Frequency resolution 14 mHz Phase resolution 0 1 de...

Страница 100: ...Technical Data BSMS 2 Lock Transceiver 99 Frequency resolution See Technical Data BSMS 2 Lock Transceiver 99 Phase resolution See Technical Data BSMS 2 Lock Transceiver 99 Phase range See Technical D...

Страница 101: ...dress 110 Figure 11 4 2H Lock System with L TRX Internal Power Amplifier for Gradient Shimming 11 2 7 2H Lock with Additional External 2H Power Amplifier A more powerful external amplifier can be used...

Страница 102: ...peration with SEL_2H AMP Signal in Real Time Figure 11 6 Timing Diagram of Lock 2H Operation with Interrupts for 2H Decoupling or 2H Observe 11 2 8 19F Lock with external 2H Power Amplifier Figure 11...

Страница 103: ...8 Timing Diagram of Lock 19F Operation and Simultaneous 2H Decoupling or 2H Observe 11 3 AVANCE NEO OneBay TwoBay Configurations The AV4 BSMS chassis is only compatible to the current generation of lo...

Страница 104: ...If the ELCB does not process the interrupt immediately the LED stays active In diagnostic mode the LED beats with approx 2 Hz During the Error state only a minimal set of diagnostic functions is avai...

Страница 105: ...tus Operating Mode LED Status Operating Mode Power OFF The L TRX is switched off Lock 2H Normal operating mode Pulsed Lock signal gener ated Idle No 2H stimulus signal no RF signal generated Lock 2H a...

Страница 106: ...Service Web 110 BLNKTR 2H IN J5 SMA Power amplifier blanking pulse from AV4 TRX via NanoBay backplane or AV4 PSM A board 5V TTL input high 5 V power amplifier blanked low 0 V power amplifier gated SE...

Страница 107: ...ors detected by the L 19F unit are displayed with the ERROR LED LED PWR green In case of a power supply failure the PWR LED is deactivated The L 19F unit enters the ERROR state LED 2H green If the L T...

Страница 108: ...s the L TRX deuterium lock signal to fluorine lock signal LED Status Operating Mode Power OFF The L 19F unit is switched off 2H L TRX and L 19F are configured for deuterium lock 19F L TRX and L 19F ar...

Страница 109: ...5 dBm REF OUT J4 SMA Reference clock output to L TRX REF IN J3 19F TR OUT J7 SMA 19F RF output to HPPR 2 19F preamplifier 19F TRANSM 19F Transmitter output specification see Technical Data BSMS 2 19F...

Страница 110: ...nfiguration settings for external pulses For other settings please refer to Lock Configuration 64 Figure 11 11 Lock Configuration 1 TP_F0 pulse polarity select High active standard or Low active High...

Страница 111: ...y Figure 11 12 Service Functions 1 FPGA revision and build date yymmdd 2 Hardware code used by ELCB to identify Lock system 3 Firmware status and file name download and factory default 4 Reboot button...

Страница 112: ...rt to the factory firmware see the table Service Functions above Figure 11 13 Firmware Download 1 Path and file name for firmware download file type bin 2 Current firmware file name A firmware downloa...

Страница 113: ...L TRX L 19F H172203_1_001 113 234 BIS Information The BIS memory is write protected The information can only be altered at the factory Figure 11 14 View BIS...

Страница 114: ...and self tests may vary depending on hardware level ECL and or firmware release Figure 11 15 L TRX Diagnostic Functions 1 Select selftest to be executed 2 Selftest result summary use Details to read...

Страница 115: ...nternal loop CW decimated diagnostic Verification of transmitter and receiver signal path internal loop Measurement bandwidth is 3 3 kHz lowpass filter CW measurement signal with 10 dBm power level Lo...

Страница 116: ...mode select amplifier for gradient shimming or any diagnostic mode during download Firmware Download Takes too Long If the firmware download takes much longer than 5 minutes the Service Web message l...

Страница 117: ...amplifier drain current exceeds the limit of safe operation it is switched off and the L TRX enters the ERROR state An error message is sent to TopSpin Reboot L TRX to clear error state The 2H TR out...

Страница 118: ...occurred Contact your local Bruker service representative L TRX Error Signal BLKTR 2H was activated without selecting SEL_2H DEC Check wiring if external power amplifier is used the BLNKTR 2H input m...

Страница 119: ...SCEIVER 700 L TRX 700 Z109892 BSMS 2 LOCK TRANSCEIVER 750 L TRX 750 Z109893 BSMS 2 LOCK TRANSCEIVER 800 L TRX 800 Z109894 BSMS 2 LOCK TRANSCEIVER 850 L TRX 850 Z109895 BSMS 2 LOCK TRANSCEIVER 900 L TR...

Страница 120: ...L TRX L 19F 120 234 H172203_1_001...

Страница 121: ...B The adaptation of the various probes and temperature control accessory interfaces is realized with smartVT interfaces also named VTAdapters This digital interface has also been introduced for other...

Страница 122: ...re 12 3 BSVT Software and Features The BSVT is fully supported with TopSpin 3 0 or later by using an attractive and modern VT panel for easy user control monitoring configuration and other VT specific...

Страница 123: ...ulti channel intelligent Ethernet based VT architecture PnP Up to 2 heater channels additional 2 channels possible Up to 2 sensor cooling channels additional 3 channels possible Software controlled sh...

Страница 124: ...umber Description W1100255 THERMOCOUPLE HR 500WB W1100407 THERMOCOUPLE HR 600MHZ W1100401 THERMOCOUPLE HR 200 500MHZ W1100884 THERMOCOUPLE HR 750MHZ W1100024 HEATER SC FOR HP CXP MSL W1100316 HEATER S...

Страница 125: ...rt VT interface for 2 thermocouple type T sensors Z119237 BSMS 2 VTA TC 2T see also BSVT Probe Adaptation 126 12 6 1 Support for Nitrogen Level Sensor There are two generations of Nitrogen Level Senso...

Страница 126: ...aptation The whole variety of probe temperature sensor interfaces and VT accessories can be adapted with smart VT interfaces BSMS 2 VTA For the different probe or VT accessory interfaces dedicated sma...

Страница 127: ...HR RT Probe with Thermocouple T RT probes are typically operated with a VTA TC 2T One of the sensor cables is not connected It does not matter which sensor cable is connected as the connected sensor i...

Страница 128: ...BSVT Introduction Configurations 128 234 H172203_1_001 12 8 2 HR RT Probes BTO2000 Figure 12 6 HR RT Probes BTO2000...

Страница 129: ...he male pins Do not plug in the VTA connector while the Cryo Controller is on there is risk of short circuiting Contact your local Bruker office for assistance When operating a RT probe the Z116923 BS...

Страница 130: ...BSVT Introduction Configurations 130 234 H172203_1_001 12 8 4 Solids Probes 2 Thermocouple Type T Solids probes DVT thermocouple type T Figure 12 8 Solids Probe DVT with 2 Thermocouple T...

Страница 131: ...1 131 234 Solids probes VTN WVT thermocouple type T Figure 12 9 Solids Probe VTN WVT with 2 Thermocouple T SPB E must be configured for external VT gas Can be set in the BSMS service web or in the VTU...

Страница 132: ...directly connected to the VTA1 Channel 1 of the VPSB DC E which provides up to 500 W of heater power The BVTB3500 Booster option is no longer required Figure 12 10 VPSB DC E and solids Probe up to 500...

Страница 133: ...0 BSVT and HT Accessory High Temperature BVTE3900 The BVTE3900 P N W1208962 is a cooling system for high temperature NMR The Power Booster of the BVTE3900 is no longer required the VPSB DC E provides...

Страница 134: ...gurations 134 234 H172203_1_001 12 11 BSVT and VT Gas Cooling Accessory Adaptation 12 11 1 BCU I BCU II COOLING UNIT Connection of BCU I and BCU II is identical and straightforward Figure 12 12 BCU I...

Страница 135: ...2 11 2 BCU05 BCU X COOLING UNIT Connection of BCU05 and BCU X is identical using a Z116925 BSMS 2 VTA BCU Figure 12 13 BCU05 or BCU X Cooling Unit Do not feed the heater power cable from the VTA thru...

Страница 136: ...ions 136 234 H172203_1_001 12 11 3 BVTL3200 N2 EXCHANGER BVTL3200 N2 Exchanger is adapted to the BSMS BSVT system using a Z119238 BSMS 2 VTA LN2 Figure 12 14 BVTL3200 N2 Exchanger Part of Z119854 CABL...

Страница 137: ...H172203_1_001 137 234 12 11 4 BVTL3200 N2 Evaporator BVTL3200 N2 Evaporator is adapted to the BSMS 2 BSVT system using a Z119238 BSMS 2 VTA LN2 Figure 12 15 15 BVTL3200 N2 Evaporator Part of Z119854...

Страница 138: ...For Flow NMR there exist several variants The following configurations shows typical applications Flow Probe with HT Heated Probe Capillary Figure 12 16 Flow Probe with HT Heated Probe Capillary Part...

Страница 139: ...234 Flow Probe with TCTC Temperature Controlled Transfer Capillary Figure 12 17 Flow Probe with TCTC Temperature Controlled Transfer Capillary Part of Z119854 CABLE SET BSVT AUXILIARY HEATER Flow Pro...

Страница 140: ...BSVT Introduction Configurations 140 234 H172203_1_001 CryoProbe with CryoFit Preheater Figure 12 18 CryoProbe with CryoFit Preheater Part of Z119854 Cable Set BSVT Auxiliary Heater...

Страница 141: ...led BSVT configuration The various options for BSVT configurations are described in chapter BSVT Introduction Configurations 121 It is possible to add or remove VT adapters a probe or a chiller at any...

Страница 142: ...specific heater the BSVT is switched on or off as a whole In addition to the base states on off there are additional states for system calibration tuning self tune system identification self test exc...

Страница 143: ...BSVT is switched on All devices of the BSVT configuration are active Heater s Regulating for required target temperature s Chiller According to user settings Gas flow Operating gas flow between minimu...

Страница 144: ...in the Service Web the VT gas flow regulation guarantees that this maximum pressure is never exceeded even if the VT gas is blocked somewhere 13 2 5 State Self Test If there is a problem e g the BSVT...

Страница 145: ...the Cryo Platform initiates a sample ejection in case of insufficient temperature This operation is detected by the BSVT and in case of safety lift initiated by the Cryo Platform the BSVT disables its...

Страница 146: ...channel is connected to the back panel of the NMR cabinet by a smaller RJ45 connecter The width of the power channel cable is quite higher than that of an accessory channel What happens if a probe is...

Страница 147: ...e BSVT the VT power is represented in Watt absolute power However the user can select alternatively a relative representation for the GUI percent In that case the reference power is the highest possib...

Страница 148: ...BSVT Concept 148 234 H172203_1_001...

Страница 149: ...he gas flows for the variable temperature system VT Integrated mass flow and pressure sensors provide accurate gas flow setting The new electronics are fully compatible to the well known sensors for h...

Страница 150: ...ift 0 6000 0 9000 l h Helium level sensor HELIUM LEVEL included BST sensor interface SAMPLE CONTROL includeda BACS interface SAMPLE CHANGER included included Analog and digital liquid nitrogen level s...

Страница 151: ...SPB H172203_1_001 151 234 14 4 System Architecture Overview Figure 14 1 Block Diagram of the SPB...

Страница 152: ...LCB and the SPB E are connected via the BSMS backplane SSRB Synchronous Serial Rack Bus In normal configuration the SPB E uses a common 10 MHz clock that is distributed by the ELCB this clock is typic...

Страница 153: ...he following checks Power supply voltages Short circuits disconnected lines at sensor interface connectors and connection to VPSB variable power supply board Helium level measurement current source st...

Страница 154: ...of the lift parameters is described on the according Service Web page in detail Helium Level Sensor Calibration Contact your local Bruker office Nitrogen Level Sensor Calibration The digital Nitrogen...

Страница 155: ...s are active Power LED Indication that the SPB is correctly powered HE30V LED Indication that the galvanically isolated power supply for the helium level measurement is available VPSB connected LED Wh...

Страница 156: ...rogen level sensor or future use of other accessories SPB E only VPSB CTRL 2 Control signals for BSMS 2 Variable Power Supply Board VPSB Digital signalling is with LVDS at 10MBit s SPB E only VPSB CTR...

Страница 157: ...4 Version of the Shim Upper Part The shim upper part version can be read by the SPB Old style shim upper parts SOT72 using Z12084 CABLE ADAPT BSMS SOT72 can be connected to a SPB E ECL02 03 and newer...

Страница 158: ...Pin Signal 1 GND_24V 11 24V 2 GND_24V 11 24V 3 GND_5V 13 FLOW_VT_GAS_ON_N 4 GND_5V 14 FLOW_VT_GAS_REQ_N 5 LVDS_SRX_P 15 LVDS_SRX_N 6 LVDS_STX_N 16 LVDS_STX_P 7 LVDS_SRXCLK_P 17 LVDS_SRXCLK_N 8 LVDS_S...

Страница 159: ...filtered gas Gas supply filter 88437 must be installed The SPB contains all valves valve drivers and pneumatic connectors necessary to control Sample lift Sample spinner sample rotation VT gas Probe f...

Страница 160: ...d Gas Flows NOTICE The mass flow controller cannot compensate for poor gas supply or insufficient input gas pressure The new gas flow regulation ensure stable gas flow as long as site planning specifi...

Страница 161: ...ency lift air must be carried through an external throttle valve As before the amount of emergency lift air flow must be adjusted with this external throttle valve Please contact your local Bruker off...

Страница 162: ...cessary to log in and enter the required password before these functions can be accessed description in the BSMS Service Web 34 chapter 14 7 1 SPB Service Web The SPB Service Page contains information...

Страница 163: ...Ds on the SPB front panel and the LEDs on the BSMS 2 Power Supply Boards Red LED ERROR must be off Green LED s READY POWER and HE30V must be on If a VPSB is connected the green LED above the VPSB CTRL...

Страница 164: ...console pressure is within the specified range of 4 6 bar the flow can be stabilized The gas supply pressure must be at minimum 1 bar higher than set with the pressure regulator of the console margin...

Страница 165: ...PB H172203_1_001 165 234 14 8 System Requirements See Minimal requirements for all configurations in the chapter Basic BSVT Configuration 124 14 9 Ordering Information See Basic BSVT Configuration 124...

Страница 166: ...SPB 166 234 H172203_1_001...

Страница 167: ...emented directly on the VPBS DC E whereas higher level functions such as output power control and read out of the power monitoring are done by software running on the ELCB A two stage watchdog system...

Страница 168: ...ations a second PSM 48V is required See also Power Supply Requirements 33 VPSB DC VPSB DC E Required PSM 48V 1 1 1 1 or 2a 1 1 2 2 2 a Two power supplies are only required if more than 250 W heater po...

Страница 169: ...have the same specification Parameter Min Type Max Unit Output power 0 250a W Output voltage range 0 45 Vdc Output current 0 7 A Settling time 10 100 load 100 ms Ripple Noise 30MHz BW 50 mVpp Short c...

Страница 170: ...e Noise 30MHz BW 50 mVpp Short circuit protection constant current a 50 of the channel 1 power are contributed by the extension board booster The remaining power is subject to the same power budgeting...

Страница 171: ...VPSB DC and VPSB DC E H172203_1_001 171 234 15 4 System Architecture Overview Figure 15 2 Block Diagram of the VPSB DC...

Страница 172: ...VPSB DC and VPSB DC E 172 234 H172203_1_001 Figure 15 3 Block Diagram of the VPSB DC E...

Страница 173: ...ble for the second channel Vice versa if the second channel maximum power is set to 100 W the first channel power is reduced to 280 W 100 W 2 360 W The AV4 BSVT software will handle the power budgetin...

Страница 174: ...watchdog mechanism checks for valid connection to the ELCB and for valid power commands In case of a failure the board will reset and switch off the power stages The software running on the ELCB may n...

Страница 175: ...rror LED This LED is lit after power ON It turns off as soon as the VPSB DC E is initialized i e the FPGA has loaded its configuration from the flash memory and the communication with the ELCB is esta...

Страница 176: ...nitialized correctly the LED will be switched on AUX 2 LED Whenever a VTA or BSCU is connected to the connector labeled AUX 2 and initialized correctly the LED will be switched on Connectors Label Des...

Страница 177: ...Web access available for service purpose setup calibration and diagnostic Some of these Web functions are open to all users e g clients other functions are reserved for service engineers it is necessa...

Страница 178: ...Y LED and POWER LED must be on If the POWER LED is off three serviceable fuses for the VPSB DC and five for the VPSB DC E can be checked see Serviceable Fuses 178 If a VTA is connected the correspondi...

Страница 179: ...d VPSB DC E H172203_1_001 179 234 15 6 System Requirements See Minimal requirements for all configurations in the chapter Basic BSVT Configuration 124 15 7 Ordering Information See Basic BSVT Configur...

Страница 180: ...VPSB DC and VPSB DC E 180 234 H172203_1_001...

Страница 181: ...ng and transmit this value to the BSMS 2 ELCB Measure the environmental temperature use this value to compensate the room temperature dependencies of the specific sensor and transmit the room temperat...

Страница 182: ...eat exchanger Z116925 BSMS 2 VTA BCU BCU AUX BCU 05 BCU X a POWER means that this application needs heater power and therefore must be connected through a cable that contains heater power wires to an...

Страница 183: ...urement Range 200 850 C Thermocouple type K Resolution 0 1 Measurement update rate 1 s 1 a Connector types See Figure 16 1 187 Table 16 3 VTA BTO VTA CRP Parameter Min Type Max Unit Temperature measur...

Страница 184: ...le type K Resolution 0 1 Measurement update rate 1 s 1 a Connector types See Figure 16 1 187 Table 16 5 VTA TC 2T VTA FLOW NMR Parameter Min Type Max Uni t Temperature measurement Range 200 350 C Ther...

Страница 185: ...nt update rate 1 s 1 a Connector types See Figure 16 1 187 Table 16 7 VTA TC 2E VTA LN2 Parameter Min Type Max Unit Level measurement Range 0 500 ohm Resistive PT100 type Resolution 0 1 ohm Accuracy 1...

Страница 186: ...e Figure 16 1 187 Table 16 9 VTA BCU VTA MAG RS Parameter Min Typ e Max Unit Temperature measurement Range 260 850 C Number of channels 2 Connector typea O Heater Connector type P Maximum voltage 50 V...

Страница 187: ...VTA H172203_1_001 187 234 Figure 16 1 VTA Cable Connectors...

Страница 188: ...done Simultaneous measurements of sensor temperature and cold junction temperature leads to precise results The heater current is fed through the VTA for RF filtering before entering the probe A dedi...

Страница 189: ...er and enables remote operation The VTA BCU can be used for BCU05 or BCU X BCU Extreme type of cooling units and can be connected to an auxiliary control port New BCU I and BCU II do not need a VTA BC...

Страница 190: ...nning on the ELCB board In case of failure e g missing status information the VTA will be re booted power cycle on the VTA s 5 V The software running on the ELCB may notify the user about abnormal eve...

Страница 191: ...Web or on the vtudisp in TopSpin VT adapters can be connected or disconnected at any time The temperature control will go to OFF state if disconnected In general the Green LED indicates the channel nu...

Страница 192: ...s Figure 16 5 Overview of VTAs Connected to the BFB Peripheral Bus 16 5 2 Diagnostic and Troubleshooting The device state is displayed using the 5 LED See Figure 16 4 191 for a detailed description In...

Страница 193: ...VTA H172203_1_001 193 234 16 7 Ordering Information See Basic BSVT Configuration 124...

Страница 194: ...VTA 194 234 H172203_1_001...

Страница 195: ...he corresponding cryostat of the magnet system at any time and as many times as wanted Together with MICS software the Nitrogen level measurement allows monitoring the Nitrogen level over longer time...

Страница 196: ...are protected against short circuits either by limiting the output current or by current monitoring and shut down 17 2 3 Measurements Provided for Diagnostic The on board diagnostics supervise essent...

Страница 197: ...board no field calibration necessary 17 2 5 Connectors and LED s Figure 17 2 Nitrogen Level Sensor LED s Like the VT adapters the LN2 sensor can be connected or disconnected at any time In general th...

Страница 198: ...r Interface The N2 level sensor is connected to the BSMS BSVT electronics back panel RJ45 connector labeled NITROGEN LEVEL and to the CryoPlatform if a BSNL option is installed Bruker Smart Nitrogen L...

Страница 199: ...level measurement 17 3 2 Diagnostic and Troubleshooting The device state is displayed using the 5 LED See Figure 17 3 198 for detailed description In addition on board diagnosis data or failure event...

Страница 200: ...Nitrogen Level Sensor 200 234 H172203_1_001...

Страница 201: ...to the BSMS like other accessory e g Nitrogen Level Sensor or BSMS 2 VTA In case of a failure the operator will receive an alarm by MICS 18 2 Configurations and Installation Bruker Part Number Name M...

Страница 202: ...ing MAG RS 202 234 H172203_1_001 Figure 18 2 Connection to BSMS Monitoring only 18 2 2 Protection All external interfaces are protected against short circuits either by limiting the output current or...

Страница 203: ...oard no field calibration necessary 18 2 5 Connectors and LED s See Connectors and LED s 190 18 2 6 Service This unit does not need any calibration in the field the product is factory calibrated 18 2...

Страница 204: ...Radiation Shield Temperature Monitoring MAG RS 204 234 H172203_1_001...

Страница 205: ...must only be carried out by Bruker authorized personnel All the requirements concerning environment described in the technical specifications must be met To reduce the risk of electric shock and malfu...

Страница 206: ...cording to the BsmsCheckDownload txt file and the hardware codes of the connected subsystems the required firmware versions are evaluated and displayed outdated or incompatible versions are marked as...

Страница 207: ...the firmware information there is also the hardware configuration displayed on the Setup screen In our example it is a configuration with one SCB20 providing maximum 20 shims BOSS1 GAB 2 SPB and VPSB...

Страница 208: ...Installation and Initial Commissioning 208 234 H172203_1_001...

Страница 209: ...f BSMS system is operating with low and safe voltages except for the power supply and its connection to mains Nevertheless any electrical equipment can become a source of danger under extreme conditio...

Страница 210: ...Operation 210 234 H172203_1_001...

Страница 211: ...ing any actions 2 Switch the power off via PDU 3 Switch the compressed gas supply off 4 Disconnect the mains power cable 21 1 2 Cleaning the Outside of the Cabinet Units Do not use any detergent or ot...

Страница 212: ...work reliably without preventative maintenance except for the Fan Tray The life expectancy of DC fans is usually lower than that of other electronic parts Therefore preventative maintenance may be us...

Страница 213: ...file from the Bruker FTP server and do the checks as described before For further investigations the BSMS provides a detailed logging service The latest information can be retrieved under the menu po...

Страница 214: ...2203_1_001 22 2 Savelogs Savelogs is a TopSpin command that simplifies the collection of all information needed by the customer service Read the TopSpin User Manual chapter Store Complete Log with sav...

Страница 215: ...s see Contact Repair is always handled by your local Bruker office Their reply will contain all necessary information for the subsequent repair process steps 2 They will provide you with details on th...

Страница 216: ...Replacement of Parts 216 234 H172203_1_001...

Страница 217: ...environmental protection regulations 24 2 Disposal Europe Environmental information for laboratory and industrial customers within the EU European Union This laboratory product is developed and marke...

Страница 218: ...2012 19 EU WEEE 2 Bruker BioSpin offers to take back the equipment only for deliveries after 23 03 2006 after termination of use at the customer site upon request by the customer This request must be...

Страница 219: ...onnected individually to the PDU power distribution unit of the cabinet The connecting values are given per supply module Data Value Unit Voltage rangea 208 230 Vac Apparent power consumption rated ma...

Страница 220: ...ee 2 a Decreasing linear till relative humidity 50 at 40 C Table 25 4 Operating Environment For the appropriate temperature see also the Bruker site planning guides 25 4 Rating Plate The rating plate...

Страница 221: ...Bruker BioSpin NMR provides dedicated hotlines and service centers so that our specialists can respond as quickly as possible to all your service requests applications questions software or technical...

Страница 222: ...Contact 222 234 H172203_1_001...

Страница 223: ...se Location 49 Figure 7 5 PCTRL Overview 50 Figure 8 1 ELCB Front Panel with LED s and Connectors 55 Figure 8 2 Functional System Architecture 56 Figure 8 3 Abstract Control Domain and Real Time Domai...

Страница 224: ...m with External 2H Power Amplifier 102 Figure 11 8 Timing Diagram of Lock 19F Operation and Simultaneous 2H Decoupling or 2H Ob serve 103 Figure 11 9 View BSMS 2 Lock Transmitter 300 104 Figure 11 10...

Страница 225: ...163 Figure 15 1 VT Adapter Device Revision 1 Necessary for VPSB DC E booster Support 168 Figure 15 2 Block Diagram of the VPSB DC 171 Figure 15 3 Block Diagram of the VPSB DC E 172 Figure 15 4 Front V...

Страница 226: ...List of Figures 226 234 H172203_1_001...

Страница 227: ...s and ADC Functions 115 Table 11 4 L TRX Error Messages 118 Table 11 5 Part Numbers L TRX 119 Table 11 6 Part Numbers L 19F 119 Table 12 1 External Probe Interfaces no Longer Supported discontinued pr...

Страница 228: ...6 5 VTA TC 2T 184 Table 16 6 VTA FLOW NMR 184 Table 16 7 VTA TC 2E 185 Table 16 8 VTA LN2 185 Table 16 9 VTA BCU 185 Table 16 10 VTA MAG RS 186 Table 18 1 Available Unit 201 Table 21 1 Maintenance Sch...

Страница 229: ...Glossary H172203_1_001 229 234 Glossary...

Страница 230: ...Glossary 230 234 H172203_1_001...

Страница 231: ...dress of the BSMS 2 34 L Laboratory personnel 15 P Personal protective equipment 15 Personnel qualifications 14 Product liability 13 R Radiation Shield Temperature Control MAG RS 201 Risk assessment 1...

Страница 232: ...Index 232 234 H172203_1_001...

Страница 233: ...H172203_1_001 233 234...

Страница 234: ...Bruker Corporation info bruker com www bruker com Order No H172203...

Отзывы: