-24-
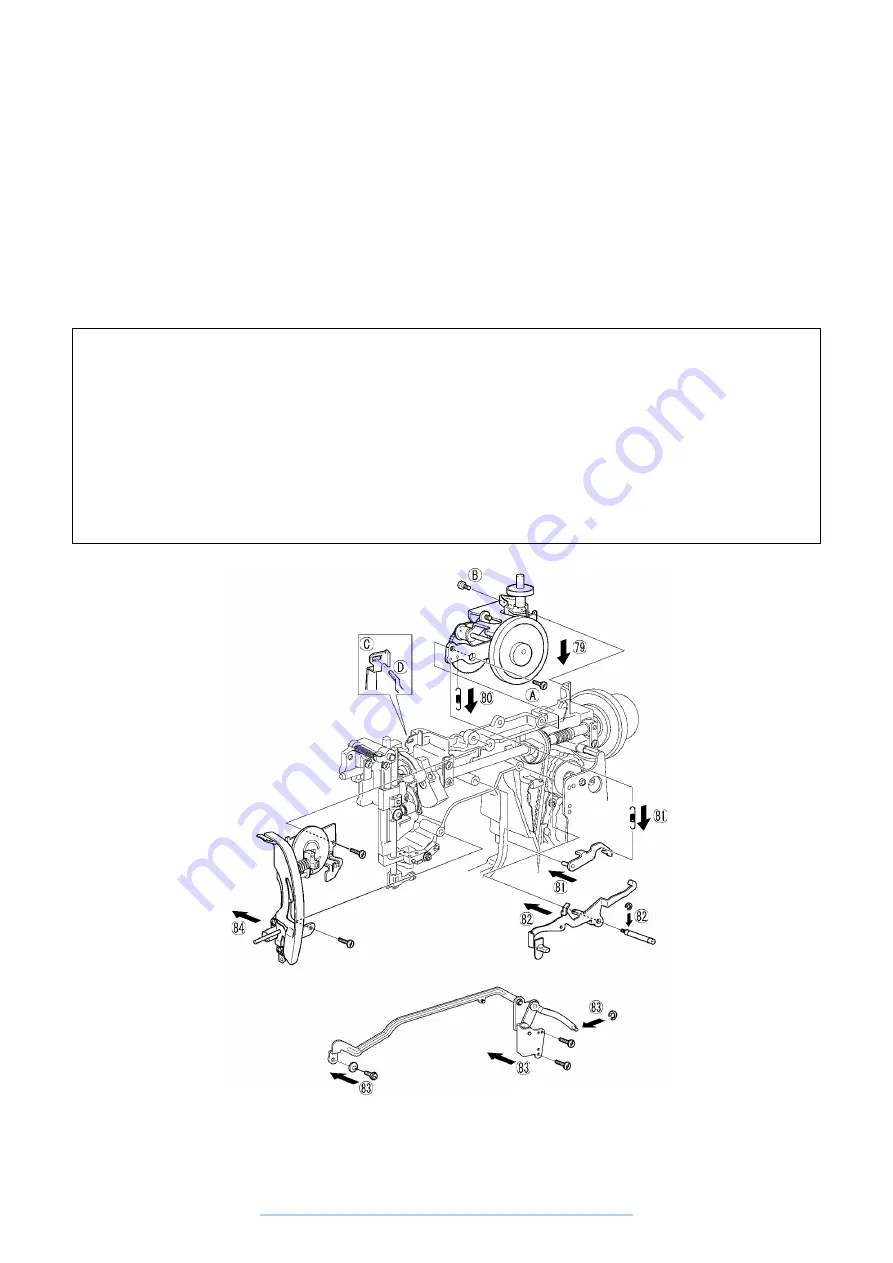
79. Align the feed bracket assembly fear section and install with the two tightening screws. (See Adjustment
Procedure 18.)
80. Hang the feed regulator tension spring on the feed bracket assembly and feed regulator.
81. Install reverse sewing lever B on the arm and hang the tension spring on the reverse sewing lever B and
feed bracket assembly.
82. Install reverse sewing lever A with the screw and lock ring.
83. Install the Zigzag connecting rod assembly on the selection unit with the lock ring, tighten with the two
screws, install on the needle bar block with the Zigzag adjustment nut and tightening screw and hang the
feed rod tension spring.
84. Install the thread tension connecting rod assembly with the two screws.
Assembly Points
79. Install the feed bracket assembly screws in the order (A), then (B). After installing the feed bracket
assembly, be careful about backlash at the feed bracket assembly gear. (See Adjustment Procedure 18.)
80. Hang the feed regulator tension spring with the shorter hook section on the feed bracket assembly.
83. Hang the feed regulator tension spring with the longer hook section on the feed bracket assembly.
83. Install the Zigzag adjustment nut with the hex nut section facing up.
84. When installing the thread tension assembly, lower the presser lifter and pass the thread tension
assembly thread slack plate B tip D through the (C) hole in thread slack plate C. After installing the thread
tension assembly, raise and lower the presser lifter and check that the thread tension adjuster plate opens
and closes.
www.promelectroavtomat.ru
Содержание XL-6040
Страница 1: ... 6 2001 www promelectroavtomat ru ...
Страница 3: ... 1 I 1 MECHANICAL CHART 2 2 POWER TRANSMISSION CHART 3 www promelectroavtomat ru ...
Страница 4: ... 2 1 MECHANICAL CHART www promelectroavtomat ru ...
Страница 29: ... 27 2 LEAD WIRES ARRANGEMENT www promelectroavtomat ru ...
Страница 61: ...XL 6060 Series XL 6050 Series XL 6040 Series H1040194 www promelectroavtomat ru ...


