Manage Your Network Machine Securely Using IPsec
> Configure an IPsec Address
Template Using Web Based Management
Configure an IPsec Address Template Using Web Based Management
1. Start your web browser.
2. Type "https://machine's IP address" in your browser's address bar (where "machine's IP address" is the
machine's IP address).
For example:
https://192.168.1.2
3. If the machine prompts you for a password, type it, and then click
.
4. Click the
Network
tab.
5. Click the
Security
tab.
6. Click the
IPsec Address Template
menu in the left navigation bar.
The Template List appears, displaying 10 Address Templates.
Click the
Delete
button to delete an
Address Template
. When an
Address Template
is in use, it cannot be
deleted.
7. Click the
Address Template
that you want to create. The
IPsec Address Template
appears.
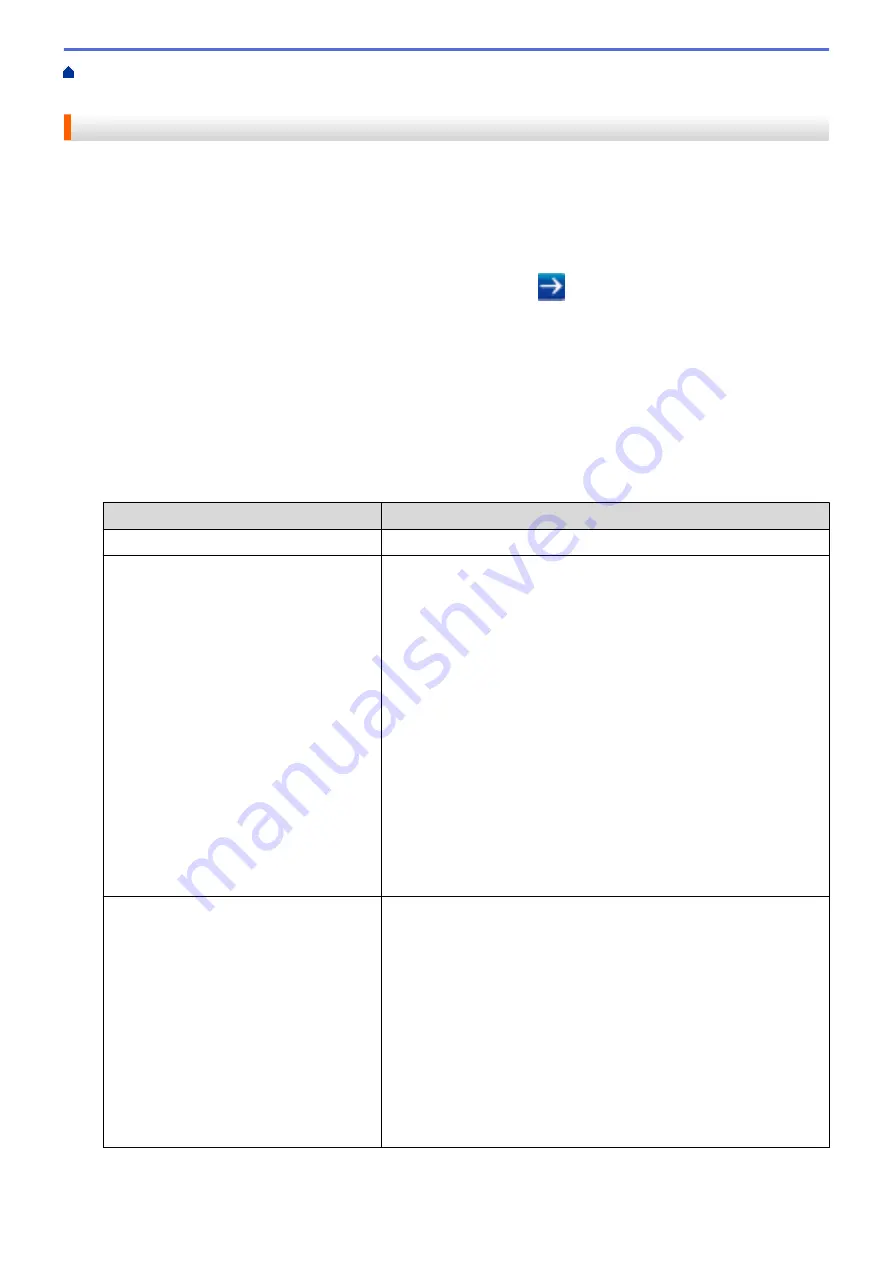
8. Configure the settings.
Option
Description
Template Name
Type a name for the template (up to 16 characters).
Local IP Address
•
IP Address
Specify the IP address. Select
ALL IPv4 Address
,
ALL IPv6
Address
,
ALL Link Local IPv6
, or
Custom
from the drop-down
list.
If you select
Custom
from the drop-down list, type the IP address
(IPv4 or IPv6) in the text box.
•
IP Address Range
Type the starting and ending IP addresses for the IP address
range in the text boxes. If the starting and ending IP addresses
are not standardised to IPv4 or IPv6, or the ending IP address is
smaller than the starting address, an error will occur.
•
IP Address / Prefix
Specify the IP address using CIDR notation.
For example: 192.168.1.1/24
Because the prefix is specified in the form of a 24-bit subnet mask
(255.255.255.0) for 192.168.1.1, the addresses 192.168.1.xxx are
valid.
Remote IP Address
•
Any
If you select
Any
, all IP addresses are enabled.
•
IP Address
Type the specified IP address (IPv4 or IPv6) in the text box.
•
IP Address Range
Type the starting and ending IP addresses for the IP address
range. If the starting and ending IP addresses are not
standardised to IPv4 or IPv6, or the ending IP address is smaller
than the starting address, an error will occur.
•
IP Address / Prefix
Specify the IP address using CIDR notation.
For example: 192.168.1.1/24
184
Содержание HL-J6000DW
Страница 1: ...Online User s Guide HL J6000DW HL J6100DW 2018 Brother Industries Ltd All rights reserved ...
Страница 13: ...Related Topics Near Field Communication NFC 8 ...
Страница 17: ... Check the Ink Volume Page Gauge 12 ...
Страница 22: ...Related Information Introduction to Your Brother Machine 17 ...
Страница 23: ...Home Paper Handling Paper Handling Load Paper 18 ...
Страница 38: ... Change the Paper Size and Paper Type 33 ...
Страница 41: ... Paper Type and Size for Each Operation 36 ...
Страница 46: ...Related Information Load Paper Related Topics Choose the Right Print Media Error and Maintenance Messages 41 ...
Страница 194: ...Related Information Configure an IPsec Template Using Web Based Management 189 ...
Страница 220: ...Related Information Set Up Brother Web Connect 215 ...
Страница 236: ...Home Mobile Web Connect AirPrint AirPrint AirPrint Overview Before Using AirPrint macOS Print Using AirPrint 231 ...
Страница 246: ...Home Brother iPrint Scan for Windows and Mac Brother iPrint Scan for Windows and Mac Brother iPrint Scan Overview 241 ...
Страница 286: ...Related Topics My Brother Machine Cannot Print over the Network 281 ...
Страница 299: ... Clean the Print Head from Your Brother Machine 294 ...
Страница 303: ...5 Slowly push the paper tray completely into the machine Related Information Clean Your Brother Machine 298 ...
Страница 308: ...Related Topics Paper Handling and Printing Problems 303 ...
Страница 317: ... Change the Print Setting Options When Having Printing Problems 312 ...
Страница 373: ...Visit us on the World Wide Web www brother com UK Version 0 ...


