background image

3-100

Confidential

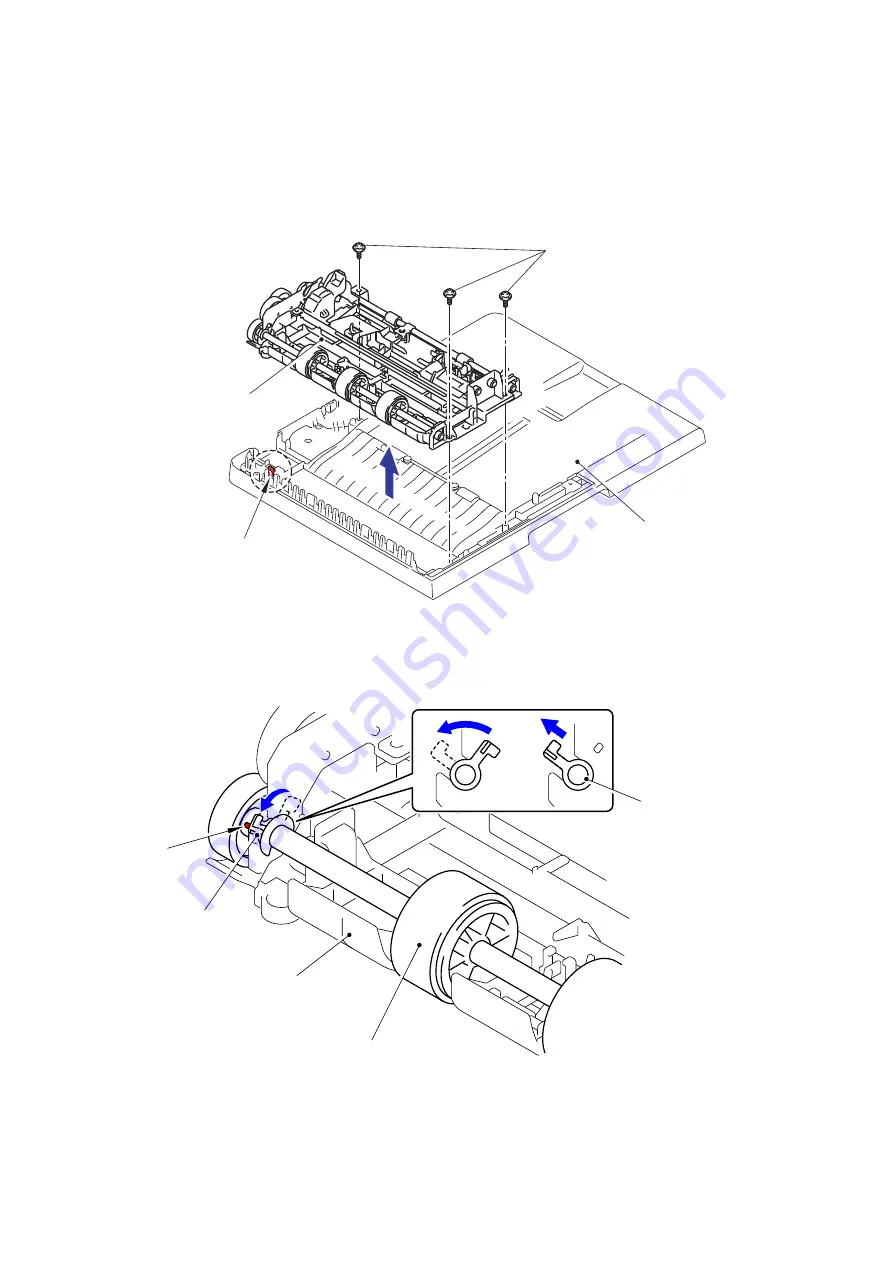
9.29 Document Feed Roller ASSY 2

(1) Remove the three Taptite cup B M3x10 screws from the Lower ADF chute.

(2) Release all the wiring from the Document cover.

(3) Release the Hook and remove the Lower ADF chute from the Document cover.

Fig. 3-120

(4) Release the Pin of the Conductive bushing and rotate it to the position shown in the figure.

Fig. 3-121

Taptite cup B M3x10

Lower ADF chute

Hook

Document cover 

Pin

Conductive bushing

Conductive bushing

4a

4b

Document feed roller ASSY 2

Lower ADF chute

Содержание DCP-L8400CDN

Страница 1: ...Brother Color Laser MFC SERVICE MANUAL MODEL DCP L8400CDN L8450CDW MFC L8600CDW L8650CDW MFC L8850CDW L9550CDW Read this manual thoroughly before maintenance work Keep this manual in a convenient place for quick and easy reference at all times ...

Страница 2: ...i Protected Access are registered trademarks of the Wi Fi Alliance WPA WPA2 Wi Fi Protected Setup log and Wi Fi Direct are trademarks of the Wi Fi Alliance FLICKR is a registered trademark of Yahoo Inc AOSS is a trademark of Buffalo Inc Android Google Cloud Print Google Drive Google Play and Picasa Web Albums are trademarks of Google Inc Use of this trademark is subject to Google Permissions Nuanc...

Страница 3: ...the following vendors 1983 1998 PACIFIC SOFTWORKS INC ALL RIGHTS RESERVED 2008 Devicescape Software Inc All rights reserved This product includes the KASAGO TCP IP software developed by ZUKEN ELMIC Inc OTHER INFORMATION FlashFX is a registered trademark of Datalight Inc FlashFX Copyright 1998 2010 Datalight Inc U S Patent Office 5 860 082 6 260 156 FlashFX Pro is a trademark of Datalight Inc Relia...

Страница 4: ...ction 1 8 1 8 Copy 1 9 1 9 Scanner 1 10 CHAPTER 2 ERROR INDICATION AND TROUBLESHOOTING 1 INTRODUCTION 2 1 1 1 Precautions 2 1 1 2 Checks before Commencing Troubleshooting 2 3 2 OVERVIEW 2 5 2 1 Cross section Drawing 2 5 2 1 1 Printer part 2 5 2 1 2 Scanning part 2 6 2 2 Paper Feeding 2 7 2 2 1 Printer part 2 7 2 2 2 Scanning part 2 8 2 3 Operation of Each Part 2 9 2 4 Block Diagram 2 11 2 5 Main C...

Страница 5: ...5 1 Cannot make a print through network connection 2 115 4 6 Troubleshooting for Control Panel Problems 2 116 4 6 1 Nothing is displayed on the LCD 2 116 4 6 2 Unable to perform panel operation 2 117 4 6 3 The machine does not enter the ready state when the power is turned ON 2 118 4 7 Troubleshooting for Toner Cartridge and Drum Unit Problems 2 119 4 7 1 New toner not detected 2 119 4 7 2 Toner c...

Страница 6: ...2 4 13 5 Receive buffer full during receiving into memory 2 133 4 14 Troubleshooting for Other Problems 2 133 4 14 1 Cannot make print 2 133 4 14 2 Problem of USB direct interface 2 133 4 14 3 Cannot update firmware 2 134 4 14 4 The machine is not turned ON 2 134 CHAPTER 3 DISASSEMBLY AND ASSEMBLY 1 SAFETY PRECAUTIONS 3 1 2 PACKING 3 2 3 SCREW CATALOGUE 3 3 4 SCREW TORQUE LIST 3 4 5 LUBRICATION 3 ...

Страница 7: ...port Film Legal Model Only 3 81 9 25 ADF Separation Spring Holder Legal Model Only 3 84 9 26 CIS Spacer 3 86 9 27 Second Side CIS Flat Cable Second Side CIS Unit 3 88 9 28 ADF Cover Document Detection Sensor PCB ASSY First Side Document Scanning Position Sensor PCB ASSY Second Side Document Scanning Position Sensor PCB ASSY Duplex Scanning Model Only 3 95 9 29 Document Feed Roller ASSY 2 3 100 9 3...

Страница 8: ... Sensor ASSY 3 159 9 59 Eject Sensor PCB ASSY 3 160 9 60 Registration Mark Sensor Unit 3 161 9 61 Power Fan 3 162 9 62 Low voltage Power Supply PCB Unit 3 163 9 63 MP Paper Empty Actuator A ASSY MP Paper Empty Actuator B 3 166 9 64 MP Paper Empty Registration Front Sensor PCB ASSY 3 172 9 65 Paper Feed Unit Joint Pin 3 174 9 66 Registration Front Rear Sensor PCB ASSY 3 178 9 67 T1 Paper Feed Senso...

Страница 9: ...f States at Factory Shipment 4 6 2 IF YOU REPLACE THE REGISTRATION MARK SENSOR UNIT 4 7 2 1 Continuous Adjustments of Density and Registration Sensor Function code 73 4 7 3 IF YOU REPLACE THE LOW VOLTAGE POWER SUPPLY PCB UNIT 4 8 3 1 Reset of Irregular Power Supply Detection Counter of Low Voltage Power Supply PCB Reset Counters for Parts Function code 88 4 8 4 IF YOU REPLACE THE PROCESS DRIVE UNI...

Страница 10: ... Maintenance Mode Exclusive to Service Personnel 5 1 1 1 2 How to Enter the End User accessible Maintenance Mode 5 2 1 2 List of Maintenance mode Functions 5 3 1 3 Detailed Description of Maintenance mode Functions 5 5 1 3 1 EEPROM parameter initialization Function code 01 91 5 5 1 3 2 Printout of scanning compensation data Function code 05 5 6 1 3 3 ADF performance test Function code 08 5 8 1 3 4...

Страница 11: ... 44 1 3 24 Laser unit test pattern print Function code 68 5 48 1 3 25 Frame pattern print One sided Function code 69 5 49 1 3 26 Frame pattern print Two sided Function code 70 5 50 1 3 27 Color test pattern Function code 71 5 51 1 3 28 Sensitivity adjustment of density sensor Function code 72 5 54 1 3 29 Continuous adjustments of density and registration sensor Function code 73 5 55 1 3 30 Setting...

Страница 12: ...DICAL REPLACEMENT PARTS 7 2 2 1 Procedures to Replace Periodical Replacement Parts 7 2 2 1 1 Fuser unit 7 3 2 1 2 Laser unit 7 12 2 1 3 PF kit 1 7 42 2 1 4 PF kit 2 7 45 2 1 5 PF kit MP 7 48 APPENDIX 1 SERIAL NUMBERING SYSTEM APPENDIX 2 DELETION OF USER SETTING INFORMATION APPENDIX 3 INSTALLING THE MAINTENANCE PRINTER DRIVER ...

Страница 13: ...NT indicates a potentially hazardous situation which if not avoided may result in damage to property or loss of product functionality Prohibition icons indicate actions that must not be performed Electrical Hazard icons alert you to possible electrical shock Fire hazard icons alert you to the possibility of fire Hot Surface icons warn you not to touch product parts that are hot Note Notes tell you...

Страница 14: ...ng make sure you have unplugged the telephone line cord first MFC only and then the power cord from the AC power outlet as well as any telephone RJ 11 MFC only or Ethernet RJ 45 cables Network models only from the product Never push objects of any kind into this product through cabinet slots since they may touch dangerous voltage points or short out parts DO NOT handle the plug with wet hands DO N...

Страница 15: ...cord is stretched or where strain is otherwise put on the cord Doing so may cause the cord to become worn or frayed Brother strongly recommends that you DO NOT use any type of extension cord MFC only Use caution when installing or modifying telephone lines Never touch telephone wires or terminals that are not insulated unless the telephone line has been unplugged from the wall jack Never install t...

Страница 16: ... SURFACE After you have just used the product some internal parts of the product will be extremely hot Wait for the product to cool down before you touch the internal parts of the product This product is heavy and weighs more than 20 0 kg 44 1 lb To prevent possible injuries at least two people should lift the product One person should hold the front of the product and one person should hold the b...

Страница 17: ...ire electrical shock and injury to people These important safety precautions including the following 1 DO NOT use this product near water or locations that may become wet for example near a bath tub wash bowl kitchen sink or washing machine in a wet basement or near a swimming pool 2 Avoid using this product during an electrical storm There may be a remote risk of electric shock from lightning 3 D...

Страница 18: ...d rings before working on the machine A reflected beam though invisible can permanently damage the eyes Since the beam is invisible the following caution label is attached on the laser unit CAUTION In case of any trouble with the laser unit replace the laser unit itself To prevent direct exposure to the laser beam do not try to open the enclosure of the laser unit ACHTUNG Im Falle von Störungen de...

Страница 19: ...ter July 23 2001 the REN for this product is part of the product identifier that has the format US AAAEQ TXXXX The digits represented by are the REN without a decimal point e g 06 is a REN of 0 6 For earlier products the REN is separately shown on the label If this equipment causes harm to the telephone network the telephone company will notify you in advance that temporary discontinuance of servi...

Страница 20: ... Certificates of Title to motor vehicles under certain State Provincial law Copying copyrighted works may be regulated by Federal State or local laws For more information consult an appropriate authority or advisor WARNING For protection against the risk of electrical shock always disconnect all cables from the wall outlet before the equipment is installed or modified DO NOT attempt to service thi...

Страница 21: ...ed Two sided Two sided Two sided FAX N A N A Model DCP L8400CDN DCP L8450CDW Warm up time From Sleep mode Less than 31 seconds at 73 4F 23 C 50 FromPower OFF ON Less than 33 seconds at 73 4F 23 C 50 First print time From Ready mode Monochrome Full Color Less than 15 15 seconds From Sleep mode Monochrome Full Color Less than 36 36 seconds CPU StarSapphire 400 MHz Backup Clock Up to 60 hours Dimensi...

Страница 22: ... H Carton Size 637 x 545 x 649 mm 25 1 x 21 5 x 25 6 inch 660 x 625 x 698 mm 26 0 x 24 6 x 27 5 inch Machine Size 410 x 503 x 492 mm 16 1 x 19 8 x 19 4 inch 490 x 526 x 530 mm 19 3 x 20 7 x 20 9 inch Weights with carton 33 6 kg 74 0 lb for the U S A Latin 34 3 kg 75 6 lb for Oceania Asia 35 2 kg 77 7 lb for Europe 34 9 kg 77 0 lb for China 36 4 kg 80 3 lb for the U S A Latin 36 8 kg 81 2 lb for Eu...

Страница 23: ...ject to change without prior notice Model DCP L8400CDN DCP L8450CDW Wired network Network node type NC 8600h type2 Wireless network Network node type N A NC 8200w type2 Model MFC L8600CDW MFC L8650CDW MFC L8850CDW MFC L9550CDW Wired network Network node type NC 8600h type2 Wireless network Network node type NC 8200w type2 ...

Страница 24: ...rs MTTR 0 5 hours Maximum monthly volume Up to 40 000 pages Up to 60 000 pages Periodical maintenance parts Fuser Unit Up to 100 000 pages Laser Unit Up to 100 000 pages PF kit 1 Up to 100 000 pages PF kit 2 Up to 100 000 pages PF kit MP Up to 50 000 pages Model MFC L8600CDW MFC L8650CDW MFC L8850CDW MFC L9550CDW Machine life 200 000 pages A4 Letter size or 5 years Part life ADF Up to 50 000 pages...

Страница 25: ... China Standard Toner Black Approximately 2 500 pages except for China N A for China Cyan Magenta Yellow Approximately 1 500 pages except for China N A for China High Capacity Toner Black Approximately 4 000 pages Cyan Magenta Yellow Approximately 3 500 pages Super High Capacity Toner Black Approximately 6 000 pages except for Europe N A for Europe Cyan Magenta Yellow Approximately 6 000 pages exc...

Страница 26: ... pages except for China N A for China N A except for Asia Approximately 1 500 pages for Asia High Capacity Toner Black Approximately 4 000 pages except for Asia N A for Asia N A Cyan Magenta Yellow Approximately 3 500 pages except for Asia N A for Asia N A Super High Capacity Toner Black Approximately 6 000 pages except for the U S A Oceania Europe N A for the U S A Oceania Europe Approximately 6 ...

Страница 27: ... 40 to 50 C Up to 5 days Storage condition at the temperature of 20 to 0 C Up to 5 days Humidity Normal condition 35 to 85 without condensation Storage condition at the humidity of 85 to 95 Up to 5 days without condensation Storage condition at the humidity of 10 to 35 Up to 5 days without condensation Belt unit Life expectancy Approximately 50 000 pages 5 page job Life expectancy Approximately 20...

Страница 28: ...W Modem Speed N A Transmission speed N A ITU T group N A Color FAX Sending N A Receiving N A Internet FAX ITU T 37 simple mode N A Model MFC L8600CDW MFC L8650CDW MFC L8850CDW MFC L9550CDW Modem Speed 33 600 bps Fax Transmission speed Approximately 2 5 seconds ITU T Test Chart Std resolution JBIG ITU T group Super G3 Color FAX Sending N A Receiving N A Internet FAX ITU T 37 simple mode Yes Downloa...

Страница 29: ...an 18 20 seconds From Sleep mode and Paper tray Monochrome Full Color Less than 39 41 seconds Resolution dpi 1 200 x 600 dpi Auto duplex scanning copy N A Yes Model MFC L8600CDW MFC L8650CDW MFC L8850CDW MFC L9550CDW Copy Speed A4 Letter Monochrome Full Color Up to 28 30 ppm Monochrome Full Color Up to 30 32 ppm First copy out time From Ready mode and Paper tray Monochrome Full Color Less than 18 ...

Страница 30: ...Monochrome 1 99 seconds Letter 2 12 seconds A4 1 68 seconds Letter 1 79 seconds A4 Color 1 99 seconds Letter 2 12 seconds A4 1 68 seconds Letter 1 79 seconds A4 Model MFC L8600CDW MFC L8650CDW MFC L8850CDW MFC L9550CDW Resolution Optical FB Maximum scanning 1 200 main scanning x 2 400 dpi sub scanning ADF Maximum scanning 1 200 main scanning x 600 dpi sub scanning Resolution Interpolated Maximum s...

Страница 31: ...g the machine and so on If you need to take voltage measurements with the power switched on take the greatest of care not to receive an electric shock 2 When connecting or disconnecting cable connectors make sure that you hold the connector body and not the cables 3 Static electricity charged in your body may damage electronic parts Before handling the PCBs touch a metal portion of the machine to ...

Страница 32: ...ts repaired or removed during the repair work function properly when the repair is completed WARNING DO NOT use any flammable spray or flammable solvent such as alcohol benzine or thinner in or around the machine Otherwise a fire or electric shock may result ...

Страница 33: ...orrectly 2 The belt unit and waste toner box are installed correctly Others 1 Condensation When the machine is moved from a cold place into a warm room condensation may occur inside the machine causing various problems as listed below Condensation on the surface of optical devices such as the scanner windows lens reflecting mirror and protection glass etc may cause light print image If the exposur...

Страница 34: ...fidential Cleaning Use a soft dry lint free cloth WARNING DO NOT use any flammable spray or flammable solvent such as alcohol benzine or thinner to clean the machine DO NOT use these articles near the machine ...

Страница 35: ... MP separation roller MP paper pick up roller MP paper empty actuator MP separation pad Registration front actuator T1 paper feed actuator T1 separation roller T1 separation pad T1 paper pick up roller T2 separation roller T2 paper feed actuator T2 separation pad T2 paper pick up roller Duplex tray Pressure roller Heat roller Eject actuator Eject roller 1 Eject roller 2 Eject roller 3 Duplex paper...

Страница 36: ...ent hold Second side document scanning position actuator Second side document scanning position sensor PCB ADF cover document detection sensor PCB Exit pinch roller Document ejection roller Document sponge Document glass ADF document output support flap Document cover ADF document support Document guide ADF cover actuator Document pick up roller holder Document pick up roller Document detection ac...

Страница 37: ...2 7 Confidential 2 2 Paper Feeding 2 2 1 Printer part Fig 2 3 Paper tray 1 path T2 paper tray unit path Front side Back side Paper feed from the MP tray Paper eject from the back side Duplex path ...

Страница 38: ...2 8 Confidential 2 2 2 Scanning part Fig 2 4 Right side Left side Face up Document scanning feed path ...

Страница 39: ...ct sensor Detect whether or not paper is ejected from the fuser unit In the case of the 2 sided printing detect the rear edge of paper and adjust the timing of the eject roller 2 and 3 switching Eject roller 1 Feed the paper ejected from the fuser unit to the eject roller 2 Eject roller 2 Feed the paper to the eject roller 3 In the case of the 2 sided printing after the front of the sheet is print...

Страница 40: ...e documents from ADF document support to the scanning part Document separate roller ADF separation pad Separates the documents fed from ADF document support into single sheets Document detection actuator Document detection sensor Detect whether documents are set in the ADF First side Second side document scanning position actuator Document scanning position sensor Detect the scanning start positio...

Страница 41: ...ASSY Polygon motor Side thermistor Heater Low voltage power supply PCB unit High voltage power supply PCB ASSY Toner sensor Light emission EL emission circuit External temperature humidity sensor Fuser unit Main PCB ASSY Develop release clutch Develop release drive unit Switch back solenoid Panel control PCB ASSY Color LCD Touch panel Key PCB ASSY LDSUB PCBASSY BD sensor PCB ASSY NFC PCB ASSY Pape...

Страница 42: ...tage power supply PCB ASSY MP upper cover ASSY MP paper guide ASSY MP cover ASSY Front cover Access cover Main PCB Base frame unit Power fan Fuser cover ASSY Duplex tray Low voltage power supply PCB unit ASSY drive unit A4 model Side cover R Legal model A4 model Side cover L Legal model Legal model A4 model PCB Wireless LAN PCB ADF unit ADF unit Document scanner unit Document scanner unit Control ...

Страница 43: ...d 2 40 0405 0501 The center thermistor of the fuser unit does not reach the specified temperature within the specified time 2 41 0502 After the temperature of the fuser unit rises to a certain level the temperature of the center thermistor does not reach the specified temperature within the specified period of time in the next step 2 41 0503 The center thermistor of the fuser unit detected a tempe...

Страница 44: ... in the high voltage power supply PCB ASSY in the ready state 2 44 0C00 Error occurred in the density sensor 2 44 0D01 0D02 0D03 0D04 0E00 Communication error occurred in the high voltage power supply PCB ASSY 2 45 1003 The registration mark sensor R is dirty and cannot normally receive reflected light 2 45 Error Codes Description Refer to 1004 The registration mark sensor L is dirty and cannot no...

Страница 45: ...2 2703 2801 2802 2803 2804 2805 2806 2901 2902 2903 2904 2905 2906 2A01 2A02 Error Codes Description Refer to 2A03 2B01 2B02 2C01 2C02 2D01 2E01 2E02 2E03 2E04 2E05 2E06 2E07 2E08 2E0A 2F01 2F02 2F03 2F04 2F05 2F06 2F07 2F08 2F0A 3001 3002 3003 3102 3202 3301 3302 3401 3402 3501 3601 Error Codes Description Refer to ...

Страница 46: ...box is almost full 2 49 4800 After the waste toner sensor detected that the waste toner box was almost full pages more than the specified number have been printed 2 49 4900 4A00 4B01 Dot counter of the toner cartridge Black or develop roller counter reaches the upper limit soon 2 49 4B02 Dot counter of the toner cartridge Yellow or develop roller counter reaches the upper limit soon 2 49 4B03 Dot ...

Страница 47: ...r the PF kit 2 has reached the upper limit 2 52 5004 5005 5100 5200 5301 5302 5401 5402 5406 5502 5602 5702 5801 5802 Error Codes Description Refer to 5902 5A02 5B02 5C02 6001 The front cover sensor detected that the front cover was open 2 53 6002 6003 6004 The eject sensor detected that the fuser cover was open 2 53 6007 6101 The toner sensor detected that no toner cartridge Black was set 2 54 61...

Страница 48: ...nsor detects that lift up of the plate of the T2 paper tray unit is not completed within the specified period of time 2 58 6C03 6C04 6D00 Error Codes Description Refer to 6E00 The develop release sensor detected the developer roller disengagement or engagement failure 2 59 6F00 Machine detected that supplied power was unstable Less than 100 times 2 59 7000 After the registration rear sensor detect...

Страница 49: ... Description Refer to 8505 The T1 paper feed sensor detected that the paper tray 1 is open in 2 sided printing or printing by feeding paper from the T2 paper tray unit after the registration of printing in the engine 2 64 8506 8507 8508 8601 8602 8603 8604 8701 8702 8703 8801 8802 8901 8902 8903 The back cover sensor detected the open state when 2 sided printing is started before the registration ...

Страница 50: ... paper was fed from the paper tray 1 the T1 paper feed sensor detected that no paper was in the paper tray 1 2 68 Error Codes Description Refer to 9303 When paper was fed from the T2 paper tray unit the T2 paper feed sensor detected that no paper was in the T2 paper tray unit 2 69 9304 9305 9306 For printing specifying Auto it was detected that no paper was loaded in any of the paper trays 2 69 93...

Страница 51: ...age processing is not completed successfully 2 75 Error Codes Description Refer to A200 During document scanning the first side document scanning position sensor detected that the document length was 90 cm or more 2 76 A300 Though a document was fed and conveyed by the specified distance or longer the first side document scanning position sensor did not detect the passing of the paper 2 76 A400 Th...

Страница 52: ... write permission on directory file write lock or no write permission on file 2 82 Error Codes Description Refer to C004 The current time necessary for user authentication is unavailable due to time not being obtained 2 82 C700 The memory is insufficient to expand the data of PC Print 2 83 C800 The memory used to store secure print data exceeded the memory size for secure print data 2 83 C900 CA00...

Страница 53: ...in PCB 2 85 E900 NFC PCB initialization failed 2 86 EC00 Overcurrent was caused because a USB device that did not meet the specifications was inserted into the USB port 2 86 F900 Setting by spec code is not entered 2 86 FA01 FA02 FA03 FB01 FB02 FB03 FB04 FB05 FB06 FB07 FB08 FB09 FB0A FB0B FB0C FB0D FB0F FC01 FC02 FC03 FC04 FC05 Error Codes Description Refer to ...

Страница 54: ...rom the control panel 9803 2 73 Error occurred with the value measured during density sensor sensitivity calibration 9804 2 73 Calibration failed Turn the power off and then back on again Error occurred with the value measured during color density adjustment performed from the control panel 9801 2 72 Cartridge Error Put the Toner Cartridge back in The new toner sensor of the toner cartridge Black ...

Страница 55: ...ensor detected that the document length was 90 cm or more A200 2 76 First side document scanning position sensor did not detect paper pass A300 2 76 Drum Slide the Blue tab on Drum Unit Electric discharge that may be caused by dirt on the corona wire of the drum unit was detected 6A00 2 58 Drum Stop Replace the Drum Unit Electric discharge was detected when the number of the drum unit rotations ha...

Страница 56: ...nsor detects the end of paper pass and the specified period of time has passed the eject sensor continues to detect paper pass 7100 2 60 Jam Tray 1 Pull the paper tray1 completely out of the machine and remove the jammed paper In the case of printing by feeding paper from the paper tray 1 after the T1 paper feed sensor detects paper pass the registration front sensor does not detect paper pass aft...

Страница 57: ...ed Refer to the error code of Maintenance Replace Fuser Number of used pages for the fuser unit has reached the upper limit 4500 2 48 Replace Laser Number of pages printed with the laser unit has reached the upper limit 4600 2 48 Replace PF Kit 1 Number of used pages for the PF kit 1 has reached the upper limit 5002 2 52 Replace PF Kit 2 Number of used pages for the PF kit 2 has reached the upper ...

Страница 58: ...cked In the case of PC print the ID which does not have permission to perform color printing was used 4 10 3 Function Locked Job Deleted Press Stop X In the case of Secure print or USB Direct print the ID which does not have permission to perform color printing was used 4 10 3 No Toner Open the Front Cover then install Toner Cartridge Black BK The toner sensor detected that no toner cartridge Blac...

Страница 59: ...gine 8501 2 64 No Waste Toner Install the Waste Toner Box The waste toner sensor detected that no waste toner box was set 6300 2 56 Out of Memory Press Stop Key The memory is insufficient to expand the data of PC Print C700 2 83 Out of Fax Memory Delete unwanted fax data The memory becomes full when Fax preview is ON 4 10 2 Print fax data from All Settings Fax Print fax The memory becomes full whe...

Страница 60: ...roller counter has reached the upper limit was detected 4C01 2 50 Dot counter of the toner cartridge Cyan or develop roller counter has reached the upper limit was detected 4C04 2 50 During printing dot counter of color toner cartridge or develop roller counter has reached the upper limit was detected 4C05 2 50 Dot counter of the toner cartridge Magenta or develop roller counter has reached the up...

Страница 61: ...paper loaded in the paper tray was smaller than the specified size 8D01 2 65 Size Error Specify the correct paper size for Tray 1 For printing by feeding paper from the paper tray 1 the size of paper specified from the driver set the size which was not supported by the paper tray 1 9702 2 71 Specify the correct paper size for Tray 2 For printing by feeding paper from the T2 paper tray unit the siz...

Страница 62: ...fed from the T2 paper tray unit 9003 2 67 Reload correct paper in MP Tray then press Retry The size of paper loaded in the MP tray and the one specified from the driver are not same when paper is fed from the MP tray 9001 2 67 Size Mismatch Reload correct paper Upon fax reception the paper size setting is the one other than A4 Letter Legal and Folio 8E02 2 66 Small paper Open the Back Cover and th...

Страница 63: ... reaches the upper limit soon 4B02 2 49 WT Box End Soon The waste toner sensor detected that the waste toner box is almost full 4700 2 49 Toner Error One or more Toner Cartridges are not detected Pull out and reinsert all 4 Toner Cartridges The develop release sensor detected the developer roller disengagement or engagement failure 6E00 2 59 Touchscreen initialization failed Remove any material wh...

Страница 64: ...ack Cover of the Machine The back cover sensor detected the open state when 2 sided printing is started before the registration of printing in the engine 8903 2 64 The back cover sensor detected the open state during 2 sided printing after the registration of printing in the engine 8904 2 64 Reload paper then press Start The registration rear sensor detected that the length of the paper is too lon...

Страница 65: ...han 33 digits or nonnumeric characters 4 13 2 17 07 No response from the remote terminal in receiving 4 13 2 1C 01 Lack of access right detected in NGN line T38 403 Forbidden 4 13 4 1C 02 File or folder directory not found in NGN line T38 404 Not Found 4 13 4 1C 03 Context sensitive acceptance impossible in NGN line T38 488 Not Acceptable Here 4 13 4 1C 04 SIP Session Initiation Protocol connectio...

Страница 66: ...erminal only with V 29 capability in 2 400 or 4 800 bps transmission 4 13 4 32 02 Remote terminal not ready for polling 4 13 4 32 10 Remote terminal not equipped with password function or its password switch OFF 4 13 4 32 11 Remote terminal not equipped with or not ready for confidential mailbox function 4 13 4 32 12 Remote terminal not equipped with or not ready for relay broadcasting function 4 ...

Страница 67: ...cted 4 13 4 50 01 Vertical resolution capability changed after calibration of background color 4 13 4 63 01 Password plus lower 4 digits of telephone number not coincident 4 13 1 63 02 Password not correct 4 13 1 63 03 Polling ID not correct 4 13 1 63 04 Provided confidential ID and mailbox ID are different 4 13 1 63 05 Relay broadcasting ID inconsistency 4 13 1 63 06 Provided retrieval ID and mai...

Страница 68: ...ransmission due to call reservation 4 13 2 B0 04 PC interface error 4 13 2 C0 01 No common modulation mode or failed to poll 4 13 4 C0 02 Unable to detect JM 4 13 4 C0 03 Unable to detect CM 4 13 4 C0 04 Unable to detect CJ 4 13 4 C0 10 Cannot finish V 34 negotiation or training 4 13 4 C0 11 Modem error detected during V 34 negotiation or training 4 13 4 C0 20 Modem error detected during sending o...

Страница 69: ...the main motor harness 2 Connection failure of the low voltage power supply PCB harness Reconnect the low voltage power supply PCB harness 3 Part in the process drive unit damaged Replace the process drive unit 4 Fuser unit damaged Replace the fuser unit 5 Low voltage power supply PCB failure Replace the low voltage power supply PCB unit 6 Main PCB failure Replace the main PCB ASSY Print Unable 02...

Страница 70: ...damaged Print Unable 03 Turn the power off and then back on again Print Unable 04 Turn the power off and then back on again Print Unable 04 Turn the power off and then back on again Step Cause Remedy 1 Connection failure of the polygon motor harness Reconnect the polygon motor harness 2 Laser unit failure Replace the laser unit 3 Main PCB failure Replace the main PCB ASSY ...

Страница 71: ... seconds turn ON the power again and check that this error is reset Print Unable 05 Turn the power off and then back on again Print Unable 05 Turn the power off and then back on again Print Unable 05 Turn the power off and then back on again Print Unable 05 Turn the power off and then back on again Print Unable 05 Turn the power off and then back on again Print Unable 05 Turn the power off and the...

Страница 72: ... Turn the power off and then back on again Print Unable 05 Turn the power off and then back on again Print Unable 05 Turn the power off and then back on again Step Cause Remedy 1 Connection failure of the center or side thermistor harness of the fuser unit Reconnect the harness of the center thermistor or side thermistor of the fuser unit 2 Connection failure of the heater harness of the fuser uni...

Страница 73: ...t the irregular power supply detection counter of the low voltage power supply PCB unit 2 Main PCB failure Replace the main PCB ASSY Note The irregular power supply detection error Error code 0900 of the low voltage power supply PCB unit occurs when there is a large distortion in the power supply voltage supplied to the machine In this case if the same power supply is used the same error might occ...

Страница 74: ...PCB failure Replace the low voltage power supply PCB unit 5 High voltage power supply PCB failure Replace the high voltage power supply PCB ASSY 6 Main PCB failure Replace the main PCB ASSY Print Unable 0B Turn the power off and then back on again Print Unable 0B Turn the power off and then back on again Step Cause Remedy 1 Connection failure of the high voltage power supply PCB harness Reconnect ...

Страница 75: ...High voltage power supply PCB failure Replace the high voltage power supply PCB ASSY 3 Main PCB failure Replace the main PCB ASSY Print Unable 10 Turn the power off and then back on again Step Cause Remedy 1 Dirt on the registration mark sensor R Clean the registration mark sensor R of the registration mark sensor R PCB 2 Dirt by toner inside the machine Clean inside of the machine 3 Registration ...

Страница 76: ... cover then switch ON Step Cause Remedy 1 Main PCB failure Replace the main PCB ASSY 2 Laser unit failure Replace the laser unit Print Unable 15 Turn the power off and then back on again Step Cause Remedy 1 Connection failure of the paper eject origin sensor harness Reconnect the paper eject origin sensor harness 2 Paper eject origin sensor failure Replace the paper eject origin sensor 3 Paper eje...

Страница 77: ...int Unable 38 Turn the power off and then back on again Print Unable 38 Turn the power off and then back on again Step Cause Remedy 1 Connection failure of the high voltage power supply PCB harness Reconnect the high voltage power supply PCB harness 2 External temperature humidity sensor failure Replace the high voltage power supply PCB ASSY 3 Main PCB failure Replace the main PCB ASSY Print Unabl...

Страница 78: ...he belt counter Replace the main PCB ASSY Maintenance Replace Fuser Step Cause Remedy 1 The fuser unit is at the end of life Replace the fuser unit After replacing the fuser unit refer to 1 3 37 Reset counters for parts Function code 88 in Chapter 5 and reset the fuser unit counter 2 Main PCB failure if the error code remains after replacing with a new fuser unit and resetting the fuser unit count...

Страница 79: ...ge Magenta or develop roller counter reaches the upper limit soon Error code 4B04 Dot counter of the toner cartridge Cyan or develop roller counter reaches the upper limit soon User Check Prepare a new toner cartridge Supplies WT Box End Soon Replace WT Box Replace the Waste Toner Box inside the machine Step Cause Remedy 1 High voltage power supply PCB failure Replace the high voltage power supply...

Страница 80: ...ror code 4C05 During printing dot counter of color toner cartridge or develop roller counter has reached the upper limit was detected User Check Replace the toner cartridge whose counter reached the upper limit Replace Toner Open the Top Cover replace Toner Cartridge Black BK Replace Toner Open the Top Cover replace Toner Cartridge Yellow Y Replace Toner Open the Top Cover replace Toner Cartridge ...

Страница 81: ...r cartridge with a new toner cartridge again If the place where the machine is installed is not flat relocate the machine to a flat place Cartridge Error Put the Toner Cartridge back in Cartridge Error Put the Yellow C Toner Cartridge back in Cartridge Error Put the Magenta C Toner Cartridge back in Cartridge Error Put the Cyan C Toner Cartridge back in Step Cause Remedy 1 Connection failure of th...

Страница 82: ... if the error code remains after resetting the counter of the PF kit MP Replace the main PCB ASSY Maintenance Replace PF Kit1 Step Cause Remedy 1 The PF kit 1 is at the end of life Replace the PF kit 1 After replacing the PF kit 1 refer to 1 3 37 Reset counters for parts Function code 88 in Chapter 5 and reset the PF kit 1 counter 2 Main PCB failure if the error code remains after resetting the co...

Страница 83: ...harness 2 Front cover failure Replace the front cover 3 Front cover sensor failure Replace the front cover sensor 4 Main PCB failure Replace the main PCB ASSY Cover is Open Close the Back Cover of the machine Step Cause Remedy 1 Eject actuator that has come off or that has been caught Re assemble the eject actuator 2 Fuser cover installation failure Re assemble the fuser cover 3 Connection failure...

Страница 84: ...Cartridge Black BK No Toner Open the Front Cover then install Toner Cartridge Yellow Y No Toner Open the Front Cover then install Toner Cartridge Magenta M No Toner Open the Front Cover then install Toner Cartridge Cyan C Step Cause Remedy 1 Toner sensor failure Replace the toner new sensor PCB ASSY 2 Main PCB failure Replace the main PCB ASSY No Drum Unit Install the Drum Unit Step Cause Remedy 1...

Страница 85: ...g 2 7 Electrodes location of the drum unit Fig 2 8 Developer roller Cleaning roller Belt transfer roller Belt cleaning roller Waste toner cleaner shaft Waste toner cleaner roller Paper dust cleaner Charging Corona wire Grid Erase lamp lens Erase lamp lens ...

Страница 86: ...e Toner Box Step Cause Remedy 1 High voltage power supply PCB failure Replace the high voltage power supply PCB ASSY 2 Main PCB failure Replace the main PCB ASSY No Belt Unit Open the Front Cover pull out all Drum Units completely and install the Belt Unit Step Cause Remedy 1 Connection failure of the registration mark L PCB harness Reconnect the registration mark sensor L PCB harness 2 Registrati...

Страница 87: ...unit 3 Main PCB failure Replace the main PCB ASSY Self Diagnostic Turn the power off then on again Leave the machine for 15 min Self Diagnostic Will Automatically Restart within 15 minutes Step Cause Remedy 1 Connection failure of each harness of the fuser unit Reconnect each harness of the fuser unit 2 Connection failure of the eject sensor PCB harness Reconnect the eject sensor PCB harness 3 Fus...

Страница 88: ...od of time User Check Open the T2 paper tray unit and close the T2 paper tray unit correctly Drum Slide the Blue tab on Drum Unit Drum Stop Replace the Drum Unit Step Cause Remedy 1 Dirt on the GRID terminals of the main body Clean the GRID terminals of the main body Refer to Fig 2 7 P2 55 2 Dirt on the terminal of the high voltage power supply PCB Clean the terminal of the high voltage power supp...

Страница 89: ...se drive unit 4 Main PCB failure Replace the main PCB ASSY Print Unable ZC Turn the power off and then back on again Step Cause Remedy 1 The power supply waveform is incorrect Install a voltage stabilizer in the power supply part Jam Inside Open the Front Cover pull out all four drum and toner cartridge assemblies and remove the jammed paper Step Cause Remedy 1 Foreign object inside machine Remove...

Страница 90: ...f the machine Remove the foreign object 2 Eject actuator caught on some position Re assemble the eject actuator 3 Fuser cover installation failure Re assemble the fuser cover 4 Back cover installation failure Re assemble the back cover 5 Eject sensor failure Replace the eject sensor PCB ASSY 6 Back cover failure Replace the back cover 7 Fuser drive gear Z25 damaged Replace the fuser drive gear Z25...

Страница 91: ...upport and MP flap are in closed state Jam MP Tray Remove the jammed paper from MP Tray and press Retry Step Cause Remedy 1 Foreign object at the back of the machine Remove the foreign object 2 Registration rear actuator that has come off or that has been caught Re assemble the registration rear actuator 3 Connection failure of the registration front rear sensor PCB harness Reconnect the registrat...

Страница 92: ... Re assemble the registration front actuator 4 Connection failure of the registration front rear sensor PCB harness Reconnect the registration front rear sensor PCB harness 5 Registration front sensor failure Replace the registration front rear sensor PCB ASSY 6 Paper feed related gear damaged Replace the main drive unit 7 Main PCB failure Replace the main PCB ASSY Jam Tray 2 Pull the paper tray2 ...

Страница 93: ... tray completely out of the machine Check inside the machine towards the rear Or open the Back Cover to remove the jammed paper Step Cause Remedy 1 Foreign object inside the duplex path Remove the foreign object 2 Foreign object inside the duplex path of the paper tray 1 Remove the foreign object 3 Fuser cover installation failure Re assemble the fuser cover 4 Back cover installation failure Re as...

Страница 94: ... Check Close the back cover No Tray The paper tray cannot be detected re install Tray1 No Tray The paper tray cannot be detected re install Tray1 Step Cause Remedy 1 T1 paper feed actuator that has come off or that has been caught Re assemble the T1 paper feed actuator 2 Connection failure of the T1 paper feed sensor PCB harness Reconnect the T1 paper feed sensor PCB harness 3 T1 paper feed sensor...

Страница 95: ...and print using the straight paper path Length of the paper is 114 mm or more Size Error 2 sided Specify the correct paper 2 sided Disabled Reload paper then press Start Step Cause Remedy 1 Registration rear actuator caught on some position Re assemble the registration rear actuator 2 Registration rear sensor failure Replace the registration front rear sensor PCB ASSY 3 Main PCB failure Replace th...

Страница 96: ...range Open the back cover and print using the straight paper path Error code 8E02 Upon fax reception the paper size setting is the one other than A4 Letter Legal and Folio User Check Set the paper size of the driver to A4 Letter Legal or Folio Small paper Open the Back Cover and then press Retry Step Cause Remedy 1 Main PCB failure Replace the main PCB ASSY Size Mismatch Reload correct paper Step ...

Страница 97: ...m the driver are not same when paper is fed from the T2 paper tray unit User Check When specifying the paper in the driver set the paper size of the paper that is actually set Size mismatch Reload correct paper in MP Tray then press Retry Size mismatch Reload correct paper in Tray1 then press Retry Size mismatch Reload correct paper in Tray2 then press Retry Step Cause Remedy 1 Registration rear a...

Страница 98: ...er empty actuator 2 Connection failure of the MP paper empty registration front sensor PCB harness Reconnect the MP paper empty registration front sensor PCB harness 3 MP paper empty sensor failure Replace the MP paper empty registration front sensor PCB ASSY 4 Main PCB failure Replace the main PCB ASSY No Paper Reload paper in Tray 1 Step Cause Remedy 1 T1 paper feed actuator caught on some posit...

Страница 99: ...ain PCB failure Replace the main PCB ASSY No Paper Reload paper in Tray Step Cause Remedy 1 MP paper empty actuator caught on some position Re assemble the MP paper empty actuator 2 T1 paper feed actuator caught on some position Re assemble the T1 paper feed actuator 3 T2 paper feed actuator caught on some position Re assemble the T2 paper feed actuator 4 Connection failure of the MP paper empty r...

Страница 100: ...the T2 paper feed actuator 4 Connection failure of the MP paper empty registration front sensor PCB harness Reconnect the MP paper empty registration front sensor PCB harness 5 Connection failure of the T1 paper feed sensor PCB harness Reconnect the T1 paper feed sensor PCB harness 6 Connection failure of the T2 paper feed sensor PCB harness Reconnect the T2 paper feed sensor PCB harness 7 MP pape...

Страница 101: ...e T2 paper tray unit the size of paper specified from the driver set the size which was not supported by the T2 paper tray unit User Check The size of the paper specified from the driver shall be A4 or Letter size and load the same size of paper to the specified paper tray Size Error 2 sided Press OK Specify the correct paper and load the same size paper as the Printer driver setting Size Error Sp...

Страница 102: ...r Check Replace the corresponding toner cartridge Calibration Calibration failed Turn the power off and then back on again Step Cause Remedy 1 Dirt on the registration mark sensor L Clean the registration mark sensor L 2 Failure in printed measurement pattern image If failure occurs when printing 2D3S YMCBWKW_A in Function code 71 refer to 4 3 Troubleshooting for Image Defects in this chapter and ...

Страница 103: ...nit has dirt replace the waste toner box Calibration Calibration failed Press Retry and try again Calibration Calibration failed Press Retry and try again Step Cause Remedy 1 Dirt on the registration mark sensor L Clean the registration mark sensor L 2 Failure in printed measurement pattern image If failure occurs when printing 2D3S YMCBWKW_A in Function code 71 refer to 4 3 Troubleshooting for Im...

Страница 104: ...Turn the power off and then back on again Step Cause Remedy 1 Dirt on the registration mark sensor L registration mark sensor R Clean the registration mark sensor L registration mark sensor R 2 Connection failure of the registration mark sensor L PCB registration mark sensor R PCB harness Reconnect the registration mark sensor L PCB registration mark sensor R PCB harness 3 Failure in printed measu...

Страница 105: ...ark sensor L registration mark sensor R 2 Connection failure of the registration mark sensor L PCB registration mark sensor R PCB harness Reconnect the registration mark sensor L PCB registration mark sensor R PCB harness 3 Failure in printed measurement pattern image If failure occurs when printing 2D3S YMCBWKW_A in Function code 71 refer to 4 3 Troubleshooting for Image Defects in this chapter a...

Страница 106: ...canning position actuator catching on some position Re assemble the first side document scanning position actuator 2 First side document scanning position sensor failure Replace the first side document scanning position sensor PCB 3 Main PCB failure Replace the main PCB ASSY Document Jam Clear the scanner jam then press the Stop Key Step Cause Remedy 1 First side document scanning position actuato...

Страница 107: ... document detection sensor PCB ASSY 3 Connection failure of the ADF cover document detection sensor PCB harness Reconnect the ADF cover document detection sensor PCB harness 4 ADF cover damaged Replace the ADF cover 5 ADF cover sensor failure Replace the ADF cover document detection sensor PCB ASSY 6 Main PCB failure Replace the main PCB ASSY Scan Unable Remove the original document Turn the power...

Страница 108: ... chapter 2 First side CIS flat cable damaged Replace the first side CIS flat cable 3 Second side CIS flat cable damaged Replace the second side CIS flat cable 4 First side CIS unit failure Replace the first side CIS unit 5 Second side CIS unit failure Replace the second side CIS unit 6 Main PCB failure Replace the main PCB ASSY Scan Unable Remove the original document Turn the power off then on ag...

Страница 109: ...st side CIS flat cable 3 First side CIS unit failure Replace the first side CIS unit 4 Main PCB failure Replace the main PCB ASSY Scan Unable AF Turn the power off and then back on again Step Cause Remedy 1 Dust adhered to guide shaft Remove the dust from the guide shaft 2 Coming off of CIS drive belt Re assemble the CIS drive belt 3 Wiring failure of first side CIS flat cable Re assemble the firs...

Страница 110: ...ged Replace the second side CIS flat cable 5 First side CIS unit failure Replace the first side CIS unit 6 Second side CIS unit failure Replace the second side CIS unit 7 Main PCB failure Replace the main PCB ASSY Scanner Error BB Step Cause Remedy 1 First side or second side CIS unit calibration data error Perform Function code 55 Refer to 1 3 19 Acquisition of white level data and setting of CIS...

Страница 111: ...cond side CIS unit failure Replace the second side CIS unit 4 Main PCB failure Replace the main PCB ASSY Scanner Error BD Step Cause Remedy 1 First side or second side CIS unit calibration data error Perform Function code 55 Refer to 1 3 19 Acquisition of white level data and setting of CIS scanning area Function code 55 in this chapter 2 First side CIS flat cable damaged Replace the first side CI...

Страница 112: ...The current time necessary for user authentication is unavailable due to time not being obtained User Check Refer to User s guide and reconfigure network settings Check the wiring of the LAN cables Check the wireless LAN settings Log Access Error Server Timeout contact your administrator Log Access Error Authentication Error contact your administrator Log Access Error File Access Error contact you...

Страница 113: ...initialization Error code D200 The machine detected that the modem PCB was disconnected Out of Memory Press Stop Key Print Data Full Print Data is full Press Stop X Key and delete the previously stored data Step Cause Remedy 1 Main PCB failure Replace the main PCB ASSY Print Unable D1 Turn the power off and then back on again Machine Error Step Cause Remedy 1 Connection failure of the modem PCB fl...

Страница 114: ...is on the touchscreen Print Unable DB Turn the power off and then back on again Step Cause Remedy 1 The version of the panel firmware and the main firmware do not match Install the latest panel firmware and main firmware 2 Connection failure of the panel PCB harness Reconnect the panel PCB harness 3 Connection failure of the touch panel flat cable Reconnect the touch panel flat cable 4 Connection ...

Страница 115: ...lash ROM on the main PCB Error code E702 Error occurred during reading from the flash ROM on the main PCB Print Unable E0 Turn the power off and then back on again Print Unable E1 Turn the power off and then back on again Step Cause Remedy 1 Main PCB failure Replace the main PCB ASSY Print Unable E4 Turn the power off and then back on again Step Cause Remedy 1 Main PCB failure Replace the main PCB...

Страница 116: ...lure of the NFC PCB flat cable Reconnect the NFC PCB flat cable 2 Connection failure of the panel PCB harness Reconnect the panel PCB harness 3 Panel PCB failure Replace the panel PCB unit 4 NFC PCB failure Replace the NFC PCB ASSY 5 Main PCB failure Replace the main PCB ASSY Unusable Device Remove the Device Turn the power off and back on again Step Cause Remedy 1 USB host relay PCB failure Repla...

Страница 117: ... the paper tray When the T2 paper tray unit is available check if the T2 paper tray unit is closed correctly Clean the T1 paper pick up roller Step Cause Remedy 1 T1 paper feed actuator coming off Re assemble the T1 paper feed actuator 2 Connection failure of the main motor harness Reconnect the main motor harness 3 T1 roller holder ASSY installation failure Install the T1 roller holder ASSY corre...

Страница 118: ...ction failure of the main motor harness Reconnect the main motor harness 3 T2 roller holder ASSY installation failure Install the T2 roller holder ASSY correctly 4 Connection failure of the T2 paper feed plate origin sensor PCB harness Reconnect the T2 paper feed plate origin sensor PCB harness 5 Connection failure of the T2 registration sensor PCB harness Reconnect the T2 registration sensor PCB ...

Страница 119: ...MP paper empty acutuator A ASSY B 2 Connection failure of the main motor harness Reconnect the main motor harness 3 MP roller holder ASSY installation failure Check the installation of the MP roller holder ASSY and install it correctly 4 Connection failure of the MP paper empty registration front sensor PCB harness Reconnect the MP paper empty registration front sensor PCB harness 5 MP paper pick ...

Страница 120: ... that no dust adheres to the fuser unit Check whether the paper type is appropriate 4 2 6 Paper is fed at an angle User Check Check if the paper is loaded into each paper tray correctly Turn back the paper loaded in each paper tray or change the orientation of the paper by 180 Adjust the paper guide corresponding to the paper size Check if the thickness of the paper is 60 to 105 g m2 60 to 163 g m...

Страница 121: ...iver setting to 2 sided printing Use the paper equal to or larger than Letter size or A4 size Use paper specified in each country setting Step Cause Remedy 1 Fuser unit failure Replace the fuser unit 2 Main PCB failure Replace the main PCB ASSY Step Cause Remedy 1 Eject actuator coming off Re assemble the eject actuator 2 Back cover failure Replace the back cover 3 Eject sensor failure Replace the...

Страница 122: ...t around paper tray 1 Remove the foreign object 2 T1 paper dust cleaning roller installation failure Re assemble the T1 paper dust cleaning roller 3 Registration front actuator coming off Re assemble the registration front actuator 4 Connection failure of the registration front rear sensor PCB harness Reconnect the registration front rear sensor PCB harness 5 Registration front sensor failure Repl...

Страница 123: ...per tray 1 Remove the foreign object 3 T1 T2 paper dust cleaning roller installation failure Re assemble the T1 T2 paper dust cleaning roller 4 Registration front actuator coming off Re assemble the registration front actuator 5 Connection failure of the registration front rear sensor PCB harness Reconnect the registration front rear sensor PCB harness 6 Connection failure of the T2 registration s...

Страница 124: ...it Step Cause Remedy 1 Foreign object around MP tray Remove the foreign object 2 MP registration front actuator coming off Re assemble the MP registration front actuator 3 Connection failure of the MP registration front sensor PCB harness Reconnect the MP registration front sensor PCB harness 4 MP paper empty registration front sensor failure Replace the MP paper empty registration front sensor PC...

Страница 125: ...oreign object 2 Eject actuator coming off Re assemble the eject actuator 3 Fuser cover installation failure Re assemble the fuser cover 4 Connection failure of the eject sensor PCB harness Reconnect the eject sensor PCB harness 5 Eject sensor failure Replace the eject sensor PCB ASSY 6 Paper eject origin sensor failure Replace the paper eject origin sensor 7 Main motor or process motor failure Rep...

Страница 126: ...2 104 Vertical streaks in a dark background 2 105 Horizontal stripes 2 105 Light vertical steaks and bands on one color image 2 106 White horizontal stripes on one color image 2 106 Faint print 2 107 White spots on one color image 2 108 One color spots or dirt 2 109 One color band 2 110 Downward fogging of solid color 2 110 Horizontal lines 2 110 Ghost 2 111 Inter color position alignment 2 111 Fo...

Страница 127: ... the toner cartridge with a new one Replace the belt unit with a new one Wipe the scanner windows of the laser unit with a soft lint free cloth Leave the machine for a while as the power remains ON Condensation Check if paper is not damp Step Cause Remedy 1 Dirt on the electrodes of the main body and the drum unit Clean the electrodes of the main body and the drum unit Refer to Fig 2 7 P2 55 Fig 2...

Страница 128: ...es of the main body and the drum unit Refer to Fig 2 7 P2 55 Fig 2 8 P2 55 2 Dirt on the electrodes of the main body and the toner cartridge Clean the electrodes of the main body and the toner cartridge Refer to Fig 2 7 P2 55 See the figure below 3 Dirt on the electrodes of the main body and the belt unit Clean the electrodes of the main body and the belt unit Refer to Fig 2 7 P2 55 Fig 2 11 P2 99...

Страница 129: ...stration User Check Check whether appropriate paper type is selected on the driver Step Cause Remedy 1 Registration rear actuator coming off Re assemble the registration rear actuator 2 Laser unit failure Replace the laser unit 3 Main PCB failure Replace the main PCB ASSY ...

Страница 130: ... power supply PCB Clean the electrodes of the high voltage power supply PCB 5 Density sensor failure Replace the registration mark sensor unit 6 Fuser unit failure Replace the fuser unit 7 High voltage power supply PCB failure Replace the high voltage power supply PCB ASSY 8 Main PCB failure Replace the main PCB ASSY 9 Laser unit failure Replace the laser unit User Check Check the machine s enviro...

Страница 131: ... 55 Fig 2 10 P2 98 3 Dirt on the electrodes of the main body and the belt unit Clean the electrodes of the main body and the belt unit Refer to Fig 2 7 P2 55 Fig 2 11 P2 99 4 Connection failure of the laser unit flat cable Reconnect the laser unit flat cable 5 Laser unit flat cable failure Replace the laser unit flat cable 6 Dirt on the electrodes of the high voltage power supply PCB Clean the ele...

Страница 132: ...of the main body and the toner cartridge Clean the electrodes of the main body and the toner cartridge Refer to Fig 2 7 P2 55 Fig 2 10 P2 98 3 Dirt on the electrodes of the main body and the belt unit Clean the electrodes of the main body and the belt unit Refer to Fig 2 7 P2 55 Fig 2 11 P2 99 4 Laser unit flat cable failure Replace the laser unit flat cable 5 High voltage power supply PCB failure...

Страница 133: ...electrodes of the main body and the belt unit Clean the electrodes of the main body and the belt unit Refer to Fig 2 7 P2 55 Fig 2 11 P2 99 3 Dirt on the electrodes of the main body and the waste toner box Clean the electrodes of the main body and the waste toner box Refer to Fig 2 7 P2 55 See the figure below 4 Dirt on the cleaner pinch roller of the fuser cover Replace the cleaner pinch roller S...

Страница 134: ... with a soft lint free cloth Step Cause Remedy 1 Dirt in the paper feed system Wipe dirt off 2 Installation failure of each FG wire and or FG plate Grounding is not performed correctly Retighten the screws of each FG wire and or FG plate Repair the bend of the tray ground spring of the paper tray See the figure below 3 Dirt on the exposure drum Perform drum cleaning Refer to 2 2 Drum Cleaning in C...

Страница 135: ...3 Laser unit failure Replace the laser unit User Check Clean the corona wire of all four colors on the drum unit This symptom might stop occurring after making several prints Refer to the User s guide and remove the dirt on the exposure drum using a cotton swab Replace the drum unit with a new one Replace the toner cartridge with a new one Step Cause Remedy 1 Dirt on charged electrode Clean the el...

Страница 136: ...might stop occurring after making several prints Replace the drum unit with a new one Replace the toner cartridge with a new one Step Cause Remedy 1 Dirt on charged electrode Clean the electrodes of the drum unit and the main body Refer to Fig 2 8 P2 55 Fig 2 7 P2 55 2 Dirt on the exposure drum Perform drum cleaning Refer to 2 2 Drum Cleaning in Chapter 5 3 Laser unit failure Replace the laser uni...

Страница 137: ... the scanner windows of the laser unit with a soft lint free cloth Replace the drum unit with a new one Replace the toner cartridge with a new one Step Cause Remedy 1 Laser unit failure Replace the laser unit 2 Fuser unit failure Replace the fuser unit 3 Main PCB failure Replace the main PCB ASSY ...

Страница 138: ... Fig 2 14 Step Cause Remedy 1 Paper dust is accumulated Referring to the figure below remove paper dust attached on the paper dust cleaning roller 2 Dirt on the exposure drum Perform drum cleaning Refer to 2 2 Drum Cleaning in Chapter 5 3 Toner filter is clogged Clean the toner filter 4 Scratch and dirt on fuser unit Replace the fuser unit 5 High voltage power supply PCB failure Replace the high v...

Страница 139: ...sure drum Perform drum cleaning Refer to 2 2 Drum Cleaning in Chapter 5 3 Toner filter is clogged Clean the toner filter 4 Scratch and dirt on fuser unit Replace the fuser unit 5 High voltage power supply PCB failure Replace the high voltage power supply PCB ASSY Note Image defects which occur periodically may be caused by a failure of the rollers Use the diameters of the rollers or the pitches wh...

Страница 140: ...Perform drum cleaning Refer to 2 2 Drum Cleaning in Chapter 5 3 Laser unit failure Replace the laser unit User Check Replace the toner cartridge with a new one Step Cause Remedy 1 High voltage power supply PCB failure Replace the high voltage power supply PCB ASSY 2 Main PCB failure Replace the main PCB ASSY User Check This symptom might stop occurring after making several prints Refer to the User...

Страница 141: ...eplace the drum unit with a new one Replace the waste toner box with a new one Step Cause Remedy 1 Registration mark sensor L or registration mark sensor R failure Replace the registration mark sensor unit 2 Main PCB failure Replace the main PCB ASSY User Check Check the machine s environment High temperature and high humidity or low temperature and low humidity conditions can cause this problem C...

Страница 142: ...y and the belt unit Refer to Fig 2 7 P2 55 Fig 2 11 P2 99 4 High voltage power supply PCB failure Replace the high voltage power supply PCB ASSY 5 Laser unit failure Replace the laser unit 6 Main PCB failure Replace the main PCB ASSY User Check Check the machine s environment High temperature and high humidity or low temperature and low humidity conditions can cause this problem Refer to the User ...

Страница 143: ... the paper is properly set in the driver Print with the envelope lever is lowered Refer to the figure below Step Cause Remedy 1 Fuser unit failure Replace the fuser unit User Check Check the machine s environment High temperature and high humidity or low temperature and low humidity conditions can cause this problem Print with the envelope lever is lowered See the figure above Step Cause Remedy 1 ...

Страница 144: ...ns on the software setting in the User s guide Check the driver setting Restore the settings at factory shipment Refer to User s guide Follow the procedures below to verify the product ID in Macintosh 1 Select About This Mac from the Apple menu 2 Click the More Info button in the About This Mac dialog box 3 Select USB under the Hardware in Contents on the left side 4 Select the machine DCP XXXX or...

Страница 145: ...etwork User s guide Check the network connection Perform network reset Refer to User s guide Check the LAN cable Step Cause Remedy 1 Connection failure of the wireless LAN PCB harness Reconnect the wireless LAN PCB harness 2 Wireless LAN PCB failure Replace the wireless LAN PCB ASSY 3 LAN terminal pin deformation Main PCB failure Replace the main PCB ASSY ...

Страница 146: ...3 Connection failure of the panel PCB harness Reconnect the panel PCB harness 4 Connection failure of the LCD flat cable Reconnect the LCD flat cable 5 Connection failure of the low voltage power supply PCB harness Reconnect the low voltage power supply PCB harness 6 AC cord failure Replace the AC cord 7 Panel PCB failure Replace the panel PCB unit 8 LCD failure Replace the LCD 9 Key PCB failure R...

Страница 147: ...he key PCB flat cable Reconnect the key PCB flat cable 4 Connection failure of the panel PCB harness Reconnect the panel PCB harness 5 Connection failure of the touch panel flat cable Reconnect the touch panel flat cable 6 Connection failure of the low voltage power supply PCB harness Reconnect the low voltage power supply PCB harness 7 Panel PCB failure Replace the panel PCB unit 8 LCD failure Re...

Страница 148: ... on the LCD in this order 5 Press the 0 0 8 and 4 keys on the LCD in this order 6 Press the or key to display FUNC_DISABLE on the LCD 7 Press the SET key The function selection at startup is disabled 8 Press the 9 key twice to return the machine to the ready state 1 Pull out the power cord and insert it again 2 Hold down the Home key for about 5 seconds while the machine is in the ready state The ...

Страница 149: ... Cause Remedy 1 New toner actuator coming off Re assemble the new toner actuator 2 Connection failure of the new toner sensor PCB harness Reconnect the toner new sensor PCB harness 3 Main PCB failure Replace the main PCB ASSY Step Cause Remedy 1 High voltage power supply PCB failure Replace the high voltage power supply PCB ASSY 2 New toner sensor PCB failure Replace the toner new sensor PCB ASSY ...

Страница 150: ...e GRID terminals or CHG terminals of the main body and the drum unit Clean the GRID terminals and CHG terminals of the main body and the drum unit 2 Dirt on the terminal of the high voltage power supply PCB Clean the terminal of the high voltage power supply PCB 3 High voltage power supply PCB failure Replace the high voltage power supply PCB ASSY 4 Toner sensor failure Replace the toner new senso...

Страница 151: ...voltage power supply PCB failure Replace the low voltage power supply PCB unit 7 Fuser unit failure Replace the fuser unit 8 Main PCB failure Replace the main PCB ASSY Note Turn the power OFF and then ON again After the machine is left as it is for about 10 minutes this problem may be resolved If test print is performed in maintenance mode for service personnel the machine may recover from the err...

Страница 152: ...ull memory User Check Print the stored data Reduce the amount of data or lower the resolution 4 10 3 Problem of print restriction ID authentication User Check Check if PC print is not prohibited Check the print restricted ID Step Cause Remedy 1 Main PCB failure Replace the main PCB ASSY Step Cause Remedy 1 Main PCB failure Replace the main PCB ASSY Step Cause Remedy 1 ID is forgotten Execute Funct...

Страница 153: ...le the document detection actuator 2 Coming off of ADF cover actuator Re assemble the ADF cover actuator 3 Connection failure of the ADF motor harness Reconnect the ADF motor harness 4 Connection failure of the ADF cover document detection sensor PCB harness Reconnect the ADF cover document detection sensor PCB harness 5 Document separate roller failure Replace the document separate roller ASSY 6 ...

Страница 154: ...ocument scanning position actuator 3 Connection failure of the second side document scanning position sensor PCB harness Reconnect the second side document scanning position sensor PCB harness 4 Coming off of document pinch roller Re assemble the document pinch roller 5 Second side CIS glass installation failure Re assemble the second side CIS glass 6 Second side document hold installation failure...

Страница 155: ...document scanning position sensor PCB harness Reconnect the first side document scanning position sensor PCB harness 4 Coming off of document pinch roller Re assemble the document pinch roller 5 First side document hold installation failure Re assemble the first side document hold 6 Scratch on ADF cover Replace the ADF cover 7 Document feed roller worn out Replace the document feed roller ASSY2 8 ...

Страница 156: ...e assemble the first side document scanning position actuator 3 Coming off of exit pinch roller Re assemble the exit pinch roller 4 First side document scanning position sensor failure Replace the first side document scanning position sensor PCB ASSY 5 ADF drive gear damaged Replace the ADF unit 6 Scratch on document scanner unit Replace the document scanner unit 7 Main PCB failure Replace the mai...

Страница 157: ... 2 129 White vertical streaks 2 130 User Check Check whether the setting of the contrast does not become light Clean the document glass or first side CIS glass Clean the first side CIS glass of the ADF Step Cause Remedy 1 White level calibration data failure Perform the acquisition of white level data Function code 55 2 First side or second side CIS unit failure Replace the first side or second si...

Страница 158: ...ent scanning position actuator caught on some position Re assemble the second side document scanning position actuator 3 Second side CIS unit failure Replace the second side CIS unit 4 Main PCB failure Replace the main PCB ASSY User Check Check whether the setting of the contrast does not become dark Clean the second side document hold Step Cause Remedy 1 White level calibration data failure Perfo...

Страница 159: ... glass or document glass Clean the second side CIS glass Clean the document hold Step Cause Remedy 1 Foreign object inside the document scanner unit Remove the foreign object 2 Foreign object inside the second side CIS glass Remove the foreign object 3 Dirt on each roller of the ADF Clean each roller of the ADF 4 Dirt on the ADF paper feed section Clean the ADF paper feed section 5 Dirt inside the...

Страница 160: ... each roller of the ADF Clean each roller of the ADF 4 Dirt on the ADF paper feed section Clean the ADF paper feed section 5 Dirt inside the second side CIS glass Clean inside the second side CIS glass 6 Dirt inside the document scanner unit Clean inside the document scanner unit 7 First side or second side CIS unit failure Replace the first side or second side CIS unit 8 Scratch on second side CI...

Страница 161: ...ent detection sensor PCB harness 5 Coming off of document detection actuator Re assemble the document detection actuator 6 Coming off of ADF cover actuator Re assemble the ADF cover actuator 7 Disconnection of line cord Replace the line cord 8 ADF cover document detection sensor failure Replace the ADF cover document detection sensor PCB ASSY 9 ADF motor failure Replace the ADF motor 10 First side...

Страница 162: ...cable 2 Disconnection of line cord Replace the line cord 3 Modem PCB failure Replace the modem PCB ASSY 4 Main PCB failure Replace the main PCB ASSY Step Cause Remedy 1 Connection failure of the speaker harness Reconnect the speaker harness 2 Connection failure of the modem PCB flat cable Reconnect the modem PCB flat cable 3 Disconnection of line cord Replace the line cord 4 Modem PCB failure Repl...

Страница 163: ...USB direct interface User Check Replace the USB flash memory Check if the extension of the data in the USB flash memory is correct Step Cause Remedy 1 Main PCB failure Replace the main PCB ASSY Step Cause Remedy 1 Forgot the print restricted ID Clear the old ID and get a new ID by Function code 01 2 Connection failure of the wireless LAN harness ASSY Reconnect the wireless LAN harness ASSY 3 Wirel...

Страница 164: ...e is available only for the model with touch panel 2 Main PCB failure Replace the main PCB ASSY Step Cause Remedy 1 Connection failure of the panel PCB harness Reconnect the panel PCB harness 2 Connection failure of the LCD flat cable Reconnect the LCD flat cable 3 Connection failure of the low voltage power supply PCB harness Reconnect the low voltage power supply PCB harness 4 Disconnection of A...

Страница 165: ...flat cables or on the wire harness After disconnecting flat cables check that each cable is not damaged at its end or short circuited When connecting flat cables do not insert them at an angle After insertion check that the cables are not at an angle When connecting or disconnecting harnesses hold the connector body not the cables If the connector is locked release it first After a repair check no...

Страница 166: ...per R Develop spacer R Develop spacer L Machine Machine Set guide Accessory bag Set guide Accessory bag AC cord AC cord A4 model Option carton Option carton Polystyrene pad ASSY Polystyrene pad ASSY Polystyrene pad ASSY Polystyrene pad ASSY Polystyrene pad ASSY Polystyrene pad ASSY Carton Brother Remove sheet ASSY Legal model ...

Страница 167: ...ite pan washer Taptite pan B M4x14 Taptite cup S Taptite cup S M3x6 SR Taptite pan washer B M4x12 DA Taptite flat B Screw pan S P washer M3 5x6 Taptite flat B M3x10 Taptite bind B M4x10 Taptite cup B M3x12 Taptite cup S M3x8 SR Taptite cup S M3x10 SR Taptite B M3x6 Taptite cup S M3x12 Screw pan S P washer M3x6 Screw bind Screw bind M3x8 Screw bind M3x6 Taptite cup B M4x12 Taptite pan B M3x10 ...

Страница 168: ...harness Screw bind M3x8 1 0 5 0 05 5 0 5 Document scanner FG harness Screw bind M3x8 1 0 5 0 05 5 0 5 ADF unit Taptite bind B M4x12 2 0 8 0 1 8 1 Hinge ASSY L Taptite cup S M3x12 3 0 8 0 1 8 1 Hinge R support Taptite cup B M3x10 1 0 5 0 05 5 0 5 Document scanner unit Taptite bind B M4x12 4 0 7 0 1 7 1 Taptite cup B M4x12 2 0 7 0 1 7 1 Upper ADF chute Taptite cup B M3x10 1 0 5 0 05 5 0 5 ADF unit T...

Страница 169: ...SR 1 0 8 0 1 8 1 Under bar ground spring Taptite cup S M3x8 SR 1 0 8 0 1 8 1 Process drive unit Taptite bind B M4x12 5 0 8 0 1 8 1 Taptite pan washer B M4x12 DA 1 0 8 0 1 8 1 Screw pan S P washer M3 5x6 1 0 5 0 05 5 0 5 Main drive unit Taptite bind B M4x12 4 0 8 0 1 8 1 Develop release drive unit Taptite bind B M4x12 3 0 8 0 1 8 1 Paper eject ASSY Taptite bind B M4x12 4 0 8 0 1 8 1 Registration ma...

Страница 170: ...er left Taptite cup S M3x6 SR 2 0 8 0 1 8 1 T2 cover right Taptite cup S M3x6 SR 2 0 8 0 1 8 1 T2 relay PCB ASSY Taptite cup S M3x6 SR 1 0 8 0 1 8 1 T2 beam F ASSY Taptite cup S M3x6 SR 5 0 8 0 1 8 1 T2 solenoid holder ASSY Taptite cup S M3x6 SR 1 0 8 0 1 8 1 T2 beam front Taptite cup S M3x6 SR 2 0 8 0 1 8 1 T2 beam rear Taptite cup S M3x6 SR 4 0 8 0 1 8 1 T2 frame L unit Taptite bind B M4x10 1 0 ...

Страница 171: ...oint Quantity of lubrication PG661 W TORAY Joint cover base ASSY 1 0 to 1 5 mm dia ball BDX 313 A Kanto Kasei Hinge ASSY L 2 0 mm dia ball Hinge R thin rib 2 0 mm dia ball Hinge R thick rib 3 0 mm dia ball Back cover 2 0 mm dia ball PG1 0 to 1 5 BDX2 0 BDX2 0 BDX3 0 BDX2 0 PG1 0 WR 1 5 Joint cover base ASSY Joint cover base ASSY BDX2 0 BDX2 0 Hinge ASSY L ADF unit ...

Страница 172: ... 8 Confidential thin rib BDX2 0 BDX 313 A 2 0 mm dia ball thick rib BDX3 0 BDX 313 A 3 0 mm dia ball BDX2 0 BDX 313 A 2 0 mm dia ball BDX2 0 BDX2 0 BDX3 0 BDX3 0 Hinge R ADF unit BDX2 0 BDX2 0 Back cover ...

Страница 173: ...SSY Layout view Development view Name of gears These parts are subject to change without notice 1 LY0299 Pinch roller drive gear Z21M05 2 LY1816 Registration gear Z26 23 3 LY0164 PF drive gear 21 4 LY0166 PP gear 14 55 5 LY6128 Cleaner drive gear Z30 6 LY1817 DX drive gear Z15 23 1 1 2 2 3 3 4 4 5 5 6 6 1 2 3 4 5 6 ...

Страница 174: ...colors may be changed for any reason 1 Laser Unit Hook Hook A A A view Front A view Main PCB ASSY Hook Front Hole Wireless LAN cable rack Laser unit flat cable Laser unit Wireless LAN cable rack Main PCB ASSY CN7 CN8 Polygon motor harness WH Core ...

Страница 175: ...nit Main motor Process motor Registration T1 solenoid harness BK Front cover sensor Front cover flat cable Hook CN45 CN30 solenoid Main harness ASSY Develop clutch harness BK Hook ASSY flat cable harness BK LT drawer sensor harness RD WH Hook Hook Hook Hook CN21 CN10 Develop release Toner new sensor Develop release drive unit Develop release clutch harness BL CN2 Main PCB ASSY Wireless Toner new s...

Страница 176: ...eject ASSY Paper eject ASSY Paper eject origin sensor A B C Switch back solenoid Paper eject Switch back Paper eject origin High voltage main solenoid A C D CN1 CN2 High voltage power sensor harness WH B Hook D D C A Front Front Main PCB ASSY solenoid origin sensor supply PCB ASSY harness ASSY WH Hole WH Hook Hook Hook Main frame L ASSY Main frame L ASSY harness ...

Страница 177: ... Unit Front Front A B Hook Hole Hook CN3 A view A view Main frame L ASSY Back cover sensor harness Back cover sensor ASSY Main PCB BL Hole C ASSY B view B view Front A B Hook D Hook Hook Paper eject ASSY Joint cover base ASSY Hole C Hook D Hook Front A view A view Main PCB ASSY Eject sensor PCB ASSY Main frame L ASSY Eject sensor harness ASSY RD WH BL A Hole Front A Hole Fuser unit CN1 CN2 Hook Gu...

Страница 178: ... A view A CN43 CN44 A Main PCB ASSY Hook Hole Hole Main frame L ASSY Registration mark sensor unit Registration mark sensor L PCB harness Registration mark sensor R PCB harness RD WH BL GY Front Hook CN5 CN4 High voltage power supply PCB ASSY Main frame R ASSY Fuser fan Power fan Hook Fuser fan harness RD WH BK Power fan harness RD BK ...

Страница 179: ...t A view B view A view B view Front Front CN40 A A Hook Hook Hook Hook Hole Hook Hook Hook Hook Main Core Fuser unit Guide Guide LVPS main harness ASSY FG harness of the Inlet harness ASSY Inlet harness ASSY Inlet harness ASSY Low voltage power supply PCB unit PCB ASSY Core LVPS heater harness ASSY Hook ...

Страница 180: ... Front Hook Hook Hook MP upper cover ASSY MP upper cover ASSY MP paper empty registration front MP paper empty registration front sensor PCB ASSY PF cable rack Registration pinch roller gear bushing Registration pinch roller gear bushing Main PCB ASSY CN14 MP sensor harness ASSY RD WH BL YL Hole Hook sensor PCB ASSY Hook ...

Страница 181: ...er feed unit Main drive unit Main PCB ASSY T1 paper feed sensor PCB ASSY T1 paper feed sensor PCB ASSY Registration front rear sensor PCB ASSY Registration front rear sensor PCB ASSY MP solenoid MP solenoid Hook PF cable rack T1 paper feed sensor harness ASSY WH Registration front rear sensor harness ASSY MP solenoid RD WH BL YL harness BK Hook Hook ...

Страница 182: ...ntial Harness colors may be changed for any reason 12 Blower Waste Toner Sensor Front Hook Hook High voltage power supply Blower harness CN6 Blower RD WH BL Hook Hook CN7 Waste toner sensor harness ASSY YL PCB ASSY ...

Страница 183: ...t ADF unit Hole Second side CIS flat cable Hole Drive frame Document cover ASSY Hole CN41 Hole Harness of the ADF unit Core ADF unit ASSY Document cover ASSY Hook Hook Hook Drive frame ASSY Upper ADF chute First side CIS flat cable ADF earth harness First side document scanning position sensor PCB ASSY ADF motor harness Second side document scanning position sensor PCB ASSY ADF cover document dete...

Страница 184: ...anner unit Joint cover top Joint cover top Flat core Hole Second side CIS flat cable Hole Harness of the ADF unit Upper ADF chute ASSY ASSY Core Front Document cover ASSY Hook Hook Hook Drive frame ASSY ADF earth harness First side document scanning position sensor PCB ASSY ADF motor harness Second side document scanning position sensor PCB ASSY ADF cover document detection sensor PCB ASSY Hole AD...

Страница 185: ...nt Hook Hook Hole CN32 First side CIS flat cable Joint cover top Joint cover top Flat core Document scanner FG harness BR Hook Document scanner motor harness scanner unit First side CIS flat cable Document scanner unit Double sided adhesive tape First side CIS unit Double sided adhesive tape Double sided adhesive tape Second side CIS flat cable A A Front Screw bind M3x8 ...

Страница 186: ...k Hook Hook Document scanner unit Joint cover top First side CIS flat cable Flat core Document FG harness scanner Joint cover top BR Document scanner unit Double sided adhesive tape Double sided adhesive tape Document scanner unit First side CIS flat cable Document scanner motor harness Double sided adhesive tape First side CIS unit Front A A Screw bind M3x8 ...

Страница 187: ...unit Hook Panel PCB harness CN27 Main PCB ASSY Main shield cover plate ASSY Front Control panel ASSY Core Panel FG harness BK Panel USB harness CN20 Screw bind M3x8 Hook Main PCB ASSY Panel PCB harness CN27 Front Main shield cover plate ASSY Control panel ASSY Document scanner unit Core Panel FG harness BK Panel USB harness CN20 Screw bind M3x8 ...

Страница 188: ...Modem shield cover CN28 Hole Modem ground Hole YL harness GR Flat core Front Screw pan S P washer M3 5x6 Screw pan S P washer M3 5x6 Hook Hook Hole Modem shield cover Hook Hook Hook Hole Front GR Hole Hole CN28 Modem flat cable Modem ground harness GR Modem FG Back cover upper Main PCB ASSY Modem flat cable Back cover upper Modem ground harness harness BK A A view view Hook Flat core Flat core Fro...

Страница 189: ...eless LAN PCB Front Hook Hook Hole Hole Hook CN11 Main PCB ASSY Joint cover top Joint cover USB ASSY Joint cover USB ASSY Main USB host harness ASSY Main USB host harness ASSY Core Wireless LAN PCB Main body Front Hook Hook Hook CN9 Main Wireless LAN harness ASSY Main PCB ASSY Core ...

Страница 190: ... Hinge R Support 9 40 Joint Film2 Single side Scanning Model 9 41 Joint Cover Top 9 42 Modem PCB ASSY Modem Flat Cable 9 43 Back cover upper 9 44 Joint Cover USB ASSY 9 45 Wireless LAN PCB 9 37 NFC PCB ASSY Model with NFC Only Panel Cover ASSY 9 36 Touch Panel ASSY 9 35 LCD 9 34 Panel PCB Unit 9 33 Control Panel ASSY Document Scanner Unit 9 38 First Side CIS Unit First Side CIS Flat Cable 9 48 Fro...

Страница 191: ...ject Film 9 31 ADF Motor 9 32 Document Cover ASSY 9 46 Main PCB ASSY 9 49 Process Drive Unit Fuser Drive Gear Z25 9 55 Paper Eject ASSY 9 57 Paper Eject Origin Sensor 9 58 Back Cover Sensor ASSY 9 51 Develop Release Drive Unit 9 52 Develop Release Sensor PCB ASSY 9 53 Toner New Sensor PCB ASSY 9 50 Main Drive Unit 9 63 MP Paper Empty Actuator A ASSY MP Paper Empty Actuator B 9 65 Paper Feed Unit J...

Страница 192: ...Paper tray the Toner cartridge the Drum unit the Belt unit the Waste toner box EXT cap and LAN port cap Note Backup of machine information Before starting disassembly work back up the machine information and user setting information Refer to 1 3 13 Backup of machine information Function code 41 in Chapter 5 After replacing the PCB restore the backup data to a new PCB LAN port cap Toner cartridge D...

Страница 193: ...e Hook and remove the Lift gear 46 from the Plate up plate Fig 3 1 2 Remove the Gear Z24M10Z14M75 from the Paper tray 1 3 Remove the Gear Z19M10 from the Paper tray 1 Fig 3 2 Plate up plate Hook Lift gear 46 1a 1b Plate Paper tray 1 Gear Z24M10Z14M75 Paper tray 1 Gear Z19M10 2 3 ...

Страница 194: ...ack Cover Stopper Arm R 1 Open the Back cover Fig 3 3 2 Remove the Back cover stopper arm L R from the Main body Fig 3 4 Back cover Main body Back side Back cover stopper arm L Main body Back cover stopper arm R Back cover stopper arm L Pin Back cover Back side ...

Страница 195: ...dential 3 Remove the Shaft of the Back cover from the Bush on the right side of the Main body Fig 3 5 4 Remove the Back cover Fig 3 6 Back cover Bush Main body Shaft Back side Back cover Main body 4a 4b Back side ...

Страница 196: ...he Back cover stopper arm L from the Back cover 6 Remove the Back cover stopper arm R from the Back cover Fig 3 7 Back cover stopper arm R Back cover Back cover stopper arm R Center 5a 5b 6b 6a Back cover Back cover stopper arm L ...

Страница 197: ...lder from the Main body Fig 3 8 2 Remove the two Taptite bind B M4x12 screws from the Fuser cover L 3 Release the one Hook and one Pin and remove the Fuser cover L from the Main body Fig 3 9 Back flapper holder Pin Main body Pin Back side Taptite bind B Fuser cover L Hook Pin Main body M4x12 Taptite bind B M4x12 Back side ...

Страница 198: ...L R to open the Fuser cover ASSY Fig 3 10 5 Slide the Fuser cover ASSY in the direction of the arrow 5a and remove it to the front Fig 3 11 Fuser cover lock lever R Fuser cover ASSY Main body Back side Fuser cover lock lever L Fuser cover ASSY 5a Main body 5b Back side ...

Страница 199: ...g 3 12 2 Remove the Cleaner roller spring from the two Pins of the Fuser cover ASSY Remove the Cleaner pinch roller S ASSY and Cleaner roller spring from the Fuser cover ASSY Fig 3 13 Hook Cleaner pinch roller S ASSY Cleaner roller spring Fuser cover ASSY Cleaner roller spring Pin Cleaner pinch roller S ASSY Fuser cover ASSY ...

Страница 200: ...fidential 3 Remove the Cleaner pinch roller S ASSY from the Cleaner roller spring Fig 3 14 4 Remove the other three Cleaner pinch roller S ASSYs in the same way Cleaner pinch roller S ASSY Cleaner roller spring ...

Страница 201: ...nect the two Connectors CN1 and CN2 from the Eject sensor PCB ASSY Fig 3 16 Assembling Note Center thermistor has a black and blue connectors 230V models only The black connector may be connected to the blue insertion port and vice versa Taptite bind B M4x12 Fuser cover R Hook Main body Back side Connector CN1 CN2 Connector CN1 CN2 Back side Eject sensor PCB ASSY Center thermistor harness ...

Страница 202: ... of the Fuser unit Fig 3 17 5 Remove the two Taptite pan B M4x14 screws to remove the Fuser unit from the Main body Fig 3 18 Fuser unit Electrode terminal of the Main body Electrode terminal Main body of the Back side Fuser unit Taptite pan B M4x14 Fuser unit Main body Taptite pan B M4x14 Back side ...

Страница 203: ...s routing Refer to Eject Sensor PCB ASSY Fuser Unit Note Do not apply a physical impact or vibration to the Fuser unit Do not touch the roller and electrodes as shown in the figure below to prevent breakage of the Fuser unit Fuser unit ...

Страница 204: ... Confidential 9 6 Cord Hook 1 Rotate the Cord hook in the direction of the arrow 1a and remove it from the Main body Fig 3 20 2 Remove the other Cord hook in the same way Main body Cord hook Cord hook 1a 1b ...

Страница 205: ...aptite B 3x6 screw and the one Taptite bind B M4x12 screw from the front of the Side cover L 3 Remove the Taptite bind B M4x12 screw from the side of the Side cover L Fig 3 22 Main body Front cover Front side Taptite B 3x6 Taptite bind B M4x12 Taptite bind B M4x12 Main body Side cover L ...

Страница 206: ...3 42 Confidential 4 Remove the two Taptite bind B M4x12 screws from the back of the Side cover L Fig 3 23 Back side Side cover L Taptite bind B M4x12 ...

Страница 207: ...row 5a and release the other Hooks and remove Side cover L from the Main body Fig 3 24 Inside of Side cover L Fig 3 25 Front side Hook 1 Hook 2 Hook 3 Hook 4 Hook 5 Hook 6 Hook 7 Hook 8 5a 5b Hook Main body Hook Hook Hook Side cover L Front side Back side Hook Hook Hook Hook Hook Hook Hook Hook Hook Hook Hook Side cover L ...

Страница 208: ...the arrow 5a and release the other Hooks and remove Side cover L from the Main body Fig 3 26 Inside of Side cover L Fig 3 27 Front side Hook Hook 8 Hook 7 Hook 6 Hook 5 Hook 4 Hook 3 Hook 2 Hook 1 Hook Hook Main body Side cover L 5a 5b Front side Back side Hook Hook Hook Hook Hook Hook Hook Hook Hook Hook Side cover L ...

Страница 209: ...and the one Taptite bind B M4x12 screw from the front of the Side cover R Fig 3 28 2 Remove the two Taptite bind B M4x12 screws from the back of the Side cover R Fig 3 29 Front side Taptite bind B M4x12 Taptite B 3x6 Side cover R Back side Taptite bind B M4x12 Side cover R ...

Страница 210: ...the arrow 3a and release the other Hooks and remove Side cover R from the Main body Fig 3 30 Inside of Side cover R Fig 3 31 Front side Hook 1 Hook 2 Hook 3 Hook 4 Hook 5 Hook 6 Hook 7 3a 3b Main body Side cover R Hook Hook Hook Hook Hook Hook Hook Hook Hook Hook Hook Hook Hook Hook Side cover R Front side Back side ...

Страница 211: ...on of the arrow 3a and release the other Hooks and remove Side cover R from the Main body Fig 3 32 Inside of Side cover R Fig 3 33 Front side Hook Hook Hook 1 Hook 2 Hook 3 Hook 4 Hook 5 Hook 6 Hook 7 Hook 3a 3b Side cover R Main body Hook Hook Hook Hook Hook Hook Hook Hook Hook Side cover R Front side Back side ...

Страница 212: ...3 48 Confidential Fig 3 34 Note As the Spacer tends to come off be careful not to lose it Right side Right side Spacer Spacer Spacer High voltage power Spacer supply PCB ASSY ...

Страница 213: ... 49 Confidential 9 9 Duplex Tray 1 Remove the two Taptite cup B M3x12 screws and remove the Duplex tray from the Main body Fig 3 35 Taptite cup B M3x12 Main body Taptite cup B M3x12 Back side Duplex tray ...

Страница 214: ... Front cover 2 Open the MP cover ASSY Fig 3 36 3 Release the Pin of the MP link L from the MP cover ASSY 4 Release the Pin of the MP link R from the MP cover ASSY Fig 3 37 MP cover ASSY Front cover Pin MP cover ASSY MP link R MP link L MP link L MP link R MP cover ASSY ...

Страница 215: ...e MP link R from the MP paper guide ASSY Fig 3 38 7 Slide the MP paper guide ASSY in the direction of the arrow 7b and remove it from MP cover ASSY Fig 3 39 Pin MP link L MP link R MP paper guide ASSY MP link L MP link R MP paper guide ASSY MP paper guide ASSY MP cover ASSY Pin Pin Pin 7a 7b MP cover ASSY ...

Страница 216: ...3 52 Confidential 8 Release the two Pins and remove the MP cover ASSY from the Front cover Fig 3 40 MP cover ASSY Pin Front cover Pin ...

Страница 217: ...3 53 Confidential 9 11 MP Link L MP Link R 1 Remove the MP link L from the Front cover 2 Remove the MP link R from the Front cover Fig 3 41 MP link L MP link R MP link L 1b 1a 2b 2a Front cover ...

Страница 218: ...r damper spring from the Front cover Fig 3 42 3 Open the Front cover 4 Release the Hook and remove the Forced develop release link from the Front cover Fig 3 43 Front cover Front side 1 2 Front cover damper spring Taptite B 3x6 Spring hook Spring hook Front cover damper spring Main frame R ASSY Front cover Hook Forced develop release link Forced develop release link Front cover ...

Страница 219: ...3 55 Confidential 5 Release the three Bosses and remove the Front cover from the Main body Fig 3 44 Boss Front cover Main body Boss 5a 5b 5c ...

Страница 220: ...ss Fig 3 45 2 Tilt the Front cover release button in the direction of the arrow 2a and remove it from the Front cover Fig 3 46 Assembling Note Align the Hole of the Front cover release button to the Boss of the Front cover and insert it into the Hole Hook Front cover release button Hole 1b 1c 1a 1c Boss Boss Boss Front cover Front cover release button Front cover release button 2a 2b Front cover ...

Страница 221: ...Fig 3 48 Assembling Note When assembling the Front cover release button spring attach A of the Front cover release button spring to the cutout of the Front cover release button Front cover Boss Front cover release button spring A Cutout Front cover release button Front cover release button spring ...

Страница 222: ...Document scanner unit Fig 3 49 2 Release the two Pins and remove the Support flap from the Main body Fig 3 50 Memo Follow the procedure 2 only in the case of the Legal model Main body Document scanner unit Pin Pin Support flap Support flap Main body ...

Страница 223: ... Document scanner unit Fig 3 51 2 Remove the Pull arm L and Pull arm spring from the Pull arm guide 3 Remove the Pull arm R and Pull arm spring from the Pull arm guide Fig 3 52 Document scanner unit Hook Pull arm L Pull arm R Hook Hook Pull arm L Pull arm guide Pull arm spring Pull arm spring Pull arm guide Pull arm R Rib Rib Rib Main body ...

Страница 224: ...odel Only 1 Remove the two Taptite bind B M4x12 screws from the Back cover upper 2 Release the four Hooks and remove the Back cover upper from the Main body Fig 3 53 Taptite bind B M4x12 Back cover upper Hook Hook Hook Taptite bind B M4x12 Main body ...

Страница 225: ...bind M3x8 screws and remove the Main shield cover plate ASSY from the Main body Fig 3 54 Note Note that the tightening torque is different between the upper side and lower side of the Screw bind M3x8 Upper side 0 5 0 05 N m Lower side 0 8 0 1 N m Main body Main shield cover plate ASSY Panel FG harness Left side Upper side Lower side Lower side Screw bind M3x8 Screw bind M3x8 Screw bind M3x8 Screw ...

Страница 226: ... 5 Disconnect the four Connectors CN20 CN27 CN32 and CN33 and two Flat cables CN37 and CN38 from the Main PCB ASSY Fig 3 56 Screw bind M3x8 CN39 CN41 Main PCB ASSY Main PCB plate Main PCB insulation sheet Back side Document scanner FG harness ADF earth harness Screw bind M3x8 Main PCB ASSY CN3 CN4 CN7 CN13 CN16 CN20 CN27 CN28 CN32 CN33 CN37 CN38 CN41 CN39 CN42 CN43 CN44 CN46 CN47 CN40 CN45 CN30 CN...

Страница 227: ...e Fig 3 57 7 Release all the wiring passes through the Hole of the Joint cover top 8 Change the angle of the Document scanner unit as shown in the figure to remove it from the Main body Fig 3 58 Document scanner unit Flat core Flat core First side CIS flat cable Second side CIS flat cable Document scanner unit Hole Joint cover top Flat cable ...

Страница 228: ...ble holder from the Document scanner unit 12 Pull out the Harness of the ADF unit from the Hole of the Document scanner unit 13 Remove the ADF unit from the Document scanner unit Fig 3 60 Taptite bind B M4x12 Document scanner unit ADF unit Hole ADF unit Hook Document scanner unit Flat cable holder Harness of the Flat cable Flat cable holder 12 11 Hook ADF unit ...

Страница 229: ...not insert them at an angle After insertion check that the cables are not at an angle 45 80 1 mm 200 2 mm 9 1 mm 45 8 mm To be connected to Main PCB To be connected to Supporting tape Fold the flat cable at the edge Surface of the Supporting plate Surface of the Supporting plate Back side Terminal surface Back side Terminal surface Fold down Fold back of the Supporting plate Second side CIS flat c...

Страница 230: ...e cup B M3x10 screw and remove the Hinge R and Hinge R support from the ADF unit Fig 3 63 Harness routing Refer to ADF A4 model Document Scanner Unit A4 model Control Panel ASSY A4 model Taptite cup B M3x10 Hinge R ADF unit Hinge R support ...

Страница 231: ...ove the Main shield cover plate ASSY from the Main body Fig 3 64 Note Note that the tightening torque is different between the upper side and lower side of the Screw bind M3x8 Upper side 0 5 0 05 N m Lower side 0 8 0 1 N m Main body Main shield cover plate ASSY Panel FG harness Left side Lower side Lower side Upper side Screw bind M3x8 Screw bind M3x8 Screw bind M3x8 Screw bind M3x8 ...

Страница 232: ... 3 65 5 Disconnect the four Connectors CN20 CN27 CN32 and CN33 and two Flat cables CN37 and CN38 from the Main PCB ASSY Fig 3 66 CN39 CN41 Main PCB plate Document scanner Main PCB insulation sheet Main PCB ASSY FG harness ADF earth harness Screw bind M3x8 Screw bind M3x8 Main PCB ASSY CN3 CN4 CN7 CN13 CN16 CN20 CN27 CN28 CN32 CN33 CN37 CN38 CN41 CN39 CN42 CN43 CN44 CN46 CN47 CN40 CN45 CN30 CN31 CN...

Страница 233: ...o Taptite bind B M4x12 screws from the right side of the Main body 10 Remove the two Taptite bind B M4x12 screws from the left side of the Main body 11 Remove the two Taptite cup B M4x12 screws from the back side of the Main body Fig 3 68 Hook Flat core Flat core Joint cover top A view A view Document scanner unit Second side CIS flat cable Joint cover top Main body Taptite bind B M4x12 Taptite bi...

Страница 234: ...le from the Flat core of the Main body as lifting the Document scanner unit Fig 3 69 14 Remove the two Taptite bind B M4x12 screws from the ADF unit Fig 3 70 Main body Hook Hook Hook Hook Hook Main body Document Hook Flat core First side CIS flat cable scanner unit Document scanner unit Taptite bind B M4x12 Document scanner unit ADF unit ...

Страница 235: ...ond side CIS flat cable as shown in the figure After disconnecting Flat cables check that each cable is not damaged at its end or short circuited When connecting Flat cables do not insert them at an angle After insertion check that the cables are not at an angle Hole ADF unit Hook Document scanner unit Flat cable holder Flat cable Flat cable holder 17 16 Hook Harness of the ADF unit Fold down Fold...

Страница 236: ...it Fig 3 73 21 Remove the Taptite cup B M3x10 screw and remove the Hinge R and Hinge R support from the ADF unit Fig 3 74 Harness routing Refer to ADF Legal model Document Scanner Unit Legal model Control Panel ASSY Legal model Taptite cup S M3x12 Taptite cup S M3x12 Hinge ASSY L ADF unit Taptite cup B M3x10 Hinge R Hinge R support ADF unit ...

Страница 237: ...ins and remove the ADF document output support flap from the ADF unit Fig 3 75 9 19 ADF Document Support 1 Open the ADF document support 2 Release the two Pins and remove the ADF document support from the ADF unit Fig 3 76 Pin Pin ADF document output support flap ADF unit Pin Pin ADF document support ADF unit ...

Страница 238: ...3 74 Confidential 9 20 ADF Cover ASSY 1 Open the ADF cover ASSY 2 Release the two Pins and remove the ADF cover ASSY from the ADF unit Fig 3 77 ADF unit ADF cover ASSY Pin Pin ...

Страница 239: ...Release the two Hooks of the ADF unit Fig 3 78 Legal model 1 Release the three Hooks of the ADF unit Fig 3 79 Hook Hook Hook Hook ADF unit ADF unit Gear cover Gear cover Hook Hook Hook Hook ADF unit Gear cover Gear cover Hook Gear cover Gear cover ...

Страница 240: ...Legal model 2 Remove the Gear cover from the ADF unit Fig 3 81 Assembling Note When assembling the Gear cover take care not to accidentally damage the Hooks shown in the figure Hook Gear cover Hook ADF unit ADF unit Gear cover Hook 2a 2b ...

Страница 241: ...ng to release the lock Fig 3 82 2 Remove the Separation roller from the ADF unit Fig 3 83 Note When removing the Separation roller be careful not to damage the Flap ADF Conductive bushing 1a 1b ADF unit Separation roller Separation roller ADF unit 2a 2b Flap ADF Flap ADF ...

Страница 242: ...Fig 3 84 Assembling Note When assembling the Separation roller be sure to assemble it in a way that the Flap ADF comes under the Document feed roller ASSY 1 Flap ADF Flap ADF Document feed roller ASSY 1 Separation roller ...

Страница 243: ...l Only 1 Remove the two Pins and remove the ADF separation pad holder from the Upper ADF chute Fig 3 85 Fig 3 86 Note Be careful not to lose the ADF spring Pin ADF separation ADF separation pad holder Upper ADF chute Pin pad holder ADF Spring Upper ADF chute ...

Страница 244: ...ole of the ADF separation pad holder In this case remove the Upper ADF chute from the ADF unit and take out the ADF spring In the case that the Upper ADF chute has been removed be sure to assemble the ADF spring and ADF separation pad holder and then assemble the Upper ADF chute to the ADF unit ADF spring Hole Upper ADF chute ...

Страница 245: ...del Only 1 Remove the Taptite cup B M3x10 screw from the Upper ADF chute Fig 3 88 2 Release the two Hooks and remove the Separation rubber holder ASSY from the Upper ADF chute Fig 3 89 Taptite cup B M3x10 Upper ADF chute Hook Hook Separation rubber holder ASSY Upper ADF chute ...

Страница 246: ...te If the edge of the Separate support film protrudes from the Upper ADF chute it causes noise Separation support film ADF separation pad Upper ADF chute Separate support film Separate support film Upper ADF chute ADF separation pad Separate support film ADF separation pad Upper ADF chute Upper ADF chute ADF separation pad ...

Страница 247: ...dential 4 Remove the Separate support film from the ADF separation pad Fig 3 92 Note When the ADF separation pad is replaced the Separate support film need to be replaced ADF separation pad Separate support film ...

Страница 248: ...y 1 Release the Hook of the ADF separation spring holder Fig 3 93 2 Remove the two Pins and remove the ADF separation spring holder from the Upper ADF chute Fig 3 94 Hook ADF separation spring holder Upper ADF chute Pin Pin Upper ADF chute ADF separation spring holder ...

Страница 249: ...3 85 Confidential 3 Remove the ADF spring from the Upper ADF chute Fig 3 95 ADF spring Upper ADF chute ...

Страница 250: ... 1 Release the two Hooks and remove the CIS glass stopper from the ADF unit Fig 3 96 2 Remove the CIS glass from the ADF unit Fig 3 97 Note Disassemble it in a place without dust Hook CIS glass stopper ADF unit CIS glass ADF unit 2a 2b ...

Страница 251: ...3 87 Confidential 3 Remove the CIS spacer from the both ends of the Second side CIS unit Fig 3 98 CIS spacer CIS spacer Second side CIS unit ADF unit ...

Страница 252: ...cond Side CIS Unit 1 Lift the Second side CIS unit and release the Second side CIS flat cable Fig 3 99 2 Remove the two CIS springs from the ADF unit Fig 3 100 Second side CIS unit ADF unit 1a 1b Second side CIS flat cable ADF unit CIS spring CIS spring ...

Страница 253: ...3 89 Confidential 3 Remove the Second side CIS flat cable from the ADF unit Fig 3 101 ADF unit Second side CIS flat cable ...

Страница 254: ...ure to replace it with a new Second side CIS flat cable When assembling a new Second side CIS flat cable be sure to assemble it in accordance with the following procedure Fold down Fold back 200 2 mm Second side CIS flat cable Supporting tape To be connected to Surface of the Supporting plate Back side Terminal surface Second side CIS unit Fold down Fold back Second side CIS flat cable 210 2 mm Su...

Страница 255: ...CIS flat cable at the Second side CIS unit side to the Second side CIS unit Fig 3 105 Fold down Fold back 9 1 mm 45 8 mm Supporting tape Second side CIS flat cable Fold the flat cable at the edge Surface of the Supporting plate Back side Terminal surface of the Supporting plate To be connected to Second side CIS unit Second side CIS flat cable Second side CIS unit ...

Страница 256: ...to remove it and then affix new double sided adhesive tape Fig 3 107 Note Remove the Upper ADF chute from the ADF unit in advance Refer to 9 28 ADF Cover Document Detection Sensor PCB ASSY First Side Docu ment Scanning Position Sensor PCB ASSY Second Side Document Scanning Position Sensor PCB ASSY Duplex Scanning Model Only in this chapter Upper ADF chute Second side CIS flat cable Lower ADF chute...

Страница 257: ... in the figure below and then affix it to the double sided adhesive tape affixed to the Flat cable holder Fig 3 108 Flat cable holder Flat cable holder Second side CIS flat cable To be connected to Rib Align the folded area to this part Pass the harness through here Affix it to the double sided adhesive tape Second side CIS unit Second side CIS flat cable ...

Страница 258: ... Fig 3 110 Harness routing Refer to ADF A4 model ADF Legal model Fold down Fold back To be connected to 45 80 1 mm Second side CIS flat cable Surface of the Supporting plate Back side Terminal surface Main PCB Fold down Fold back To be connected to Second side CIS flat cable 45 35 1 mm Surface of the Supporting plate Back side Terminal surface Main PCB ...

Страница 259: ...SY Second Side Document Scanning Position Sensor PCB ASSY Duplex Scanning Model Only 1 Rotate the Conductive bushing to release the lock Fig 3 111 2 Remove the Document feed roller ASSY 1 from the ADF unit Fig 3 112 Conductive bushing ADF unit 1a 1b Document feed roller ASSY 1 ADF unit Document feed roller ASSY 1 2a 2b ...

Страница 260: ...rew from the ADF unit Fig 3 113 5 Turn the ADF unit right side up 6 Remove the five Taptite cup B M3x10 screws from the Upper ADF chute 7 Remove the Upper ADF chute from the ADF unit Fig 3 114 Taptite cup B M3x10 ADF unit ADF unit Upper ADF chute Taptite cup B M3x10 Taptite cup B M3x10 ...

Страница 261: ...116 Assembling Note When you replace this part without disassembling the Second side CIS unit follow the instructions given below Shift the Upper ADF chute to the position shown in the figure so that it will not interfere with the work Be careful not to damage the Flat cable ADF unit Flat cable Upper ADF chute Rib 8 9b 9a 9c ADF cover document detection Lower ADF chute Film sensor PCB ASSY ...

Страница 262: ...en the Rib and remove the Second side document scanning position sensor PCB ASSY from the Lower ADF chute Fig 3 118 Connector ADF cover document detection sensor PCB ASSY Lower ADF chute Film Rib 11 12a 12b 12c Second side document scanning position sensor PCB ASSY Second side document scanning position sensor PCB ASSY First side document scanning position sensor PCB ASSY ...

Страница 263: ...he Connector from the Second side document scanning position sensor PCB ASSY Fig 3 119 14 Remove the First side document scanning position sensor PCB ASSY in the same way Connector Second side document scanning position sensor PCB ASSY ...

Страница 264: ...the Document cover 3 Release the Hook and remove the Lower ADF chute from the Document cover Fig 3 120 4 Release the Pin of the Conductive bushing and rotate it to the position shown in the figure Fig 3 121 Taptite cup B M3x10 Lower ADF chute Hook Document cover Pin Conductive bushing Conductive bushing 4a 4b Document feed roller ASSY 2 Lower ADF chute ...

Страница 265: ...3 101 Confidential 5 Remove the Document feed roller ASSY 2 from the Lower ADF chute Fig 3 122 Document feed roller ASSY 2 Lower ADF chute 5a 5b ...

Страница 266: ...r bushing from the Document ejection roller Fig 3 123 2 Rotate the Conductive bushing to release the lock Fig 3 124 Hook Document ejection roller bushing Document ejection roller Lower ADF chute Conductive bushing Conductive bushing Document ejection roller 2a 2b Lower ADF chute Conductive bushing ...

Страница 267: ...the Lower ADF chute Fig 3 125 4 Peel off the double sided adhesive tape and remove the Eject film from the Lower ADF chute A4 model Legal model Fig 3 126 Fig 3 127 3a 3b Document ejection roller Lower ADF chute Eject film Lower ADF chute Lower ADF chute Eject film ...

Страница 268: ...SR screw and remove the ADF FG harness Fig 3 128 2 Remove the three Taptite cup B M3x10 screws and remove the Drive frame ASSY from the Lower ADF chute Fig 3 129 Taptite cup S M3x8 SR ADF FG harness Lower ADF chute Taptite cup B M3x10 Drive frame ASSY Lower ADF chute ...

Страница 269: ...he Connector from the ADF motor Fig 3 131 Assembling Note When assembling the Drive frame ASSY ensure that the Arm ASSY L2 are placed in the positions as shown in the figure below Drive frame ASSY Arm ASSY L2 Connector ADF motor Drive frame ASSY ...

Страница 270: ...the Gear43 from the Drive frame ASSY Fig 3 132 5 Remove the Screw pan S P washer M3x6 screw and remove the ADF motor from the Drive frame ASSY Fig 3 133 Hook Gear43 Drive frame ASSY Screw pan S P washer M3x6 Drive frame ASSY ADF motor ADF motor 5b 5a ...

Страница 271: ...fts and three Document feed pinch rollers from the Document cover ASSY Fig 3 134 Document cover ASSY Document feed pinch roller spring shaft Document feed pinch Document feed pinch Document feed pinch roller Document feed pinch roller Document feed pinch roller roller spring shaft roller spring shaft ...

Страница 272: ...ve the Control panel ASSY in the direction of the arrow and release the other four Hooks 3 Remove the Control panel ASSY from the Document scanner unit 4 Disconnect the two Connectors CN5 and CN7 from the Panel PCB unit Fig 3 136 Taptite cup B M3x10 Taptite cup B M3x10 Control panel ASSY Hook Hook 1 Hook 1 Control panel ASSY Hook 1 CN5 Document CN7 A view A view Hook 2a 2b scanner unit ...

Страница 273: ...l ASSY Fig 3 137 3 Release the other eight Hooks and remove the Control panel ASSY from the Document scanner unit 4 Disconnect the two Connectors CN5 and CN7 from the Control panel ASSY Fig 3 138 Taptite bind B M4x12 Taptite bind B M4x12 Control panel ASSY Hook Hook Document scanner unit Hook Hook Hook Control panel ASSY CN5 CN7 Hook 3a 3b Document scanner unit ...

Страница 274: ... the wiring Fig 3 139 A4 model 2 Remove the three Taptite cup B M3x10 screws from the LCD hold plate 3 Release the four Hooks and remove the LCD hold plate from the Control panel ASSY Fig 3 140 CN4 Panel PCB unit Flat cable Control panel ASSY Taptite cup B M3x10 Hook Hook LCD hold plate Control panel ASSY ...

Страница 275: ...ontrol panel ASSY Fig 3 141 A4 model Legal model Fig 3 142 Assembling Note When assembling the LCD hold plate to the Control panel ASSY be sure to assemble it in a way that LCD hold tab fits in the groove of the LCD Taptite cup B M3x10 Hook Hook LCD hold plate Control panel ASSY LCD hold plate Control panel ASSY LCD hold tab LCD hold tab LCD hold tab Groove Groove ...

Страница 276: ...e the Lock and disconnect the Flat cable CN1 of the Panel PCB unit 6 Disconnect the Flat cable CN2 from the Panel PCB unit Model with NFC only 7 Remove the Panel PCB unit from the Control panel ASSY Fig 3 144 Taptite cup B M3x10 Panel control PCB Control panel ASSY shield plate cover Control panel ASSY CN1 Panel PCB unit CN2 Lock Flat cable Flat cable Flat cable ...

Страница 277: ...3 113 Confidential 9 35 LCD 1 Remove the LCD from the Control panel ASSY Fig 3 145 Control panel ASSY LCD ...

Страница 278: ...nel ASSY 2 Remove the Touch panel ASSY from the Key PCB ASSY Fig 3 146 Fig 3 147 Assembling Note When assembling the Touch panel ASSY be sure to assemble A of the Touch panel ASSY as shown in the figure below Touch panel ASSY Key PCB ASSY CN1 1 2 Flat cable Touch panel ASSY A Key PCB ASSY ...

Страница 279: ...emove the NFC PCB ASSY from the Panel cover ASSY Fig 3 149 Fig 3 150 Assembling Note When the NFC PCB ASSY are replaced be sure to fold and assemble the NFC PCB ASSY flat cable as shown in the figure PCB insulation sheet 1 2 Panel cover ASSY Shield plate base NFC PCB ASSY Panel cover ASSY Fold down FFC Fold up FFC Supporting plate 45 13 2 mm 45 73 2 mm along with the dotted line along with the sol...

Страница 280: ...move the Document scanner top cover ASSY from the Document scanner unit Fig 3 151 2 Remove the CIS guide L and CIS guide R from the First side CIS unit Fig 3 152 Taptite bind B M4x12 Taptite bind B M4x12 Taptite bind B M4x12 Document scanner unit Document scanner top cover ASSY First side CIS unit CIS guide R CIS guide L ...

Страница 281: ...le sided adhesive tape from the First side CIS flat cable Fig 3 154 CIS drive belt CIS drive belt First side CIS unit First side CIS unit Guide shaft Guide shaft Double sided adhesive tape Double sided adhesive tape First side CIS unit First side CIS flat cable First side CIS unit First side CIS flat cable ...

Страница 282: ...t side CIS flat cable from the Connector CN1 of the First side CIS unit Fig 3 155 6 Remove the two Pins to remove the First side CIS unit from the CIS Carriage Fig 3 156 First side CIS unit CN1 5a 5b First side CIS flat cable Pin Pin First side CIS unit CIS Carriage ...

Страница 283: ...le of the Document scanner bottom cover ASSY 9 Remove the Flat core from the First side CIS flat cable Fig 3 158 Double sided adhesive tape Double sided adhesive tape Double sided adhesive tape Flat core First side CIS flat cable Document scanner bottom cover ASSY Document scanner Hole Flat core 9 8 bottom cover ASSY First side CIS flat cable ...

Страница 284: ...ng plate Back side Terminal surface Surface of the Supporting plate Back side Terminal surface Affix the tape on the back side terminal side 39 1 mm First side CIS unit 0 to 3 To be connected to Main PCB Fold down Fold back 113 1 mm 471 1 mm 317 1 mm 39 1 mm 10 1 5 mm 10 1 5 mm 45 45 40 mm 20 mm 20 mm Surface of the Supporting plate Back side Terminal surface Affix the tape on the back side termin...

Страница 285: ...dhesive tape and remove the Joint film from the Joint cover top Fig 3 161 Assembling Note When affixing the Joint film be sure to affix it to the Joint cover top as shown in the figure below Double sided Joint film Joint cover top Joint film A view A view adhesive tape 0 to 1 mm ...

Страница 286: ...3 122 Confidential 9 40 Joint Film2 Single side Scanning Model Only 1 Peel off the double sided adhesive tape and remove the Joint film2 from the Joint cover top Fig 3 162 Joint film2 Joint cover top ...

Страница 287: ...uide from the Joint cover top Fig 3 163 2 Remove the eight Taptite bind B M4x12 screws from the Joint cover top Fig 3 164 Lock claw Lock claw Pull arm guide Pull arm guide Joint cover top Joint cover top Taptite bind B M4x12 Taptite bind B M4x12 Taptite bind B M4x12 Taptite bind B M4x12 Front side ...

Страница 288: ... the Screw pan S P washer M3 5x6 screw and remove the Modem FG harness from the Main PCB plate 2 Disconnect the Modem flat cable CN28 from the Main PCB ASSY Fig 3 166 Hook Hook Hook Hook Hook Joint cover top Main body Screw pan S P washer M3 5x6 Modem FG harness CN28 Main PCB ASSY 1 2 Modem Back side flat cable Main PCB plate ...

Страница 289: ...an S P washer M3 5x6 screw and remove the Modem ground harness from the High voltage power supply PCB ASSY Fig 3 168 Taptite bind B M4x12 Taptite bind B M4x12 Taptite bind B M4x12 Taptite bind B M4x12 Joint cover top Front side High voltage power supply PCB ASSY Right side Modem ground harness Screw pan S P washer M3 5x6 ...

Страница 290: ...the arrow 7 Slide the Joint cover top from the four Hooks D and remove it from the Main body Fig 3 169 8 Release the Hook and remove the two Flat cores of the Modem flat cable from the Back cover upper Fig 3 170 Hook B Hook A Hook A Hook B Hook C Hook D Hook C Joint cover top Main body Front side 7 6 Modem flat cable Flat core Back cover upper Hook ...

Страница 291: ...9 Remove the two Taptite bind B M4x12 screws and remove the Modem shield cover from the Joint cover top Fig 3 171 Harness routing Refer to Modem PCB ASSY Legal model Taptite bind B M4x12 Joint cover top Modem shield cover ...

Страница 292: ... S P washer M3 5x6 screw and remove the Modem FG harness 2 Disconnect the Modem flat cable CN28 from the Main PCB ASSY Fig 3 172 Memo Follow the procedures 8 to 11 in the case of the Legal model Screw pan S P washer Modem FG harness Modem flat cable Main PCB ASSY CN28 M3 5x6 Back side 1 2 ...

Страница 293: ...the Back cover upper Fig 3 173 5 Remove the Screw pan S P washer M3 5x6 screw and remove the Modem ground harness from the High voltage power supply PCB ASSY 6 Disconnect the wiring of the Modem ground harness Fig 3 174 Modem flat cable Flat core Back cover upper Hook High voltage power supply PCB ASSY Modem ground harness Right side Screw pan S P washer M3 5x6 ...

Страница 294: ...om the Back cover upper Fig 3 175 A4 model Legal model 8 Disconnect the Modem flat cable CN1 from the Modem PCB ASSY 9 Remove the Flat core from the Modem flat cable Fig 3 176 Taptite bind B M4x12 Back cover upper Modem shield cover CN1 Modem flat cable Modem PCB ASSY Flat core 8 9 Modem shield cover ...

Страница 295: ...o not insert them at an angle After insertion check that the cables are not at an angle To be connected 45 18 1 mm 45 45 45 40 1 mm 155 2 mm 157 2 mm 76 1 mm 20 1 mm 11 1 mm Fold down Fold back Supporting plate Supporting plate to Main PCB To be connected to Modem PCB Fold down Fold back 45 45 10 1 mm 20 1 mm 82 1 mm 128 2 mm 138 2 mm Supporting plate Supporting plate To be connected to Modem PCB ...

Страница 296: ...ate Fig 3 179 11 Remove the two Taptite cup S M3x6 SR screws and remove the Modem PCB ASSY from the Modem shield plate Fig 3 180 Harness routing Refer to Modem PCB ASSY A4 model Modem PCB ASSY Legal model Screw pan S P washer M3 5x6 Modem shield cover Modem shield plate Taptite cup S M3x6 SR Modem shield plate Modem PCB ASSY ...

Страница 297: ...Only 1 Remove the four Taptite bind B M4x12 screws from the Back cover upper 2 Release the two Hooks and remove the Back cover upper from the Main body Fig 3 181 Taptite bind B M4x12 Taptite bind B M4x12 Back cover upper Hook Hook Main body Front side ...

Страница 298: ...e Main USB host harness ASSY 3 Remove the one Taptite bind B M4x12 screw Fig 3 183 Main PCB ASSY CN41 CN39 CN38 CN37 CN33 CN32 CN28 CN27 CN20 CN3 CN4 CN5 CN2 CN6 CN7 CN21 CN8 CN10 CN12 CN11 CN9 CN13 CN22 CN14 CN15 CN26 CN17 CN18 CN19 CN31 CN30 CN45 CN40 CN47 CN46 CN44 CN43 CN42 CN16 CN49 Taptite bind B M4x12 Joint cover USB ASSY Main body ...

Страница 299: ... 135 Confidential 4 Release the four Hooks to remove the Joint cover USB ASSY from the Main body Fig 3 184 Harness routing Refer to USB Host Hook Joint cover USB ASSY Main body Hook Joint cover USB ASSY ...

Страница 300: ...ove the Wireless LAN PCB from the Main body Fig 3 185 2 Disconnect the Main Wireless LAN harness ASSY from the Wireless LAN PCB Fig 3 186 Harness routing Refer to Wireless LAN PCB Hook Hook Hook Wireless LAN PCB Main body 1a 1b Wireless LAN PCB Main Wireless LAN harness ASSY ...

Страница 301: ...setting information Refer to 1 3 13 Backup of machine information Function code 41 in Chapter 5 After replacing the PCB restore the backup data to a new PCB Note After disconnecting flat cables check that each cable is not damaged at its end or short circuited When connecting flat cables do not insert them at an angle After insertion check that the cables are not at an angle Main PCB ASSY CN41 CN3...

Страница 302: ...om the Main body Fig 3 188 Note Note that the tightening torque is different between the upper middle side and lower side of the Screw bind M3x6 Upper Middle side 0 5 0 05 N m Lower side 0 8 0 1 N m Main PCB ASSY Main body 2a 2b Screw bind M3x6 Screw bind M3x6 Upper side Lower side Middle side ...

Страница 303: ...he back of the Joint cover base ASSY Fig 3 189 3 Release the three Hooks 1 Release the other seven Hooks and remove the Joint cover base ASSY from the Main body Fig 3 190 Taptite bind Taptite bind B M4x12 Taptite bind B M4x12 B M4x12 Taptite bind B M4x12 Taptite bind B M4x12 Joint cover base ASSY Main body Front side Main body Hook 1 Hook Hook Hook Hook Joint cover base ASSY Front side ...

Страница 304: ...unit and release the wiring Fig 3 192 Assembling Note When assembling the six screws of the Taptite bind B M4x12 be sure to assemble them in the order shown in the figure Taptite bind B M4x12 Taptite bind B M4x12 Taptite bind B M4x12 1 Taptite cup S M3x6 SR Taptite cup S M3x6 SR Taptite cup S M3x6 SR Main body 2 3 6 5 4 Scanner cover plate Taptite bind B M4x12 Front side Laser unit flat cable Lase...

Страница 305: ... flat cables do not insert them at an angle After insertion check that the cables are not at an angle 0 43 1 mm 71 1 mm 119 1 mm 135 1 mm 163 1 mm 183 1 mm 200 mm 45 45 2 mm 2 mm 28 mm 48 mm 16 mm 28 mm 20 mm 17 mm Supporting tape Reverse side Supporting tape Reverse side Fold down Fold back Contact plane Contact plane 8 mm 8 mm To be connected to Laser unit To be connected to Main PCB ...

Страница 306: ...older of which B is a screw and not to use other Scanner holders When assembling the Scanner holder to A of the Laser unit be sure that the Scanner holder is placed as shown in the figure Taptite cup S M3x6 SR Scanner holder Taptite cup S M3x6 SR Taptite cup S M3x6 SR Taptite cup S M3x6 SR Taptite cup S M3x6 SR Scanner plate Scanner holder Scanner holder Scanner holder Front side Laser unit A Scan...

Страница 307: ...ser Unit 9 48 Front Cover Sensor 1 Release the wiring of the Front cover sensor 2 Release the two Hooks and remove the Front cover sensor from the Main body Fig 3 197 Harness routing Refer to Process Drive Unit Front Cover Sensor Main Drive Unit Laser unit Scanner plate CN8 Front side Hook Main body Hook Front side Front cover sensor ...

Страница 308: ...less LAN cable rack from the Main body Fig 3 198 3 Release the wiring of the Polygon motor harness 4 Remove the two Taptite cup S M3x8 SR screws and remove the Side ground plate L from the Main body Fig 3 199 Wireless LAN cable rack Hook Main body Hook Left side Taptite cup S M3x8 SR Main body Taptite cup S M3x8 SR Polygon motor harness Left side Side ground plate L ...

Страница 309: ...e wiring from the PF cable rack 7 Remove the Taptite cup S M3x8 SR screw from the PF cable rack Release the six Hooks and slide the PF cable rack in the direction of the arrow and remove it from the Main body Fig 3 201 Hook Main PCB plate Main body Left side Main PCB insulation sheet Screw bind M3x8 PF cable rack Taptite cup S M3x8 SR Hook Main body Hook Hook Hook 7a 7b Left side ...

Страница 310: ...o color cam be sure to check that the Forced develop release link is at A position If you attach the Mono color cam as the Forced develop release link is at B position the Mono color cam may be damaged Mono color cam Main body Front side Mono color cam A B Mono color cam Forced develop release link Forced develop release link ...

Страница 311: ...e direction of the arrow and remove it from the Main body Fig 3 204 11 Remove the Taptite cup S M3x8 SR screw and fasten the Under bar ground spring to the Rib of the Main body Fig 3 205 Hook Cable rack Hook Hook Hook Process drive unit Hook Left side Taptite cup S M3x8 SR Under bar ground spring Main body Rib Back side ...

Страница 312: ...oks and remove the Process drive unit from the Main body Fig 3 206 Taptite bind Hook Main body B M4x12 Taptite bind B M4x12 Taptite bind B M4x12 Taptite bind B M4x12 Taptite bind B M4x12 Taptite bind B M4x12 Hook Hook Taptite pan washer Screw pan S P washer M3 5x6 Hook B M4x12 DA A view A view Taptite pan washer B M4x12 DA Screw pan S P washer M3 5x6 Left side Process drive unit Process drive unit...

Страница 313: ...unit Fig 3 207 Harness routing Refer to Laser Unit Process Drive Unit Front Cover Sensor Main Drive Unit Develop Release Drive Unit Develop Release Sensor PCB ASSY Toner New Sensor PCB ASSY MP Paper Empty Registration Front Sensor PCB ASSY Paper Feed Unit Hook Fuser Drive Gear Z25 Process drive unit ...

Страница 314: ...e As the DX drive gear Z15 23 Cleaner drive gear Z30 Registration gear Z26 23 PF drive gear 21 PF drive joint Pinch roller drive gear Z21M05 Registration roller drive joint and PP gear 14 55 tend to come off be careful not to lose them Taptite bind B M4x12 Hook Main body Taptite bind B M4x12 Left side Main drive unit PF drive gear 21 PF drive joint PP gear 14 55 Front side DX drive gear Z15 23 Cle...

Страница 315: ...nd B M4x12 screws from the Develop release drive unit Release the three Hooks and remove the Develop release drive unit from the Main body Fig 3 210 Harness routing Refer to Develop Release Drive Unit Develop Release Sensor PCB ASSY Toner New Sensor PCB ASSY Taptite bind Hook Develop release drive unit Main body Hook B M4x12 Left side ...

Страница 316: ...52 Confidential 9 52 Develop Release Sensor PCB ASSY 1 Release the Hook and remove the Develop release sensor PCB ASSY from the Main body Fig 3 211 Hook Main body Left side Develop release sensor PCB ASSY ...

Страница 317: ...lease link from the Main body Fig 3 212 2 Release the six Hooks and remove the Toner new sensor PCB ASSY from the Main body Fig 3 213 Hook Main body Hook Left side Forced develop release link Forced develop release link Forced develop release link Hook Main body Hook Hook Left side PCB ASSY Toner new sensor ...

Страница 318: ...er fan in the direction of the arrow 2a and pull it out from the Main body Fig 3 215 Harness routing Refer to Fuser Fan Power Fan Assembling Note When assembling the Fuser fan be sure to assemble it in a way that the label side faces out CN4 High voltage power supply PCB ASSY Right side Fuser fan Main body Label Hook 2a 2b Right side Fuser fan ...

Страница 319: ...ng of the High voltage main harness ASSY Fig 3 216 3 Remove the four Taptite bind B M4x12 screws and remove the Paper eject ASSY from the Main body Fig 3 217 Harness routing Refer to Paper Eject ASSY CN1 CN2 High voltage power supply PCB ASSY Right side Paper eject ASSY Taptite bind B M4x12 Paper eject ASSY Main body Taptite bind B M4x12 Back side ...

Страница 320: ...3 156 Confidential 9 56 Toner Filter ASSY 1 Release the five Hooks and remove the Toner filter ASSY from the Paper eject ASSY Fig 3 218 Hook Paper eject ASSY Hook Hook 1a 1b Toner filter ASSY ...

Страница 321: ...d wire 1 from the Paper eject ASSY Fig 3 219 2 Release the five Hooks and remove the Eject ground wire 2 from the Paper eject ASSY Fig 3 220 Paper eject ASSY Eject ground wire 1 Hook Hook Paper eject ASSY Paper eject ASSY A view A view Eject ground wire 2 Eject ground wire 2 ...

Страница 322: ...ss routing Refer to Paper Eject ASSY Assembling Note After assembling the Eject ground wire 1 and Eject ground wire 2 check the conduction between the Middle roller shaft and the Cooling roller shaft Middle roller shaft Cooling roller shaft Middle roller ASSY Eject cooling Paper eject ASSY roller ASSY Paper eject origin sensor Hook Paper eject ASSY Hook Hook Paper eject origin sensor Hook ...

Страница 323: ... wiring of the Back cover sensor ASSY 2 Release the two Hooks and remove the Back cover sensor ASSY from the Main body Fig 3 223 Harness routing Refer to Back Cover Sensor ASSY Back cover sensor ASSY Hook Main body Hook Back side Hook Hook Back cover sensor ASSY ...

Страница 324: ...e Eject sensor PCB ASSY 2 Release the Hook and remove the Eject sensor PCB ASSY from the Main body Fig 3 224 Harness routing Refer to Eject Sensor PCB ASSY Fuser Unit Hook Eject sensor PCB ASSY Main body Pin Hook Pin 2a 2b 2a 2b A view A view Back side Eject sensor PCB ASSY ...

Страница 325: ... attaching the Registration mark sensor unit make sure that the Registration ground spring is placed as shown in the figure After assembling the Registration mark sensor unit make sure that the Front chute flapper moves Taptite bind Boss Main body B M3x10 Boss Back side Registration mark sensor unit Front chute flapper Front chute flapper If the Registration ground spring is dropped from the step ...

Страница 326: ...wer fan in the direction of the arrow 2a and pull it out from the Main body Fig 3 228 Harness routing Refer to Fuser Fan Power Fan Assembling Note When assembling the Power fan be sure to assemble it in a way that the label side faces out CN5 High voltage power supply PCB ASSY Back side Power fan Main body Label 2a 2b Hook Back side Power fan ...

Страница 327: ...from the LVPS plate 2 Remove the Taptite flat B M3x10 screw and remove the Inlet harness ASSY from the Main body 3 Release the wiring of the Inlet harness ASSY 4 Release the wiring of the LVPS heater harness ASSY Fig 3 229 Screw pan Inlet harness ASSY Main body S P washer M3 5x6 Taptite flat B M3x10 Back side LVPS plate Inlet harness ASSY FG harness of the ...

Страница 328: ...of the LVPS main harness ASSY Fig 3 230 8 Remove the two Taptite cup S M3x8 SR screws and two Taptite bind B M4x12 screws and remove the LVPS plate from the Main body Fig 3 231 Screw pan S P washer M3 5x6 Drive ground plate Back side Boss Low voltage power supply PCB unit LVPS main harness ASSY Taptite bind B M4x12 Main body Taptite bind B M4x12 Taptite cup S M3x8 SR Taptite cup S M3x8 SR Back sid...

Страница 329: ... the five Taptite cup S M3x6 SR screws and remove the Low voltage power supply PCB unit from the LVPS plate Fig 3 233 Harness routing Refer to Low voltage Power Supply PCB Unit LVPS main harness ASSY CN101 Low voltage power supply PCB unit Connector of the Taptite cup S M3x6 SR Low voltage power supply PCB unit LVPS plate Taptite cup S M3x6 SR ...

Страница 330: ...r B 1 Press A to release the Hook and remove the MP upper frame cover from the MP upper cover ASSY Fig 3 234 2 Remove the MP lift arm B from the MP upper cover ASSY Fig 3 235 MP upper frame cover Hook A MP upper cover ASSY Front side MP upper cover ASSY MP lift arm B Front side ...

Страница 331: ...w 4 Release the Hook 2 and remove the MP holder bushing from the MP upper cover ASSY Fig 3 236 5 Remove the MP roller holder ASSY from the MP upper cover ASSY Fig 3 237 Hook 2 MP upper cover ASSY MP holder bushing 3 4 Front side Hook 1 Hook 1 Hook 2 MP upper cover ASSY MP roller holder ASSY Front side ...

Страница 332: ... roller gear bushing Fig 3 238 7 Remove the Pinch roller drive gear Z21M05 from the Registration pinch roller gear bushing Fig 3 239 Registration gear Z26 23 Left side Registration pinch roller gear bushing Pinch roller drive gear Z21M05 Left side Registration pinch roller gear bushing ...

Страница 333: ...e shaft as shown in the figure 11 Remove the two Taptite bind B M3x10 screws from the MP upper cover ASSY Release the two Hooks and remove the MP upper cover ASSY from the MP lower chute ASSY Fig 3 241 Registration pinch roller gear bushing Hook Main body Left side MP drive shaft Taptite bind B M3x10 Hook MP lower chute ASSY Taptite bind B M3x10 11 10 Hook Front side MP upper cover ASSY MP upper c...

Страница 334: ... the Sensor cover MP from the MP upper cover ASSY Fig 3 243 Assembling Note When assembling the MP upper cover ASSY attach A of the MP lift arm A to the MP lift lever MP upper cover ASSY MP lift arm A MP lift lever A Hook Sensor cover MP MP upper cover ASSY Hook Hook ...

Страница 335: ...244 14 Release the Hook and remove the MP paper empty actuator B from the MP upper cover ASSY Fig 3 245 Hook MP paper empty actuator A ASSY MP upper cover ASSY MP paper empty actuator A ASSY MP paper empty actuator B MP paper empty actuator B Hook MP paper empty actuator B 14a 14b MP upper cover ASSY Attach it to the cutouts ...

Страница 336: ...on roller bushing from the MP drive shaft Fig 3 246 2 Release the two Hooks and remove the MP registration front actuator spring from the MP registration front actuator Fig 3 247 Hook MP separation roller bushing MP drive shaft MP registration front actuator spring Hook MP registration front actuator MP upper cover ASSY ...

Страница 337: ... sensor PCB ASSY 5 Remove the Taptite bind B M3x8 screw and remove the MP paper empty registration front sensor PCB ASSY from the MP upper cover ASSY Fig 3 249 Harness routing Refer to MP Paper Empty Registration Front Sensor PCB ASSY MP drive shaft MP upper cover ASSY 3b 3a MP registration front actuator Taptite bind B M3x8 MP upper cover ASSY MP paper empty registration front sensor PCB ASSY ...

Страница 338: ... 2 Slide the Roller holder ASSY in the direction of the arrow and remove it from the T1 drive shaft gear Z17M07 3 Slide the Roller holder ASSY in the direction of the arrow 3a and 3b in this order and remove it from the Paper feed unit Fig 3 251 T1 lift arm Roller holder ASSY A B Front side Roller holder ASSY Paper feed unit 3b 3a 2 T1 drive shaft gear Z17M07 ...

Страница 339: ... of the arrow 4a and remove it from the Boss of the Paper feed unit Fig 3 253 Assembling Note Align the Hole of the Paper feed unit to the Shaft of the Roller holder ASSY and insert it into the Hole Paper feed unit Paper feed unit Roller holder ASSY Hole Shaft T1 lift arm Paper feed unit Boss 4a 4b 4b 4a Boss Front ...

Страница 340: ...w from the Paper feed unit 7 Remove the two Taptite bind B M4x12 screws then shift the Paper feed unit to the right and remove it from the Main body Fig 3 255 PF drive gear 21 PF drive joint Main body Left side Taptite cup B M3x12 Paper feed unit Taptite Main body bind B M4x12 Paper feed unit Front side Registration roller drive joint ...

Страница 341: ...t 9 Remove the Joint pin from the PF registration roller shaft Fig 3 256 Harness routing Refer to Paper Feed Unit Registration roller Joint pin Paper feed unit PF registration roller shaft Joint pin PF registration roller shaft Paper feed unit PF registration roller shaft A view A view 9 8 drive joint ...

Страница 342: ...ar sensor PCB holder from the Paper feed unit Fig 3 257 3 Release the three Hooks and remove the Registration front rear sensor PCB ASSY from the Registration front rear sensor PCB holder Fig 3 258 Harness routing Refer to Paper Feed Unit Taptite bind B M3x10 Registration front rear Paper feed unit sensor PCB holder Registration front rear sensor PCB ASSY Registration front rear sensor Hook Hook P...

Страница 343: ...3 259 Fig 3 260 Note As the MP drive shaft gear Z17M07 MP lift lever and Registration roller drive joint tend to come off be careful not to lose them When the MP drive shaft gear Z17M07 and MP lift lever come off assemble them as shown in the figure MP drive frame Taptite bind B M3x10 Paper feed unit Taptite bind B M3x10 MP lift lever Registration roller drive joint Paper feed unit MP drive shaft ...

Страница 344: ...T1 drive shaft gear Z17M07 Fig 3 261 4 Remove the Edge actuator spring from the Hook of the Paper feed unit and the Hook of the Edge actuator Fig 3 262 Hook Paper feed unit MP separation roller bushing T1 drive shaft gear Z17M07 Hook Hook Paper feed unit Edge actuator spring Edge actuator ...

Страница 345: ...263 6 Release the wiring of the T1 paper feed sensor PCB ASSY 7 Release the three Hooks and remove the T1 paper feed sensor PCB ASSY from the Paper feed unit Fig 3 264 Harness routing Refer to Paper Feed Unit Paper feed unit T1 drive shaft gear Z17M07 5a 5b Edge actuator T1 paper feed sensor PCB ASSY Hook Paper feed unit ...

Страница 346: ...cers from the Main frame R ASSY Fig 3 265 2 Disconnect the two Connectors CN6 and CN7 from the High voltage power supply PCB ASSY Fig 3 266 Spacer Spacer Right side High voltage power supply PCB ASSY Main frame R ASSY CN6 CN7 High voltage power supply PCB ASSY Main body Right side ...

Страница 347: ...SY Release the eight Hooks and remove the High voltage power supply PCB ASSY from the Main body Fig 3 267 High voltage power supply PCB ASSY Hook Main body High voltage power supply PCB ASSY Hook Hook Hook Hook Hook Main body A view A view Front side Right side Taptite pan B M3x10 Taptite pan B M3x10 ...

Страница 348: ... 268 Fig 3 269 Assembling Note After assembling the High voltage power supply PCB ASSY check that the Electrode inside the machine does not fall and that you do not feel that the Electrode gets caught when you press it Hook High voltage power supply PCB ASSY HVPS shield ASSY High voltage power supply PCB ASSY Main body ...

Страница 349: ...rotector tends to come off be careful not to lose it When removing the Air duct film replace the Air duct film with a new one Assembling Note When assembling the Air duct film to the Main frame R ASSY affix it without making clearance between the Air duct film and Main frame R ASSY Air duct film Air duct protector Double sided adhesive tape Right side R ASSY Main frame ...

Страница 350: ...Blower 2 Remove the Blower from the Main frame R ASSY Fig 3 271 Harness routing Refer to Blower Waste Toner Sensor Assembling Note When assembling the Blower be sure to assemble it in a way that the label side faces out Label Right side Main frame R ASSY Blower ...

Страница 351: ...3 187 Confidential 10 DISASSEMBLY PROCEDURE LT 320CL LT 325CL 10 1 T2 Paper Tray Unit 1 Take out the T2 paper tray unit from the Main body Fig 3 272 Main body T2 paper tray unit ...

Страница 352: ...ptite cup S M3x10 SR screws from the T2 cover rear Fig 3 273 2 Release the two Pins and remove the T2 cover rear from the Main body Fig 3 274 T2 cover rear Taptite cup S M3x10 SR Taptite cup S M3x10 SR Back side Pin Pin T2 cover rear 2a 2b Main body Back side ...

Страница 353: ...r left Fig 3 275 2 Release the one Pin and release the two Hooks at the top 3 Release the two Hooks at the bottom and remove the T2 cover left from the T2 frame L unit Fig 3 276 Taptite cup S M3x6 SR Taptite cup S M3x6 SR T2 cover left Front side Hook Hook Pin T2 cover left T2 frame L unit Front side ...

Страница 354: ...cover right Fig 3 277 2 Release the one Pin and release the two Hooks at the top 3 Release the three Hooks at the bottom and remove the T2 cover right from the Main body Fig 3 278 Taptite cup S M3x6 SR Taptite cup S M3x6 SR T2 cover right Right side T2 cover right Hook Hook Pin Main body Right side ...

Страница 355: ...3 279 2 Remove the Taptite cup S M3x6 SR screw and remove the T2 relay PCB ASSY from the T2 frame L unit Fig 3 280 Not used T2 paper edge sensor T2 plate up detection sensor T2 connector T2 plate up motor T2 solenoid T2 relay PCB ASSY 2a 2b T2 relay PCB ASSY Taptite cup S M3x6 SR T2 frame L unit Left side ...

Страница 356: ...Edge Actuator 1 Remove the Clutch spring from the Clutch arm ASSY Fig 3 281 2 Release the Hook and remove the Gear 45 40 from the T2 frame L unit Fig 3 282 Clutch arm ASSY Clutch arm ASSY Clutch spring Left side Gear 45 40 T2 frame L unit Hook Left side ...

Страница 357: ...onfidential 3 Remove the Collar 6 from the Clutch arm ASSY Fig 3 283 4 Remove the Clutch arm ASSY from the T2 frame L unit Fig 3 284 Collar 6 Clutch arm ASSY Left side T2 frame L unit Clutch arm ASSY Left side ...

Страница 358: ...the Main body Fig 3 285 6 Remove the Retaining ring E4 from the Feed roller and remove the Gear 24 and Feed roller bushing Fig 3 286 Taptite cup S M3x6 SR T2 beam F ASSY Taptite cup S M3x6 SR Taptite cup S M3x6 SR Front side Main body Retaining ring E4 Gear 24 Left side Feed roller Feed roller bushing ...

Страница 359: ... Remove the Lift spring from the Hook of the Lift lever A 9 Remove the Feed roller from the Main body in the directions of the arrows 9a 9b and 9c in this order Fig 3 288 Retaining ring E3 Right side Feed roller Feed roller bushing TR Lift lever A Lift lever A Hook Lift spring 8 9a 9c 9b Front side Main body Feed roller ...

Страница 360: ...ssembling the Feed roller be sure to assemble it in a way that the Rib of the T2 paper feed frame unit comes between A and B of the Lift lever B and the lever of the T2 paper feed holder comes in front of B Lift lever B A B Rib T2 paper feed holder T2 paper feed frame unit Feed roller Lever Hook T2 frame L unit Gear 20A Left side ...

Страница 361: ...e T2 frame L unit Fig 3 291 12 Remove the Extension spring from the Spring hook 13 Release the Hook and remove the Gear 46 55 from the T2 frame L unit Fig 3 292 Hook T2 frame L unit Gear 33 Left side Hook T2 frame L unit Gear 46 55 Extension spring Spring hook Left side ...

Страница 362: ...e L unit 15 Remove the Gear 46 from the T2 frame L unit Fig 3 293 16 Turn the T2 frame L unit upside down 17 Remove the two Taptite cup S M3x6 SR screws from the T2 beam front Fig 3 294 T2 frame L unit Gear 46 Taptite cup S M3x6 SR 15 14 Left side T2 solenoid holder ASSY Taptite cup S M3x6 SR T2 beam front Left side ...

Страница 363: ...side up 19 Remove the two Taptite cup S M3x6 SR screws from the T2 beam rear Fig 3 295 20 Remove the two Taptite cup S M3x6 SR screws from the T2 beam rear Fig 3 296 T2 beam rear Taptite cup S M3x6 SR Back side Taptite cup S M3x6 SR T2 beam rear Left side ...

Страница 364: ... from the T2 frame L unit Fig 3 297 22 Remove the T2 paper feed frame unit from the Main body in the order of the arrow 22a and arrow 22b Fig 3 298 Taptite bind B M4x10 T2 frame L unit Bush Left side T2 frame L unit 22b 22a Front side Main body T2 paper feed frame unit ...

Страница 365: ...irection of the arrow 24b Fig 3 299 Fig 3 300 Assembling Note When assembling the T2 separation roller ASSY assemble it by sliding it in the direction of the arrow b as rotating the T2 separation roller ASSY in the direction of the arrow a Hook T2 separation roller ASSY 23 24b 24a T2 separation roller ASSY T2 paper feed frame unit T2 paper feed frame unit T2 paper feed drive shaft a b T2 separatio...

Страница 366: ...haft Fig 3 301 26 Remove the A of the T2 edge actuator spring from the Hook of the T2 paper feed frame unit Fig 3 302 Hook T2 paper feed frame unit T2 paper pick up roller ASSY T2 paper feed drive shaft A Hook A view A view T2 edge T2 paper feed frame unit T2 edge actuator actuator spring T2 paper feed frame unit ...

Страница 367: ...he Hook of the T2 paper feed holder ASSY Fig 3 303 28 Remove the two Collar 6s from the T2 paper feed drive shaft Fig 3 304 Hook T2 paper feed holder ASSY T2 paper feed spring T2 paper feed frame unit Hook of the T2 paper feed holder ASSY Collar 6 T2 paper feed drive shaft Collar 6 T2 paper feed frame unit ...

Страница 368: ...ushing from the T2 paper feed holder ASSY Fig 3 305 30 Remove the T2 paper feed holder ASSY and T2 paper feed drive shaft from the T2 paper feed frame unit Fig 3 306 29a 29b T2 paper feed drive shaft T2 paper feed holder bushing T2 paper feed holder ASSY T2 paper feed frame unit T2 paper feed holder ASSY T2 paper feed drive shaft ...

Страница 369: ... T2 edge actuator 32 Remove the T2 edge actuator from the T2 paper feed holder ASSY Fig 3 307 33 Remove the T2 edge actuator spring from the Hook of the T2 edge actuator Fig 3 308 31 32 T2 paper feed drive shaft T2 paper feed holder ASSY T2 edge actuator Hook T2 edge actuator spring T2 edge actuator ...

Страница 370: ...sh memory 2 A USB cable 3 Create a temporary folder on the C drive of the computer Windows XP or higher 4 Service setting tool BrUsbsn zip Copy it into the temporary folder that has been created in the C drive Extract the copied file and execute BrUsbsn exe file by double clicking it 5 Download utility Filedg32 exe Copy it into the temporary folder that has been created in the C drive 6 Maintenanc...

Страница 371: ...y state Memo If you cannot find the Home key press the Toner key and the Home key lights up 2 Hold down the blank space at the bottom of the LCD for about 2 seconds 3 Press the 2 8 6 and 4 keys on the LCD in this order to enter the maintenance mode 4 Press the 2 and 5 keys in this order Then the Main firmware version information is displayed on the LCD 5 Next press the Mono Start key to display th...

Страница 372: ...ompleted the machine automatically restarts 6 Repeat steps 3 to 4 to install necessary firmware 7 When all firmware installation has been completed remove the USB flash memory from the USB direct interface Memo Installing the firmware using a USB flash memory is not possible in deep sleep mode Open and close the front cover etc to quit the deep sleep mode before installing the firmware Install the...

Страница 373: ... flash ROM is started 5 When installation is completed the machine reboots and returns to the ready state 6 Turn OFF the power of the machine and repeat steps 1 to 5 to install necessary firmware 7 Turn OFF the power of the machine and disconnect the USB cable 1 2 Initializing the EEPROM of the Main PCB ASSY Function code 01 Initialize the EEPROM of the main PCB ASSY in accordance with 1 3 1 EEPRO...

Страница 374: ... the OK button The serial number is written in the machine 9 Turn OFF the power of the machine and disconnect the USB cable from the computer and the machine 1 4 Restore Machine Information Function code 41 Restore the machine information and user setting information that have been backed up in an external memory in accordance with 1 3 13 Backup of machine information Function code 41 in Chapter 5...

Страница 375: ...on of States at Factory Shipment Operating procedure 1 Hold down the Home key for about 5 seconds while the machine is in the ready state The screen shown below is displayed on the LCD 2 Hold down the blank space at the bottom of the LCD for about 2 seconds The screen shown below is displayed on the LCD 3 Press the 1 9 3 and 7 keys on the LCD in this order 4 Press the 0 0 8 and 4 keys on the LCD i...

Страница 376: ...ments of Density and Registration Sensor Function code 73 2 1 Continuous Adjustments of Density and Registration Sensor Function code 73 Perform continuous adjustments of density and registration sensor in accordance with 1 3 29 Continuous adjustments of density and registration sensor Function code 73 in Chapter 5 ...

Страница 377: ...ge Power Supply PCB Reset Counters for Parts Function code 88 3 1 Reset of Irregular Power Supply Detection Counter of Low Voltage Power Supply PCB Reset Counters for Parts Function code 88 Perform resetting irregular power supply detection counter of the low voltage power supply PCB in accordance with 1 3 37 Reset counters for parts Function code 88 in Chapter 5 ...

Страница 378: ...4 IF YOU REPLACE THE PROCESS DRIVE UNIT What to do after replacement Motor Reset Function code 57 4 1 Motor Reset Function code 57 Perform motor reset in accordance with 1 3 20 Motor reset Function code 57 in Chapter 5 ...

Страница 379: ...LING THE MAINTENANCE PRINTER DRIVER to install the driver 7 Firmware 5 1 Installing the Firmware 5 1 1 Checking firmware version Check whether the firmware installed on the machine is the latest version in accordance with 1 1 1 Checking firmware version in this chapter If the version is the latest installing the firmware is unnecessary If the version is not the latest install all the firmwares 5 1...

Страница 380: ...ng firmware version Check whether the firmware installed on the machine is the latest version in accordance with 1 1 1 Checking firmware version in this chapter If the version is the latest installing the firmware is unnecessary If the version is not the latest install all the firmwares 6 1 2 Installing the firmware When each installed firmware is not the latest version install the firmwares in ac...

Страница 381: ... Adjustments of Density and Registration Sensor Function code 73 Perform continuous adjustments of density and registration sensor in accordance with 1 3 29 Continuous adjustments of density and registration sensor Function code 73 in Chapter 5 7 2 Counter Reset of Laser Unit Reset Counters for Parts Function code 88 Perform counter reset of the laser unit in accordance with 1 3 37 Reset counters ...

Страница 382: ...e 55 Perform the acquisition of white level data in accordance with 1 3 19 Acquisition of white level data and setting of CIS scanning area Function code 55 in Chapter 5 8 2 Scanning and Printing Check Scan the test chart TC 023 for scanning and printing check on the document glass and make sure there are no problems of the printed image Make sure there are no problem of the document scanner unit ...

Страница 383: ... Duplex Scanning Model Only Perform the acquisition of white level data in accordance with 1 3 19 Acquisition of white level data and setting of CIS scanning area Function code 55 in Chapter 5 9 2 Scanning and Printing Check Scan the test chart TC 023 for scanning and printing check with ADF and make sure there are no problem of the printed image Make sure there are no problem of the ADF and the p...

Страница 384: ...of Fuser Unit or PF Kit 1 2 and MP Reset Counters for Parts Function code 88 10 1 Counter Reset of Fuser Unit or PF Kit 1 2 and MP Reset Counters for Parts Function code 88 Perform counter reset of the fuser unit or PF kit 1 2 and MP in accordance with 1 3 37 Reset counters for parts Function code 88 in Chapter 5 ...

Страница 385: ... Hold down the Home key for about 5 seconds while the machine is in the ready state The screen shown on the right is displayed on the LCD Memo If you cannot find the Home key press the Toner key and the Home key lights up 2 Hold down the blank space at the bottom of the LCD for about 2 seconds The screen shown on the right is displayed on the LCD 3 Press the 2 8 6 and 4 keys on the LCD in this ord...

Страница 386: ...66 68 71 72 77 80 82 87 and 91 Operating procedure 1 Hold down the Home key for about 5 seconds while the machine is in the ready state The screen shown on the right is displayed on the LCD Memo If you cannot find the Home key press the Toner key and the Home key lights up 2 Hold down the blank space at the bottom of the LCD for about 2 seconds The screen shown on the right is displayed on the LCD...

Страница 387: ...f USB No Switching Dither Pattern Switching of ON OFF of DirectPrint Color mode Improve Gray Color Switching of timing to execute Auto Registration Adjusting left end print start position on second side in duplex printing Change of the transfer current setting Change of ghost reduction setting 1 3 15 5 29 52 Set country language 1 3 16 5 33 53 Transfer of received fax data and log information 1 3 ...

Страница 388: ... of maintenance information 1 3 31 5 59 78 Operational check of fans 1 3 32 5 61 80 Display of device log information 1 3 33 5 62 82 Display of device error codes 1 3 34 5 66 83 Developing bias voltage correction 1 3 35 5 67 87 Sending of communication log information to telephone line 1 3 36 5 68 88 Reset counters for parts 1 3 37 5 69 91 EEPROM parameter initialization 1 3 1 5 5 99 Exit from the...

Страница 389: ...n completion of parameter initialization the machine returns to the initial state of the maintenance mode Data item Function code 01 Function code 91 Printer switch Counter information These will not be initialized These will not be initialized Error History MAC address Ethernet Address Operation lock of the control panel password These will be initialized Secure Function Lock Telephone function r...

Страница 390: ...nt the correct data for compensation cannot be printed out even if this operation is implemented without scanning the document The print result varies depending on whether implementing color scanning or black and white scanning immediately before this operating procedure Make sure the brightness level data you want to print and implement the operation below Note If there is no paper in the paper t...

Страница 391: ...5 7 Confidential Common to first and second side Fig 5 1 ...

Страница 392: ... and ejects documents while counting the number of scanned pages indicates the current count of scanned pages 3 Press the X key to return the machine to the initial state of the maintenance mode Note For duplex scanning models as 2 faces are scanned per a sheet of document the page count increases by two each time a sheet of document is ejected Note If this test is performed as the ADF cover is op...

Страница 393: ...quality and if there is any image loss Operating procedure 1 Press the 0 and 9 keys in this order in the initial state of the maintenance mode MAINTENANCE 09 is displayed on the LCD Printing of a monochrome image quality test pattern see the figure below is started 2 When printing is finished the machine returns to the initial state of the maintenance mode Fig 5 2 ...

Страница 394: ...ransmission settings WSW09 Protocol definition 1 WSW39 V 34 transmission speed WSW10 Protocol definition 2 WSW40 V 34 modem settings WSW11 Busy tone setting WSW41 ON duration of the scanning light source WSW12 Signal detection condition setting WSW42 Internet mail settings WSW13 Modem setting WSW43 Function setting 16 WSW14 AUTO ANS facility setting WSW44 Speeding up scanning 1 WSW15 Redial facili...

Страница 395: ...mber of the documents in reverse for paper ejection of the two sided from ADF WSW65 Setting the paper support WSW66 Reserved Change of the setting is prohibited WSW78 Recording stop function when the drum reaches the end of life WSW67 Reserved Change of the setting is prohibited WSW79 Function setting 27 WSW68 Reserved Change of the setting is prohibited WSW80 Copying speed control function WSW81 ...

Страница 396: ...tion saves the newly entered selector values onto the EEPROM and readies the machine for accepting a worker switch number WSW00 5 When worker switch setting is completed press the X key to return the machine to the initial state of the maintenance mode Note To cancel this operation and return the machine to the initial state of the maintenance mode during the above procedure press the X key If the...

Страница 397: ...tems and the details set by the worker switches Operating procedure 1 Press the 1 key twice in the initial state of the maintenance mode 2 PRINTING is displayed on the LCD and the CONFIGURATION LIST see the figure below is printed 3 When printing is finished the machine returns to the initial state of the maintenance mode Fig 5 3 ...

Страница 398: ...ank screen is displayed on the LCD 2 Each time you press the key the LCD cycles through the displays as shown below When you press the key the display on the LCD returns to the preceding one When you press the key with Display 7 shown on the LCD Display 1 appears 3 When the X key is pressed the machine returns to the initial state of the maintenance mode regardless of the display status Display on...

Страница 399: ...he corresponding number in decimal notation each time a key is pressed Check that the displayed number is correct by referring to the figure below If the keys are pressed in the incorrect order the machine displays the INVALID OPERATE on the LCD Press the X key and then press the correct keys 3 After the last number key is pressed the machine returns to the initial state of the maintenance mode To...

Страница 400: ...ach other When you press the SET key while ROM Check Sum is displayed check is automatically conducted for each ROM of each software part When the check sum is matched OK is displayed on the LCD When all ROMs result in OK ROM Check Sum OK is displayed at the end and the operation is finished When the check sum of any ROM is not matched NG is displayed and the display stops LCD Description TOTAL Ve...

Страница 401: ...enance mode OnePushDemo ON is displayed on the LCD 2 To enable the function display OnePushDemo ON using the or key To disable the function display OnePushDemo OFF 3 Press the SET key The displayed setting is confirmed and the machine returns to the initial state of the maintenance mode Note To terminate this operation press the X key The machine returns to the initial state of the maintenance mod...

Страница 402: ...nstalled not installed C2 T2 paper feed sensor T2 paper tray unit installed not installed MP MP paper empty sensor MP tray paper not detected detected CV Front cover sensor Front cover closed open RC Back cover sensor Back cover closed open PO Eject sensor Paper not detected detected L2 T2 plate origin sensor Plate down of T2 paper tray unit Plate up of T2 paper tray unit T2 T2 connect sensor T2 p...

Страница 403: ...perature sensor 0 C The value will not be changed since this sensor is not installed TMP XXC External temperature sensor XX C NG HUM XXC External humidity sensor XX NG DF Document detection sensor Without documents With document DR First side document scanning position sensor Without documents With document AC ADF cover sensor ADF cover closed open DB Second side document scanning position sensor ...

Страница 404: ...evelop release sensor PCB ASSY MP paper empty registration front sensor PCB ASSY MP upper cover front sensor ASSY Toner new sensor sensor PCB ASSY T2 paper feed sensor Back cover sensor Eject sensor T2 plate origin sensor T2 connect sensor Belt temperature sensor Internal temperature Paper eject ASSY Registration mark sensor unit Low voltage power Registration mark sensor L PCB Registration mark s...

Страница 405: ...nfidential Fig 5 9 Document detection sensor First side document scanning ADF cover sensor Second side document ADF cover document detection Lower ADF chute scanning position sensor position sensor sensor PCB ...

Страница 406: ...in the initial state of the maintenance mode 2 Based on the wired LAN connection status of the machine the corresponding items shown in the table below is displayed on the LCD 3 Press the X key to return the machine to the initial state of the maintenance mode LCD LAN connection status Active 100B FD 100B FD Active 100B HD 100B HD Active 10B FD 10B FD Active 10B HD 10B HD Inactive Not connected ...

Страница 407: ...key and finish this operation to return the machine to the initial state of the maintenance mode If an error occurs during printing it is necessary to start from the beginning The serial number of the machine is printed on the first line on each page LCD Description E2PDUMP ENGN ALL Print of all the values stored in the E2PROM of the engine control unit print of 1 page E2PDUMP MAIN TOP Print of th...

Страница 408: ...ey Please wait is displayed on the LCD and the backup data is saved in an USB flash memory After the backup data is saved USB Host Connect is displayed on the LCD and the machine returns to the initial state of the maintenance mode 7 Remove the USB flash memory from the machine Note The backup and restore procedures can also be used with the maintenance mode operation by end users However end uses...

Страница 409: ...for restoring only user setting information Import ALL for restoring all backup data including machine information If an error occurs while executing Function code 41 error items below are displayed on the LCD Press the X key and the machine returns to the initial state of the maintenance mode Then take a measure LCD Cause USB Mem used The USB flash memory is being used by another operation Insert...

Страница 410: ...Toner Save On Off Off Density Switching of the Density level 6 to 6 0 Job Cancel Time out Setting of the time until the host time out at the Job Cancel 0 to 225 seconds 4 seconds Sleep Time Setting of the time until enter the Sleep Mode 0 to 99 minutes 5 minutes Page Protection Switching of the protection of the page memory Off Letter A4 Legal Auto Off Emulation Switching of the emulation Auto HP ...

Страница 411: ... computer or for the print of the NetWorkConfig TestPrint FontList Configuration from the panel When select the tray on the computer the setting becomes effective And this setting is ignored Resolution Effective only for the print from the computer When set the Resolution on the computer the setting becomes effective And this setting is ignored Toner Save Effective for all print and change the set...

Страница 412: ...ection Effective for the print from the computer P Pos X Offset Configure the setting for the offset print position of the landscape orientation Effective for the print from the computer When set the X Offset on the computer the setting becomes effective And this setting is ignored P Pos Y Offset Configure the setting for the offset print position of the portrait orientation Effective for the prin...

Страница 413: ...obtained the number of devices increases each time the device is connected to the computer To avoid this problem setting this function to USBNo ON can fix the USB No return value to 0 is displayed at the end of the currently specified function in the LCD display Operating procedure 1 Press the 4 and 5 keys in this order in the initial state of the maintenance mode USBNo is displayed on the LCD 2 P...

Страница 414: ...color or the gray color is uneven upon printing is displayed at the end of the currently specified function in the LCD display Operating procedure 1 Press the 4 and 5 keys in this order in the initial state of the maintenance mode USBNo is displayed on the LCD 2 Press the or key to display DP ImpGray and then press the Mono Start or SET key 3 Press the or key to select DP ImpGray ON or DP ImpGray ...

Страница 415: ...This function is to adjust the left end print start position on the second side in the left and right direction if it is displaced in duplex printing The adjustable range is 100 to 750 unit 300 dpi The minus direction means the left direction Operating procedure 1 Press the 4 and 5 keys in this order in the initial state of the maintenance mode USBNo is displayed on the LCD 2 Press the or key to d...

Страница 416: ... maintenance mode 5 Perform hagaki printing again to check if the dot symptom is alleviated 6 If not repeat the steps 1 to 4 to set an optimum option and then perform hagaki printing Change of ghost reduction setting Function This function is a mode to reduce the level of ghost when it appears in low temperature and high humidity environment If this function is turned ON however spots and dirt may...

Страница 417: ...d press the OK key 3 Press the Yes key on the LCD 4 The new setting is saved After the machine finishes saving the new settings it returns to the initial state of the maintenance mode Note This function is applied to France Belgium Netherlands Pan Nordic East Europe Oceania and Iberia only France Belgium Netherlands Oceania Pan Nordic Iberia East Europe South Africa Turkey Gulf France Australia No...

Страница 418: ...cation press the 4 key 4 COM LIST NEW is displayed on the LCD To transfer the communication list for last three errors press the 5 key 5 COM LIST ERR3 is displayed on the LCD To transfer the maintenance information the list in Function code 77 press the 6 key 6 MNT77 LIST is displayed on the LCD 2 With the 2 ACTIVITY 3 DOCUMENTS 4 COM LIST NEW 5 COM LIST ERR3 or 6 MNT77 LIST being displayed press ...

Страница 419: ...er equipment FAX number of the sender equipment Telephone number of the sender equipment Transfer start date Model code Boot ROM info ROM info Serial number 8CE 501 2014 06 05 Job number Total number of pages transferred Station ID registered in the sender equipment FAX number of the sender equipment Telephone number of the sender equipment Error codes ...

Страница 420: ...the scanning position of the ADF press the key If you want to adjust scanning position of the FB press the key and go to step 2 For single side scanning model go to step 2 2 Press the key to increase the correction value and the key to lower it 3 When the adjustment is finished press the SET key Accepted is displayed on the LCD and the machine returns to the initial state of the maintenance mode F...

Страница 421: ...the Mono Start key SCANNER AREA SET is displayed on the LCD and the white level data is acquired 3 After a few seconds the machine saves the correction of the white level data scanning width in the EEPROM and returns to the initial state of the maintenance mode If an error is detected during this operation the message SCANNER ERROR is displayed on the LCD for single side scanning model and the mes...

Страница 422: ...e performs a warm up Operating procedure 1 Press the 5 and 7 keys in this order in the initial state of the maintenance mode RESET MOTOR is displayed on the LCD 2 When the Mono Start key is pressed each motor identification result is reset and PLZ POWER OFF ON is displayed on the LCD 3 Turn OFF ON the power switch to perform a motor identification operation for each motor and the machine returns t...

Страница 423: ...Note This adjustment requires a touch panel stylus with a thin tip A commercially available stylus designed for electronic dictionaries or personal digital assistance PDA can be used If you do not have it on hand order the TOUCH PEN from the Brother s parts list Note Do not use tools other than a touch panel stylus Especially never use a pointed one e g a screwdriver Using such a tool damages the ...

Страница 424: ...are Main Firmware and High voltage Firmware in Chapter 4 After upgrading the firmware execute Maintenance mode 66 again Function Description LCD Adjustment of inter color position alignment without registration sensor calibration auto Automatically correct misregistration between colors that occurs as the number of printed pages increases and time passes REGISTRATION Printing of misregistration co...

Страница 425: ...bration auto fails while being in process ERROR 66 1 is displayed on the LCD Refer to the error message list in the table below for the troubleshooting Error message Measure FAILED REGIST Press the Mono Start key to clear the error Perform the Adjustment of inter color position alignment auto again If the error recurs clean the belt unit and the drum unit and then perform the adjustment again If t...

Страница 426: ...ed on the LCD 2 Press the or key to display PRINT CHART on the LCD 3 Press the SET key PRINTING is displayed on the LCD and misregistration correction chart see the figure below is printed When printing is finished PRINT CHART is displayed on the LCD 4 Press the X key to return the machine to the initial state of the maintenance mode Misregistration correction chart Fig 5 14 ...

Страница 427: ...e X key to return the machine to the initial state of the maintenance mode Adjustment of inter color position alignment including registration sensor calibration auto Operating procedure 1 Press the 6 key twice in the initial state of the maintenance mode REGISTRATION is displayed on the LCD 2 Press the or key to display ADD REGISTRATION on the LCD 3 Press the SET key PLS WAIT 66 1 is displayed on...

Страница 428: ...e SET key SELECT TRAY1 SX is displayed on the LCD 5 Referring to the Print type table press the or key to select the desired print type and press the SET key SELECT 1PAGE is displayed on the LCD 6 Referring to the Number of pages to be printed table press the or key to select the desired number of pages to be printed and press the SET key For the intermittent pattern printing only SELECT 1P JOB is...

Страница 429: ...CT KCMY5 Black Cyan Magenta Yellow 5 intermittent pattern print SELECT Lattice Lattice print SELECT Total Total pattern print LCD Description SELECT A4 A4 size SELECT LETTER Letter size SELECT ISOB5 ISO B5 size SELECT JISB5 JIS B5 size SELECT A5 A5 size SELECT A5L A5L size SELECT JISB6 JIS B6 size SELECT A6 A6 size SELECT EXECUTE Executive size SELECT LEGAL Legal size SELECT FOLIO Folio size SELEC...

Страница 430: ...SELECT TRAY2 SX One sided printing from T2 paper tray unit SELECT MP SX One sided printing from MP tray SELECT TRAY1 DX Two sided printing from Paper tray 1 SELECT TRAY2 DX Two sided printing from T2 paper tray unit SELECT MP DX Two sided printing from MP tray LCD Description SELECT 1PAGE One page printing SELECT CONTINUE Continuous printing SELECT JOB Intermittent printing by each unit LCD Descri...

Страница 431: ...tern Fig 5 15 SELECT K 100 SELECT C 100 SELECT M 100 SELECT Y 100 SELECT W 100 SELECT R 100 SELECT G 100 SELECT B 100 SELECT KCMY1 SELECT KCMY5 SELECT Lattice SELECT Total When Print type is SX SELECT Total When Print type is DX ...

Страница 432: ... indicates the toner color K Y M or C of which cartridge became empty Laser unit test pattern Fig 5 16 Note When printing fails the following error indications are displayed on the LCD When the error factors are removed and the Mono Start key is pressed the machine automatically recovers to the re executable state PRINTING is displayed on the LCD and the Laser unit test pattern is printed on a she...

Страница 433: ...ss the X key and finish this operation to return the machine to the initial state of the maintenance mode Frame pattern Fig 5 17 Note If printing fails the following error indications are displayed on the LCD and printing is cancelled To print again refer to the measures in the table below and remove the cause of the error Then press the Mono Start key PRINTING is displayed on the LCD and the fram...

Страница 434: ... maintenance mode Frame pattern Fig 5 18 Note If printing fails the following error indications are displayed on the LCD and printing is cancelled To print again refer to the measures in the table below and remove the cause of the error Then press the Mono Start key PRINTING is displayed on the LCD and the frame pattern is printed on a single sheet Error message Measure Replace Toner Replace the e...

Страница 435: ...played on the LCD 4 Referring to the Print specifications table press the or key to select the desired media specifications and press the SET key SELECT SX is displayed on the LCD 5 Referring to the Print type table press the or key to select the desired print type and press the SET key SELECT 1PAGE is displayed on the LCD 6 Referring to the Number of pages to be printed table press the or key to ...

Страница 436: ...size SELECT ISOB5 ISO B5 size SELECT JISB5 JIS B5 size SELECT A5 A5 size SELECT A5L A5L size SELECT JISB6 JIS B6 size SELECT A6 A6 size SELECT EXECUTE Executive size SELECT LEGAL Legal size SELECT FOLIO Folio size SELECT HAGAKI Postcard size LCD Description SELECT PLAIN Plain paper SELECT THICK Thick paper SELECT THIN Thin paper SELECT THICKER Thicker paper SELECT RECYCLED Recycled paper SELECT BO...

Страница 437: ...ce the empty toner cartridge and press the Mono Start key to clear the error Cover is Open Close the front cover No Paper Load paper into the paper tray close the paper tray and press the Mono Start key to clear the error Jam Tray1 Remove the jammed paper close the paper tray and all the covers and press the Mono Start key to clear the error Jam Rear 2D3S YMCBWKW_A 2D3S M 2D3S K 2D3S C 2D3S Y 2D3S...

Страница 438: ...rresponds to the error message Error message Measure dens_l_drk_err Reconnect the harness of the eject sensor PCB Replace the registration mark sensor unit Replace the main PCB ASSY belt_err Replace the belt unit Replace the waste toner box Replace the registration mark sensor unit Replace the main PCB ASSY dens_pat_err dens_calc_err Check if the toner cartridges are set in the correct order of co...

Страница 439: ...erformed in the following order 1 Sensitivity adjustment of density sensor Function code 72 LCD PLS WAIT 72 2 Developing bias voltage correction Function code 83 LCD PLS WAIT 83 3 Adjustment of color registration Adjustment of inter color position alignment including registration sensor calibration Function code 66 LCD PLS WAIT 66 1 3 When all operations are completed COMP is displayed on the LCD ...

Страница 440: ...e Spec code Note If there is a pause of more than one minute the machine will automatically return to the initial state of the maintenance mode MODEL Spec code Spec code Detail DCP L8400CDN Brazil 0042 CEE General 1004 China 0020 France Belgium Netherlands 1058 Belgium 1008 France 1004 Netherlands 1004 Others 1004 Germany 3004 Italy Iberia 1004 Pan Nordic 1004 Switzerland 1004 UK 1004 DCP L8450CDW...

Страница 441: ... 0366 Italy 0316 Portugal 0318 Spain 0315 Pan Nordic 0357 Denmark 0313 Finland 0312 Norway 0307 Sweden 0326 Others 0350 Russia 0348 Switzerland 0310 UK 0304 MFC L8850CDW Argentina 0436 Asia 0440 Australia New Zealand 0456 Australia 0406 New Zealand 0427 Brazil 0442 Canada 0402 CEE General 0488 Bulgaria 0432 Croatia 0481 Czecho 0437 Hungary 0438 Poland 0439 Romania 0433 Slovakia 0430 Slovenia 0482 ...

Страница 442: ...w Zealand 0527 Canada 0502 CEE General 0588 Bulgaria 0532 Croatia 0581 Czecho 0537 Hungary 0538 Poland 0539 Romania 0533 Slovakia 0530 Slovenia 0582 Others 0550 France Belgium Netherlands 0555 Belgium 0508 France 0505 Netherlands 0509 Germany 0503 Italy Iberia 0566 Italy 0516 Portugal 0518 Spain 0515 Pan Nordic 0557 Denmark 0513 Finland 0512 Norway 0507 Sweden 0526 Others 0550 Russia 0548 Switzerl...

Страница 443: ... such as the remaining amount of consumables number of replacements and counter values Operating procedure 1 Press the 7 key twice in the initial state of the maintenance mode Maintenance information starts to be printed 2 When printing is finished the machine returns to the initial state of the maintenance mode Maintenance information Fig 5 20 ...

Страница 444: ...46 Rotations of the developer roller used in print ing Current toner Previous used toner 47 Total number of paper jams Paper jams that have occurred in each section in the machine 22 Main PCB inspection log High voltage inspection log Number of electric discharge errors Number of fuser unit errors The number of polygon motor lock errors Process execution state 48 Machine error log Total pages prin...

Страница 445: ...te at the rotating speed of 100 2 Press the Mono Start key F50 P 0 B 0 is displayed on the LCD and the fuser fan only operates at the rotating speed of 50 3 Press the Mono Start key F0 P 0 B 0 is displayed on the LCD and all the fans stop 4 Press the X key to return the machine to the initial state of the maintenance mode Location of fans Fig 5 21 LCD Parts name Description F Fuser fan Evacuate ho...

Страница 446: ... remaining yellow toner estimated from coverage YTN_RRM 67 Amount of remaining yellow toner estimated from the number of developer rotations KTN_ERM 87 Amount of remaining black toner estimated from coverage KTN_RRM 67 Amount of remaining black toner estimated from the number of developer rotations DRUM_PG 00000000 Number of pages printed on drum unit PFMP_PG 00000000 Number of pages where PF kit ...

Страница 447: ...0000 Total number of paper input of Legal and Folio size paper B5 EXE 00000000 Total number of paper input of B5 and Executive size paper ENVLOP 00000000 Number of paper input of Envelope size A5 00000000 Number of paper input of A5 size including A5 Long Edge paper OTHER 00000000 Number of paper input of other size paper PLTNRE 00000000 Total of pages printed on plain thin and recycled paper TKTR...

Страница 448: ...umber of pages printed from the previous installed yellow toner cartridge KTN_PG1 00000000 Number of pages printed from the currently installed black toner cartridge KTN_PG2 00000000 Number of pages printed from the previous installed black toner cartridge WTNR_PG 00000000 Number of pages printed from the waste toner box ADSX_PG 00000000 Number of sheets scanned in one sided scanning with the ADF ...

Страница 449: ...ou press the SET key the serial number is written and the machine returns to the initial state of the maintenance mode 3 For the models without FAX function TTLLIST 00000000 is displayed on the LCD and the number of the List printed pages is displayed 4 If you press the SET key with the replacement count of a consumable part is displayed DATE_XX 000000 XX indicates a relevant consumable part and t...

Страница 450: ...unction is used to display the latest error code on the LCD Operating procedure 1 Press the 8 and 2 keys in this order in the initial state of the maintenance mode MACHINE ERR XXXX is displayed on the LCD 2 Press the X key to return the machine to the initial state of the maintenance mode ...

Страница 451: ... PCB ASSY make sure to perform the 1 3 28 Sensitivity adjustment of density sensor Function code 72 first Note If developing bias voltage correction fails ERROR 83 is displayed on the LCD Display the error message by pressing the key and take the following measure that corresponds to the error message Error message Measure FAILED DEVBIAS Remove the error factors with the following operations and p...

Страница 452: ...the user s machine User side Service side 5 When the user side starts sending the error list press the Start key Send or Receive 1 Send 2 Receive is displayed on the LCD 6 Press the 2 key The machine starts receiving the error list 2 Hold down the Home key in the ready state until the display on the LCD changes Memo If you cannot find the Home key press the Toner key and the Home key lights up 3 H...

Страница 453: ... reset and the machine returns to step 2 again represents the selected part name 4 Press the X key to return the machine to the initial state of the maintenance mode The parts that can be selected are shown in the table below 1 3 38 Exit from the maintenance mode Function code 99 Function This function is used to exit from the maintenance mode restart the machine and return to the ready state If t...

Страница 454: ...e ready state The serial number screen is displayed on the LCD Memo If you cannot find the Home key press the Toner key and the Home key lights up 2 Hold down the blank space at the bottom of the LCD for about 2 seconds The screen containing the ten key pad and Start key is displayed on the LCD 3 Press the 1 0 4 1 and 4 in this order Then Communication List is printed 4 Press the X key and the mac...

Страница 455: ...r 5 seconds or more Attach the cleaning sheet Please refer to the included instructions is displayed on the LCD 7 Open the front cover take out the drum unit and attach the cleaning sheet on the drum unit For the method of attaching the cleaning sheet refer to the insertion of the cleaning sheet 8 Put the drum unit back in the machine and close the front cover Please wait is displayed on the LCD a...

Страница 456: ...ne Info and then press the Machine Info key 4 Press the or key to display Parts Life and then press the Parts Life key 5 Hold down the key for 5 seconds or more Reset Menu is displayed on the LCD 6 Drum and Belt Unit are displayed on the LCD Press the key of the part you want to reset Reset is displayed on the LCD represents the selected part name 7 Press the Yes key Accepted is displayed on the L...

Страница 457: ...V 9 V 8 V 7 V 6 W 5 W 4 W 3 W 2 FG 1 FG CN31 1 24V 2 MP_SOL 1 24V 2 T1_SOL CN18 CN17 T1 SOLENOID MP SECTOR SOLENOID 1 24V 2 REG_SOL CN19 REGISTRATION SOLENOID 1 LED_VCC 2 SGND 3 DEVREL_SEN CN10 1 T1_REG_F_SEN 2 VCC 3 SGND 4 REGR_SEN CN15 1 SGND 2 LED_VCC 3 T1_PEDG_SEN CN13 PAPER DETECT SENSOR PCB ASSY 1 MP_PE_SEN 2 MP_REG_F_SEN 3 SGND 4 LED_VCC CN14 1 A 2 A 3 B 4 B CN32 CN28 1 SGND 2 PNEW_K_SEN 3 ...

Страница 458: ...at cables or on the wire harness After disconnecting flat cables check that each cable is not damaged at its end or short circuited When connecting flat cables do not insert them at an angle After insertion check that the cables are not at an angle When connecting or disconnecting harnesses hold the connector body not the cables If the connector is locked release it first After a repair check not ...

Страница 459: ...o Replace Periodical Replacement Parts Preparation Prior to proceeding with the disassembly procedure 1 Unplug the AC cord the telephone line the USB flash memory the USB cable if connected and the LAN cable if connected 2 Remove the Paper tray Main body Paper tray ...

Страница 460: ... Open the Back cover Fig 7 1 2 Remove the Back cover stopper arm L R from the Main body Fig 7 2 Main body Back side Back cover Back cover stopper arm L Main body Back cover stopper arm R Back cover stopper arm L Pin Back cover Back side ...

Страница 461: ...ential 3 Remove the Shaft of the Back cover from the Bush on the right side of the Main body Fig 7 3 4 Remove the Back cover Fig 7 4 Back cover Bush Main body Shaft Back side 4a 4b Back cover Main body Back side ...

Страница 462: ...he Main body Fig 7 5 6 Remove the two Taptite bind B M4x12 screws from the Fuser cover L 7 Remove the one Hook and one Pin and remove the Fuser cover L from the Main body Fig 7 6 Back flapper holder Pin Main body Pin Back side Taptite bind B Fuser cover L Hook Pin Main body M4x12 Taptite bind B M4x12 Back side ...

Страница 463: ...L R to open the Fuser cover ASSY Fig 7 7 9 Slide the Fuser cover ASSY in the direction of the arrow 9a and remove it to the front Fig 7 8 Fuser cover lock lever R Fuser cover ASSY Fuser cover Main body lock lever L Back side 9a 9b Fuser cover ASSY Main body Back side ...

Страница 464: ...the Cleaner roller spring from the two Pins of the Fuser cover ASSY Remove the Cleaner pinch roller S ASSY and Cleaner roller spring from the Fuser cover ASSY Fig 7 10 Cleaner Hook Cleaner pinch roller S ASSY Fuser cover ASSY roller spring Cleaner roller spring Fuser cover ASSY Cleaner pinch roller S ASSY Pin ...

Страница 465: ...ther three Cleaner pinch roller S ASSYs in the same way 14 Remove the two Taptite bind B M4x12 screws from the Fuser cover R 15 Release the two Hooks and remove the Fuser cover R from the Main body Fig 7 12 Cleaner pinch roller S ASSY Cleaner roller spring Taptite bind B M4x12 Fuser cover R Main body Back side Hook ...

Страница 466: ...of the Fuser unit Fig 7 14 Assembling Note Center thermistor has a black and blue connectors 230V models only The black connector may be connected to the blue insertion port and vice versa Connector CN1 CN2 Eject sensor Connector CN1 CN2 Back side PCB ASSY Center thermistor harness Fuser unit Electrode terminal of the Fuser unit Main body Electrode terminal of the Main body Back side ...

Страница 467: ...rom the Main body Fig 7 15 Fig 7 16 Note Do not apply a physical impact or vibration to the Fuser unit Do not touch the roller and electrodes as shown in the figure below to prevent breakage of the Fuser unit Taptite pan B M4x14 Fuser unit Main body Taptite pan B M4x14 Back side Fuser unit ...

Страница 468: ...move the Toner filter ASSY from the Paper eject ASSY Fig 7 17 20 After replacing the Fuser unit reset the counter Refer to 1 3 37 Reset counters for parts Function code 88 in Chapter 5 Toner filter Hook Hook Hook Paper eject ASSY ASSY Paper eject ASSY ...

Страница 469: ... Open the Back cover Fig 7 18 2 Remove the Back cover stopper arm L R from the Main body Fig 7 19 Main body Back cover Back side Back cover stopper arm L Main body Back cover stopper arm R Back cover stopper arm L Pin Back cover Back side ...

Страница 470: ...ential 3 Remove the Shaft of the Back cover from the Bush on the right side of the Main body Fig 7 20 4 Remove the Back cover Fig 7 21 Back cover Bush Main body Shaft Back side 4a 4b Back cover Main body Back side ...

Страница 471: ... 3x6 screw and the one Taptite bind B M4x12 screw from the front of the Side cover L 7 Remove the Taptite bind B M4x12 screw from the side of the Side cover L Fig 7 23 Main body Front cover Taptite B 3x6 Taptite bind B M4x12 Main body Taptite bind BM4x12 Front side Side cover L ...

Страница 472: ...7 15 Confidential 8 Remove the two Taptite bind B M4x12 screws from the back of the Side cover L Fig 7 24 Taptite bind B M4x12 Back side Side cover L ...

Страница 473: ...row 9a and release the other Hooks and remove Side cover L from the Main body Fig 7 25 Inside of Side cover L Fig 7 26 Hook 1 Hook 2 Hook 3 Hook 4 Hook 5 Hook 6 Hook 7 Hook 8 Hook 9a 9b Front side Main body Hook Hook Hook Side cover L Hook Hook Hook Hook Hook Hook Front side Back side Hook Hook Hook Hook Hook Side cover L ...

Страница 474: ...one Taptite bind B M4x12 screw from the front of the Side cover R Fig 7 27 11 Remove the two Taptite bind B M4x12 screws from the back of the Side cover R Fig 7 28 Taptite B 3x6 Taptite bind B M4x12 Front side Side cover R Taptite bind B M4x12 Back side Side cover R ...

Страница 475: ...row 12a and release the other Hooks and remove Side cover R from the Main body Fig 7 29 Inside of Side cover R Fig 7 30 Hook 1 Hook 2 Hook 3 Hook 4 Hook 5 Hook 6 Hook 7 Hook 12a 12b Front side Side cover R Main body Hook Hook Hook Hook Hook Hook Hook Hook Front side Back side Hook Hook Hook Hook Hook Side cover R ...

Страница 476: ... and release the Hooks from the joint of the Document scanner unit Fig 7 32 Note As the Spacer tends to come off be careful not to lose it Spacer Spacer Spacer Spacer High voltage power Right side supply PCB ASSY Document scanner unit Hook Pull arm R Pull arm L Hook ...

Страница 477: ...he ADF earth harness and Document scanner FG harness from the Main PCB plate 17 Disconnect the two Connectors CN39 and CN41 from the Main PCB ASSY and release the wiring of the Main PCB insulation sheet Fig 7 34 Main body Left side Main shield cover plate ASSY Panel FG harness Screw bind M3x8 Screw bind M3x8 Screw bind M3x8 Screw bind M3x8 CN41 CN39 Back side ADF earth harness Document scanner Mai...

Страница 478: ...ut the First side CIS flat cable and Second side CIS flat cable from the Flat core Fig 7 36 Main PCB ASSY CN3 CN4 CN7 CN13 CN16 CN20 CN27 CN28 CN32 CN33 CN37 CN38 CN41 CN39 CN42 CN43 CN44 CN46 CN47 CN40 CN45 CN30 CN31 CN19 CN18 CN17 CN26 CN14 CN22 CN9 CN11 CN12 CN10 CN8 CN21 CN6 CN5 CN2 CN49 Flat core Document scanner unit Flat core First side CIS flat cable Second side CIS flat cable ...

Страница 479: ...nt scanner unit as shown in the figure to remove it from the Main body Fig 7 37 22 Remove the eight Taptite bind B M4x12 screws from the Joint cover top Fig 7 38 Joint cover top Document scanner unit Flat cable Hole Taptite bind B M4x12 Taptite bind B M4x12 Taptite bind B M4x12 Taptite bind B M4x12 Joint cover top Front side ...

Страница 480: ...rew pan S P washer M3 5x6 screw and remove the Modem FG harness from the Main PCB plate 25 Disconnect the Modem flat cable CN28 from the Main PCB ASSY Fig 7 40 Hook Hook Hook Hook Hook Main body Joint cover top Screw pan S P washer M3 5x6 Back side Main PCB ASSY CN28 24 25 Modem flat cable Modem FG harness Main PCB plate ...

Страница 481: ...iring of the Modem ground harness 28 Remove the four Taptite bind B M4x12 screws from the Back cover upper 29 Release the two Hooks and remove the Back cover upper from the Main body Fig 7 42 Right side High voltage power supply PCB ASSY Modem ground harness Screw pan S P washer M3 5x6 Taptite bind B M4x12 Taptite bind B M4x12 Back cover upper Hook Hook Main body Front side ...

Страница 482: ...move the two Taptite bind B M4x12 screws from the back of the Joint cover base ASSY Fig 7 44 Main PCB ASSY CN3 CN4 CN7 CN13 CN16 CN20 CN27 CN28 CN32 CN33 CN37 CN38 CN41 CN39 CN42 CN43 CN44 CN46 CN47 CN40 CN45 CN30 CN31 CN19 CN18 CN17 CN26 CN14 CN22 CN9 CN11 CN12 CN10 CN8 CN21 CN6 CN5 CN2 CN49 CN15 Joint cover base ASSY Taptite bind B M4x12 Taptite bind B M4x12 Taptite bind B M4x12 Taptite bind B M...

Страница 483: ...er cover plate from the Main body Fig 7 46 Assembling Note When assembling the six screws of the Taptite bind B M4x12 be sure to assemble them in the order shown in the figure Hook 1 Hook Hook Hook Hook Joint cover base ASSY Main body Front side Taptite bind B M4x12 Taptite bind B M4x12 Taptite bind B M4x12 Taptite bind B M4x12 Taptite cup S M3x6 SR Taptite cup S M3x6 SR Main body 1 2 3 4 5 6 Tapt...

Страница 484: ...x6 SR screws and remove the four Scanner holders from the Scanner plate Fig 7 48 CN1 Laser unit Laser unit flat cable Front side Taptite cup S M3x6 SR Scanner holder Taptite cup S M3x6 SR Taptite cup S M3x6 SR Taptite cup S M3x6 SR Taptite cup S M3x6 SR Scanner plate Scanner holder Scanner holder Scanner holder Front side ...

Страница 485: ... code 88 in Chapter 5 Assembling Note When assembling the Scanner holder to A of the Laser unit be sure to use the Scanner holder of which B is a screw and not to use other Scanner holders When assembling the Scanner holder to A of the Laser unit be sure that the Scanner holder is placed as shown in the figure Laser unit A Scanner holder B Front side Scanner holder Laser unit Laser unit Scanner pl...

Страница 486: ...the arrow 9a and release the other Hooks and remove Side cover L from the Main body Fig 7 51 Inside of Side cover L Fig 7 52 Hook Hook Hook 8 Hook 7 Hook 6 Hook 5 Hook 4 Hook 3 Hook 2 Hook 1 Hook 9a 9b Front side Main body Side cover L Hook Hook Hook Hook Hook Hook Hook Front side Back side Hook Hook Hook Side cover L ...

Страница 487: ...one Taptite bind B M4x12 screw from the front of the Side cover R Fig 7 53 11 Remove the two Taptite bind B M4x12 screws from the back of the Side cover R Fig 7 54 Taptite B 3x6 Taptite bind B M4x12 Front side Side cover R Taptite bind B M4x12 Back side Side cover R ...

Страница 488: ...he arrow 12a and release the other Hooks and remove Side cover R from the Main body Fig 7 55 Inside of Side cover R Fig 7 56 Hook Hook Hook 7 Hook 6 Hook 5 Hook 4 Hook 3 Hook 2 12a 12b Hook 1 Front side Main body Side cover R Hook Hook Hook Hook Hook Hook Hook Hook Hook Hook Front side Back side Side cover R ...

Страница 489: ...Release the four Hooks and remove the Back cover upper from the Main body Fig 7 58 Note As the Spacer tends to come off be careful not to lose it Spacer Spacer Spacer Spacer High voltage power Right side supply PCB ASSY Taptite bind B M4x12 Taptite bind B M4x12 Hook Hook Hook Main body Back cover upper ...

Страница 490: ...he ADF earth harness and Document scanner FG harness from the Main PCB plate 18 Disconnect the two Connectors CN39 and CN41 from the Main PCB ASSY and release the wiring of the Main PCB insulation sheet Fig 7 60 Main body Main shield cover plate ASSY Left side Panel FG harness Screw bind M3x8 Screw bind Screw bind M3x8 Screw bind M3x8 M3x8 CN39 CN41 ADF earth harness Main PCB insulation sheet Main...

Страница 491: ...e Flat core from the Joint cover top 22 Pull out the Second side CIS flat cable from the Flat core Fig 7 62 Main PCB ASSY CN3 CN4 CN7 CN13 CN16 CN20 CN27 CN28 CN32 CN33 CN37 CN38 CN41 CN39 CN42 CN43 CN44 CN46 CN47 CN40 CN45 CN30 CN31 CN19 CN18 CN17 CN26 CN15 CN14 CN22 CN9 CN11 CN12 CN10 CN8 CN21 CN6 CN5 CN2 CN49 Flat core Flat core A view A view Hook Joint cover top Document Second side CIS flat c...

Страница 492: ...ack side of the Main body Fig 7 63 26 Remove the eight Hooks and lift the Document scanner unit from the Main body 27 Pull out the First side CIS flat cable from the Flat core of the Main body as lifting the Document scanner unit Fig 7 64 Taptite bind B M4x12 Taptite bind B M4x12 Main body Taptite cup B M4x12 Main body Hook Hook Hook Hook Hook Main body Document Hook Flat core First side CIS flat ...

Страница 493: ...at cable CN28 from the Main PCB ASSY Fig 7 65 30 Remove the eight Taptite bind B M4x12 screws from the Joint cover top Fig 7 66 Screw pan S P washer M3 5x6 Modem FG harness Modem flat cable Main PCB ASSY CN28 Back side 29 28 Main PCB plate Front side Taptite bind B M4x12 Taptite bind B M4x12 Taptite bind B M4x12 Taptite bind B M4x12 Joint cover top ...

Страница 494: ...ease the two Hooks A and release the two Hooks B 34 Release the four Hooks C and lift the Joint cover top in the direction of the arrow 35 Slide the Joint cover top from the four Hooks D and remove it from the Main body Fig 7 68 High voltage power supply PCB ASSY Right side Modem ground harness Screw pan S P washer M3 5x6 Joint cover top Main body Front side 35 34 Hook B Hook A Hook A Hook B Hook ...

Страница 495: ...move the two Taptite bind B M4x12 screws from the back of the Joint cover base ASSY Fig 7 70 Main PCB ASSY CN3 CN4 CN7 CN13 CN16 CN20 CN27 CN28 CN32 CN33 CN37 CN38 CN41 CN39 CN42 CN43 CN44 CN46 CN47 CN40 CN45 CN30 CN31 CN19 CN18 CN17 CN26 CN15 CN14 CN22 CN9 CN11 CN12 CN10 CN8 CN21 CN6 CN5 CN2 CN49 Joint cover base ASSY Taptite bind B M4x12 Taptite bind B M4x12 Taptite bind B M4x12 Taptite bind B M...

Страница 496: ...er cover plate from the Main body Fig 7 72 Assembling Note When assembling the six screws of the Taptite bind B M4x12 be sure to assemble them in the order shown in the figure Hook 1 Hook Hook Hook Hook Main body Front side Joint cover base ASSY 1 2 3 4 5 6 Taptite bind B M4x12 Taptite cup S M3x6 SR Front side Main body Scanner cover plate Taptite cup S M3x6 SR Taptite cup S M3x6 SR Taptite bind B...

Страница 497: ...x6 SR screws and remove the four Scanner holders from the Scanner plate Fig 7 74 Laser unit Laser unit flat cable CN1 Front side Taptite cup S M3x6 SR Scanner holder Taptite cup S M3x6 SR Taptite cup S M3x6 SR Taptite cup S M3x6 SR Taptite cup S M3x6 SR Scanner plate Scanner holder Scanner holder Scanner holder Front side ...

Страница 498: ... code 88 in Chapter 5 Assembling Note When assembling the Scanner holder to A of the Laser unit be sure to use the Scanner holder of which B is a screw and not to use other Scanner holders When assembling the Scanner holder to A of the Laser unit be sure that the Scanner holder is placed as shown in the figure Laser unit A Scanner holder B Front side Scanner holder Laser unit Laser unit Scanner pl...

Страница 499: ...ration pad spring from the Paper tray 1 Fig 7 78 Assembling Note When assembling the Separation pad holder ASSY be sure to assemble it in a way that A of the Separation pad holder ASSY is inserted into B of the Separation pad spring 1a 1b Hook B Separation pad holder ASSY A Paper tray 1 Separation pad spring Paper tray 1 Separation pad spring ...

Страница 500: ...e Roller holder ASSY in the direction of the arrow and remove it from the T1 drive shaft gear Z17M07 5 Slide the Roller holder ASSY in the direction of the arrow 5a and 5b in this order and remove it from the Paper feed unit Fig 7 80 T1 lift arm Roller holder ASSY B A 5b 5a 4 Roller holder ASSY Paper feed unit T1 drive shaft gear Z17M07 ...

Страница 501: ...the counter Refer to 1 3 37 Reset counters for parts Function code 88 in Chapter 5 Assembling Note Align the Hole of the Paper feed unit to the Shaft of the Roller holder ASSY and insert it into the hole Paper feed unit Paper feed unit Roller holder ASSY Hole Shaft ...

Страница 502: ...SY to remove them in the upward direction Fig 7 82 2 Remove the T2 separation pad spring from the T2 separation pad ASSY Fig 7 83 Note Be careful not to lose the T2 separation pad spring Hook Hook T2 separation pad ASSY T2 paper tray unit T2 separation pad ASSY T2 separation pad spring ...

Страница 503: ...direction of the arrow 4b Fig 7 84 Fig 7 85 Assembling Note When assembling the T2 separation roller ASSY assemble it by sliding it in the direction of the arrow b as rotating the T2 separation roller ASSY in the direction of the arrow a 3 4b 4a Hook T2 separation roller ASSY T2 separation roller ASSY T2 paper feed drive shaft T2 paper feed drive shaft T2 paper feed frame unit a b T2 separation ro...

Страница 504: ...k up roller ASSY from the T2 paper feed drive shaft Fig 7 86 6 After replacing the PF kit 2 reset the counter Refer to 1 3 37 Reset counters for parts Function code 88 in Chapter 5 Hook T2 paper feed frame unit T2 paper feed drive shaft T2 paper pick up roller ASSY ...

Страница 505: ... A to release the Hook and remove the MP upper frame cover from the MP upper cover ASSY Fig 7 87 2 Remove the MP lift arm B from the MP upper cover ASSY Fig 7 88 MP upper frame cover Hook A MP upper cover ASSY MP upper cover ASSY MP lift arm B ...

Страница 506: ...e arrow 4 Release the Hook 2 and remove the MP holder bushing from the MP upper cover ASSY Fig 7 89 5 Remove the MP roller holder ASSY from the MP upper cover ASSY Fig 7 90 3 4 Hook 2 MP upper cover ASSY MP holder bushing Front side Hook 1 Hook 2 Hook 1 MP upper cover ASSY MP roller holder ASSY ...

Страница 507: ...P separation pad spring from the two Pins of MP upper cover ASSY Fig 7 92 8 After replacing the PF kit MP reset the counter Refer to 1 3 37 Reset counters for parts Function code 88 in Chapter 5 6a 6b MP separation pad ASSY Pin Pin MP separation pad ASSY Pin MP upper cover ASSY MP separation pad spring Pin MP upper cover ASSY ...

Страница 508: ... Fig App 1 2 Fig App 1 3 Serial number Serial number 6 digit Manufacturing factory No 4 2014 5 2015 A January B February C March D April E May F June G July H August J September K October L November M December Year of manufacture Month of manufacture A 4 J 1 1 1 1 0 1 Model number Serial number label Serial number label ...

Страница 509: ...LCD in the ready state 2 Press the All Settings key on the LCD 3 Press the Initial Setup key on the LCD 4 Press the Reset key on the LCD 5 Press the Factory Reset key on the LCD 6 When Factory Reset It may take time until reset finishes Yes No is displayed on the LCD press the Yes key 7 When Reboot OK Press Yes for 2 seconds to confirm is displayed on the LCD hold down the Yes key for 2 seconds or...

Страница 510: ...that connects the machine with your computer 2 Turn ON your computer 3 Turn ON the power switch of the machine 4 Enter the maintenance mode Refer to 1 1 How to Enter the Maintenance Mode in Chapter 5 5 Connect the machine to your computer using a USB cable The following window appears 6 The following screen appears indicating the detection of new hardware device by the system Select No not this ti...

Страница 511: ...App 3 2 Confidential 7 Select Install the software automatically Recommended and click Next 8 Alert warning message of WHQL appears Click Continue Anyway to proceed ...

Страница 512: ... Confidential 9 Repeat steps 6 to 8 three times Installation is completed 10 If the Brother Maintenance USB Printer driver is successfully installed the following message screen appears Click Finish to return ...

Страница 513: ...nfidential Note In order to check whether the printer driver is successfully installed click Start Settings Printers to select the Printers window Then check that the Brother Maintenance USB Printer icon is shown ...

Страница 514: ...he electrical outlet Disconnect the USB cable that connects the machine with your computer 2 Turn ON your computer 3 Double click Setup exe inside the Brother Maintenance USB Printer folder that was saved in a temporary folder The following screen appears Click the Next button The following screen is displayed during installation ...

Страница 515: ...ck Finish 5 Plug the power cord of the machine into an electrical outlet 6 Enter the maintenance mode Refer to 1 1 How to Enter the Maintenance Mode in Chapter 5 7 Connect the machine to your computer using a USB cable and the installation will be performed automatically ...

Отзывы: