background image

68

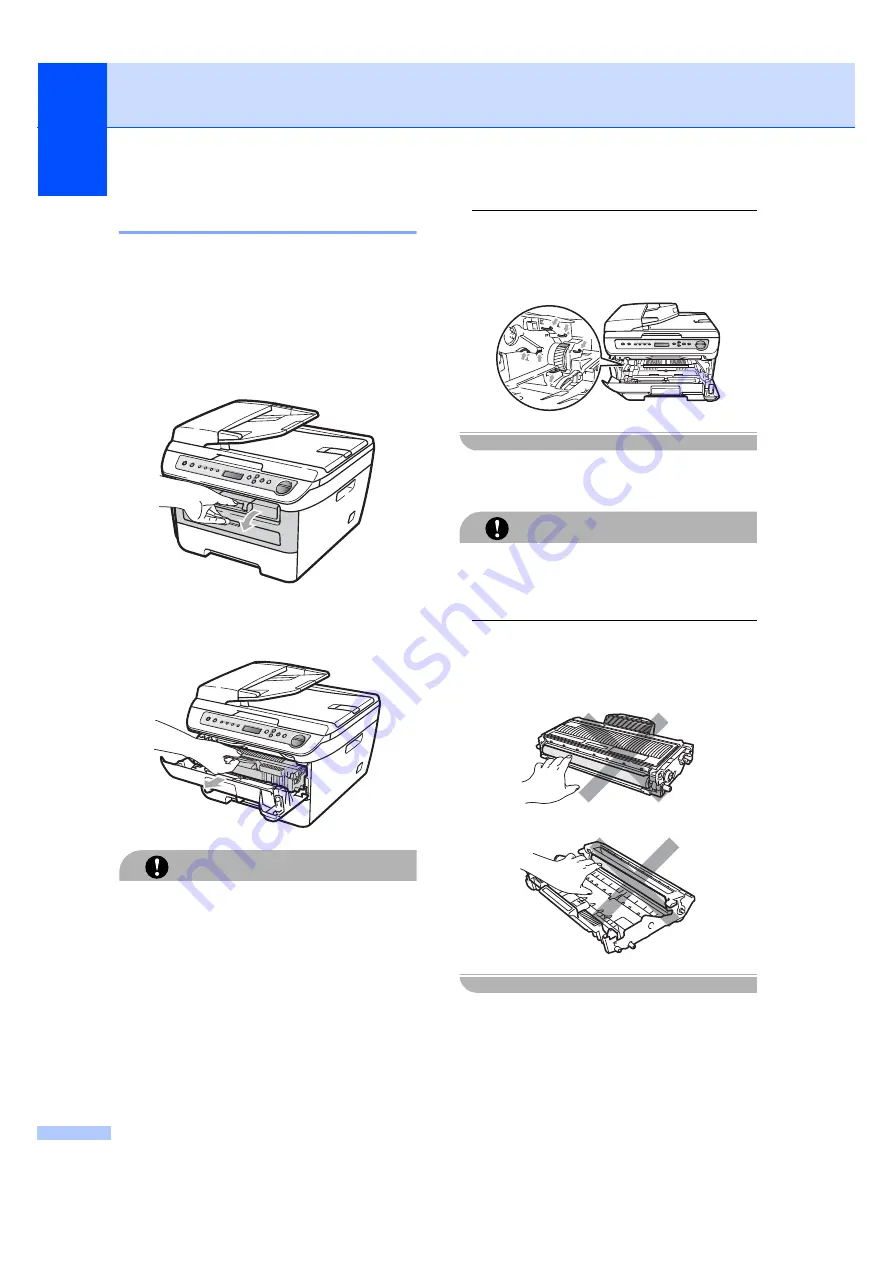
Cleaning the drum unit

B

If you have print quality problems, clean the 
drum unit as follows.

a

Turn off the machine’s power switch. 
Unplug the power cord from the AC 
power outlet. 

b

Open the front cover.


c

Slowly take out the drum unit and toner 
cartridge assembly.


CAUTION


We recommend that you put the drum unit 
and toner cartridge assembly on a clean, 
flat surface with a piece of disposable paper 
or cloth underneath it in case you 
accidentally spill or scatter toner.


To prevent damage to the machine caused 
by static electricity, DO NOT touch the 
electrodes shown in the illustration.


d

Push down the green lock lever and take 
the toner cartridge out of the drum unit.

CAUTION


Handle the toner cartridge carefully. If toner 
scatters on your hands or clothes, wipe or 
wash it off with cold water at once.


To avoid print quality problems, DO NOT 
touch the shaded parts shown in the 
illustrations below.


Содержание DCP-7030

Страница 1: ...USER S GUIDE DCP 7030 DCP 7040 Not all models are available in all countries Version 0 USA CAN ...

Страница 2: ...egister your product on line at http www brother com registration By registering your product with Brother you will be recorded as the original owner of the product Your registration with Brother may serve as confirmation of the purchase date of your product should you lose your receipt may support an insurance claim by you in the event of product loss covered by insurance and will help us notify ...

Страница 3: ...ient way to register your new product register on line at http www brother com registration FAQs frequently asked questions The Brother Solutions Center is our one stop resource for all your Digital copier Center needs You can download the latest software and utilities and read FAQs and troubleshooting tips to learn how to get the most from your Brother product http solutions brother com Note You ...

Страница 4: ... 1 Approx cartridge yield is declared in accordance with ISO IEC 19752 2 Drum yield is approximate and may vary by type of use In USA 1 877 552 MALL 1 877 552 6255 1 800 947 1445 fax http www brothermall com In Canada 1 877 BROTHER http www brother ca Description Item Toner Cartridge Standard TN 330 Approx 1 500 pages 1 Toner Cartridge High Yield TN 360 Approx 2 600 pages 1 Drum Unit DR 360 Approx...

Страница 5: ...E LIKE ARISING OUT OF THE USE OR INABILITY TO USE THE SOFTWARE EVEN IF BROTHER S LICENSOR HAS BEEN ADVISED OF THE POSSIBILITY OF SUCH DAMAGES BECAUSE SOME STATES IN THE USA AND SOME PROVINCES IN CANADA DO NOT ALLOW THE EXCLUSION OR LIMITATION OF LIABILITY FOR CONSEQUENTIAL OR INCIDENTAL DAMAGES THE ABOVE LIMITATIONS MAY NOT APPLY TO YOU IN ANY EVENT BROTHER S LICENSOR S LIABILITY TO YOU FOR ACTUAL...

Страница 6: ...nd Accessory Items 4 Consumable and Accessory Items that expired in accordance with a rated life 5 Problems arising from other than defects in materials or workmanship and 6 Normal Periodic Maintenance Items such as Paper Feeding Kit Fuser and Laser Units This limited warranty is VOID if this Product has been altered or modified in any way including but not limited to attempted warranty repair wit...

Страница 7: ...rranty iii the proper packaging instructions are not followed and has caused damage to the product or iv the warranty period on your original Product has expired or has not been sufficiently validated with a copy of the proof of purchase bill of sale The replacement Machine you receive even if refurbished or remanufactured will be covered by the balance of the limited warranty period remaining on ...

Страница 8: ...ransport will cause severe damage to the Laser MFC Fax machine and will void the Warranty For inkjet units When shipping your Inkjet MFC Fax machine remove the ink cartridges and replace them with the original protective parts If original protective parts are not available leave ink cartridges installed Please avoid shipping the unit without original protective parts or ink cartridges Damage to yo...

Страница 9: ...vii ...

Страница 10: ...anual feed slot 8 Unprintable area 11 Acceptable paper and other print media 12 Recommended paper and print media 12 Type and size of paper 12 Handling and using special paper 14 Loading documents 17 Using the automatic document feeder ADF DCP 7040 only 17 Using the scanner glass 18 3 General setup 19 Paper settings 19 Paper type 19 Paper size 19 Volume settings 19 Beeper volume 19 Ecology feature...

Страница 11: ...mation 40 Federal Communications Commission FCC Declaration of Conformity USA only 40 Industry Canada Compliance Statement Canada only 41 Disconnect device 41 International ENERGY STAR Compliance Statement 41 Laser safety 41 FDA regulations 42 Important safety instructions 42 Trademarks 45 B Troubleshooting and routine maintenance 46 Troubleshooting 46 If you are having difficulty with your machin...

Страница 12: ...counters 77 Checking the Drum life 77 Packing and shipping the machine 78 C Menu and features 79 On screen programming 79 Menu table 79 Memory storage 79 Menu keys 79 How to access the menu mode 80 Menu table 81 D Specifications 83 General 83 Print media 85 Copy 86 Scan 87 Print 88 Interfaces 88 Computer requirements 89 Consumable items 90 E Glossary 91 F Index 92 ...

Страница 13: ...Section I General I General information 2 Loading paper and documents 7 General setup 19 ...

Страница 14: ...mputer screen Italics Italicized style emphasizes an important point or refers you to a related topic Courier New Courier New font identifies the messages shown on the LCD of the machine Warnings tell you what to do to prevent possible personal injury Cautions specify procedures you must follow or avoid to prevent possible damage to the machine or other objects Electrical Hazard icons alert you to...

Страница 15: ...ur PC Insert the Brother CD ROM labeled Windows into your CD ROM drive b If the language selection screen appears click your language c If the model name screen appears click your model name The CD ROM main menu will appear If this window does not appear use Windows Explorer to find and run the start exe program from the root directory of the Brother CD ROM d Click Documentation e Click the docume...

Страница 16: ...e selection screen appears double click your language e Double click the top page file to view the Software User s Guide in HTML format f Click the documentation you want to read Software User s Guide Note The documents are also available in PDF format 3 manuals User s Guide for stand alone operations Software User s Guide and Quick Setup Guide The PDF format is recommended for printing the manual...

Страница 17: ...e numbers for the USA and Canada click Support Information To access the USA Brother online shopping mall http www brothermall com for additional product and service information click Brother Mall com To access Canada s Brother online shopping mall http www brother ca for additional product and service information click Shop Online Canada For the latest news and product support information http so...

Страница 18: ...hoose temporary settings for copying Enlarge Reduce Reduces or enlarges copies Contrast You can increase or decrease the contrast of your copies Number of Copies Use this key to make multiple copies 4 LCD Displays messages to help you set up and use your machine 5 Menu keys Clear Back Deletes entered data or lets you cancel the current setting a or b Press to scroll through the menus and options O...

Страница 19: ...n set the paper size in the printer driver or by using the control panel buttons Before using paper that has holes in it such as organizer sheets you must fan the stack to avoid paper jams and misfeeds Loading paper in the paper tray 2 Printing on plain paper recycled paper or transparencies from the paper tray 2 a Pull the paper tray completely out of the machine b While pressing the green paper ...

Страница 20: ...pletely inserted into the machine e Unfold the support flap 1 to prevent paper from sliding off the face down output tray Loading paper in the manual feed slot 2 You can load envelopes and special print media one at a time into this slot Use the manual feed slot to print or copy on labels envelopes or thicker paper Printing on plain paper recycled paper or transparencies from the manual feed slot ...

Страница 21: ...he paper let go Printing on thick paper bond paper labels and envelopes 2 When the back output tray is pulled down the machine has a straight paper path from the manual feed slot through to the back of the machine Use this paper feed and output method when you want to print on thick paper labels or envelopes Note Remove each printed sheet or envelope immediately to prevent a paper jam The machine ...

Страница 22: ...n is straight and in the proper position on the manual feed slot If it is not the paper or the transparency may not be fed properly resulting in a skewed printout or a paper jam Do not put more than one sheet of paper in the manual feed slot at any one time as it may cause a jam If you put any print media in the manual feed slot before the machine is in the Ready state the print media may be eject...

Страница 23: ... above is for a single copy or a 1 in 1 copy using Letter size paper The unprintable area changes with the paper size Unprintable area when printing from a computer 2 When using the default driver the printable area is smaller than the paper size as shown below Portrait 1 0 16 in 4 23 mm 2 0 25 in 6 35 mm Landscape 1 0 16 in 4 23 mm 2 0 2 in 5 08 mm Note The unprintable area shown above is for Let...

Страница 24: ... moisture content of approx 5 Recommended paper and print media 2 To get the best print quality we suggest using the following paper Type and size of paper 2 The machine loads paper from the installed standard paper tray or manual feed slot Standard paper tray 2 Since the standard paper tray is a universal type you can use any of the paper sizes one paper type and size at a time listed in the tabl...

Страница 25: ...led paper up to 250 20 lb 80 g m2 Transparency up to 10 Manual Feed Slot Width 3 8 66 in 76 2 to 220 mm Length 4 57 to 16 in 116 to 406 4 mm Plain paper recycled paper bond paper envelopes labels and transparencies 1 Basis weight 20 24 lb 75 90 g m2 Thickness 80 110 µm Roughness Higher than 20 sec Stiffness 90 150 cm3 100 Grain direction Long grain Volume resistivity 10e9 10e11 ohm Surface resisti...

Страница 26: ...using process 200 degrees centigrade If you use bond paper paper having a rough surface or paper that is wrinkled or creased the paper may exhibit degraded performance Types of paper to avoid 2 CAUTION Some types of paper may not perform well or may cause damage to your machine DO NOT use paper that is highly textured that is extremely smooth or shiny that is curled or warped 1 0 08 in 2 mm that i...

Страница 27: ...folded crisply and correctly irregularly cut or folded envelopes may cause paper jams Envelopes should consist of two layers of paper in the area circled in figure below 1 Feeding direction Envelope joints that are sealed by the manufacturer should be secure We recommend that you do not print within 0 6 in 15 mm of the edges of envelopes Types of envelopes to avoid 2 CAUTION DO NOT use envelopes t...

Страница 28: ...h any part of the machine because the label stock may stick to the drum unit or rollers and cause jams and print quality problems No adhesive should be exposed between the labels Labels should be arranged so that they cover the entire length and width of the sheet Using labels with spaces may result in labels peeling off and causing serious jams or print problems All labels used in this machine mu...

Страница 29: ...bric To avoid damaging your machine while using the ADF DO NOT pull on the document while it is feeding To scan non standard documents see Using the scanner glass on page 18 Make sure documents written with ink are completely dry Documents must be from 5 8 to 8 5 in 148 to 215 9 mm wide and from 5 8 to 14 in 148 to 355 6 mm long and of a standard weight 20 lb 80 g m2 a Unfold the ADF document outp...

Страница 30: ...in wide and 11 7 in long 215 9 mm wide and 297 mm long Note DCP 7040 only To use the scanner glass the ADF must be empty a Lift the document cover b Using the document guidelines on the left center the document face down on the scanner glass c Close the document cover CAUTION If the document is a book or is thick do not slam the cover or press on it ...

Страница 31: ...e time so your machine can fit the document on the page a Press Menu b Press a or b to choose 1 General Setup Press OK c Press a or b to choose 2 Paper Size General Setup 2 Paper Size Press OK d Press a or b to choose A4 Letter Legal Executive A5 A6 B5 B6 or Folio Press OK e Press Stop Exit Note If you chose Transparency as the paper type you will only be able to choose Letter Legal Folio or A4 si...

Страница 32: ...hine is idle You can choose how long the machine must be idle from 00 to 99 minutes before it goes into sleep mode When the machine receives computer data or makes a copy the timer will be reset The default setting is 05 minutes While the machine is in sleep mode the LCD will display Sleep When printing or copying in sleep mode there will be a short delay while the fuser warms up a Press Menu b Pr...

Страница 33: ...LCD Contrast General Setup 5 LCD Contrast Press OK d Press a to make the LCD darker Or press b to make the LCD lighter Press OK e Press Stop Exit User Settings List 3 You can print a list of the settings you programmed a Press Menu b Press a or b to choose 1 General Setup Press OK c Press a or b to choose 6 User Settings General Setup 6 User Settings Press OK d Press Start e Press Stop Exit ...

Страница 34: ...Chapter 3 22 ...

Страница 35: ...Section II Copy II Making copies 24 ...

Страница 36: ...Load your document b Press Start Making multiple copies 4 a Load your document b Do one of the following Press Number of Copies to enter the number of copies up to 99 Press or hold a or b to increase or decrease the number of copies c Press Start Note To sort your copies see Sorting copies using the ADF DCP 7040 only on page 28 Stop copying 4 To stop copying press Stop Exit Making copies 4 ...

Страница 37: ...r Auto is only available when using the ADF Custom 25 400 allows you to enter a ratio from 25 to 400 To enlarge or reduce the next copy follow the instructions below a Load your document b Enter the number of copies you want c Press Enlarge Reduce d Do one of the following Press a or b to choose the enlargement or reduction ratio you want Press OK Press a or b to choose Custom 25 400 Press OK Pres...

Страница 38: ...r document b Enter the number of copies you want c Press Contrast d Press a or b to increase or decrease the contrast Press OK e Press Start To change the default setting follow the steps below a Press Menu b Press a or b to choose 2 Copy Press OK c Press a or b to choose 2 Contrast Copy 2 Contrast Press OK d Press a or b to increase or decrease the contrast Press OK e Press Stop Exit ...

Страница 39: ...ext Photo Suitable for copying photographs To temporarily change the quality setting follow the steps below a Load your document b Enter the number of copies you want c Press Options Press a or b to choose Quality Press OK d Press a or b to choose Auto Photo or Text Press OK e Press Start Press Menu selections Options Page Press a or b then press OK Press a or b then press OK Quality Auto Photo Te...

Страница 40: ... using the N in 1 copy feature This allows you to copy two or four pages onto one page which lets you save paper Important 4 Please make sure the paper size is set to Letter A4 Legal or Folio P means Portrait and L means Landscape You cannot use the Enlarge Reduce setting with the N in 1 feature a Load your document b Enter the number of copies you want c Press Options d Press a or b to choose Pag...

Страница 41: ... down in the direction shown below 2 in 1 P 2 in 1 L 4 in 1 P 4 in 1 L Out of memory message 4 If the memory becomes full while you are making copies the LCD message will guide you through the next step DCP 7030 only If you get an Out of Memory message press Stop Exit to cancel the operation DCP 7040 only If you get an Out of Memory message while scanning a subsequent page you will have the option...

Страница 42: ...Chapter 4 30 ...

Страница 43: ...Section III Software III Software features 32 ...

Страница 44: ...ter3 for Windows ControlCenter2 for Macintosh Note See Accessing the Software User s Guide on page 3 How to read HTML User s Guide 5 This is a quick reference for using the HTML User s Guide For Windows 5 Note If you have not installed the software see Chapter 1 a From the Start menu point to Brother DCP XXXX from the programs group then click User s Guides in HTML format b Click on SOFTWARE USER ...

Страница 45: ... Brother CD ROM into your CD ROM drive b Double click the Documentation icon c Double click your language folder and then double click the top page file d Click on SOFTWARE USER S GUIDE in the top menu and then click the heading you would like to read from the list at the left of the window ...

Страница 46: ...Chapter 5 34 ...

Страница 47: ...Section IV Appendixes IV Safety and legal 36 Troubleshooting and routine maintenance 46 Menu and features 79 Specifications 83 Glossary 91 ...

Страница 48: ...heaters air conditioners refrigerators water chemicals or devices that contain magnets or generate magnetic fields DO NOT expose the machine to direct sunlight excessive heat open flames salty or corrosive gasses moisture or dust DO NOT connect your machine to an AC power outlet controlled by wall switches or automatic timers Disruption of power can wipe out information in the machine s memory DO ...

Страница 49: ... from the AC power outlet See Routine maintenance on page 62 DO NOT use flammable substances any type of spray or an organic solvent liquid that contains alcohol or ammonia to clean the inside or outside of the machine Refer to Routine maintenance on page 62 for how to clean the machine DO NOT handle the plug with wet hands Doing this might cause an electrical shock Always make sure the plug is fu...

Страница 50: ...tentially starting a fire Please carefully clean the toner dust with a dry lint free cloth and dispose of it according to local regulations When you move the machine grasp the side hand holds that are under the scanner This product must be installed near an AC power outlet that is easily accessible In case of an emergency you must disconnect the power cord from the AC power outlet to shut off the ...

Страница 51: ...ipment basic safety precautions should always be followed to reduce the risk of fire electric shock and injury to people including the following 1 DO NOT use this product near water for example near a bath tub wash bowl kitchen sink washing machine or in a wet basement or near a swimming pool 2 Avoid using this product during an electrical storm There may be a remote risk of electric shock from li...

Страница 52: ...ommunications However there is no guarantee that interference will not occur in a particular installation If this equipment does cause harmful interference to radio or television reception which can be determined by turning the equipment off and on the user is encouraged to try to correct the interference by one or more of the following measures Reorient or relocate the receiving antenna Increase ...

Страница 53: ...te the development and popularization of energy efficient office equipment As an ENERGY STAR Partner Brother Industries Ltd has determined that this product meets the ENERGY STAR guidelines for energy efficiency Laser safety A This equipment is certified as a Class 1 laser product as defined in IEC 60825 1 A2 2001 under the U S Department of Health and Human Services DHHS Radiation Performance Sta...

Страница 54: ... damp cloth for cleaning 5 DO NOT place this product on an unstable cart stand or table The product may fall causing serious damage to the product 6 Slots and openings in the cabinet at the back or bottom are provided for ventilation To ensure reliable operation of the product and to protect it from overheating these openings must not be blocked or covered The openings should never be blocked by p...

Страница 55: ...l pages have exited the machine before picking them up 15 Never push objects of any kind into this product through cabinet slots since they may touch dangerous voltage points or short out parts resulting in the risk of fire or electric shock Never spill liquid of any kind on the product DO NOT attempt to service this product yourself because opening or removing covers may expose you to dangerous v...

Страница 56: ... shock and injury to people note the following DO NOT use this product near appliances that use water a swimming pool or in a wet basement DO NOT use the machine during an electrical storm there is the remote possibility of an electrical shock ...

Страница 57: ...osh and TrueType are registered trademarks of Apple Inc Nuance the Nuance logo PaperPort and ScanSoft are trademarks or registered trademarks of Nuance Communications Inc or its affiliates in the United States and or other countries Presto PageManager is a registered trademark of NewSoft Technology Corporation Java and all Java based trademarks and logos are trademarks or registered trademarks of ...

Страница 58: ...y yourself If you need additional help the Brother Solutions Center offers the latest FAQs and troubleshooting tips Visit us at http solutions brother com Troubleshooting and routine maintenance B Copy quality difficulties Difficulties Suggestions Vertical black line appears in copies Black vertical lines on copies are typically caused by dirt or correction fluid on the glass strip DCP 7040 only o...

Страница 59: ...er Make sure that Use Printer Offline is unchecked The machine prints unexpectedly or it prints garbage Pull out the paper tray and wait until the machine stops printing Then turn off the machine s power switch and disconnect from the power for several minutes Check the settings in your application to make sure it is set up to work with your machine The machine prints the first couple of pages cor...

Страница 60: ...he envelope size you are using This is usually done in the Page Setup or Document Setup menu of your application See your application s manual for more information Which paper can I use You can use plain paper recycled paper transparency and labels that are made for laser machines For details see Acceptable paper and other print media on page 12 There is a paper jam See Paper jams on page 58 Print...

Страница 61: ... page 70 The drum unit may be damaged Put in a new drum unit See Replacing the drum unit on page 74 Hollow print Make sure that you use paper that meets our specifications See Acceptable paper and other print media on page 12 Choose Thick paper mode in the printer driver choose Thick in the machine s Paper Type menu setting or use thinner paper than you are currently using See Paper type on page 1...

Страница 62: ...per and other print media on page 12 and Basic tab in the Software User s Guide on the CD ROM The drum unit may be damaged Put in a new drum unit See Replacing the drum unit on page 74 The fuser unit may be contaminated Call Brother Customer Service Wrinkles or creases Check the paper type and quality See Acceptable paper and other print media on page 12 Make sure that paper is loaded properly See...

Страница 63: ...e paper tray White Spots on black text and graphics at 2 95 in 75 mm intervals Black Spots at 2 95 in 75 mm intervals Make ten copies of a blank white sheet of paper See Making multiple copies on page 24 If the problem is not solved the drum unit may have glue from a label stuck on the OPC drum surface Clean the drum unit See Cleaning the drum unit on page 68 The drum unit may be damaged Put in a ...

Страница 64: ...it on page 74 Toner specks Make sure that you use paper that meets our specifications Rough surfaced paper may cause the problem See Acceptable paper and other print media on page 12 Clean the primary corona wire and the drum unit See Cleaning the corona wire on page 66 and Cleaning the drum unit on page 68 The drum unit may be damaged Put in a new drum unit See Replacing the drum unit on page 74 ...

Страница 65: ... window and the primary corona wire inside the drum unit See Cleaning the laser scanner window on page 64 and Cleaning the corona wire on page 66 The drum unit may be damaged Put in a new drum unit See Replacing the drum unit on page 74 Black lines down the page Printed pages have toner stains down the page Clean the primary corona wire inside the drum unit by sliding the green tab Be sure to retu...

Страница 66: ...User s Guide on the CD ROM Turn the paper over in the paper tray and print again Excluding Letterhead paper Lift up the output tray support flap Replace the paper in the paper tray with paper from a freshly opened ream Make sure you are using paper that is recommended for your machine See Acceptable paper and other print media on page 12 Examples of poor print quality Recommendation ...

Страница 67: ...r the cooling fan running while the LCD shows Cooling Down and Wait for a while Make sure that you can hear the fan in the machine spinning and that the exhaust outlet is not blocked by something If the fan is spinning remove any obstacles that surround the exhaust outlet and then leave the machine turned on but do not use it for several minutes If the fan is not spinning do the following Disconne...

Страница 68: ...following Press Start to copy the scanned pages Press Stop Exit and wait until the other operations in progress finish and then try again Clear the data from the memory See Out of memory message on page 29 Print operation in process Reduce print resolution See Advanced tab in the Software User s Guide on the CD ROM Print Unable XX The machine has a mechanical problem Disconnect the machine from th...

Страница 69: ...DF unit B a Take out any paper from the ADF that is not jammed b Open the ADF cover c Pull the jammed document out to the left d Close the ADF cover e Press Stop Exit Document is jammed under the document cover B a Take out any paper from the ADF that is not jammed b Lift the document cover c Pull the jammed document out to the right d Close the document cover e Press Stop Exit Document is jammed ...

Страница 70: ...ains open and close the front cover and fuser cover firmly to reset the machine WARNING HOT SURFACE After you have just used the machine some internal parts of the machine will be extremely hot When you open the front or back cover back output tray of the machine DO NOT touch the shaded parts shown in the illustration If you do this you may get burned CAUTION To prevent damage to the machine cause...

Страница 71: ...scatter toner c If you can not remove the drum unit and toner cartridge assembly easily do not use extra force Instead lift the scanner cover Use both hands to carefully pull the jammed paper up and out of the output tray opening d Close the scanner cover e If you could not pull the jammed paper out of the output tray opening as shown in step c take the paper tray completely out of the machine f P...

Страница 72: ...bly on a clean flat surface with a piece of disposable paper or cloth underneath it in case you accidentally spill or scatter toner c Open the back cover back output tray d Pull the tabs 1 toward you to open the fuser cover 2 e Pull the jammed paper out of the fuser unit f Close the back cover back output tray g Put the drum unit and toner cartridge assembly back in the machine h Close the front c...

Страница 73: ...flat surface with a piece of disposable paper or cloth underneath it in case you accidentally spill or scatter toner c Push down the green lock lever and take the toner cartridge out of the drum unit CAUTION Handle the toner cartridge carefully If toner scatters on your hands or clothes wipe or wash it off with cold water at once To avoid print quality problems DO NOT touch the shaded parts shown ...

Страница 74: ...ol any type of spray or any type of flammable substance to clean the outside or inside of the machine Doing this may cause a fire or electrical shock For more infomation see Important safety instructions on page 42 CAUTION The drum unit contains toner so handle it carefully If toner scatters on your hands or clothes wipe or wash it off with cold water at once Cleaning the outside of the machine B ...

Страница 75: ...Plug the machine s power cord back into the AC power outlet first and then reconnect all cables Turn on the machine s power switch Cleaning the scanner glass B a Turn off the machine s power switch Disconnect all cables and then unplug the power cord from the AC power outlet b Lift the document cover 1 Clean the white plastic surface 2 and scanner glass 3 underneath it with a soft lint free cloth ...

Страница 76: ...ebris clean the glass again concentrating on that area You may need to repeat the cleaning process three or four times To test make a copy after each cleaning Cleaning the laser scanner window B WARNING DO NOT use isopropyl alcohol to clean the laser scanner window CAUTION DO NOT touch the laser scanner window with your fingers a Before you clean the inside of the machine turn off the machine s po...

Страница 77: ...haded parts shown in the illustration If you do this you may get burned CAUTION To prevent damage to the machine caused by static electricity DO NOT touch the electrodes shown in the illustration We recommend that you place the drum unit on a clean flat surface with a piece of disposable paper or cloth underneath it in case you accidentally spill or scatter toner c Wipe the laser scanner window by...

Страница 78: ...ne s power switch Disconnect all cables and then unplug the power cord from the AC power outlet b Open the front cover c Slowly take out the drum unit and toner cartridge assembly CAUTION We recommend that you place the drum unit and toner cartridge assembly on a clean flat surface with a piece of disposable paper or cloth underneath it in case you accidentally spill or scatter toner Handle the to...

Страница 79: ... to right several times CAUTION Be sure to return the green tab to the home position a 1 If you do not printed pages may have a vertical stripe e Put the drum unit and toner cartridge assembly back in the machine f Close the front cover g Plug the machine s power cord back into the AC power outlet first and then reconnect all cables Turn on the machine s power switch CAUTION To avoid print quality...

Страница 80: ...lean flat surface with a piece of disposable paper or cloth underneath it in case you accidentally spill or scatter toner To prevent damage to the machine caused by static electricity DO NOT touch the electrodes shown in the illustration d Push down the green lock lever and take the toner cartridge out of the drum unit CAUTION Handle the toner cartridge carefully If toner scatters on your hands or...

Страница 81: ...N The drum is photosensitive so DO NOT touch it with your fingers DO NOT clean the surface of the photosensitive drum with a sharp object DO NOT use a scrubbing or wiping motion because this might damage the drum h Put the toner cartridge back into the drum unit until you hear it lock into place If you put the cartridge in properly the green lock lever will lift automatically i Put the drum unit a...

Страница 82: ...ally spilling or scattering the material inside If you use paper that is not a direct equivalent for the recommended paper the life of consumable items and machine parts may be reduced Replacing a toner cartridge B The High Yield toner cartridges can print approximately 2 600 pages 1 and the Standard toner cartridges can print approximately 1 500 pages 1 Actual page count will vary depending on yo...

Страница 83: ...y take out the drum unit and toner cartridge assembly CAUTION We recommend that you put the drum unit and toner cartridge assembly on a clean flat surface with a piece of disposable paper or cloth underneath it in case you accidentally spill or scatter toner To prevent damage to the machine caused by static electricity DO NOT touch the electrodes shown in the illustration c Push down the green loc...

Страница 84: ...t quality Our warranty coverage does not apply to any problem that is caused by the use of unauthorized third party toner and or cartridge To protect your investment and obtain premium performance from the Brother machine we strongly recommend the use of Genuine Brother Supplies Wait to unpack the new toner cartridge until immediately before you put it in the machine If a toner cartridge is left u...

Страница 85: ...from the drum unit g Clean the primary corona wire of the drum unit by gently sliding the green tab from right to left and left to right several times CAUTION Be sure to return the green tab to the home position a 1 If you do not printed pages may have a vertical stripe h Put the drum unit and toner cartridge assembly back in the machine i Close the front cover CAUTION DO NOT turn off the machine ...

Страница 86: ... water at once Note The drum unit is a consumable item and it is necessary to replace it periodically There are many factors that determine the actual drum life such as temperature humidity type of paper and how much toner you use for the number of pages per print job The estimated drum life is approximately 12 000 pages 1 The actual number of pages your drum will print may be significantly less t...

Страница 87: ...used by static electricity DO NOT touch the electrodes shown in the illustration c Push down the green lock lever and take the toner cartridge out of the drum unit CAUTION To avoid print quality problems DO NOT touch the shaded parts shown in the illustrations Wait to unpack a new drum unit until immediately before you put it in the machine Exposure to direct sunlight or room light may damage the ...

Страница 88: ...m the drum unit f Clean the primary corona wire inside the drum unit by gently sliding the green tab from right to left and left to right several times CAUTION Be sure to return the green tab to the home position a 1 If you do not printed pages may have a vertical stripe g Put the new drum unit and toner cartridge assembly in the machine h Press Clear Back To confirm you are installing a new drum ...

Страница 89: ...hoose 3 Machine Info Press OK c Press a or b to choose 2 Page Counter Press OK d Press a or b to choose Total List Copy or Print You can see the machine s page count e Press Stop Exit Checking the Drum life B You can see the machine s drum life on the LCD a Press Menu b Press a or b to choose 3 Machine Info Press OK c Press a or b to choose 3 Drum Life Press OK You can see the remaining percentage...

Страница 90: ...ront cover d Remove the drum unit and toner cartridge assembly Leave the toner cartridge installed in the drum unit e Place the drum unit and toner cartridge assembly into the plastic bag and seal the bag f Close the front cover g Wrap the machine in the plastic bag and place it in the original carton with the original packing material h Pack the drum unit and toner cartridge assembly AC cord and ...

Страница 91: ...followed by the menu numbers to program your machine For example to set Beeper volume to Low a Press Menu b Press a or b to choose 1 General Setup Press OK c Press a or b to choose 3 Beeper General Setup 3 Beeper Press OK d Press a or b to choose Low Press OK e Press Stop Exit Memory storage C Your menu settings are stored permanently and in the event of a power failure will not be lost Temporary ...

Страница 92: ...r b for the direction you want c Press OK when the option you want appears on the LCD The LCD will then show the next menu level d Press a or b to scroll to your next menu selection e Press OK When you have finished setting an option the LCD will show Accepted f Press Stop Exit to exit Menu mode ...

Страница 93: ...k Thicker Transparency Recycled Paper Sets the type of paper in the paper tray 19 2 Paper Size A4 Letter Legal Executive A5 A6 B5 B6 Folio Sets the size of the paper in the paper tray 19 3 Beeper Off Low Med High Adjusts the volume level of the beeper 19 4 Ecology 1 Toner Save On Off Increases the page yield of the toner cartridge 20 2 Sleep Time 00 99 05Min Conserves power 20 The factory settings...

Страница 94: ...ou can choose the Copy resolution for your type of document 27 2 Contrast b nnnno a b nnnon a b nnonn a b nonnn a b onnnn a Adjusts the contrast for copies 26 3 Machine Info 1 Serial No You can check the serial number of your machine 77 2 Page Counter Total List Copy Print You can check the number of total pages the machine has printed during its life 77 3 Drum Life You can check the percentage of...

Страница 95: ...nes Power Source 110 120 V AC 50 60 Hz Power Consumption Peak 1056 W Copying Average 320 W 1 Sleep DCP 7030 Average 8 W DCP 7040 Average 9 W Standby Average 75 W 1 When making a copy from one sheet Dimensions DCP 7030 DCP 7040 Weight Without Drum Toner Unit DCP 7030 19 2 lb 8 7 kg DCP 7040 22 lb 10 kg 10 1 in 257 mm 16 9 in 428 mm 15 6 in 396 mm 12 in 304 mm 15 6 in 396 mm 16 9 in 428 mm ...

Страница 96: ...90 5 F 10 to 32 5 C Storage 41 F to 95 F 5 to 35 C Humidity Operating 20 to 80 without condensation Storage 10 to 90 without condensation ADF automatic document feeder DCP 7040 only Up to 35 pages Staggered 20 lb 80 g m2 Recommended Environment for Best Results Temperature 68 F to 86 F 20 to 30 C Humidity 50 70 Paper Xerox 4200 20 lb Letter Paper Tray 250 Sheets 20 lb 80 g m2 ...

Страница 97: ... A5 B6 ISO A6 Executive Legal and Folio Paper Weight 16 to 28 lb 60 to 105 g m2 Maximum Paper Tray Capacity Up to 250 sheets of 20 lb 80 g m2 Plain Paper Manual Feed Slot Paper Type Plain Paper Transparencies Recycled Paper Bond Paper Envelopes or Labels 1 Paper Size Width 3 0 to 8 66 in 76 2 to 220 mm Length 4 57 to 16 in 116 0 to 406 4 mm Paper Weight 16 to 43 lb 60 to 163 g m2 Maximum Manual Fe...

Страница 98: ...ument Size ADF Width DCP 7040 only 5 8 to 8 5 in 148 to 215 9 mm ADF Length DCP 7040 only 5 8 to 14 in 148 to 355 6 mm Scanner Glass Width Max 8 5 in 215 9 mm Scanner Glass Length Max 11 7 in 297 mm Copy Width Max 8 26 in 210 mm Multiple Copies Stacks up to 99 pages Sorts up to 99 pages DCP 7040 only Reduce Enlarge 25 to 400 in increments of 1 Resolution Up to 600 600 dpi First Copy Out Time Less ...

Страница 99: ...ta Mac OS X 10 2 4 or greater WIA Compliant Yes Windows XP Windows Vista Color Depth 24 bit color Resolution Up to 19200 19200 dpi interpolated 1 Up to 600 2400 dpi optical From Scanner Glass DCP 7040 only Up to 600 600 dpi optical From ADF Document Size ADF Width DCP 7040 only 5 8 to 8 5 in 148 0 to 215 9 mm ADF Length DCP 7040 only 5 8 to 14 in 148 0 to 355 6 mm Scanner Glass Width Max 8 5 in 21...

Страница 100: ...also be connected to a computer that has a USB 1 1 interface 2 Third party USB ports are not supported Printer Driver Host Based Driver for Windows 2000 Professional XP XP Professional x64 Edition Windows Vista Macintosh Printer Driver for Mac OS X 10 2 4 or greater Resolution HQ1200 2400 600 dpi 600 300 dpi Print Speed Up to 23 pages minute Letter size 1 First Print Out Time Less than 10 seconds ...

Страница 101: ... Speed Minimum RAM Recommended RAM Available Hard Disk Space For Drivers For Applications Windows Operating System 1 Windows 2000 Professional 4 Printing Scanning USB Intel Pentium II or AMD equivalent 64 MB 256 MB 150 MB 310 MB Windows XP Home 2 4 Windows XP Professional 2 4 128 MB Windows XP Professional x64 Edition 2 64 bit Intel 64 or AMD64 supported CPU 256 MB 512 MB Windows Vista 2 Intel Pen...

Страница 102: ...2 2 Drum yield is approximate and may vary by type of use Toner Cartridge Life Starter Toner Cartridge Approx 1 000 pages 1 Standard Toner Cartridge TN 330 Approx 1 500 pages Letter 1 High Yield Toner Cartridge TN 360 Approx 2 600 pages Letter 1 Drum Unit DR 360 Approx 12 000 pages Letter 2 ...

Страница 103: ... screen on the machine that shows interactive messages during On Screen Programming and shows the date and time when the machine is idle Menu mode Programming mode for changing your machine s settings OCR optical character recognition The bundled ScanSoft PaperPort 11SE with OCR or Presto PageManager software application converts an image of text to text you can edit Resolution The number of verti...

Страница 104: ...ftware User s Guide on the CD ROM ControlCenter3 for Windows See Software User s Guide on the CD ROM Copy contrast 24 26 Enlarge Reduce key 25 keys 6 25 multiple 24 N in 1 page layout 28 out of memory 29 quality 27 single 24 sort ADF only 28 temporary settings 25 using ADF 28 29 using scanner glass 28 29 D Document how to load 17 18 Drum unit checking remaining life 77 cleaning 66 68 replacing 74 ...

Страница 105: ...ray capacity 13 type 12 19 PaperPort 11SE with OCR See Software User s Guide on the CD ROM and Help in the PaperPort 11SE application to access How to Guides Power failure 79 Print difficulties 47 drivers 88 Job Cancel key 6 paper jams 58 quality 48 49 resolution 88 specifications 88 Printing See Software User s Guide on the CD ROM Programming your machine 79 Q Quality copying 27 printing 48 49 R ...

Страница 106: ...you are having difficulty copy quality 46 paper handling 48 print quality 48 49 printing 47 scanning 47 software 48 maintenance messages on LCD 55 paper jam 58 V Volume setting beeper 19 W Warranties Canada vi Notice Disclaimer iii USA iv Windows See Software User s Guide on the CD ROM World Wide Web i ...

Страница 107: ...EQUIPMENT ATTACHMENT LIMITATIONS Canada only NOTICE This product meets the applicable Industry Canada technical specifications ...

Страница 108: ... Ormeaux QC Canada H9B 3H6 Visit us on the World Wide Web http www brother com These machines are made for use in the USA and Canada only We cannot recommend using them overseas because the power requirement of your Digital Copier Printer may not be compatible with the power available in foreign countries Using USA or Canada models overseas is at your own risk and may void your warranty ...

Отзывы: