


NOTE
Be careful to not push on mesh screen covering the side vent on the chassis or poke screen with sharp objects.
CAUTION
Do not use the port cover tabs to lift the module. They are not designed to support the weight of the module, which can fall
and be damaged.
CAUTION
Make sure the airflow around the front, and back of the device is not
restricted.
DANGER
Mount the devices you install in a rack as low as possible. Place the heaviest device at the bottom and progressively place
lighter devices above.
DANGER
Use safe lifting practices when moving the product.
CAUTION
To prevent damage to the chassis and components, never attempt to lift the chassis using the fan or power supply handles.
These handles were not designed to support the weight of the chassis.
CAUTION
Do not attempt to lift or support the chassis by the logo bezel attached over the port-side air vents.
NOTE
You can connect the device to building ground by connecting an appropriate 2 AWG wire from a grounded connection to the
2AWG Panduit LCD2-14AF lug on the nonport-side of the device.
Unpacking and transporting the device
Use the following procedure to unpack and install your device.
DANGER
A fully populated chassis weighs approximately 68.95 kg (152.0 lbs) and requires a hydraulic or assisted lift to install it.
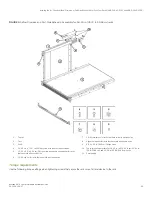
1. Unpack the device.
a)
Cut the bands that encircle the packaging.
b) Open the top of the shipping box and remove accessory kit, rack mount kits, and foam from the top of the device.
c)
Lift the cardboard shipping container and inner cardboard sleeve off the device.
d) Remove the antistatic plastic off the device.
e)
Leave the device on top the foam shipping tray and wood pallet if the device must be transported to the installation
location.
f)
Verify the contents of the shipping carton by referring to
g) Save foam packing material and wooden pallet for reuse.
2. Use a pallet jack or other assisted lift to transport the device to the installation area. Doorways must be wider than 36 in. (91
cm) to accommodate the device.
3. Remove the chassis door if installed.
Unpacking and transporting the device
Brocade X6-4 Director Hardware Installation Guide
30
53-1004106-07
Содержание X6-4
Страница 12: ...Brocade X6 4 Director Hardware Installation Guide 12 53 1004106 07...
Страница 20: ...Brocade X6 4 Director Hardware Installation Guide 20 53 1004106 07...
Страница 28: ...Brocade X6 4 Director Hardware Installation Guide 28 53 1004106 07...
Страница 64: ...Brocade X6 4 Director Hardware Installation Guide 64 53 1004106 07...
Страница 86: ...Brocade X6 4 Director Hardware Installation Guide 86 53 1004106 07...
Страница 102: ...Brocade X6 4 Director Hardware Installation Guide 102 53 1004106 07...
Страница 130: ...Brocade X6 4 Director Hardware Installation Guide 130 53 1004106 07...
Страница 140: ...Brocade X6 4 Director Hardware Installation Guide 140 53 1004106 07...
Страница 166: ...Brocade X6 4 Director Hardware Installation Guide 166 53 1004106 07...
Страница 196: ...Brocade X6 4 Director Hardware Installation Guide 196 53 1004106 07...
Страница 200: ...Brocade X6 4 Director Hardware Installation Guide 200 53 1004106 07...
Страница 204: ...Brocade X6 4 Director Hardware Installation Guide 204 53 1004106 07...
Страница 210: ...Brocade X6 4 Director Hardware Installation Guide 210 53 1004106 07...
Страница 224: ...Brocade X6 4 Director Hardware Installation Guide 224 53 1004106 07...
Страница 238: ...Brocade X6 4 Director Hardware Installation Guide 238 53 1004106 07...