


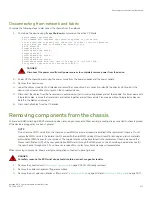


Disconnecting from network and fabric
Complete the following steps to disconnect the chassis from the network.
1. Shut down the device using the
sysShutdown
command on the active CP blade.
switch:admin> sysshutdown
This command will shutdown the operating systems on your switch.
You are required to power-cycle the switch in order to restore operation.
Are you sure you want to shutdown the switch [y/n]?y
HA is disabled
Stopping blade 1
Shutting down the blade....
Stopping blade 2
Shutting down the blade....
Stopping blade 8
Shutting down the blade....
Broadcast message from root (pts/1) Tue April 12 14:23:06 2008...
The system is going down for system halt NOW !!
DANGER
Disconnect the power cord from all power sources to completely remove power from the device.
2. Power off the chassis by removing the power cords from the power supplies and the power outlets.
3. Remove the chassis door.
4. Label the cables connected to all blades and record the connections. Per connection, identify the director slot and port, the
device connected, and the slot or port on the connected device.
5. Disconnect the cables from the transceivers in extension, port, and core routing blades and set them aside. For transceivers with
integrated cables, remove the transceivers and cables together and set them aside. Transceivers without integrated cables can
be left in the blades or removed.
6. Disconnect all cables from the CP blades.
Removing components from the chassis
Follow electrostatic discharge (ESD) precautions when removing components. Wear a wrist grounding strap connected to chassis ground
(if the device is plugged in) or a bench ground.
NOTE
Do not remove WWN cards from the chassis as new WWN cards are shipped preinstalled in the replacement chassis. Do not
replace the WWN cards in the replacement chassis with the old WWN cards as this will result in licensing and return materials
authorization (RMA) issues for your product. The original license will be transferred to the replacement chassis, based on the
license identification (LID) of the new, preinstalled WWN card, through the RMA process. You should be provided a license for
the new chassis through email. If you have not received this, contact your Brocade support representative.
When removing components, Wear a wrist grounding strap connected to bench ground.
DANGER
For safety reasons, the ESD wrist strap should contain a series 1 megaohm resistor.
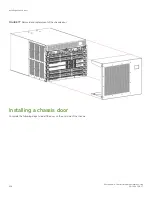
1. Remove the chassis door (
on page 205) if not already removed.
2. Remove the cable management finger assemblies.
3. Remove the port, extension, blades or filler panels (
on page 197).
Removing components from the chassis
Brocade X6-4 Director Hardware Installation Guide
53-1004106-07
217
Содержание X6-4
Страница 12: ...Brocade X6 4 Director Hardware Installation Guide 12 53 1004106 07...
Страница 20: ...Brocade X6 4 Director Hardware Installation Guide 20 53 1004106 07...
Страница 28: ...Brocade X6 4 Director Hardware Installation Guide 28 53 1004106 07...
Страница 64: ...Brocade X6 4 Director Hardware Installation Guide 64 53 1004106 07...
Страница 86: ...Brocade X6 4 Director Hardware Installation Guide 86 53 1004106 07...
Страница 102: ...Brocade X6 4 Director Hardware Installation Guide 102 53 1004106 07...
Страница 130: ...Brocade X6 4 Director Hardware Installation Guide 130 53 1004106 07...
Страница 140: ...Brocade X6 4 Director Hardware Installation Guide 140 53 1004106 07...
Страница 166: ...Brocade X6 4 Director Hardware Installation Guide 166 53 1004106 07...
Страница 196: ...Brocade X6 4 Director Hardware Installation Guide 196 53 1004106 07...
Страница 200: ...Brocade X6 4 Director Hardware Installation Guide 200 53 1004106 07...
Страница 204: ...Brocade X6 4 Director Hardware Installation Guide 204 53 1004106 07...
Страница 210: ...Brocade X6 4 Director Hardware Installation Guide 210 53 1004106 07...
Страница 224: ...Brocade X6 4 Director Hardware Installation Guide 224 53 1004106 07...
Страница 238: ...Brocade X6 4 Director Hardware Installation Guide 238 53 1004106 07...