


4. Grasp the handle and pull, sliding the power supply from the chassis and supporting the power supply from beneath as you
remove it.
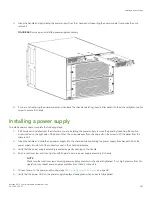
FIGURE 68
Removing and installing power supply assembly
5. If you are not replacing the power supply and can leave the chassis operating, insert a filler panel into the slot and tighten captive
screw to secure to chassis.
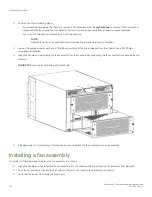
Installing a power supply
To install a power supply, complete the following steps.
1. If a filler panel is installed over the slot where you are installing the power supply, remove the panel by loosening the captive
screw located on the right side of the panel. When the screw releases from chassis, pull on the screw to lift the panel from the
chassis slot.
2. Grasp the handle and slide the new power supply into the chassis while supporting the power supply from beneath. Push the
power supply into slot until the connectors seat in the chassis backplane.
3. Verify that the power supply assembly is seated by gently pushing on the handle.
4. Push in captive screw, and then tighten with fingers to secure power supply assembly to chassis.
NOTE
Make sure that captive screws securing power supply assembly to chassis are tightened. If not, high pressure from fan
operation may unseat power supply assembly from chassis connectors.
5. Connect power to the power supply using steps in
on page 66.
6. Verify that the power LED on the power supply displays steady green when power is fully applied.
Installing a power supply
Brocade X6-4 Director Hardware Installation Guide
53-1004106-07
187
Содержание X6-4
Страница 12: ...Brocade X6 4 Director Hardware Installation Guide 12 53 1004106 07...
Страница 20: ...Brocade X6 4 Director Hardware Installation Guide 20 53 1004106 07...
Страница 28: ...Brocade X6 4 Director Hardware Installation Guide 28 53 1004106 07...
Страница 64: ...Brocade X6 4 Director Hardware Installation Guide 64 53 1004106 07...
Страница 86: ...Brocade X6 4 Director Hardware Installation Guide 86 53 1004106 07...
Страница 102: ...Brocade X6 4 Director Hardware Installation Guide 102 53 1004106 07...
Страница 130: ...Brocade X6 4 Director Hardware Installation Guide 130 53 1004106 07...
Страница 140: ...Brocade X6 4 Director Hardware Installation Guide 140 53 1004106 07...
Страница 166: ...Brocade X6 4 Director Hardware Installation Guide 166 53 1004106 07...
Страница 196: ...Brocade X6 4 Director Hardware Installation Guide 196 53 1004106 07...
Страница 200: ...Brocade X6 4 Director Hardware Installation Guide 200 53 1004106 07...
Страница 204: ...Brocade X6 4 Director Hardware Installation Guide 204 53 1004106 07...
Страница 210: ...Brocade X6 4 Director Hardware Installation Guide 210 53 1004106 07...
Страница 224: ...Brocade X6 4 Director Hardware Installation Guide 224 53 1004106 07...
Страница 238: ...Brocade X6 4 Director Hardware Installation Guide 238 53 1004106 07...