


Time and items required
The procedure to remove or install a each power supply takes less than five minutes. A power supply unit or filler panel is required for the
power supply replacement.
Removing a power supply
To remove a power supply, complete the following steps.
1. Before removing a power supply assembly, Verify if you can remove a power supply and the leave chassis operating (hot swap
replacement) or must power down the chassis (cold-swap replacement).
NOTE
Depending on the blade configuration of the chassis and the number of power supplies installed, the chassis may be
able to continue operating while replacing a power supply. Refer to "Power supply specifications" and "Power supply
requirements" in
Brocade X6 Directors Technical Specifications
on page 225 for minimum power supplies required
for low and high voltage line operation, redundancy in case of power supply failure, and other specifications. If there is
insufficient power, the chassis will power down blades until the power demand can be met.
2. Perform one of the following steps:
•
If you need to power down the chassis to remove a power supply, enter the
sysShutdown
command. Refer to
on page 83 for detailed procedures. When the chassis chassis completed shut-down, remove power
cords from all power supply assemblies.
NOTE
To remove a power cord from a HVAC/HVDC power supply, you must remove the power cord retainer cover, if
attached under the power cord connector, and then unlatch the power cord release latch located under the power
cord connector. Refer to
on page 83 for detailed procedures.
•
If you can leave the chassis in operation and replace a power supply, unplug the power cord from the power supply
assembly that you are replacing.
NOTE
Be sure to replace the power supply as soon as possible.
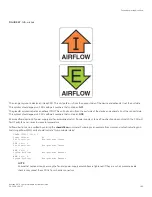
3. Loosen the captive screw on the right side of the power supply assembly until the screw releases from the chassis.
The captive screw is located just below the airflow label on the right side of the power supply assembly. If necessary use a
Phillips screwdriver.
Time and items required
Brocade X6-4 Director Hardware Installation Guide
186
53-1004106-07
Содержание X6-4
Страница 12: ...Brocade X6 4 Director Hardware Installation Guide 12 53 1004106 07...
Страница 20: ...Brocade X6 4 Director Hardware Installation Guide 20 53 1004106 07...
Страница 28: ...Brocade X6 4 Director Hardware Installation Guide 28 53 1004106 07...
Страница 64: ...Brocade X6 4 Director Hardware Installation Guide 64 53 1004106 07...
Страница 86: ...Brocade X6 4 Director Hardware Installation Guide 86 53 1004106 07...
Страница 102: ...Brocade X6 4 Director Hardware Installation Guide 102 53 1004106 07...
Страница 130: ...Brocade X6 4 Director Hardware Installation Guide 130 53 1004106 07...
Страница 140: ...Brocade X6 4 Director Hardware Installation Guide 140 53 1004106 07...
Страница 166: ...Brocade X6 4 Director Hardware Installation Guide 166 53 1004106 07...
Страница 196: ...Brocade X6 4 Director Hardware Installation Guide 196 53 1004106 07...
Страница 200: ...Brocade X6 4 Director Hardware Installation Guide 200 53 1004106 07...
Страница 204: ...Brocade X6 4 Director Hardware Installation Guide 204 53 1004106 07...
Страница 210: ...Brocade X6 4 Director Hardware Installation Guide 210 53 1004106 07...
Страница 224: ...Brocade X6 4 Director Hardware Installation Guide 224 53 1004106 07...
Страница 238: ...Brocade X6 4 Director Hardware Installation Guide 238 53 1004106 07...