


7. If both CP blades are healthy and you want to replace the active CP blade, log in to the active CP blade and run the following
steps:
a)
Run the
haFailover
command to make the standby CP blade the active blade. The currently active CP blade becomes the
standby blade. Wait until the status LED on the currently active CP blade is no longer illuminated.
b) Confirm the completion of the failover by running the
haShow
command.
c)
Log in to the new active CP blade.
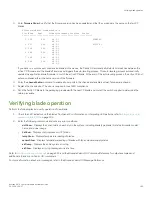
8. Run
firmwareShow
to note the firmware version of the active CP blade.
The
firmwareshow
command will display a warning message if the firmware versions on the two CP blades are not the same.
WARNING: The local CP and remote CP have different versions
of firmware, please retry firmwaredownload command.
Chassis_1:root>
9. Run
haDisable
from the active CP blade to prevent failover or communication between the CP blades during the replacement.
Replacing a CP blade
Use the following procedures in this section to replace CPX6 blades:
•
Hot swap procedure. Use this procedure to replace a single CP blade or both CP blades, one at a time, while the device power is
on. The device continues to operate while replacing a blade if the redundant blade is active and failover does not occur.
•
Cold swap procedure. Use this procedure to replace CP blades after removing power to the device.
Hot-swap procedure
Use this procedure to replace CP blades, one at a time, while the device power is on. The device continues to operate while replacing a
blade if the redundant blade is active and failover does not occur. You can prevent failover by entering the
haDisable
command.
To replace both CP blades with power off, refer to the cold-swap replacement procedures.
Removing a blade
Complete the following steps to remove a CP blade.
NOTE
The chassis continues to operate while a CP blade is being replaced if the redundant CP blade is active and a failover does not
occur. You can prevent failover by entering the
haDisable
command.
1. Remove the chassis door.
2. Log in to the active CP as the admin user. You can use a serial cable or Telnet, Web Tools, or Fabric Manager. Determine which
CP is active using the
haShow
command or view the active LED on the front of the CP.
3. Perform one of the following steps to ensure that the faulty blade is the standby blade.
•
If the faulty blade is the standby CP blade, skip to step 4.
•
If the faulty blade is the active CP blade, issue the
haFailover
command. Wait until the failover has completed. Use the
haShow
command to verify the CPs are synchronized and the failover is complete.
Depending on the nature of the failure, it is possible that the
haFailover
command may not work. Proceed to the next step
anyway.
Replacing a CP blade
Brocade X6-4 Director Hardware Installation Guide
156
53-1004106-07
Содержание X6-4
Страница 12: ...Brocade X6 4 Director Hardware Installation Guide 12 53 1004106 07...
Страница 20: ...Brocade X6 4 Director Hardware Installation Guide 20 53 1004106 07...
Страница 28: ...Brocade X6 4 Director Hardware Installation Guide 28 53 1004106 07...
Страница 64: ...Brocade X6 4 Director Hardware Installation Guide 64 53 1004106 07...
Страница 86: ...Brocade X6 4 Director Hardware Installation Guide 86 53 1004106 07...
Страница 102: ...Brocade X6 4 Director Hardware Installation Guide 102 53 1004106 07...
Страница 130: ...Brocade X6 4 Director Hardware Installation Guide 130 53 1004106 07...
Страница 140: ...Brocade X6 4 Director Hardware Installation Guide 140 53 1004106 07...
Страница 166: ...Brocade X6 4 Director Hardware Installation Guide 166 53 1004106 07...
Страница 196: ...Brocade X6 4 Director Hardware Installation Guide 196 53 1004106 07...
Страница 200: ...Brocade X6 4 Director Hardware Installation Guide 200 53 1004106 07...
Страница 204: ...Brocade X6 4 Director Hardware Installation Guide 204 53 1004106 07...
Страница 210: ...Brocade X6 4 Director Hardware Installation Guide 210 53 1004106 07...
Страница 224: ...Brocade X6 4 Director Hardware Installation Guide 224 53 1004106 07...
Страница 238: ...Brocade X6 4 Director Hardware Installation Guide 238 53 1004106 07...