


•
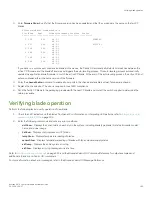
To disable beaconing:
chassisX6:admin> chassisbeacon 0
chassisBeacon success 0
•
To display beaconing status:
NOTE
Value
in the following example shows 0 when beaconing is off and 1 if beaconing is
on.
chassisX6:admin> chassisbeacon
Value = 0
For details on LED location and operation, refer to
Interpreting control processor blade LEDs
on page 106.
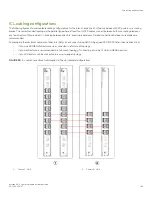
CPX6 port identification
The following illustration identifies connector ports on the CPX6 blade.
FIGURE 58
CPX6 blade port identification
1.
10 Gbps Base-T RJ45 Ethernet port (reserved for future use)
2.
USB port for firmware download and logs
3.
Serial console RJ45 port
4.
10/100/1000Base-T RJ45 Ethernet port for chassis management and
configuration
5.
10/100/1000Base-T RJ45 Ethernet port for service
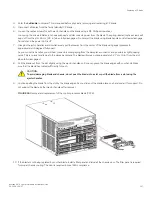
Precautions specific to the blade
This document describes how to remove and replace a control processor (CP) blade. Each device has two CPX6 blades located in slots 1
and 2.
Observe the following precautions when replacing these blades:
•
The CPX6 blade is compatible only with the Brocade X6 Director.
•
Wear an appropriately grounded ESD wrist strap when handling and installing blades and cards. Follow electrostatic discharge
(ESD) precautions. Wear a wrist grounding strap connected to chassis ground (if the chassis is plugged in) or a bench ground.
•
Install CPX6 blades in slots 1 and 2, which are half the width of other slots in the device.
•
The firmware upgrade policy for CP blades specifies testing for the current Fabric OS release and one version earlier. It is
possible to upgrade by more than one version, but it is a very specific and detailed process. Read the directions under
Downloading firmware from USB device
Downloading firmware from FTP server
on page 159 carefully.
•
If the new CP blade does not have the same firmware as the active CP blade, the new blade must be upgraded to the same
firmware version. After installing the new blade, you can determine the firmware version on the replacement blade and use the
firmwaresync
command to allow the active CP blade to copy current firmware to the replaced standby CP blade, if necessary.
However, you must disable high availability (HA) before inserting the new blade.
Precautions specific to the blade
Brocade X6-4 Director Hardware Installation Guide
152
53-1004106-07
Содержание X6-4
Страница 12: ...Brocade X6 4 Director Hardware Installation Guide 12 53 1004106 07...
Страница 20: ...Brocade X6 4 Director Hardware Installation Guide 20 53 1004106 07...
Страница 28: ...Brocade X6 4 Director Hardware Installation Guide 28 53 1004106 07...
Страница 64: ...Brocade X6 4 Director Hardware Installation Guide 64 53 1004106 07...
Страница 86: ...Brocade X6 4 Director Hardware Installation Guide 86 53 1004106 07...
Страница 102: ...Brocade X6 4 Director Hardware Installation Guide 102 53 1004106 07...
Страница 130: ...Brocade X6 4 Director Hardware Installation Guide 130 53 1004106 07...
Страница 140: ...Brocade X6 4 Director Hardware Installation Guide 140 53 1004106 07...
Страница 166: ...Brocade X6 4 Director Hardware Installation Guide 166 53 1004106 07...
Страница 196: ...Brocade X6 4 Director Hardware Installation Guide 196 53 1004106 07...
Страница 200: ...Brocade X6 4 Director Hardware Installation Guide 200 53 1004106 07...
Страница 204: ...Brocade X6 4 Director Hardware Installation Guide 204 53 1004106 07...
Страница 210: ...Brocade X6 4 Director Hardware Installation Guide 210 53 1004106 07...
Страница 224: ...Brocade X6 4 Director Hardware Installation Guide 224 53 1004106 07...
Страница 238: ...Brocade X6 4 Director Hardware Installation Guide 238 53 1004106 07...