

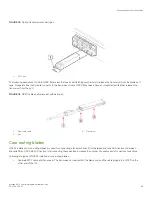


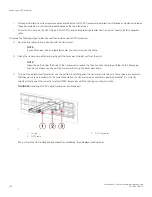


4. Position a cable so that the key (the ridge on one side of the cable connector) is aligned with the slot in the transceiver. Insert the
cable into the transceiver until the latching mechanism clicks.
NOTE
If your transceiver has an integrated cable attached, you will not install a cable.
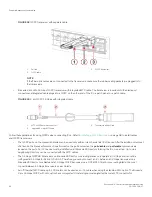
The port's status LED displays steady amber until both ends of the cable are inserted and the link is established. When the link
is fully established, the LED displays steady green.
NOTE
Cables are keyed so that they can be inserted in only one way. If a cable does not slide in easily, ensure that it is
correctly oriented.
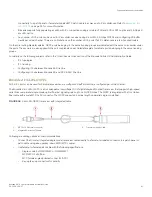
5. Organize cables to avoid covering LEDs and air vents. Refer to
on page 93.
Verifying the operation of new transceivers
You can use the following commands to verify if the transceivers are working correctly:
•
sfpShow
•
switchShow
•
switchshow-slot
slot
, where
slot
is slot number
•
switchshow -qsfp
•
errDump
•
fabricShow
For output examples and additional information on Fabric OS commands, refer to
on page 115 and the
Brocade Fabric OS Command Reference
.
For more information about error messages, refer to the
Brocade Fabric OS Message Reference
.
Verifying the operation of new transceivers
Brocade X6-4 Director Hardware Installation Guide
53-1004106-07
101
Содержание X6-4
Страница 12: ...Brocade X6 4 Director Hardware Installation Guide 12 53 1004106 07...
Страница 20: ...Brocade X6 4 Director Hardware Installation Guide 20 53 1004106 07...
Страница 28: ...Brocade X6 4 Director Hardware Installation Guide 28 53 1004106 07...
Страница 64: ...Brocade X6 4 Director Hardware Installation Guide 64 53 1004106 07...
Страница 86: ...Brocade X6 4 Director Hardware Installation Guide 86 53 1004106 07...
Страница 102: ...Brocade X6 4 Director Hardware Installation Guide 102 53 1004106 07...
Страница 130: ...Brocade X6 4 Director Hardware Installation Guide 130 53 1004106 07...
Страница 140: ...Brocade X6 4 Director Hardware Installation Guide 140 53 1004106 07...
Страница 166: ...Brocade X6 4 Director Hardware Installation Guide 166 53 1004106 07...
Страница 196: ...Brocade X6 4 Director Hardware Installation Guide 196 53 1004106 07...
Страница 200: ...Brocade X6 4 Director Hardware Installation Guide 200 53 1004106 07...
Страница 204: ...Brocade X6 4 Director Hardware Installation Guide 204 53 1004106 07...
Страница 210: ...Brocade X6 4 Director Hardware Installation Guide 210 53 1004106 07...
Страница 224: ...Brocade X6 4 Director Hardware Installation Guide 224 53 1004106 07...
Страница 238: ...Brocade X6 4 Director Hardware Installation Guide 238 53 1004106 07...