background image

ZB80ML 

n


ZB110ML  Installation Guide

Page 7

12"

 (30.5 cm)

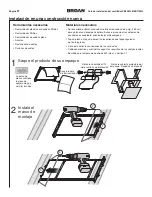
1

2

Retrofit Installation

Parts Bag holds 

 Knockout  Plate 

 and six (6) 

 screws

Existing ductwork and

wiring left in place

11" 

(27.9 cm)

parallel with joists

WARNING

Before removing existing fan, switch power off at service panel and lock the service disconnecting 

means to prevent power from being switched on accidentally. When the service disconnecting means 

cannot be locked, securely fasten a prominent warning device, such as a tag, to the service panel.

Examine the existing wiring to make sure it is not damaged. If any damage is found, 

DO NOT CONTINUE INSTALLATION

 of this product. Contact a qualified person(s) for repair.

Remove

Instruction

Sheet

Remove CFL Bulbs

from protective packaging

Punch out Mask from

packaging. See Step 12.

1

  Remove Packaging

2

  Switch Off Power

4

  Examine Wiring

3

  Enlarge Ceiling Opening and Remove Existing Fan


•  Ruler
•  Pencil
•  Drywall saw
•  Claw hammer or pry bar
•  Utility knife

Materials needed

•  Tape to seal duct connections
•  Existing rigid duct will require the

  addition of a short length of flexible duct

•  Electrical wiring and supplies per 

  local code requirements

•  4W (max.) C7-type night light bulb

Tools needed

•  Power screwdriver with a Phillips bit
•  Phillips screwdriver
•  Flathead screwdriver
•  Pliers
•  Wire insulation stripper
•  Wire cutter

Содержание ZB110ML

Страница 1: ...guide with homeowner Register your product online at www broan com register Easy installation in both new construction and retrofit Table of Contents Warnings and Cautions 2 Typical Installation 2 New Construction Installation 3 Retrofit Installation 7 Operation 12 Cleaning and Maintenance 12 Troubleshooting 12 Service Parts 13 Warranty 13 2012 Broan NuTone LLC ...

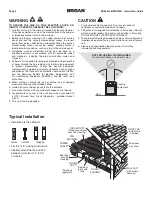
Страница 2: ...5 When cutting or drilling into wall or ceiling do not damage electrical wiring and other hidden utilities 6 Ducted fans must always be vented to the outdoors 7 Do not use this fan with any solid state speed control device 8 Acceptable for use over a tub or shower when connected to a GFCI Ground Fault Circuit Interrupter protected branch circuit 9 This unit must be grounded Typical Installation CA...

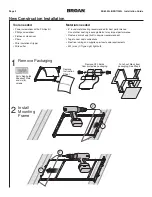
Страница 3: ...ewdriver with a Phillips bit Phillips screwdriver Flathead screwdriver Pliers Wire insulation stripper Wire cutter Materials needed 6 round metal ducting recommended for best performance Use of other ducting is acceptable but may impact performance Roof cap or wall cap built in damper recommended Tape to seal duct connections Electrical wiring and supplies per local code requirements 4W max C7 typ...

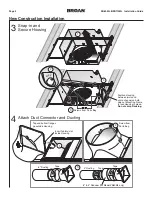
Страница 4: ...r and Ducting Position Housing between joists and crimp channel on both sides of Mounting Frame to lock Housing in place Do not crimp Housing Screws from Parts Bag Top and bottom flanges go outside Housing Insert tab into slot inside Housing Screw from Parts Bag 6 to 4 Reducer for Model ZB80ML only Tape Tape Tape 6 Ducting 4 Ducting snap ...

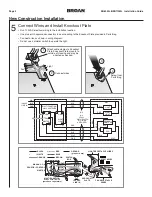
Страница 5: ...ut Plate Knockout Plate mounts to outside of Housing and may be oriented as desired Connect wires Fan Light LIGHT WHT MANUAL ON GRD WHT BLK GRD WHT BLK RED 120 VAC LINE IN MULTI FUNCTION WALL SWITCHES SENSOR CONTROL MASTER LIGHT NIGHT LIGHT FAN SENSOR CONTROL BLK WHT BLK BRN BLU NIGHT LIGHT RED ORG WHT BLK RED BLU RED 14 4 IF ALL WALL SWITCH OPTIONS ARE USED 14 3 KNOCKOUT PLATE LIGHT RECEPTACLE WI...

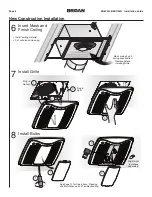
Страница 6: ... and Finish Ceiling 7 Install Grille 8 Install Bulbs See Page 12 for Operations Cleaning and Maintenance and Troubleshooting Mask protects unit during construction Remove before installing Grille Night Light purchase separately Install ceiling material Cut out around Housing Plug in Sensor Plug in Light ...

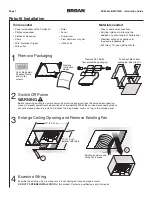
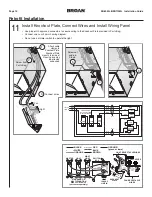
Страница 7: ...t damaged If any damage is found DO NOT CONTINUE INSTALLATION of this product Contact a qualified person s for repair Remove Instruction Sheet Remove CFL Bulbs from protective packaging Punch out Mask from packaging See Step 12 1 Remove Packaging 2 Switch Off Power 4 Examine Wiring 3 Enlarge Ceiling Opening and Remove Existing Fan Ruler Pencil Drywall saw Claw hammer or pry bar Utility knife Mater...

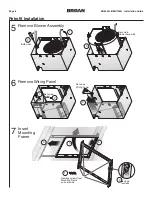
Страница 8: ...3 4 5 1 1 2 3 3 Retrofit Installation 5 Remove Blower Assembly 6 Remove Wiring Panel 7 Insert Mounting Frame Both sides Set aside Blower Assembly Set aside Wiring Panel Set aside screw Bend up four tabs Remove screws from Mounting Frame and set aside ...

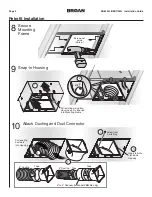
Страница 9: ...ide in Step 7 Pull existing wiring into Housing as it is inserted into Mounting Frame Pull existing ductwork into Housing Insert tab into slot inside Housing 10 Attach Ducting and Duct Connector 8 Secure Mounting Frame 9 Snap in Housing snap 6 to 4 Reducer for Model ZB80ML only Tape Tape Tape 6 Ducting 4 Ducting ...

Страница 10: ...ch to operate the light Attach cable clamps to Knockout Plate Knockout Plate mounts to inside of Housing and may be oriented as desired LIGHT WHT BLU NIGHT LIGHT RED MASTER NIGHT LIGHT GRD WHT BLK GRD 120 VAC LINE IN STANDARD OR MULTI FUNCTION WALL SWITCHES WHT BLK RED FAN SENSOR CONTROL RED WHT BLK ORG WHT BLK BRN LIGHT BLK 14 3 14 2 KNOCKOUT PLATE LIGHT RECEPTACLE WIRES FAN RECEPTACLE WIRES STAN...

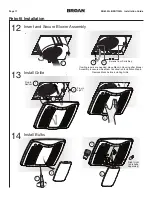
Страница 11: ...Secure Blower Assembly 13 Install Grille 14 Install Bulbs If ceiling repairs are needed place Mask in Housing after Blower Assembly is secured See New Construction Installation Step 6 Remove Mask before installing Grille Screws from Parts Bag Night Light purchase separately Plug in Sensor Plug in Light ...

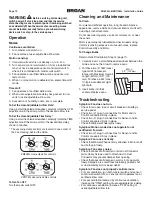
Страница 12: ...g sprays solvents or water on or near the sensor Motor is permanently lubricated and never needs oiling If motor is making excessive or unusual noises replace Control Assembly and Motor To Change Bulbs Refer to Retrofit Installation Step 14 page 11 1 Carefully insert a small flathead screwdriver between the Grille and Lens then twist to remove Lens 2 Purchase two 2 18W max type GU24 fluorescent la...

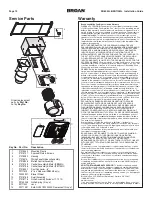
Страница 13: ...ntenance storage or repair other than repair by Broan d damage caused by faulty installation or installation or use contrary to recommendations or instructions e any Fan that has been moved from its original point of installation f damage caused by environmental or natural elements g damage in transit h natural wear of finish i Fans in commercial or nonresidential use or j damage caused by fire fl...

Страница 14: ...ZB80ML n ZB110ML Installation Guide Page 14 99044859C ...

Страница 15: ...ueño de la casa Registre su producto en línea en www broan com register Fácil instalación en construcciones nuevas y en aplicaciones de conversión Índice Advertencias y precauciones 16 Instalación típica 16 Instalación en una construcción nueva 17 Instalación de conversión 21 Funcionamiento 26 Limpieza y mantenimiento 26 Resolución de problemas 26 Piezas de servicio 27 Garantía 27 2012 Broan NuTon...

Страница 16: ... de la pared o del cielo raso tenga cuidado de no dañar el cableado eléctrico ni otros servicios ocultos 6 Los ventiladores con conductos siempre se deben conectar hacia el exterior 7 No use este ventilador junto con ningún dispositivo de control de velocidad de estado sólido 8 Esta unidad puede instalarse sobre una tina o ducha siempre que se conecte a un GFCI interruptor accionado por pérdida de...

Страница 17: ...ps Destornillador de cabeza plana Alicates Desforrador de cables Cortador de cables Materiales necesarios Se recomienda utilizar conductos metálicos redondos de 6 pulg 15 2 cm para obtener un desempeño óptimo Aunque el uso de otros sistemas de conductos es aceptable puede afectar al desempeño Tapa de techo o tapa de pared se recomienda que tenga regulador de tiro integrado Cinta para sellar las co...

Страница 18: ...l a ambos lados del marco de montaje para fijar la cubierta en su lugar No doble la cubierta Tornillos de la bolsa de piezas Las bridas superior e inferior se instalan por fuera de la cubierta Introduzca la pestaña en la ranura del interior de la cubierta Tornillo de la bolsa de piezas Reductor de 6 a 4 pulg 15 2 a 10 2 cm para modelo ZB80ML solamente Cinta Cinta Cinta Conductos de 6 pulg 15 2 cm ...

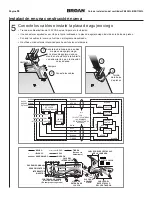
Страница 19: ...a y puede orientarse en la dirección que se desee Conecte los cables Ventilador Lámpara LÁMPARA BLANCO TIERRA BLANCO NEGRO TIERRA BLANCO NEGRO ROJO INTERRUPTORES DE PARED MULTIFUNCIONALES SENSOR CONTROL LÁMPARA LÁMPARA DE NOCHE VENTILADOR SENSOR CONTROL NEGRO BLANCO NEGRO CAFÉ AZUL LÁMPARA DE NOCHE ROJO NARANJA BLANCO NEGRO ROJO AZUL ROJO 14 3 120 VCA LÍNEA DE ENTRADA ENCENDIDO MANUAL INTERRUPTOR ...

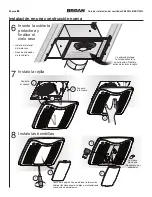
Страница 20: ...rejilla 8 Instale las bombillas Consulte la página 26 para obtener información sobre el funcionamiento limpieza mantenimiento y resolución de problemas La cubierta protege la unidad durante la construcción Retírela antes de instalar la rejilla Lámpara de noche Se compra por separado Instale el material del cielo raso Recorte alrededor de la cubierta Conecte el sensor Conecte la lámpara ...

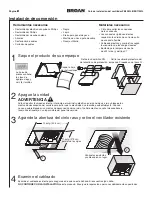
Страница 21: ... Lápiz Sierra para panel de yeso Martillo de uñas o pata de cabra Navaja utilitaria Materiales necesarios Cinta para sellar las conexiones de los conductos Los conductos rígidos existentes requerirán la adición de un tramo corto de conducto flexible Cableado eléctrico y suministros según los requisitos de los códigos locales Bombilla para lámpara de noche de 4W máx y del tipo C7 Herramientas neces...

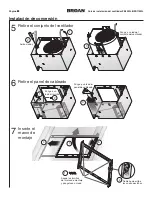
Страница 22: ...Retire el conjunto del ventilador 6 Retire el panel de cableado 7 Inserte el marco de montaje Ambos lados Ponga a un lado el conjunto del ventilador Ponga a un lado el panel de cableado Ponga a un lado el tornillo Doble hacia arriba las cuatro pestañas Saque los tornillos del marco de montaje y póngalos a un lado ...

Страница 23: ...dida que lo inserta en el marco de montaje Tire de los conductos existentes hacia el interior de la cubierta 10 Acople el conector de conductos y los conductos 8 Sujete el marco de montaje 9 Cubierta a presión Acople a presión Reductor de 6 a 4 pulg 15 2 a 10 2 cm para modelo ZB80ML solamente Cinta Cinta Cinta Conductos de 6 pulg 15 2 cm Conductos de 4 pulg 10 2 cm Introduzca la pestaña en la ranu...

Страница 24: ...placa de agujero ciego La placa de agujero ciego se monta en el interior de la cubierta y puede orientarse en la dirección que se desee LÁMPARA BLANCO AZUL LÁMPARA DE NOCHE ROJO LÁMPARA DE NOCHE TIERRA BLANCO NEGRO TIERRA BLANCO NEGRO ROJO VENTILADOR SENSOR CONTROL ROJO BLANCO NEGRO NARANJA BLANCO NEGRO CAFÉ LÁMPARA NEGRO 14 3 14 2 120 VCA LÍNEA DE ENTRADA INTERRUPTORES DE PARED MULTIFUNCIONALES O...

Страница 25: ...las bombillas Si es necesario realizar reparaciones en el cielo raso coloque el protector en la cubierta después de haber fijado el conjunto del ventilador Consulte el paso 6 sobre la instalación en una construcción nueva Retire la cubierta protectora antes de instalar la rejilla Tornillos de la bolsa de piezas Lámpara de noche Se compra por separado Conecte el sensor Conecte la lámpara ...

Страница 26: ...e la unidad con un accesorio del cepillo para quitar el polvo No use sprays limpiadores solventes ni agua en el sensor o cerca del mismo El motor está permanentemente lubricado y nunca necesitará aceite Si el motor hace ruidos excesivos o inusuales reemplace el conjunto de control y el motor Para cambiar las bombillas Consulte el paso 14 sobre la instalación de conversión página 25 1 Con cuidado i...

Страница 27: ... por Broan d daños provocados por instalación defectuosa o instalación o uso contrario a las recomendaciones o instrucciones e todo Ventilador que se haya trasladado del punto original de instalación f daño provocado por elementos naturales o ambientales g daño durante el transporte h desgaste natural del acabado i Ventiladores en uso comercial o no residencial o j daño provocado por incendio inun...

Страница 28: ...Guía de instalación del ventilador ZB80ML n ZB110ML Página 28 99044859C ...

Отзывы: