Page 1
01
Unpack the Appliance
Verify the contents of the shipping package for the Advanced Secure Gateway appliance:
•
(2) AC power cords
•
Grounding hardware
•
(1) Null modem serial cable
•
Slide-rail kit
•
Safety and Regulatory Guide
•
Quick Start Guide
(this document)
•
Software License Agreement
•
Hardware Warranty Information
02
Connect Cables
Symantec recommends plugging in cables, verifying LEDs, and configuring and licensing
the appliance before rack-mounting. Make sure the appliance is on a flat, level surface when
performing the initial configuration. If you would rather rack-mount the appliance before
performing configuration tasks, skip to
Step 6—Rack-Mount the Appliance
.
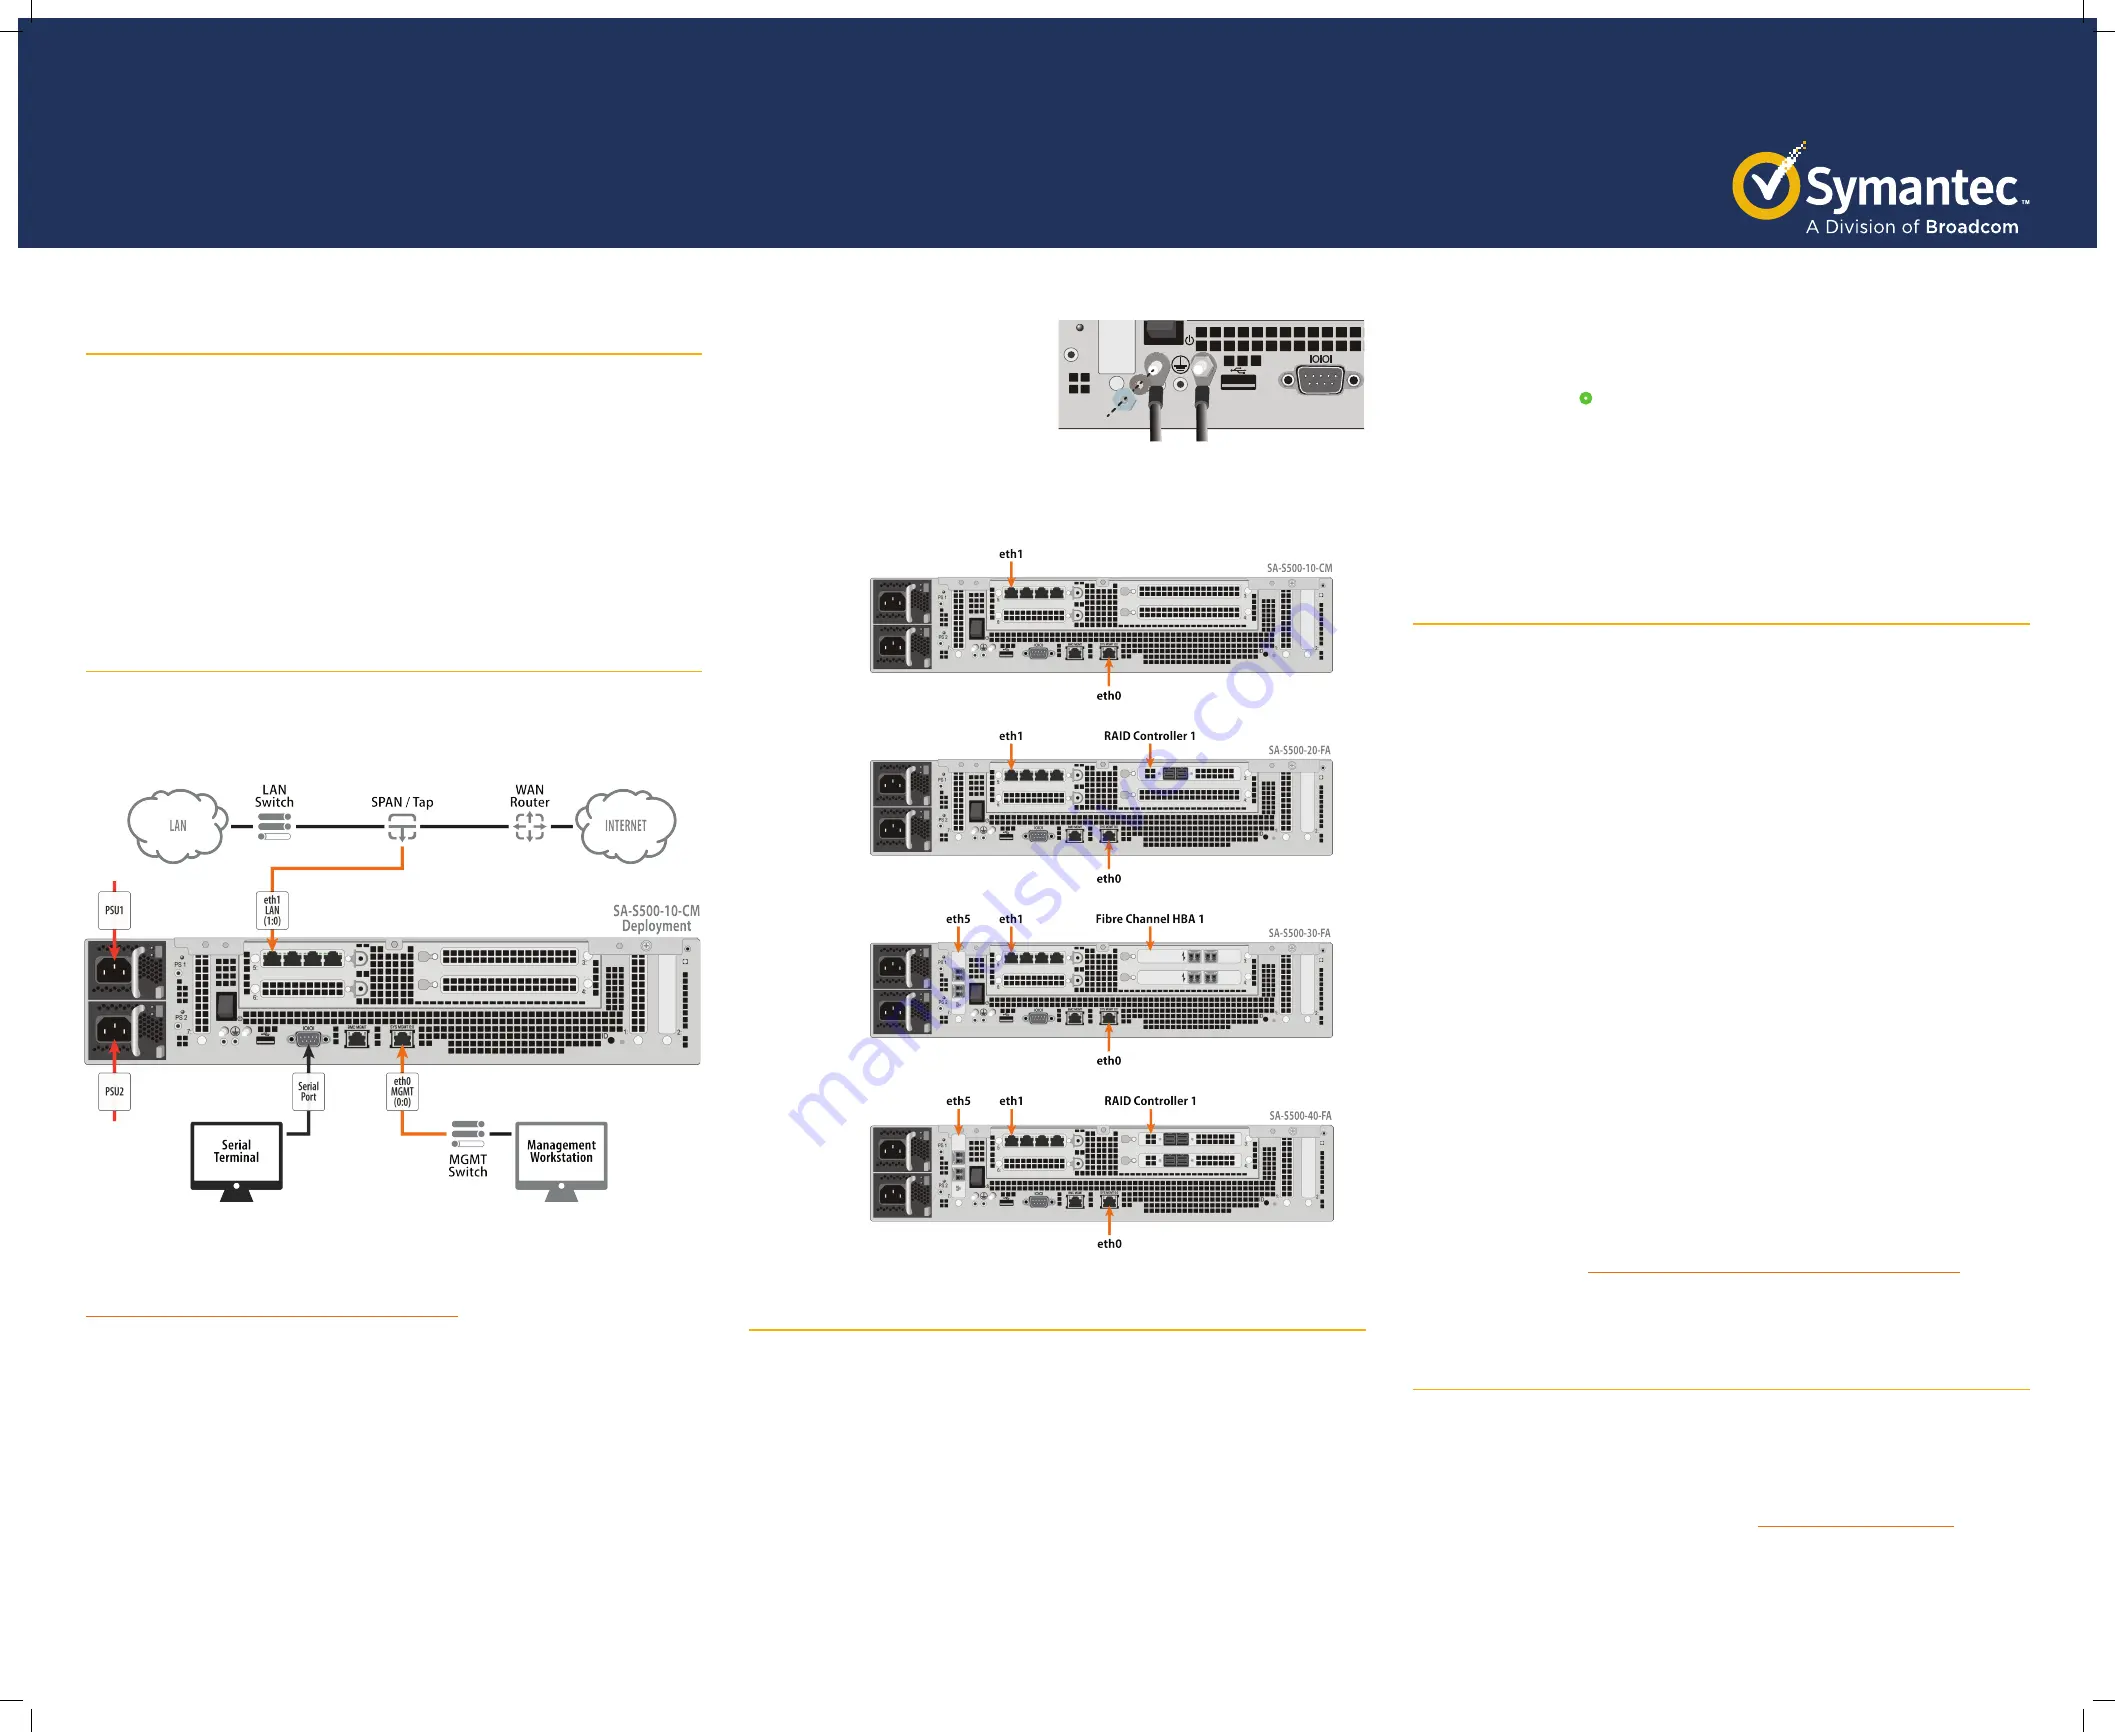
The following procedure describes a typical deployment for a single SA-S500-10-CM appliance
capturing from a single SPAN/TAP switch (as shown in the above illustration). For information
on deployments with other SA-S500 appliances, or configurations with multiple appliances or
multiple SPAN/TAP switches, see the Security Analytics documentation at:
https://support.symantec.com/us/en/documentation.html
Note:
Network cables are not included with the appliance. Make sure to use only straight-through
Ethernet cables. Category 5E cables or better are recommended for 1000Base-T operation.
Category 6A cables are recommended for 10GBase-T operation.
To deploy the appliance and connect its cables:
a.
Connect an Ethernet cable to the appliance’s
LAN
1:0
port and connect the other end to
the SPAN or TAP switch. The appliance auto-negotiates 100/1000/10GBase-T speed and
duplex settings.
b.
Connect an Ethernet cable to the appliance’s
MGMT 0:0
port and connect the other end to
the management network switch.
c.
Connect the included null-modem cable to the appliance’s
DB9 seria
l port and connect the
other end to a serial terminal or workstation with terminal emulation software. The serial
connection is used to perform the appliance’s initial configuration.
d.
Attach the lug-equipped end of the in-
cluded grounding wire (10 AWG) to both
grounding studs on the appliance, secur-
ing it with the star washers and M5 nuts.
Attach the other end of the grounding
wire to a proper earth-ground.
e.
Connect the included AC power cords to the appliance’s power inlets and connect the other
ends to a 120V or 220V power source.
Note:
The SA-S500 is available in the following appliance configurations with the indicated
port enumerations.
03
Power on the Appliance and Verify LEDs
To verify the appliance is operational:
a.
Confirm the appliance’s power cords are securely connected to a power source.
b.
If the appliance does not automatically power on, press the rear soft power switch.
Note:
The state of the appliance’s soft power switch (on or off) is retained when power is
removed. This may necessitate pressing the power switch when reapplying power to the
appliance.
c.
As the appliance boots, verify the following:
•
The LCD panel displays
Symantec
and the Power LED turns amber.
•
Near the end of the boot cycle, the Power LED alternates between amber and green,
indicating an unconfigured state.
•
After the boot cycle has completed, the LCD panel displays the appliance’s model,
serial number, and IP address.
•
Following the initial configuration (see
Step 4
), the Power LED turns green.
The front-panel LEDs indicate the following states:
•
Power LED
(
•
) Off: Powered off or no power present
(
•
) Amber: Booting
(
•
) Amber/green alternating: Not yet initialized
(
•
) Green: Powered on and configured
•
Sys Status LED
(
•
) Off: Powered off or no power present
(
•
) Green: Normal
(
•
) Amber: System fault (or not yet licensed)
(
*
) Amber blinking: Critical fault
04
Perform the Initial Configuration
You must have the following network information to initialize the appliance:
•
Appliance IP address
•
Subnet mask
•
Primary DNS server IP address
•
Link settings (speed and duplex)
•
Default Gateway IP address
•
Admin ID and password
To perform the initial configuration for the appliance:
a.
Confirm the appliance’s
DB9 serial
port is connected to a serial terminal or workstation with
terminal emulation software.
b.
Open a terminal emulation program, such as Microsoft HyperTerminal®, PuTTY, Tera Term, or
ProComm™ and configure it to use the following settings:
• Baud rate
:
9600 bps
• Data bits
:
8
• Parity
:
none
• Stop bits
:
1
• Flow control
:
none
c.
Power on the appliance (if it is not already powered on) and log in to the command-line
interface (CLI) with default credentials:
admin | Solera
d.
Configure the management IP address, netmask, and gateway with the following CLI com-
mand, specifying the netmask in dotted-decimal format (255.255.255.0):
sudo cfg _ bond _ interface.py -i eth0 -n <IP>/<netmask> -g <gateway>
e.
When prompted, enter the sudo password:
Solera
f.
Open a web browser, navigate to the address just specified, and log in with default creden-
tials:
admin | Solera
g.
When prompted, accept the EULA.
h.
On the Initial Configuration page, configure the following: hostname; IP address, mask, and
default gateway; up to three DNS servers; date, time, and time zone; interface language; and
root and admin passwords.
Note:
For more information, see the
Initial Settings
topic in the
Security Analytics
WebGuide
, available at:
https://support.symantec.com/us/en/documentation.html
i.
Click
Save
. If there are no errors, you are prompted to license the appliance.
05
License the Appliance
After completing the initial configuration, to license the appliance:
a.
After completing the initial configuration, you are prompted with the
License Details
dialog.
Note:
You can also update or change an existing license. To do so, select
Menu > Settings >
About
and then click
License Details
.
b.
Retrieve your license key from Symantec Support (
https://support.symantec.com
) as in-
structed in the eFulfillment message from Symantec.
c.
If your appliance has access to the Internet, do the following:
•
Under Retrieve License, enter the
License Key
and click
Send Request
.
•
If applicable, select the desired license type.
Quick Start Guide
Security Analytics SA-S500
IOIOI
BMC MGMT
7:
PS 2


