background image

Instructions for Installation & Use

50

IN CASE OF CRASH

We would never want you to experience an accident, but unfortunately accidents do happen. If 
you experience an accident you may be eligible for a free replacement.

The Britax Safe-n-Sound Crash Exchange Program is a voluntary program designed to ensure 
that our children are safe and that any seat that may have experienced a severe crash is taken 
out of the market.

There is no method of determining if the restraint has been damaged in a severe crash, so the 
restraint should be destroyed as the crash may reduce the child restraints ability to perform.

Since its inception in 2006, the Crash Exchange program has helped 100’s of families ensure 
that their children have new restraints and that the restraints are not sold second hand placing 
others at risk. 

Our Crash Exchange Terms and Application form are accessible on our website.                                  
Please visit www.britax.com.au for further information.

CRASH EXCHANGE

Содержание Safe-n-Sound BS4900A-020133 Series

Страница 1: ...Use 1 Instructions for Installation Use Series No BS4900A 020133 Series No BS4900B 020133 FORWARD FACING 4 years to 8 10 years approx if fitted BOOSTER SEAT IMPORTANT KEEP THIS BOOKLET IN THE PLACE PR...

Страница 2: ...2 9 4 Rotate to lengthen base Unfold Seat Risk of trapping hand finger Raise Lower headrest Check and adjust SecureGuard Device Check and adjust headrest 30 mm 2 Lift 1 Push down and out 3 Push back T...

Страница 3: ...Instructions for Installation Use 3 SEATBELT QUICK SETUP Attach top tether to anchorage Store excess strap in pocket Feed slack to retractor Engage lap belt 10 11 13 12 14 16 17 15 Remove slack...

Страница 4: ...atbelt ng isang bata na ang mga balikat ay lampas na sa ibabang marka ng taas ng balikat humigit kumulang 4 na taong gulang hanggang sa maabot ngmga balikat ng bata ang itaas na marka ng taas sa balik...

Страница 5: ...Instructions for Installation Use 5 INTRODUCTION...

Страница 6: ...Instructions for Installation Use 6 INTRODUCTION...

Страница 7: ...Instructions for Installation Use 7 INTRODUCTION...

Страница 8: ...RSATETHER catch that allows it to be used with an approved child harness This booster seat is suitable for use with the following child harness Britax Safe n Sound Protecta PLUS Series 220 2013 This b...

Страница 9: ...OT TO INSTALL INTO VEHICLE HOW TO USE WITH SEATBELT CHILD HARNESS PREPARATION HOW TO INSTALL CHILD HARNESS HOW TO REMOVE CARE AND MAINTENANCE ACCESSORIES FEATURES INSTALLATION OF CAR UPPER ANCHORAGE P...

Страница 10: ...in a severe crash even if no damage is visible DO NOT USE THIS RESTRAINT WITHOUT THE COVER IF AN AIRBAG IS FITTED IN THE SEATING POSITION WHERE THE CHILD RESTRAINT IS TO BE FITTED FOLLOW THE VEHICLE M...

Страница 11: ...n a front seat unless your child is over 4 years of age or in accordance with the applicable Road Rules in your region Research shows that children under 12 years old are at a greater risk of serious...

Страница 12: ...position From approximately 4 years of age TALLER CHILD Shoulders must not be above the Upper Shoulder Height Marker B when the headrest is at the highest position To approximately 8 to 10 years of a...

Страница 13: ...IGHT MARKER MARKER B The seat can be used until the child s shoulders reach the Upper Marker label B with the headrest fully raised Usually the shoulders will contact the bottom of the headrest it is...

Страница 14: ...d Anti Submarining Device 8 Shoulder Height Markers 9 Sash Guide one each side of headrest 10 Shoulder slots for use with Child Harness 1 Side Impact Cushion Technology Headrest SICT if fitted 2 Adjus...

Страница 15: ...Headrest Adjustment handle 12 Adjustable Top Tether Strap 13 Attachment Clip 14 Car s Upper Anchorage fitting 15 Top Tether Strap Adjuster 16 Storage Pocket Top Tether and Instruction Book attached t...

Страница 16: ...O NOT PLACE FINGERS IN BETWEEN SEAT BACK SEAT BASE WHEN FOLDING OR UNFOLDING RISK OF TRAPPING HAND FINGER CAUTION FOLDING THE BOOSTER SEAT To store the Booster seat push to fold the seat forward BEFOR...

Страница 17: ...adrest up or down C Adjust the headrest height so that the bottom of the sash guide is level with or just above your child s shoulder but not more than 30mm above D When the headrest is in the correct...

Страница 18: ...y reducing pressure points The Adjustable Side Wings can be adjusted to provide more width for a larger child or can be kept narrow to reduce the width of the Booster seat To adjust hold seat or headr...

Страница 19: ...ips and thighs and the lap belt is prevented from rising up the abdomen Ensure the SecureGuard Device does not push into your child s thighs as this may cause discomfort Adjust the crotch strap to a s...

Страница 20: ...seating position has a child restraint anchorage fitting Refer to your vehicle owner s manual for the location of the upper anchorage point in the car If the vehicle is not fitted with a child restrai...

Страница 21: ...ll up excess strap and use storage pocket to neatly store away from child s reach The backrest pivots freely so as to match the car seat back angle Move the restraint back until it is touching the car...

Страница 22: ...recess area B Position the lap sash belt over the child following the red BOOSTER SEATBELT PATH labels Engage seatbelt tongue into buckle ensure there are no twists in the belt If the seatbelt buckle...

Страница 23: ...r The lap belt should fit firmly across the hips thighs and the sash belt diagonally across the chest G A loose or poorly fitted seatbelt may cause preventable injuries if instructions are not followe...

Страница 24: ...ions for Installation Use 24 SEATBELT BEHIND THE BACK IS DANGEROUS HOW TO USE SEATBELT UNDER THE ARM IS DANGEROUS WARNING A SASH BELT UNDER THE ARM OR BEHIND THE BACK IS DANGEROUS CHILD USE BOOSTER SE...

Страница 25: ...be firm on the thighs The SecureGuard Device must be positioned on the lap belt so that the child cannot slump or slouch Feed all the lap belt slack and sash belt slack back to retractor Adjust headr...

Страница 26: ...are twisted or passing over any sharp edges INSTALLING SAFE N SOUND PROTECTA PLUS CHILD HARNESS WITHOUT EXTENSION STRAP INTO VEHICLE CHILD HARNESS PREPARATION 1 Attachment Clip from Child Harness 2A...

Страница 27: ...the VERSATETHER Catch on the Booster Seat top tether strap as shown below Ensure that none of the straps are twisted or catching on sharp edges Adjust the Booster Seat top tether strap refer to page 2...

Страница 28: ...the adjustment method Press the Adjuster button 1 and pull the shoulder strap 2 Left hand Strap Adjuster under cover Attachment Clip Cross Strap 2 1 B Feed the left hand Harness Strap Cross Strap thro...

Страница 29: ...he opposite slot until the straps are of equal length C Pull the left hand Harness Strap Cross Strap back through the opposite shoulder slot Hook the Child Harness Attachment Clip onto the VERSATETHER...

Страница 30: ...hicle manufacturer for advice on longer seatbelts INSTALLATION METHOD If the seating position has a lap only seat belt then no other vehicle seatbelt preparation is required If the seating position ha...

Страница 31: ...nd ensure that no lap belt slack is caused while fitting the gated slide The gated slide should be close to the child but not touching and should guide the sash belt back to the retractor away from th...

Страница 32: ...outer strap Faces towards Child Inner Strap Outer Strap A Face the hollow side of the Gated Slide and the inner strap towards the child Do not use Gated Slide for any other purpose IMPORTANT C Repeat...

Страница 33: ...e to remove any slack This has now converted the lap sash seatbelt so it will act like a lap only seatbelt E Ensure all slack is removed from the converted lap belt Strap portion Lap portion Loop on t...

Страница 34: ...se thread the lap seatbelt through the Child Harness strap loops as shown NOTE Seatbelt extenders should not be used if the seatbelt is not long enough to fit around the child If a seatbelt extender i...

Страница 35: ...ight hand strap loop end into the cross strap loop to connect the two sides C Feed the adult belt lap belt or converted lap sash through the harness strap loops ensuring that the cross strap loop does...

Страница 36: ...sted to be a firm fit on the child s thighs adjust the Child Harness to remove all slack in the shoulder straps Lap belt must be adjusted first so the lap belt is not lifted off the child s lap when t...

Страница 37: ...oulder Height Marker with the headrest in the top position NOTE It may be easier to unthread the vehicle seatbelt out of the loops before lifting the child harness over the child s head TO REMOVE REST...

Страница 38: ...nly cold or warm water Never place any straps or harness into a washing machine or tumble dryer TO CLEAN THE COVER The restraint has a flame retardant cover which is removable for cleaning Cleaning in...

Страница 39: ...seat that require user maintenance ONLY USE BRITAX SAFE N SOUND SEAT COVERS AND ACCESSORIES THAT ARE DESIGNED AND TESTED FOR USE WITH THIS PRODUCT VERY IMPORTANT Only replace the cover with BRITAX Sa...

Страница 40: ...m the channel running along the edge of the wings B Remove headrest cover by removing the elastic from hook on headrest If fitted with SICT pull elastic over the cushions Unhook the elastic from behin...

Страница 41: ...rd Device and the base adjustment knob then slide the cover off Unhook elastic from underneath booster Slide cover off base Remove the Instruction Book from the storage pocket in trim cover before was...

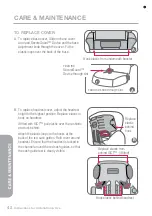
Страница 42: ...at the headrest is tucked in the channel around the red sash guides so that the sash guide text is clearly visible TO REPLACE COVER A To replace base cover Slide on base cover and feed SecureGuard Dev...

Страница 43: ...n Do not loop the elastic at the bottom of the middle cover over the booster seat This remains at the front of the booster seat Insert wing cover edge into the channel running along the edge of the wi...

Страница 44: ...he box with the child restraint can reduce the safety provided by the child restraint and may cause injury or death Always follow the instructions covering the use of accessories in this booklet or th...

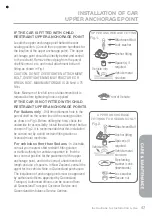
Страница 45: ...P COVER MUST ALWAYS BE USED AS IT PREVENTS THE RISK OF INCORRECT FITMENT OF THE ATTACHMENT CLIP TO THE UPPER ANCHORAGE POINT ALWAYS ENSURE THAT THE ATTACHMENT CLIP IS CORRECTLY ENGAGED TO THE UPPER AN...

Страница 46: ...car anchor fitting Within each shaded area is an upper anchorage point showing the correct way to install the fitting Ensure the upper anchorage point is aligned as illustrated unless stated otherwis...

Страница 47: ...erside for accessibility Install the attachment bolt as shown in Fig 2 It is recommended that this installation be carried out by a child restraint fitting station or licenced motor mechanic For vehic...

Страница 48: ...PROTECTED FROM SHARP CORNERS AND EDGES THE ANCHOR FITTING MUST BE USED ONLY AS DESCRIBED ABOVE IT MUST NOT BE HOOKED ONTO ANY OTHER OBJECT Centre line of seating position CAR INSTALLATION ACCESSORIES...

Страница 49: ...age is obvious The joint Australian New Zealand Standards committee CS 85 advise that this statement applies whether a child was in the child restraint or not A severe crash we consider as being one w...

Страница 50: ...severe crash is taken out of the market There is no method of determining if the restraint has been damaged in a severe crash so the restraint should be destroyed as the crash may reduce the child re...

Страница 51: ...s Level 4 650 Lorimer Street Port Melbourne VIC 3207 P O Box 5119 Garden City VIC 3207 Customer Service 1300 303 330 Email au custserv britax com www britax com au NEW ZEALAND Britax Childcare NZ Ltd...

Страница 52: ...tions and registered designs Patents pending P No 2202560 E 57 Scan QR code for installation and how to use WARRANTY Our goods come with guarantees that cannot be excluded under the Australian Consume...

Отзывы: