background image

Maintenance...

Consulting the statistics

5-174

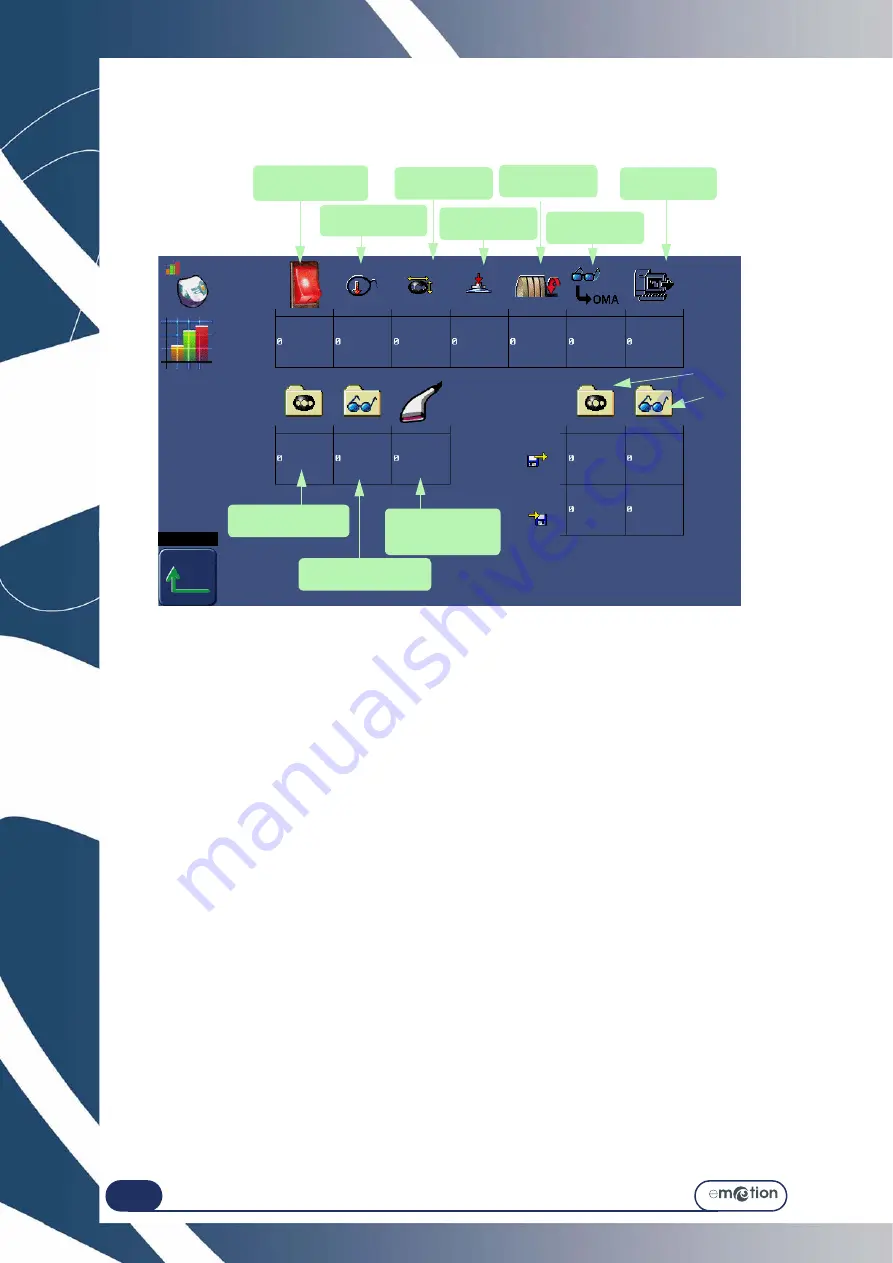
5.11.2.2.3.2 Edger general statistics display screen

The display screen for the edger general statistics is shown below:

Screen 5-12: Consulting the edger general statistics screen

Number of machine 

starts

Scanform

You are in the Machine 

Statistics menu

Digiform

Centering/

Blocking system

Edging

Server 

communication

Number of Digiform 

saved operations

Number of OMA saved 

operations

Number of saved 

operations with the 

bar code reader

Exit

OMA 

communication

Содержание emotion

Страница 1: ...Operation manual...

Страница 2: ...an be modified without prior notice This document has been prepared with great care but some unintentional errors or omissions may occur although every effort has been made to avoid them Briot Interna...

Страница 3: ......

Страница 4: ...he instructions carefully Vital recommendation Risk of machine damage or malfunction Follow the instructions carefully Vital preliminary action Before undertaking any action check that the machine is...

Страница 5: ...ment may be recycled By ensuring that this product is correctly disposed of you will help prevent potentially harmful environmental and human consequences due to improper handling when improperly disp...

Страница 6: ...ying the pattern Drilling screen Centering blocking system General Edger General Lens materials Types of lenses Finishing Sub finishing and associated parameters Safety bevels Polishing Usual procedur...

Страница 7: ...Scanform Replacing a stylus tip Replacing the frame clip tubes Replacing the centering plate Maintenance of the centering blocking system zone 5 125 Cleaning the ground glass screen Cleaning the lowe...

Страница 8: ...creen description Access Exit Typical test screen Operating principle 6 199 Operating principle of a typical screen Tests involved Procedure Test sequence Operation of the other screens Screen with sw...

Страница 9: ...Table of contents...

Страница 10: ...REVISION FOLLOW UP Revision 01 Page New Modified Item New document...

Страница 11: ...3 10...

Страница 12: ...1 INSTALLATION...

Страница 13: ...1 12 UNPACKING THE MACHINE 1 2 3 4 5 8 9 Keep the case the small carton and the hose near the machine 6 7...

Страница 14: ...ain packaging carton 3 Cut the adhesive tapes on the main packaging carton 4 Check that the accessories small box case and tube have been supplied and keep them close to the machine 5 Pull the main pa...

Страница 15: ...Installation Unpacking the machine 1 14...

Страница 16: ...the procedure below Flow chart 1 2 Removing the shipping rails As shown Illustration 1 1 Removing the fixing screws from the shipping rails 1 With the help of a second person tip the machine gently t...

Страница 17: ...Installation Removing the shipping rails 1 16...

Страница 18: ...1 3 PREPARING THE BENCH 1 3 1 MACHINE DIMENSIONS The following illustrations show the machine dimensions Flow chart 1 3 Edger dimensions Height 442 mm Width 728 mm Depth 600 mm Weight 75 kg H 442 mm...

Страница 19: ...nch and the openings which must be provided Position your machine correctly before drilling the bench Illustration 1 2 Positioning the machine on the bench and drilling to be made RECOMMENDATIONS Foll...

Страница 20: ...easy to reach and closed when not in use Water pressure 4 7 bars Water discharge through a 100 mm diameter pipe The slope must be at least 5 to ensure proper evacuation of the refuse 1 4 1 2 FILTRATI...

Страница 21: ...Installation Water connections 1 20 1 4 2 2 PROCEDURE As shown Level 1 3 2 4 6 7 Settling tank 4 6 Filtration tank DIRECT WATER SUPPLY CLOSED CIRCUIT 5 Pump power connector...

Страница 22: ...the four feet 4 Connect the water drain pipe to the chassis 5 Fit the filter seal between the water supply connection and the valve if you operate in direct water supply 6 Connect the water supply pi...

Страница 23: ...Installation Water connections 1 22...

Страница 24: ...proceed as follows Flow chart 1 5 Electrical connections As shown Illustration 1 4 Electrical connections Note The pump and reader illustrations are not the property of Briot and are used purely as e...

Страница 25: ...Installation Electrical connections 1 24 1 3 2...

Страница 26: ...d off On Off switch OFF and mains plug disconnected 2 Fit the lens clamping and lens holder adaptors on the shafts 3 Plug in the machine and switch on On Off switch lit 4 Start a dummy cycle and adjus...

Страница 27: ...1 26 Installation Starting the edger 1 6 2 SWITCHING THE MACHINE ON OFF Flow chart 1 7 Switching the machine ON OFF ON position 1 pushed in Lit up OFF position 0 pushed in Unlit...

Страница 28: ...2 SAFETY PRECAUTIONS...

Страница 29: ...2 28...

Страница 30: ...hine is not going to be used for a long period of time disconnect the power cords from the wall outlet Disconnect the machine if there is an electrical storm or when the machine is left unattended for...

Страница 31: ...Safety precautions Safety 2 30...

Страница 32: ...ntry problem push the emergency stop button and wait until the Scanform returns control to you before resuming the operations Centering locking system zone Do not scratch or put your fingers on the op...

Страница 33: ...2 32 Safety precautions Recommendations...

Страница 34: ...3 USING YOUR EDGER...

Страница 35: ...3 34...

Страница 36: ...stration 3 1 Overall view of the edger MAIN PARTS The exploded view below Illustration 3 2 shows the main parts of the edger Illustration 3 2 Exploded view of the edger Touch screen Centering blocking...

Страница 37: ...nise the drilling plan of a job Manually center the dotted bifocal and progressive lenses 3 1 2 3 SCANFORM DRILLING The Scanform allows you to Enter the characteristics of the frame shape and gaps Ent...

Страница 38: ...ed after initialising the equipment at start up Screen 3 1 Application screen 3 1 3 2 ZONE IDENTIFICATION The application screen below Screen 3 2 can be divided into zones Screen 3 2 Identification of...

Страница 39: ...ectacles 1 Job Creation Scanform Selection 2 Digiform Drilling 3 Centering blocking system 4 Edging operation The parameters for each operation are defined in each of the related tabs For a more detai...

Страница 40: ...es The buttons or menus which can be enabled are highlighted those which cannot be enabled are grayed Example Can be enabled Cannot be enabled SEVERAL POSSIBLE SELECTIONS You can enable one or more fu...

Страница 41: ...3 40...

Страница 42: ...orresponding to the desired action Then long press this button to select the job pattern or define the number associated with the creation of your pattern When the numeric key pad is displayed enter t...

Страница 43: ...the pattern holder should push the centering nose and the lower parts should be positioned between the Scanform clips Select the Scanform Select the side s to be entered Select the entry type Automati...

Страница 44: ...modify the shape of a pattern use the functions on the bottom of the screen 3 2 2 2 POSITIONING THE DRILLING HOLES To get access to the drilling menu use this key Add a hole using this key Select the...

Страница 45: ...Using your Edger General principles of use 3 44 Pin 1 2 3 5 Blocker head Blocker arm 4...

Страница 46: ...elect the side to be blocked Place a lens holder corresponding to the lens to be blocked on the ground glass screen Place the lens to be blocked on its holder Select the blocker type Center the lens P...

Страница 47: ...Using your Edger General principles of use 3 46 3 2 4 USUAL PROCEDURE EDGING Enter the Edging tab...

Страница 48: ...1 Usual procedure Call a job number Select the lens material Select the type of lens Select the finishing type Select the sub finishing type Select the type of front safety bevel if desired Select pol...

Страница 49: ...ess this button Result the lens clamp shaft opens automatically Remove the edged lens without removing the block so as to be able to do a retouch if necessary 3 2 4 3 STARTING INTERRUPTING AN EDGING C...

Страница 50: ...onfiguration message is displayed see chapter 5 If you modify the job data before starting to edge one of the lenses the new characteristics will be memorised automatically and applied to the two lens...

Страница 51: ...Using your Edger General principles of use 3 50...

Страница 52: ...s displayed for you to enter a job No saved in the internal memory Long press The jobs base is displayed Short press The job is sent to an OMA server Short press Scanform entry is launched Select fram...

Страница 53: ...ns 3 3 2 2 DRILLING SCREEN Screen 3 6 Drilling Sub Finishing Icons Note Drilling angle set to 10 Width Height W H ratio H W ratio Perimeter Half height Oversize thickness Access to drilling screen Nav...

Страница 54: ...3 3 CENTERING BLOCKING SYSTEM 3 3 3 1 GENERAL Screen 3 7 Blocking screen icons Left pupillary height Left half pupillary distance Bridge Right pupillary height Right half pupillary distance Save in th...

Страница 55: ...he icons displayed on the screen depend on the job data see When job data are received page 49 Screen 3 9 Lens Material Icons Oversize to boxing width Lens selection Lens materials Finishing Sub Finis...

Страница 56: ...r lenses that you consider to be fragile the roughing phase is slower than during a normal cycle Normal Cycle suitable for the majority of lenses NOTE If the lens type is HI and hydrophobic or fragile...

Страница 57: ...lens thickness from the front face Groove 50 Bevel The apex of the bevel is positioned at 33 of the lens thickness from the front face Groove Front Face Bevel The bevel follows the front face of the...

Страница 58: ...front face of the lens is greater than 0 4 mm and the distance between the rear edge of the groove and the rear face of the lens is greater than 0 4 mm Depth of safety bevel 0 2 mm If you make a reto...

Страница 59: ...r Application screen icons 3 58 3 3 5 POLISHING Note The presence and order of the icons displayed on the screen depend on the job data see When job data are received page 49 Screen 3 14 Polishing Ico...

Страница 60: ...tomatically in the equipment data base 3 4 1 3 DELETING A SHAPE A JOB SAVED IN THE MEMORY To delete a job from a job menu that can be accessed via use this button 1 2 3 1 A short press on the job sele...

Страница 61: ...edure 3 60 PRODUCING A JOB WITH DRILLING Illustration 3 3 Example of the production of a job with Drilling Navigation arrow in the table Add a hole Increment Confirm Decrement Numeric entry Drill an e...

Страница 62: ...towards the centre Characteristics of the diameter of a hole The diameter of a drilled hole is always greater or equal to that of the mill bit which is fitted Special case If the diameter of the fitte...

Страница 63: ...to the bit dia meter If you reply No the entire drilling plan will be ignored and no hole will be drilled The lens will be finished in rimless 3 4 2 3 HINTS When the edging cycle is finished remove th...

Страница 64: ...dge D 2 mm 1 Create the first hole 2 Enter the distance from the centre of the first hole to the lens edge D 2 1 5 2 2 75 mm 3 Enter the Y coordinate of the first hole Y 7 mm 4 Enter the hole diameter...

Страница 65: ...s of the segment must be tangential to a pair of vertical lines of the same colour Centering a dotted progressive lens The distant vision marking must be on the red cross The axis marking must be para...

Страница 66: ...k a lens which has to be regrooved or a small lens 45 mm it is preferable to use the fitted lens holder small diameter P N S390017 4 Select the type of lens to be blocked Result A coloured target corr...

Страница 67: ...procedure 3 66 PRODUCING A JOB WITH RIMLESS FINISHING Screen 3 15 Example of the production of a job with rimless finishing Normal Type With polishing Without safety bevel Polycarbonate lens Rimless S...

Страница 68: ...PROCEDURE To carry out the job described above proceed as follows Flow chart 3 3 Production of a job with Drilling finishing Note To familiarize yourself with the icons associated with each step refe...

Страница 69: ...TH GROOVE FINISHING Illustration 3 4 Example of the production of a job with Groove finishing Normal Type With polishing 0 2 mm front face safety bevel 0 2 mm rear face safety bevel 33 sub finishing G...

Страница 70: ...llows Flow chart 3 4 Production of a job with Drilling finishing Note To familiarize yourself with the icons associated with each step or obtain more details of the action required refer to the screen...

Страница 71: ...procedure 3 70 Screen 3 16 Example of the production of a job with a bevel PRODUCING A JOB WITH BEVEL FINISHING Fragile type Rear face safety bevel Without polishing Without oversize Mineral lens Bev...

Страница 72: ...ble to retouch it if necessary If you are unsure about the type of bevel positioning we advise you to choose Manual type from the main screen During the cycle when the manual finishing screen is displ...

Страница 73: ...g your Edger Usual procedure 3 72 MODIFYING A SHAPE DIGIFORM Illustration 3 5 Example of shape modification Digiform Call up a shape Shape modification keys Confirm Storage source for shapes and templ...

Страница 74: ...pe to produce a new pattern 3 5 1 2 PROCEDURE The numbers of this illustration refer to the step numbers below Follow the steps below to modify a shape Digiform function NOTE This new shape can be sav...

Страница 75: ...Using your Edger Special cases 3 74...

Страница 76: ...lens is edged and the initial dimension has been increased or decreased by the entered value You may check the lens diameter with a digital caliper and retouch it if necessary 3 5 2 3 HINTS Always ch...

Страница 77: ...b the following characteristics cannot be modified from one lens to another Lens material Finishing type Polishing type You may only modify the following characteristics Lens type Sub finishing type S...

Страница 78: ...3 5 4 2 PROCEDURE Flow chart 3 8 Edging lenses with identical characteristics The lens is edged again with the same characteristics as the previous edging Tip In this way you can group together simil...

Страница 79: ...lied to the lens being edged A special screen allows you to visualise the finishing and modify its position if desired 3 5 5 2 PRESENTATION 3 5 5 2 1 MANUAL BEVEL SCREEN Screen 3 17 Manual bevel scree...

Страница 80: ...the same finishing angular position When you move one the other moves as well C Movement of the index Angular position Index Front face developed curve Groove centre developed curve Rear face develop...

Страница 81: ...ave been redirected automatically to the manual finishing screen for the following reasons The bevel or the groove are outside the lens The bevel is too far back Irregular points were detected during...

Страница 82: ...If you wish to reposition the whole finishing move it in one direction to the required position Then do the same from the opposite point 3 5 5 4 3 SPECIAL CASES After the lens feeling you may have be...

Страница 83: ...position you wish to modify Zone Press the axis of your choice top bottom temporal nasal A Move the bevel apex and position it as you wish To the rear To the front Scan the lens profile as you wish Cl...

Страница 84: ...the bevel and the front face is 5 mm The finishing position can be modified in four points top bottom temporal nasal Only the bevel apex is displaced along this point The opposite side remains fixed a...

Страница 85: ...tioned at 1 3 of the lens thickness from the front face A Move the middle of the groove and position it as you wish To the rear To the front Scan the lens profile as you wish Clockwise Anti clockwise...

Страница 86: ...automatically to guarantee the lens resistance 3 5 5 6 5 LIMITS If the maximum thickness of the lens is less than 2 mm the applied groove will automatically be of 50 type whichever type of groove is s...

Страница 87: ...Using your Edger Special cases 3 86...

Страница 88: ...neral roughing 10000 lenses Plastic roughing 50000 lenses Finishing 8000 lenses 10000 lenses Polishing 6000 lenses Safety bevel 5000 lenses per wheel side Grooving 5000 lens Beveling Minimum lens thic...

Страница 89: ...at Boxing width Minimum distance between the apex of the bevel and the front rear face to produce a safety bevel 1 6 mm Minimum distance between the front face of the lens and the front edge of the g...

Страница 90: ...INCLINED GROOVE FINISHING Illustration 3 8 Limits of production of an inclined groove Front face Rimless Min height of finished lens 17 50 mm Front face Min height of finished lens 19 10 mm Bevel heig...

Страница 91: ...y in the screen and only marked with the mill bit end with maximum inclination angle during the drilling phase once the operator has accepted the marking The ring formed by the edge of the lens and th...

Страница 92: ...igh front base and for high drilling radii distance from centre of block to centre of hole it is possible that the mill bit retaining nut may interfere with the lens If so the edger automatically limi...

Страница 93: ...ENS CHARACTERISTICS DIAMETER INDEX COLOUR The index and colour have no effect on the centering function TREATMENT The lens treatment in particular the anti reflective coating has no effect on the cent...

Страница 94: ...4 CONFIGURATION...

Страница 95: ...4 94...

Страница 96: ...displayed on the top right of the current screen If you are working with the Personalisation screen the edger will be dis played on the top right of the screen 4 1 1 2 ACCESS EXIT 4 1 1 2 1 TO ACCESS...

Страница 97: ...EEN DESCRIPTION The personalisation menus access screen is shown below Screen 4 2 Personalisation menus access screen 4 1 2 2 ACCESS EXIT 4 1 2 2 1 TO ACCESS THE SCREEN 4 1 2 2 2 TO EXIT THE SCREEN Ad...

Страница 98: ...ay of working and wish to gain time by configuring your own default values 4 2 1 2 SCREEN DESCRIPTION The configuration screen for the finishing parameters default values is shown below Screen 4 3 Def...

Страница 99: ...entered 4 2 4 LIMITS The information given in the tables below completes the values referred to in Using Application screen icons Sub finishings and associated parameters The default values that you w...

Страница 100: ...t default values Lower limit Upper limit Incrementation 1 mm 5 mm 5 mm 0 01 mm 4 D 0 25 D 12 D 0 25 D 33 0 100 1 0 8 mm 0 8 mm 3 mm 0 1 mm TABLE 2 Sub finishing type Briot default values Lower limit U...

Страница 101: ...Configuration of finishing para meters default values 4 100 4 2 4 3 SAFETY BEVEL TABLE 3 Safety bevel type Briot default values Lower limit Upper limit Incrementation 0 2 mm 0 0 6 mm 0 1 mm 0 2 mm 0...

Страница 102: ...Configuration Configuration of finishing parameters default values 4 101...

Страница 103: ...djustment of the setting values 1 To adjust the position of the apex of the bevel To adjust the depth of the rear safety bevel To adjust the depth of the front safety bevel To adjust the position of t...

Страница 104: ...tandard setting values can affect the performance of the machine If you wish nonetheless to use the values adjustment function first target your needs with precision and then modify the values with fu...

Страница 105: ...rection for plastic and metal frames To enter a correction for plastic frames To enter a correction for CR39 lenses To enter a correction for High Index lenses To enter a correction forTrivex lenses A...

Страница 106: ...standard setting values can affect the performance of the machine If you wish nonetheless to use the values adjustment function first target your needs with precision and then modify the values with...

Страница 107: ...Configuration Correction of frame and lens values 4 106...

Страница 108: ...rating parameters is shown below Screen 4 6 Setting the machine s general operating parameters 4 5 1 3 ACCESS EXIT 4 5 1 3 1 TO ACCESS THE SCREEN 4 5 1 3 2 TO EXIT THE SCREEN Dialog language Size comp...

Страница 109: ...following wheel dressing The wheel condition compensation function takes this effect into account and allows for compensation of the lens size after the wheel has been dressed 4 5 2 3 2 PROCEDURE To e...

Страница 110: ...unication functions according to the peripheral equipment connected to the machine 4 6 1 2 SCREEN DESCRIPTION The setting screen for the machine communications is shown below Screen 4 7 Setting the co...

Страница 111: ...4 6 1 4 ENABLING DISABLING COMMUNICATION FUNCTIONS 4 6 1 4 1 PRINCIPLE According to the peripheral equipment connected to the machine the associated communication function must be enabled disabled 4 6...

Страница 112: ...5 MAINTENANCE...

Страница 113: ...5 112...

Страница 114: ...creen If you are working with the Maintenance screen the hand holding the spanner will be displayed on the top right of the screen 5 1 1 2 ACCESS EXIT 5 1 1 2 1 TO ACCESS THE SCREEN To reach the confi...

Страница 115: ...reen is shown below Screen 5 2 Maintenance menus access screen 5 1 2 2 ACCESS EXIT 5 1 2 2 1 TO ACCESS THE SCREEN 5 1 2 2 2 TO EXIT THE SCREEN Changing the lens feeler tips Dressing the wheels Replaci...

Страница 116: ...rations below will help you to identify the parts of the edger on which you will be working during maintenance operations Lens feeler tips Replacement Adjustment Visor Cleaning and replacement Lens cl...

Страница 117: ...Maintenance Visualising the components 5 116...

Страница 118: ...th a spray bottle of water Replace the flexible lens clamp adaptor pad regularly every 1000 lenses Replace the mill bit when a message asks you to do so 1 hour of total drilling time Check the conditi...

Страница 119: ...Maintenance Task list 5 118...

Страница 120: ...o not use products such as water or chemical agents Ethyl alcohol can be used when a dry cloth is not sufficient enough to remove stubborn stains The GUARANTEE WILL NOT APPLY to damage caused by impro...

Страница 121: ...Maintenance Maintenance of the touch screen unit 5 120 Illustration 5 1 Scanform...

Страница 122: ...using a compressed air spray 1 Switch OFF the emotion if it is ON 2 Manually open the Scanform and lift up the stylus tip Hold the elements in this position without applying force 3 Place a sheet of p...

Страница 123: ...ally and remove it Example Figure 1 NOTE Only the upper frame clip tubes can be replaced 4 Fit the new frame clip tube make sure the tube is engaged fully home in its shaft 5 Release the pressure on t...

Страница 124: ...Maintenance Maintenance of the Scanform unit 5 123...

Страница 125: ...Maintenance Maintenance of the Scanform unit 5 124 Illustration 5 1 Centering blocking system...

Страница 126: ...LLIMATOR To clean the lower lens of the collimator proceed as follows NOTE It is recommended to clean the lower lens of the collimator with a circular movement from the centre outwards 5 6 3 REPLACING...

Страница 127: ...e emotion if it is ON 2 Disconnect the power cord from the wall plug 3 Remove the fuse from the fuse holder on the left of the emotion mains plug 4 Fit a new fuse see Technical specifications chapter...

Страница 128: ...when handling the lens holder adaptor and feeler tip 5 7 1 2 PROCEDURE To replace the flexible lens clamp adaptor pad follow the procedure below Flow chart 5 1 Replacing the flexible lens clamp adapto...

Страница 129: ...r 5 128 Illustration 5 2 Replacing the mill bit Mill bit Chuck nut Spacer Block the rotation with an Allen key or with one turn of the screwdriver Tighten Loosen the nut Flat organic lens Diameter 57...

Страница 130: ...ill bit follow the procedure below 1 2 3 4 5 Insert an Allen key or a screwdriver in the spacer hole to block the rotation of the spindle 6 Fit an 8 mm spanner on the chuck nut 7 Loosen the nut with o...

Страница 131: ...Maintenance Regular maintenance of the edger 5 130...

Страница 132: ...During step 8 the bit may be difficult to remove from the chuck because of possible scale deposits In this case apply a small quantity of a common scale remover leave it for a few moments then remove...

Страница 133: ...n 5 3 Replacing the lens feeler tips FRAGILE MOUNTING Removable lens feeler tip 5 6 7 8 Place the feelers in the replacement position Place the feelers in the position to receive the tool Confirm and...

Страница 134: ...ow Flow chart 5 3 Replacing the lens feeler tips 1 2 3 4 5 Hold the holder and immobilize the feeler arm 6 Insert a screwdriver or an Allen key in the hole of the removable feeler tip 7 Tilt the right...

Страница 135: ...Maintenance Regular maintenance of the edger 5 134...

Страница 136: ...HINTS When you are handling the feeler tips do not apply pressure on the feeler arms because that could alter the quality of the work produced by the machine If you observe any malfunctioning after c...

Страница 137: ...Maintenance Regular maintenance of the edger 5 136 Illustration 5 4 Dressing a wheel 5 4 6 Ensure that the dressing disk is correctly centered using the indentations intended to receive the adaptors...

Страница 138: ...w to dress a wheel Flow chart 5 4 Dressing a wheel 5 7 4 3 HINTS Dress the wheels when a message asks you to do so 1 2 3 4 OR OR OR According to your selection 5 Make sure large adaptors are fitted 6...

Страница 139: ...Maintenance Regular maintenance of the edger 5 138 Illustration 5 5 Cleaning and replacing the removable visor Screw Outer visor Inner visor 1 2 3 5 or 6...

Страница 140: ...p 6 changes 5 7 5 3 HINTS Regular cleaning of the visor increases the visibility of the interior of the edging chamber and the operations under way Operating in closed circuit mode affects the cleanli...

Страница 141: ...Illustration 5 6 Presentation of the tanks Illustration 5 7 Cleaning the drawer filter Illustration 5 8 Complete cleaning of the tanks and filters Pump tank Settling tank also called main tank Drawer...

Страница 142: ...lar to the T 5 7 6 2 PROCEDURES Three situations are possible 5 7 6 2 1 FOR DAILY CLEANING Flow chart 5 5 Daily cleaning of the drawer filter 5 7 6 2 2 COMPLETE CLEANING OF THE TANKS AND FILTERS 1 Lif...

Страница 143: ...Maintenance Regular maintenance of the edger 5 142 8 9 13 14 Pump connected to PUMP socket Water supply pipe connected to the valve Drain pipe placed above clean drawer filter Dump pipe valve closed...

Страница 144: ...ions of the drain water supply and pump pipes Ensure that the discharge valve is closed If you have worked on the solenoid valves check the fixings 9 Remove the settler carefully 10 Clean the settler...

Страница 145: ...dger 5 144 Illustration 5 9 Emptying the settling tank Illustration 5 10 Water connections Open Close the discharge valve Example of drainage system Discharge pipe 1 5 8 Discharge valve Closed positio...

Страница 146: ...escape of any air which has remained in the pipes Close the valve before restarting the process Always check the water tightness of the unit before restarting the machine Check the connections of the...

Страница 147: ...Maintenance Regular maintenance of the edger 5 146...

Страница 148: ...ration 5 11 Removing the covers 5 8 2 REPLACING THE COVERS To replace the machine covers follow the above procedure in reverse order 1 Loosen and remove the four fixing screws from the upper cover and...

Страница 149: ...Maintenance Handling the covers 5 148...

Страница 150: ...s clamp adaptor pad 17 across flats 11 38 171 Every 1000 lenses Removable lens feeler tip 11 38 201 Every 3000 lenses Lens holder adaptor Large Size 11 90 375 If necessary Lens holder adaptor Small Si...

Страница 151: ...Maintenance Preventive maintenance 5 150...

Страница 152: ...reen is shown below Screen 5 3 Setting menus access screen 5 10 1 2 ACCESS EXIT 5 10 1 2 1 TO ACCESS THE SCREEN 5 10 1 2 2TO EXIT THE SCREEN Touch screen adjustment You are in the User Settings menu C...

Страница 153: ...ame go to the next step If the values are not the same enter the values marked on the tool using the keys and Note The R value should be around 40 mm and the H value around 24 mm 6 Position the tool i...

Страница 154: ...asured valued which are displayed on the screen Adjustment is correct when all the dots in front of the parameters are green Note If one or more dots are red repeat the step by pressing the key If the...

Страница 155: ...ustment and proceeds to the next one 24 When the icon is displayed insert the rectangular pattern No 14 04 191 on the pattern holder 25 Position the tool in the frame holder Figure 4 Figure 4 26 Press...

Страница 156: ...Maintenance Adjustments 5 155...

Страница 157: ...Maintenance Adjustments 5 156 Screen 5 4 Feeling adjustment...

Страница 158: ...9 Feeling adjustment 5 10 3 3 HINTS Always check that the setting tool 14 04 199 is correctly fitted on the shaft You must neither force the fitting or feel any play The feeling setting can be incorr...

Страница 159: ...Maintenance Adjustments 5 158 Screen 5 5 Adjusting the sizes Screen 1...

Страница 160: ...rements 90 apart and record the average value with the numeric keypad Perform the size adjustment procedure from beginning to end so as to record all the parameters 5 10 4 2 PROCEDURE Follow the steps...

Страница 161: ...f the lens 21 22 If the apex of the bevel is off centered enter the value of the shift using the numeric key pad Apex too close to the rear face enter a negative value Apex too close to the front face...

Страница 162: ...e centre of the edge of the lens 29 If the apex of the bevel is off centered enter the value of the shift using the numeric key pad Apex too close to the rear face enter a negative value Apex too clos...

Страница 163: ...Maintenance Adjustments 5 162 Screen 5 6 Adjustment of the flush of the mill bit...

Страница 164: ...ically to this screen 5 10 5 2 PROCEDURE To adjust the mill bit flush proceed as follows Flow chart 5 10 Adjusting the flush of the mill bit 5 10 5 3 HINTS Centre the lens 10 00 205 in the centre so a...

Страница 165: ...Maintenance Adjustments 5 164 Screen 5 7 Adjustment of the touch screen...

Страница 166: ...n 5 10 6 2 PROCEDURE Follow the steps below to adjust the touch screen Flow chart 5 11 Adjustment of the touch screen 5 10 6 3 HINTS Make sure that you press carefully on the crosses being adjusted Ot...

Страница 167: ...Maintenance Adjustments 5 166 Screen 5 8 Example of a setting values display screen...

Страница 168: ...example The setting values cannot be modified from these screens 5 10 7 2 ACCESS EXIT NAVIGATION 5 10 7 2 1 TO ACCESS THE SCREENS 5 10 7 2 2 TO EXIT THE SCREENS 5 10 7 2 3 TO NAVIGATE FROM ONE SCREEN...

Страница 169: ...Maintenance Adjustments 5 168...

Страница 170: ...reen is shown below Screen 5 9 Statistics access screen Since the last whell dressing Note The Statistics menu type is shown by the icon which is displayed on the top right of the current screen Incid...

Страница 171: ...TENT The incident log may be consulted according to four themes Consultation of the general list of incidents which have occurred incidents warnings and information Consultation of the list of fault m...

Страница 172: ...d according to their occurrences For more information about an incident press the corresponding line The message is then displayed The list shows the 128 messages displayed since the last update in de...

Страница 173: ...Maintenance Consulting the statistics 5 172...

Страница 174: ...sed on lens material Statistics based on bevel and rimless finishing Statistics based on polishing Statistics based on safety bevel Statistics based on groove finishing Statistics based on retouch Sta...

Страница 175: ...s shown below Screen 5 12 Consulting the edger general statistics screen Number of machine starts Scanform You are in the Machine Statistics menu Digiform Centering Blocking system Edging Server commu...

Страница 176: ...elow Screen 5 14 Consulting statistics based on the last wheel dressing Number of mineral lenses edged with bevel finishing Number of mineral lenses edged with rimless finishing Number of mineral lens...

Страница 177: ...e type of lens material is shown below Screen 5 15 Display screen for statistics based on the type of lens material 5 11 2 2 3 5 Display screen for statistics based on bevel finishing The display scre...

Страница 178: ...olishing have been edged since the machine installation with the wheel currently fitted The average edging time is 40 seconds per lens 5 lenses with rimless finishing and polishing have been edged sin...

Страница 179: ...safety bevel is shown below Screen 5 18 Consulting statistics based on safety bevel 5 11 2 2 3 8 Display screen for statistics based on groove finishing The display screen for statistics based on gro...

Страница 180: ...n below Screen 5 20 Consulting statistics based on drilling finishing 5 11 2 2 3 10Display screen for statistics based on the number of retouches The display screen for statistics based on the number...

Страница 181: ...statistics based on user maintenance is shown below Screen 5 22 Consulting statistics based on user maintenance Number of replaced mill bits Number of replaced feeler tips Number of dressing operatio...

Страница 182: ...statistics 5 181 5 11 2 2 3 12Display screen for statistics based on Digiform Screen 5 23 Consulting statistics based on Digiform 5 11 2 2 3 13Display screen for drilling statistics Screen 5 24 Consu...

Страница 183: ...5 182 5 11 2 2 3 14 Display screen for Scanform statistics Screen 5 25 Consulting Scanform statistics 5 11 2 2 3 15 Display screen for Rimless Edging statistics Screen 5 26 Consulting Rimless Edging...

Страница 184: ...splay screen for Edging Drilling and Grooving statistics Screen 5 27 Consulting Edging Drilling and Grooving statistics 5 11 2 2 3 17 Display screen for time statistics Screen 5 28 Consulting time sta...

Страница 185: ...5 184 5 11 2 2 3 18Display screen for the centering blocking system statistics Screen 5 29 Consulting the centering blocking system statistics 5 11 2 2 3 19Display screen for settings statistics Scree...

Страница 186: ...nother job 0x5 Unknown job number The job you are trying to load does not exist on the server Check the job number and load another number 0x7 Do you want to re edge the same lens You have just edged...

Страница 187: ...for Polycarbonate lens material In the personalisation menus you have excluded this parameter Therefore the edger cannot accept this job Confirm the message If you wish to load this job nonetheless ch...

Страница 188: ...nishing In the personalisation menus you have excluded this parameter Therefore the edger cannot accept this job Confirm the message If you wish to load this job nonetheless change the personalisation...

Страница 189: ...e personalisation of the pull down menus Select Front groove distance in mm sub finishing Load the job again 0x1C Incompatible edger configuration Percent groove sub finishing not allowed The job you...

Страница 190: ...ess change the personalisation of the pull down menus Select Front safety bevel parameter Load the job again 0x22 Incompatible edger configuration Rear safety bevel not allowed The job you have loaded...

Страница 191: ...The previous personalisation is retained Cancel you return to the personalisation screen for the menu button concerned Reselect the elements you wish to display 0x34 Groove too near front The distanc...

Страница 192: ...be made Do you want to continue Internal safety bevel cannot be made The lens is too thin and or the shape is too small YES the lens is edged without an external safety bevel NO the lens is not edged...

Страница 193: ...are required for the procedure you have selected Confirm the message Fit the small adaptors 0x412 Small adaptors fitted The 17 mm diameter flat adaptors are required for the procedure you have selecte...

Страница 194: ...lens is increased The message is displayed at each machine start up 0x509 Mineral wheel dressing recommended Do you want to do it now 1000 mineral lenses have been edged Dressing the mineral roughing...

Страница 195: ...ce Messages 5 194 0x909 Adjustment impossible Lens too small The diameter of the felt lens is less than 11 mm Confirm the message Fit another lens blocked at the centre Message Condition s for display...

Страница 196: ...6 TESTS...

Страница 197: ...6 196...

Страница 198: ...s screen is shown below Screen 6 1 Tests access screen Note SBGD Safety Bevel Grooving Drilling system Wheels spray Spraying Rear of Edging Chamber Visor spray Pump Exit Temperature You are in the Tes...

Страница 199: ...EN The following screen lens feeling test is typical of most tests see Operating principle page 199 SCREEN x 2 Micro switch status Emergency stop TEST VALUES 1 5 2 3 2 4 You are in the lens feelers te...

Страница 200: ...perating principle of a typical test screen 6 2 1 3 TEST SEQUENCE Tests must be undertaken in a logical sequence The tests which appear grayed cannot be carried out so long as the previous accessible...

Страница 201: ...N The following screen corresponds to the solenoid valve and pump tests Screen 6 2 Test screen with switch 6 2 2 1 2 PROCEDURE To start the test press the switch of the element you wish to test Observ...

Страница 202: ...The following screen corresponds to the solenoid valve and pump tests Screen 6 3 Test of micro switches and photocells 6 2 2 2 2 PROCEDURE Manually operate the micro switch or photocell of the elemen...

Страница 203: ...Tests Operating principle 6 202...

Страница 204: ...7 TECHNICAL SPECIFICATIONS...

Страница 205: ...7 212...

Страница 206: ...n single width i e W 0 6 mm Nylon thread or double width i e W 1 2 mm Drilling wide choice of holes Through holes Notches Elongated holes Drilling at fixed 10 angle Safety beveling of front and or rea...

Страница 207: ...mperature 13 C 35 C Relative humidity 10 80 Maximum water pressure 7 Bars Maximum water pressure on pump 7 Bars Controlled power output for the pump 230 V 50 Hz 115 V 60 HZ Power available for the pum...

Страница 208: ...2002 96 EC MEETS THE FOLLOWING CEM DIRECTIVES Di 2004 108 EC EN 55022 Class B EN 61000 3 2 EN 61000 3 3 EN 61000 6 2 UL STANDARDS FOR 115 V VERSIONS UL CSA 61010 1 THE MANUFACTURER CANNOT BE HELD RESP...

Страница 209: ...Technical specifications Technical specifications 7 216...

Страница 210: ...2 rue Roger Bonnet 27340 PONT DE L ARCHE FRANCE Tel 33 02 32 98 91 32 Fax 33 02 35 02 02 94...

Отзывы: