

145mm
EN_A1 301-0103-00
PeepHole Camera
Visitor Log Cam
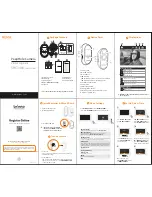
Package Contents
1
Device Parts
2
SHC1000
User Manual
1. PeepHole Camera
2. Base Flange
3. Tightening Tool
4. Washer
(SHC1000 12 only)
5. Peephole
Use the peephole in the package to get the best result.
www.brinno.com
SHC1000
User Manual
PeepHole Camera
Visitor Log Cam
2
7
8
3
4
1
5
Peephole Ø12mm
(SHC1000 12)
Peephole Ø14mm
(SHC1000 14)
Peephole
barrel
Quick Start Guide
Rychlý průvodce
Kurzanleitung
Guía Rápida
Démarrage Rapide
Guida veloce
Snelle Handleiding
Hurtigstartveiledning
Szybki przewodnik użytkowania
Краткое Руководство
คู่มือการใช้งานอย่างย่อ
快速指南
快速指南
クイックガイド
속성 설치 설명서
E N
C Z
D E
E S
F R
I T
N L
NO
P L
RU
T H
C H
C N
J P
K R
Quick Start Guide
SHC1000
6. 4 AA Batteries
7. User Manual
8. Quick Start Guide
www.brinno.com
4
Install Batteries & Micro SD Card
3
Display Icons
1
2
3
4
When Micro SD card is full, please delete files to free
up storage space.
FULL
FULL
!
No Micro SD card
Motion sensor connected
Motion sensor disconnected
Motion sensor battery low
Replace batteries
Micro SD card full
Micro SD card error
1. Micro SD card status:
2. Motion sensor (Optional):
3. Knocking sensor ON
4. Battery indicator
5
Turn on camera
1. Open the battery cover.
2. Install 4 AA batteries.
3. Insert Micro SD card.
* Micro SD Card is not included.
* Support up to 32GB Micro SD card.
(8 GB Class 10 is recommended)
!
Press
DOWN BUTTON
to enter"
MENU SETTINGS
".
(Press
UP
or
DOWN BUTTON
to browse setting options.)
Press to Exit
Exit
2
3
4
Date &
1
Press
DOWN BUTTON
to
go to
MENU SETTINGS
.
On
MENU SETTINGS
screen,
press
DOWN BUTTON
to go
to the
SYSTEM CLOCK
option.
On
SYSTEM CLOCK
screen,
press
SHUTTER BUTTON
to
set date and time.
Change settings by pressing
UP
or
DOWN BUTTONS
. Then
press
SHUTTER BUTTON
to
confirm and go to next option.
When finished, press
SHUTTER BUTTON
to return
to
MENU SETTINGS
.
5
6
Menu Setting
Motion Activated Screen
File Format
Band Filter
Set Date&Time
Reset
EXIT
V X.XX.X
Press to Setup
System Clock
YYYY/MM/DD
07:22
Menu Setting
Motion Activated Screen
File Format
Band Filter
Set Date&Time
Reset
EXIT
V X.XX.X
Press to Setup
System Clock
YYYY/MM/DD
07:22
Menu Setting
Motion Activated Screen
File Format
Band Filter
Set Date&Time
Reset
EXIT
V X.XX.X
Press to Setup
System Clock
YYYY/MM/DD
07:22
Menu Settings
6
Set Up Date & Time
7
Time
2013/05/01
17:30
Set
Exit
Press to Next
System Clock
YYYY
/MM/DD
07:22
+-
Date & Time
2013/05/01
17:30
Set
Exit
Press to Next
System Clock
YYYY/
MM
/DD
07:22
+-
1. Locking screw
2. Micro SD card slot
3. Micro USB port
4. LED Indicator:
LED On: Battery low. Alert to replace the batteries.
LED Flashing: Camera is capturing photos.
5. Live view/ Shutter button
6. Power switch
7. Playback/ Up button
8. Settings/ Down button
9. Extension port (For optional motion sensor)
10. Battery compartment
6
7
8
10
9
3
5
4
1
2
1. Power ON
Turn on power. The LCD screen displays live view images
outside the doorstep.
2. Power WAKE-UP
LCD screen is automatically turned off to save power when
camera is not in use for 10 secs. Press
LIVE VIEW BUTTON
to wake up camera again.
1
2 3
4 5 6
www.brinno.com/support/registration
For manuals in other languages, visit
www.brinno.com/support
The product features, specifications sheets and instructions may
differ from actual products. Please refer to Brinno official site for
the latest version of user manual.
Browse Images
Knocking Sensor
Auto capture photos when someone knocks on your door.
(Details in Section 12-
ENABLE KNOCKING SENSOR
)
When LCD option is ON, the screen auto displays images if camera detects
knocking on the door or motion outside the door (must with motion sensor).
Setting LCD option OFF can save power and make battery last longer.
Exit
LCD Option
System Clock
Camera info
Reset
Replay visitor photos (Details in Section 11-
IMAGE PLAYBACK
)
Camera firmware version.
Reset camera to factory settings.
Storage & Battery
Auto capture photos when someone is near your front door. Refer manual
of motion sensor(MAS200) inside the package for details.
Motion Sensor


