Not for
Reproduction
10
20
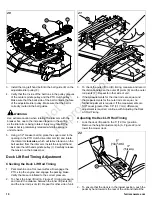
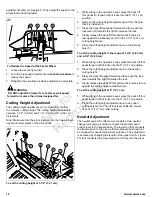
3. Install the long left hand belt into the belt guide (E) on the
adjustable idler pulley (F).
4. Verify that the V-side of the belt runs in the pulley grooves
of the center spindle pulley and the PTO clutch pulley.
Make sure that the back side of the belt contacts the face
of the adjustable idler pulley. Make sure that the belt is
correctly routed in the belt guides.
WARNING
Use extreme caution when rotating the idler arm with the
breaker bar, due to the increased tension in the spring
as the idler arm is being rotated. Injury may result if the
breaker bar is prematurely released while the spring is
under tension.
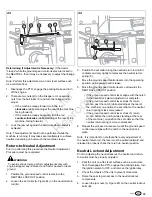
5. Using a 1/2" breaker bar (G) place the square end in the
opening in the PTO clutch drive idler arm (H) and rotate
the idler arm
clockwise
, which will relieve tension on the
belt exerted from the idler arm. Install the long left hand
belt onto the left hand spindle pulley (I). Carefully release
the tension on the breaker bar.
Deck Lift Rod Timing Adjustment
Checking the Deck Lift Rod Timing
1. Park machine on a flat, level surface. Disengage the
PTO, stop the engine, and engage the parking brake.
Verify the tires are inflated to the correct pressure.
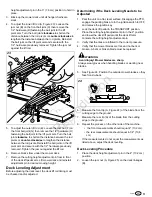
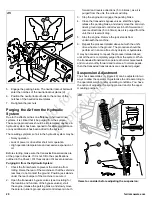
2. To check the inner lift rod (A, Figure 21) timing, measure
and record the distance between the inner lift pivots (B)
and the inner rod pivots (C). Repeat for other side of unit.
21
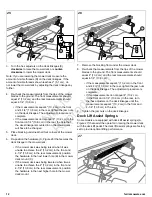
3. To check the outer lift rod (D) timing, measure and record
the distance between the outer lift pivots (E) and the outer
rod pivots (F). Repeat for other side of unit.
4. If the measurements for the inner rods are equal, and
the measurements for the outer rods are equal, no
further adjustment is required. If the measurements are
NOT equal (greater than 1/8” (3,17 mm) difference),
adjustment is required, continue with Adjusting the Deck
Lift Rod Timing.
Adjusting the Deck Lift Rod Timing
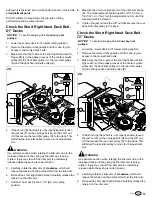
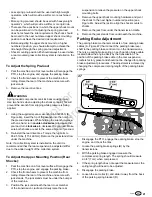
1. Lock the deck lift pedal in the 5” (12,7cm) position.
Remove the height adjustment pin (A, Figure 22) and
lower the mower deck.
22
2. To ensure that the deck is in the lowest position, push the
pedal by hand towards the rear of the unit and install the
Содержание IS3200Z Series
Страница 1: ...N o t f o r R e p r o d u c t i o n ...
Страница 23: ...N o t f o r R e p r o d u c t i o n Notes ...
Страница 24: ...N o t f o r R e p r o d u c t i o n ...


