


10x objective. Now focus the image using the fine focus only. Proceed
with the 40x objective in the same way as with the 10x objective.
The brightness control can be used to optimally adjust the contrast
and the imaging quality of the object to be viewed.
By the way: The higher the magnification, the more light is needed
for good image quality.
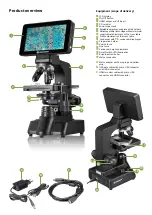
The microscope table (cross-table with vernier scale)
With the microscope stage (7), you are able to view your specimen
accurately and to the millimeter. The specimen is fixed on the
microscope stage for observation using the specimen holder (11).
Now move the object directly under the objective using the axis
adjustment (8 and 9). With the vernier graduation on both axes,
you can now move the object "true to size" and view it at different
magnifications.
Digital zoom (up to 4x)
The screen magnification can be increased to a maximum of 4x by
"pulling apart" with two fingers. By "pushing together" the image
can be reduced to its original size again.
Hide / Show on-screen menu
By pressing on a free area of the screen, the menu can be shown or
hidden.
Connection to a PC/laptop
You can transfer images and videos stored on an SD card to a PC/
laptop.
To do this, turn the microscope on. Then plug the supplied USB
cable (B) into the USB socket of the microscope (3) and into a free
socket on the PC/laptop.
The message "Connecting" appears on the screen. If this goes out,
you can access the SD. The microscope is now recognised as a mass
storage device.
To exit, correctly log off the microscope. Pull out the USB cable.
Press and hold the On/Off key (2) for approx. 2-4 seconds. The
microscope switches off, which is signaled by the word "Good Bye"
on the display (1) and a beep.
WiFi connection
The microscope can transmit the image to a device with HDMI input
(e.g. monitor, TV set or beamer).
Plug the supplied HDMI cable (C) into the microscope's micro HDMI
output (3) and into an appropriate receiving device.
Switch on the microscope. After a few seconds, the image appears on
the receiving device. The monitor of the microscope remains off.
If the image does not appear on the receiving device, check the
settings. If necessary, a look at the manual of the corresponding
device will help.
To exit, the microscope screen can be turned off.
NOTE: Images or videos cannot be captured in HDMI mode.
Technical data
Objectives:
4x, 10x, 40x, 60x
Magnification:
4x 0.35 x 0.2mm
10x 0.14 x 0.08mm
40x 0.036 x 0.02mm
60x 0.022 x 0.012mm
Illumination:
dimmable LED transmitted light
illumination
SD Card
Compatible with SD and SDHC
up to a maximum of 32 GB
Resolution photo:
4608 x 3456
Resolution video:
1920 x 1080, 30 FPS
1280 x 720, 60 FPS
Notes on Cleaning
1. Do not disassemble the microscope!
The microscope is a precision optical instrument and should not
be disassembled unnecessarily. This can seriously damage its
functionality. Do not disassemble the lenses either!
2. Avoid soiling!
You should avoid dust or moisture coming into contact with your
microscope. Also avoid fingerprints on all optical surfaces! If dust or
dirt should nevertheless get onto your microscope or accessories,
remove them as described below.
3. Cleaning of non-optical components:
Before cleaning non-optical components of the microscope (e.g.
housing, microscope stage), please disconnect the microscope from
the power supply. Dust or dirt on the microscope or accessories
should first be removed with a soft brush. Then clean the soiled
areas with a soft, lint-free cloth, which you can also dampen with
a mild detergent solution beforehand. The residual moisture
should be completely dry before using the microscope. Do NOT use
solvents such as alcohol, ether, acetone, xylene or other thinners)
to clean painted or plastic parts! Special attention is paid to the
pressure-sensitive display surface. Dirt or fingerprints should
generally only be cleaned with a lightly damp and lint-free cloth.
Please do not use any additional cleaning agents!
4. Cleaning of optical components:
To increase the imaging quality, the objective lenses of the
microscope are coated to a high standard. They should not be
wiped dry, as dry dirt or dust can scratch the sensitive coating. For
easier cleaning of the objectives, unscrew them from the turret.
Then always blow the loose dust off the lens surfaces first. Use
good quality lens wipes or soft cloth, slightly moistened with pure
alcohol (available in pharmacies) and wipe the lens surface clean
with it.
5. Non-use:
After use, cover the microscope with the dust cover and place it
in a dry and mold-free place. In case of prolonged non-use, we
recommend storing all lenses in a closed container with desiccant.
Remember:
A well-maintained microscope will retain its optical
quality and thus its value for years to come.