background image

45

Changing How a Song Plays

Quick Start

* If you modify the settings of a preset song, these settings cannot be stored. If you 

wish to store the settings, copy them to a user song. (p. 82)

5

When you’ve finished making the settings, press [EXIT].

The display returns to the original screen.

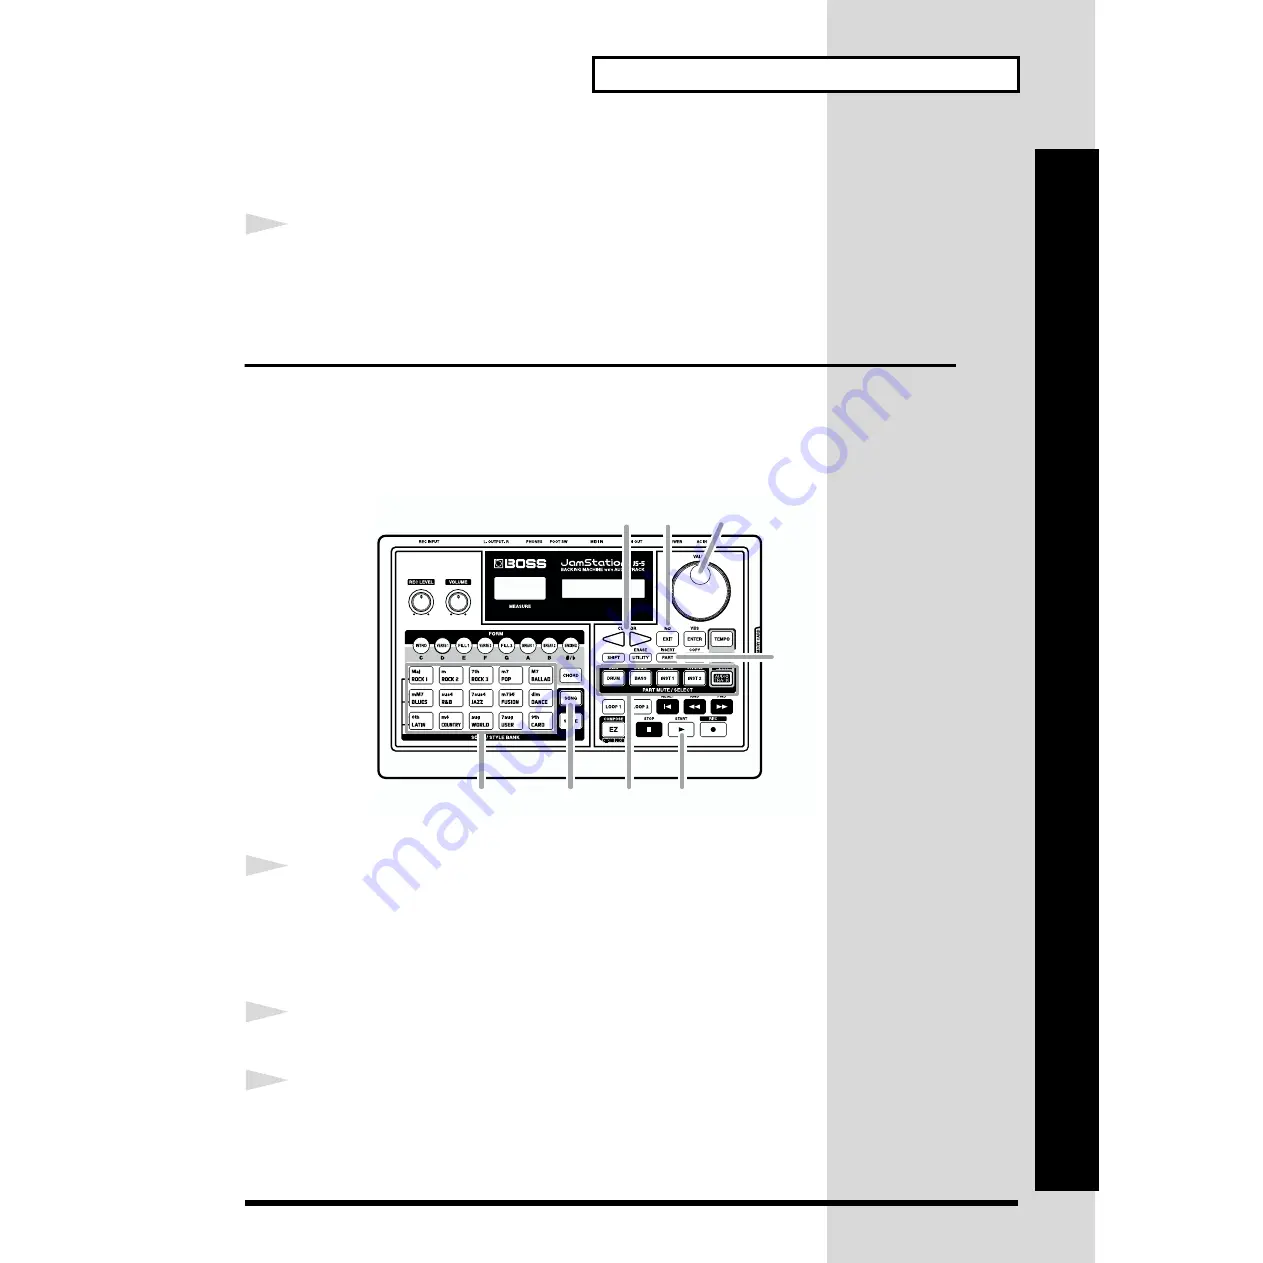
Adjusting the Volume of Each Part

You can adjust the volume level of each of the parts that make up a Style: 
Inst 1, Inst 2, Drum, and Bass.

* When a performance is recorded on the Audio Track, you can also adjust the volume 

level for this track.

fig.QS04-03

1

Select a song.

1-1

Press [SONG], getting the button to light.

1-2

Press [SONG/STYLE BANK] and select a category.

1-3

Turn [VALUE] to select a song.

2

Press [PART].

3

Press [CURSOR] to select “1 VOLUME.”

1-1

1-2

1-3

,6

3

4

2,8

8

5

Содержание JamStation JS-5

Страница 1: ...portant information concerning the proper operation of the unit Additionally in order to feel assured that you have gained a good grasp of every feature provided by your new unit Owner s manual should be read in its entirety The manual should be saved and kept on hand as a convenient reference Copyright 2000 BOSS CORPORATION All rights reserved No part of this publication may be reproduced in any ...

Страница 2: ...ead the instructions below and the Owner s Manual 002c Do not open or modify in any way the unit or its AC adaptor 003 Do not attempt to repair the unit or replace parts within it except when this manual provides specific instructions directing you to do so Refer all servicing to your retailer the nearest Roland Service Center or an authorized Roland distributor as listed on the Information page 0...

Страница 3: ...on the Information page 101b The unit and the AC adaptor should be located so their location or position does not interfere with their proper ventilation 102c Always grasp only the plug on the AC adaptor cord when plugging into or unplugging from an outlet or this unit 103b Whenever the unit is to remain unused for an extended period of time disconnect the AC adaptor 104 Try to prevent cords and c...

Страница 4: ...Song 33 Changing How a Song Plays 44 Let s Record Guitar Play 49 Chapter 1 Overview of the JS 5 55 About Songs 55 About Styles 55 About Parts 55 About Tracks 55 About Forms 55 About Styles and Chord Conversions 56 About Creating User Songs 56 About Creating User Styles 56 About Memory 57 About Changing Data 57 About Procedures for Changing Settings 58 Switching Pages 58 How to Use CURSOR and VALUE...

Страница 5: ...d 63 Playing More Than One Song Continuously Song Chain 64 Jumping to the last measure of the song 64 Chapter 3 Composing Songs Using EZ Compose 65 Chapter 4 Creating User Songs 66 Selecting the Recording Destination 66 Selecting a Style 66 Selecting a recording track 66 When There is No Data in the Recording Destination 66 Recording Forms 67 Realtime Recording 67 Step Recording 68 Adding Fill ins...

Страница 6: ...g the Amount of Chorus and Reverb Applied to Each Part 84 Chapter 7 Changing Effect Settings 86 To save the modified settings 86 Changing the Reverb Settings 86 Changing the Chorus Settings 87 Using the Insert Effects 88 Selecting the Part to Use with the Insert Effects 88 Selecting the Type 88 Changing the Settings for Each Type 89 Chapter 8 Changing Performance Instruments 109 To save the modifi...

Страница 7: ...tch Functions 117 Chapter 11 Creating User Styles 119 Points to Note When Creating User Styles 119 About Arrange Mode 119 Preparing to Record 120 Recording Operation 120 Deleting a User Style Deleting Data of the Specified Form 122 Copying Forms 123 Erasing Parts 123 Copying Styles 124 Naming the Style 124 Chapter 12 Using Memory Cards 125 Handling Memory Cards 125 Initializing the Memory Card 125...

Страница 8: ... MIDI Information Handled by the JS 5 131 About the MIDI Implementation Chart 132 Using the JS 5 As a MIDI Sound Module 132 Synchronizing a Performance 133 Saving Data to an External MIDI Instrument Bulk Dump 134 Returning Data from an External MIDI Instrument Bulk Load 135 Troubleshooting 136 Error Messages 139 Preset Song List 141 Preset Style List 142 Instrument List 143 Drum Kit List 144 Chord...

Страница 9: ...ser Songs You can compose songs User Songs by specifying a Style and recording the Form and Chord Progression You can save maximum 100 User Songs in the unit If you use a memory card SmartMedia you can save up to maximum 100 songs on the card EZ Compose Function This interactive feature lets you complete song data simply and easily making only a minimum of settings Digital Recorder Function You ca...

Страница 10: ...land assumes no liability concerning such loss of data Memory Backup 501b This unit contains a battery which powers the unit s memory circuits while the main power is off When this battery becomes weak the message shown below will appear in the display Once you see this message have the battery replaced with a fresh one as soon as possible to avoid the loss of all data in memory To have the batter...

Страница 11: ...lending public performance broadcasting or the like in whole or in part of a work musical composition video broadcast public performance or the like whose copyright is held by a third party is prohibited by law 853 Do not use this unit for purposes that could infringe on a copyright held by a third party BOSS Roland assumes no responsibility whatsoever with regard to any infringe ments of third pa...

Страница 12: ...SmartMedia 4 VALUE Dial This changes the setting values for parameters Holding down the SHIFT button while turning the dial makes the values change in larger increments 5 FORM Buttons These select a Form for playing or recording from among the eight types of Forms performance patterns ranging from Intro to Ending When the CHORD button is lit up this selects the root of the chord 6 CHORD Button Pre...

Страница 13: ...ttings INSERT Button Holding down the SHIFT button and pressing the PART button makes this function as the INSERT button allowing you to insert data 17 EFFECTS Button Use this when making settings for reverb chorus or insert effect COPY Button Holding down the SHIFT button and pressing the EFFECTS button makes this function as the COPY button allowing you to copy data 18 LONG REC Long Recording Bu...

Страница 14: ...C adapter jack if the cord is accidentally yanked 29 AC Adapter Jack This is for connecting the included AC adapter BRC series 30 POWER Switch This switches the power on and off 31 MIDI IN and OUT Connectors These are for connecting external MIDI instruments Use MIDI cables sold separately to make the connections 32 FOOT SW Foot Switch Jack This is for connecting a foot switch such as the FS 5U so...

Страница 15: ...855 Campus Drive San Mateo CA 94403 U S A Web www kensington com Some Conventions This Manual Uses This manual uses the typographical conventions shown below in order to explain methods of operation in a concise way Text enclosed in indicates buttons knobs and other controls on the panel SONG Song button VOLUME Volume knob VALUE Value dial SHIFT means while holding down the Shift button press the ...

Страница 16: ...lowing Is the volume level of the unit and the connected amp or other device turned down all the way Is the power to the unit and the connected amp or other device switched off To prevent malfunction and or damage to speakers or other devices always turn down the volume and turn off the power on all devices before making any connections GUITAR LINE MIC Foot Switch FS 5U PCS 31 Stereo Headphones Di...

Страница 17: ... undue stress to the AC adaptor jack anchor the power cord using the cord hook as shown in the illustration fig QS01 01b 3 Connect the amp or audio set as shown in the figure If necessary connect stereo headphones To get the best performance out of the JS 5 we recommend stereo use For monaural use make the connection to the OUTPUT L MONO jack For making connections to the MIDI connectors see p 131...

Страница 18: ...e connected amp or other device turned down all the way 2 Turn on the POWER switch on the rear panel of the JS 5 fig QS01 02 This unit is equipped with a protection circuit A brief interval a few seconds after power up is required before the unit will operate normally 3 Switch on the power to the amp or other device 4 Adjust the volume level on the JS 5 Press START to start playing Use VOLUME to a...

Страница 19: ... Off the Power 1 Before you switch off the power check the following Is the volume level of the unit and the connected amp or other device turned down all the way 2 Switch off the power to the amp or other device 3 Switch off the power to the JS 5 ...

Страница 20: ...TYLE BANK and select a category The category you selected appears ROCK 1 Hard rock Heavy metal ROCK 2 Typical Rock of the sixties through nineties ROCK 3 Basic Rock POP Pops 8 beat and 16 beat BALLAD Ballad BLUES Blues R B Rhythm and blues funk and soul JAZZ Jazz Preset Song List p 141 On the JS 5 each such composition is called a song The songs that were put on board the unit at the factory are c...

Страница 21: ...T flashes in time to the beat set in the selected Style If you ve made the setting for count in p 60 the count in appears on the left hand display and the count sound is played at the same time After the count in display the sound starts to play The lighted FORM buttons INTRO through ENDING change along with what is played showing the present performance pattern form 5 Press STOP to stop playing P...

Страница 22: ...ng the tempo of the song being played fig QS02 05 1 Press TEMPO getting the button to light The present tempo appears on the display fig QS02 06 2 Turn VALUE to adjust the tempo Settings values 40 250 3 Once you ve decided on the tempo press TEMPO extinguishing the button s light 2 1 3 ...

Страница 23: ...the chord changes the display of the next chord fig QS02 11 3 To go back to the Song screen press SONG getting the button to light 3 2 1 The root specifies the basic note of a chord All chords are structured with the root as the base and the name of the root tone also appears in upper case in the chord name An on bass chord is a chord that uses bass for a note other than the root such as an F Maj ...

Страница 24: ...ression fig QS02 12 1 While play is stopped hold down SHIFT and press EZ getting the button to light 2 When START is pressed the performance begins with different chord progression 3 To return to the original Chord Progression hold down SHIFT and press EZ while play is stopped extinguishing the button s light You cannot switch the Chord Progression if SHIFT EZ is pressed while a song is playing 1 ...

Страница 25: ...e button to light The Style screen appears fig QS02 15 2 Press SONG STYLE BANK and select a category The category you select appears About Styles Music includes songs in a wide variety categories musical styles such as rock and jazz Songs in the same category use more or less the same performance patterns phrasing and instruments or the tempo and the like are more or less the same and this makes i...

Страница 26: ...ATIN Salsa bossa nova and samba etc COUNTRY Country WORLD World music USER User Styles 1 through 20 CARD Card User Styles 1 through 20 If no memory card is inserted then you can t select CARD even when you press CARD 3 Turn VALUE to select a Style The name of the Style you chose Style name appears fig QS02 16 The number of Styles varies from one category to another 4 Press START to start playing t...

Страница 27: ...ing the point where you pressed the button and the button will change from blinking to lit In the case of VERSE 1 and VERSE 2 the performance will continue repeating until playback switches to the next form If you switch to either FILL 1 FILL 2 BREAK 1 or BREAK 2 playback will automatically switch to the previously selected VERSE 1 or VERSE 2 when the performance ends What is a Form Forms are the ...

Страница 28: ...owing buttons to enter a chord Use C through B and b to specify the root of the chord Pressing b repeatedly cycles through the selections of b and none Use Maj through 9th to specify the chord type To specify an On Bass chord hold down SHIFT and use C through B and b to specify the bass tone To eliminate an On Bass chord press CURSOR to get the On Bass Chord indication to begin flashing then turn ...

Страница 29: ...2 18 3 When START is pressed the performance begins with the input chord 4 Input the chords as needed Song number Chord type On Bass chord Chord root Category You can input chord types unavailable with Maj 9th Playing with Chords You Enter Yourself p 62 ...

Страница 30: ...our parts Inst instrument 1 Inst instrument 2 Drum and Bass By playing just the drum part of a song you can use the JS 5 as a rhythm machine fig QS02 19 1 Press the PART MUTE BASS INST 1 and INST 2 buttons to make the button lights go dark When a button is not lighted its corresponding part is muted out silent 1 ...

Страница 31: ... Along with a Song on Guitar Let s try connecting an electric guitar to the JS 5 and play along with a song on the guitar fig QS02 20 1 Turn REC LEVEL counterclockwise all the way fig QS02 21 2 Connect the electric guitar to the REC INPUT jack 5 1 4 2 3 ...

Страница 32: ...c guitar is connected or when a keyboard is connected MIC When a microphone is connected fig QS02 23 4 Turn REC LEVEL to adjust the volume level of the connected equipment Howling could be produced depending on the location of microphones relative to speakers This can be remedied by 1 Changing the orientation of the microphone s 2 Relocating microphone s at a greater distance from speakers 3 Lower...

Страница 33: ... for the song Form track This specifies the sequence for playing the Forms such as intro fill in and ending corresponding to the Style you chose Chord track This specifies the chord progression for playing the Forms Audio track User Song only This records guitar play vocals or other sounds input to REC INPUT Verse 1 Ending Form Track B7th E7th E7th Code Track Audio Track Intro Preset User Style Pa...

Страница 34: ... to light 1 2 Press USER 1 3 Turn VALUE to select a song A User Song where no data is recorded will have an next to the song number 2 Press EZ getting the button to light The Start screen for EZ Compose appears for about one second and then the Style Selection screen appears fig QS03 03 1 1 2 1 3 4 6 8 10 5 7 9 11 12 3 1 2 Style number Style name Category To cancel EZ Compose press EZ to make the ...

Страница 35: ...template A Chord template groups the Form sequences and chord progressions together into a single set BluesChord 1 9 Selected when creating songs with blues chord progressions MajorChord 1 24 Selected when creating songs consisting of major melodies MinorChord 1 17 Selected when creating songs consisting of minor melodies 7 Once you ve decided on a Chord template press ENTER The Tempo Setting scre...

Страница 36: ...oceed with EZ Compose appears fig QS03 40 To cancel press EXIT 12 Press ENTER to carry out EZ Compose Generation of the song data starts fig QS03 07 When the generation of the song data finishes the screen shown below appears After that the Song screen appears fig QS03 08 The song that is generated will automatically be given a song name that is the same as the Chord template The name of the song ...

Страница 37: ...22 04 80 sHardRock N C Non Chord Type Select this type when you want to have the original performance data played as is with no conversion of the chords Since the Intro and Ending Chord Progressions are included in the original performance data you can have the Chord Progressions in the performance data played as is by specifying Non Chord Type Normally when the Chord Type with a root of C is chan...

Страница 38: ...utton to light 2 Press USER 3 Turn VALUE to select a song A User Song where no data is recorded will have an next to the song number 2 Select a Style 4 Press STYLE getting the button to light 5 Press SONG STYLE BANK and select a category In this example select ROCK 1 6 Turn VALUE to select a Style In this example select 04 80 sHardRock 4 2 3 6 5 1 8 7 ...

Страница 39: ...andby screen for the Form appears SONG lights up fig QS03 12 4 Record the Forms Record the Forms on the Form Track In this example let s try using Realtime recording fig QS03 19 Recording Track Realtime recording is a method for recording selected Forms on the Form Track while pressing FORM and playing the Forms one after another Another recording method is Step recording where you specify a Form ...

Страница 40: ...JS 5 changes to Verse 1 in the second measure and VERSE 1 lights up 12 Continue by playing Verse 1 in measures 5 through 15 13 While playing the last beat of measure 15 press FILL1 The button flashes At the beginning of measure 16 performance of Fill 1 starts and the button changes from flashing to steadily lit 14 While measure 16 is playing Press ENDING The button flashes At the beginning of meas...

Страница 41: ...s fig QS03 32 To cancel press EXIT 16 Press CHORD to select a Chord Track The Recording Standby screen for the Chord appears CHORD lights up fig QS03 15 Step recording is a method for recording where you specify a chord for each individual measure or beat Another recording method is Realtime recording where you specify chords matched to the Forms being played For more information see About Creatin...

Страница 42: ...ash then turn VALUE to select Non Chord Type fig QS03 17 21 Press FWD several times The operation proceeds with the timing steps for recording the next chord E7th In this example it advances to measure 5 22 Record the next chord Press E 7th Quantize Beat Clock A clock is an even smaller division of a beat One beat is equal to 96 clocks Quantizing when using step recording sets the resolution of th...

Страница 43: ... finished recording the chords press STOP REC goes dark and the Chord screen appears Press SONG to display the song screen 6 Listen to the song you composed 25 Press RESET 26 Press START The song starts to play You can have chords recorded at pitches one octave higher or lower than played Step Recording p 71 You can give a name to the song you created Naming the Song p 74 If you use a memory card ...

Страница 44: ...change fig QS04 01 1 Select a song 1 1 Press SONG getting the button to light 1 2 Press SONG STYLE BANK and select a category 1 3 Turn VALUE to select a song 2 Press CURSOR to select 1 KEY TRANSPOSE fig QS04 02 3 Press START The song starts to play 4 Turn VALUE to set the key Setting values 24 24 You can set the key in semitone steps within a range of two octaves up or down Key transposition invol...

Страница 45: ...l screen Adjusting the Volume of Each Part You can adjust the volume level of each of the parts that make up a Style Inst 1 Inst 2 Drum and Bass When a performance is recorded on the Audio Track you can also adjust the volume level for this track fig QS04 03 1 Select a song 1 1 Press SONG getting the button to light 1 2 Press SONG STYLE BANK and select a category 1 3 Turn VALUE to select a song 2 ...

Страница 46: ...02 5 Press START The song starts to play 6 Turn VALUE to change the volume Settings values 0 127 7 Repeat steps 4 and 5 as necessary If you modify the settings of a preset song these settings cannot be stored If you wish to store the settings copy them to a user song p 82 8 When you ve finished making the settings press PART again or press EXIT The display returns to the original screen Drum Selec...

Страница 47: ...4 05 1 Select a song 1 1 Press SONG getting the button to light 1 2 Press SONG STYLE BANK and select a category 1 3 Turn VALUE to select a song 2 Press EFFECTS 3 Press CURSOR and select 1 REVERB TYPE This is the screen for setting the type of Reverb fig QS04 06 4 Press START The song starts to play An effect modifies and produces a sound such as by adding reverberations to a sound to express depth...

Страница 48: ...red If you wish to store the settings copy them to a user song p 82 6 When you ve finished making the settings press EFFECTS again or press EXIT The display returns to the original screen You can vary the amount of reverb applied to each Part Changing the Amount of Chorus and Reverb Applied to Each Part p 84 You can change the settings for effects in a variety of ways Changing Settings for Effects...

Страница 49: ... time available using the JS 5 Hi Fi 1 minute 35 seconds LONG 1 minute 58 seconds Copying a Preset Song fig QS05 30 1 Select the Preset Song to be used as the copy source 1 1 Press SONG getting the button to light 1 2 Press ROCK 1 through WORLD and select a category 1 3 Turn VALUE to select a song 2 Press COPY SHIFT EFFECTS The copy source designation screen appears fig QS05 31 Performance data re...

Страница 50: ...VALUE to select the song number User Songs with no data recorded in them are indicated by an in the display 4 When you have decided on the copy destination press ENTER The copy confirmation screen appears fig QS05 32 5 Press ENTER when you want to execute the copy The copying begins After it s been completed the following screen appears after which the copy destination Song screen is displayed fig...

Страница 51: ...ht 1 2 Press USER 1 3 Turn VALUE to select a song number 2 Press REC getting the button to light SONG CHORD and AUDIO TRACK flash and the Recording Track Selection screen appears fig QS05 20 3 Press AUDIO TRACK to select the Audio Track The Recording Standby screen for the Audio Track appears fig QS05 22 When there is no audio data a appears on the screen 1 1 1 2 1 3 3 7 6 9 2 4 5 8 Recording Trac...

Страница 52: ...QS05 04 6 Press START getting the button to light and start recording If you ve made the setting for count in p 60 the count in appears on the left hand display and the count sound is played at the same time After the count in display recording starts fig QS05 05 7 When recording is finished press STOP REC goes dark and the Song screen reappears Playback 8 Press RESET 9 Press START The audio data ...

Страница 53: ...eps below fig QS05 06 1 At the Song screen press ERASE SHIFT UTILITY The Delete screen for Song appears fig QS05 07 2 Turn VALUE to select AUDIO fig QS05 40 3 Press ENTER A screen prompting you to confirm deletion of the audio data appears To cancel the operation press EXIT This returns you to step 2 fig QS05 08 1 2 3 4 Data to be deleted ...

Страница 54: ...eted the Song screen reappears fig QS05 42 Would you like to know more about recording on the Audio Track Chapter 9 Recording Your Own Performance p 111 Using a memory card smart media makes it possible to record for longer times About Recording Time p 111 You can re record only the measures in a specified portion Redoing a Recording Rerecording p 113 ...

Страница 55: ... one Style About Parts Style performance patterns are played using four parts INST 1 INST 2 DRUM and BASS fig RE01 02 About Tracks Songs feature the following three tracks Form Track Specifies the order in which the intro fill ins endings and other Forms for the selected Style are to be played Chord Track Specifies the chord progression which causes the Forms to be played The Form track and Chord ...

Страница 56: ... in which the Chords are recorded while synchronized with the performance of the Forms and Step Recording where Chords are specified one at a time for each measure or beat Editing of both Forms and Chords is carried out in Step Recording mode 4 Record your own performance sounds input to the REC INPUT to the Audio Track 5 Adjust the volume balance and make the effect settings fig RE01 05 About Cre...

Страница 57: ...ore maximum 100 User Songs and maximum 20 different User Styles User Songs and User Styles stored on memory cards can be handled exactly the same way as User Songs and User Styles stored in the User Memory About Changing Data When Changing Data in User Memory Data is written to the User Memory during a number of different operations such as when switching pages or pressing ENTER EXIT or STOP At th...

Страница 58: ...the buttons by holding down SHIFT while pressing CURSOR fig RE01 08 How to Use CURSOR and VALUE You can use CURSOR and VALUE when changing the settings appearing in the display CURSOR Press these buttons to move to the position that shows the setting you want to change Settings that can be changed flash in the display If you continue holding the button the change will be continuous If you hold dow...

Страница 59: ...t BALLAD Ballad BLUES Blues R B Rhythm and blues funk and soul JAZZ Jazz FUSION Fusion DANCE Hip hop techno etc LATIN Salsa bossa nova and samba etc COUNTRY Country WORLD World music USER User Songs 1 through 100 CARD Card User Songs 1 through 100 If no memory card is inserted then you can t select CARD even when you press CARD 3 Turn VALUE to select a song The name of the song you select the song...

Страница 60: ...unt in of one or two measures when playing the song When you add a count in it appears on the left hand display Pressing START starts the count sound the count in and after the count in the song starts to play The count in is sounded when you begin play or recording from the top of the song the first measure The count in is not sounded when you begin play or recording from somewhere later in the s...

Страница 61: ...d at that time is copied Playing with a Different Style You can select a Style from among the 200 types of Preset Styles and the maximum 20 types of User Styles and switch to that Style When you change the Style the song plays in the chosen Style with the chord progression set for the Preset Song remaining the same 1 While play is stopped press STYLE getting the button to light 2 Press SONG STYLE ...

Страница 62: ...L 1 FILL 2 BREAK 1 or BREAK 2 playback will automatically switch to the previously selected VERSE 1 or VERSE 2 when the performance ends In the case of ENDING you will return to the beginning of the song when playback ends When playback reaches the number of measures specified for the song playback will stop and you will return to the beginning of the song Playing with Chords You Enter Yourself Yo...

Страница 63: ... plays fig RE02 11 2 To cancel muting press the corresponding button to make it light up If you wish to save the settings execute the Save procedure p 59 Muting Out a Specific Percussion Sound You can mute out just the sound of a specific percussion instrument such as snare among the drum sounds used for the Drum Part This feature cannot be used when the Drum Part is muted that is when the button ...

Страница 64: ...ART a blank will be inserted If you insert a blank when ten songs are already specified the tenth song will be canceled To cancel press EXIT The following appears when no song is selected fig RE02 23 4 When you ve finished making the settings press CURSOR to return the orderof songs to 1 then press RESET 5 Press START The Song Chain plays in the set order beginning with the initial song selection ...

Страница 65: ...hord 1 9 Selected when creating songs with blues chord progressions MajorChord 1 24 Selected when creating songs consisting of major melodies MinorChord 1 17 Selected when creating songs consisting of minor melodies 7 Once you ve decided on a Chord template press ENTER The Tempo Setting screen appears fig RE03 04 8 Turn VALUE to set the tempo Settings values 40 250 9 Once you ve decided on the tem...

Страница 66: ...rms selected at that time You can check the tempo for the selected Style as well as during recording When you have finished checking the tempo press STOP to stop the performance then press RESET If the tempo is too fast or slow use the following procedure to change the tempo 1 Press TEMPO getting the button to light 2 Turn VALUE to set the tempo 3 Once you ve decided on the tempo press TEMPO once ...

Страница 67: ...ll light 5 Press FORM in the sequence of the Forms The current Form continues to play until you switch to the next form If a Form is already recorded that Form will be played When you press ENDING then the recording stops automatically when the ending is finished playing and you re returned to the Song screen 6 Once you have finished recording press STOP REC goes dark and the Song screen reappears...

Страница 68: ...right of the screen For example when 4meas is displayed it indicates that the current Form is made up of four measures fig RE04 41 You can have a recorded data play by pressing START while Step Recording is in progress The measure currently being played appears in the left display You cannot proceed with recording while the data is being played When the last Form is played the performance stops an...

Страница 69: ... displayed for the Form and the previous Form is carried forward p 68 1 Display the Form s Step Recording screen p 66 fig RE04 12 2 Press FWD or RWD to show the Form you want to erase 3 Press ERASE SHIFT UTILITY Copying Forms This copies the Forms in a specified range of measures and copies them to other measures on the same track fig RE04 13 1 At the Form s Step Recording screen press COPY SHIFT ...

Страница 70: ...Display the Chord s Record Standby screen p 66 REC and CHORD lights up 2 Press REC to display REAL Realtime Recording is selected fig RE04 42 3 Use CURSOR and VALUE to set Quantize The Quantize here corrects discrepancies in the timing during recording of fill ins and breaks with the timing set to the selected note length fig RE04 60 4 Before you start input the first chord that you wish to record...

Страница 71: ...NG to display the song screen Step Recording 1 Display the Chord s Record Standby screen p 66 REC and CHORD lights up 2 Press REC to display STEP Step Recording is selected fig RE04 43 3 Use CURSOR and VALUE to set the Quantize The Quantize here sets the timing to the selected note length of the subsequent step when FWD or RWD is pressed in later operations fig RE04 06 4 Press START The Chord s St...

Страница 72: ...rded 10 Once you have finished recording the Chord press STOP REC goes dark and the Chord screen reappears Press SONG to display the song screen N C Maj M7 M9 7 7 13 7b5 7 9 6 69 m6 m69 add9 9 madd9 mM9 m mM7 m7 dim m9 sus4 7sus4 aug aug7 7b9 m7b5 Non chord type N C Non Chord Type Select this type when you want to have the original performance data played as is with no conversion of the chords Sin...

Страница 73: ...e copy source designation screen appears fig RE04 26 4 Specify the range of measures in the copy source Use CURSOR and VALUE to specify the starting measure and final measure 5 Press ENTER The copy destination designation screen appears fig RE04 27 6 Specify the measure for the copy destination Turn VALUE to specify the starting measure The final measure is determined automatically by the number o...

Страница 74: ...en it is finished the display will indicate Completed Naming the Song You can give the song a song name 1 Select the User Song to be named 2 Press REC The Recording Track Selection screen is displayed 3 Press SONG or CHORD The Form or Chord Record Standby screen appears fig RE04 03 4 Press CURSOR to select 2 EDIT NAME The Song Name input screen appears fig RE04 33 5 Use CURSOR and VALUE to input t...

Страница 75: ...inal measure The specified final measure cannot come before the starting measure 7 Once you ve decided on the measures to be erased press ENTER The Form erase confirmation screen appears fig RE05 04 To cancel press EXIT The Form erase screen reappears 8 Press ENTER to erase the Form The erase will be executed and when it is finished the display will indicate Completed Erasing Chords You can erase ...

Страница 76: ...ase both the Forms and the Chords in a specified range of measures This erases only the data leaving the measures intact fig RE05 09a 1 Select the User Song whose Form and Chord you wish to erase 2 While play is stopped press ERASE SHIFT UTILITY The Song Delete screen appears ig RE05 23 3 Press CURSOR to select ERASE MEASURE The screen for selecting the track to erase appears fig RE05 44 4 Turn VA...

Страница 77: ... the same track fig RE04 13 By copying measures in which no Form has been recorded measures in which a Form recorded in even earlier measures are passed on you can make blank measures in the copy destination 1 Select the User Song whose Form you wish to copy 2 While play is stopped press COPY SHIFT EFFECTS The Song copy screen appears fig RE05 25 3 Press CURSOR to select COPY MEASURE The screen fo...

Страница 78: ...sures are passed on you can make blank measures in the copy destination 1 Select the User Song whose chord progression you wish to copy 2 While play is stopped press COPY SHIFT EFFECTS The Song copy screen appears fig RE05 25 3 Press CURSOR to select COPY MEASURE The screen for selecting the track to copy appears fig RE05 46 4 Turn VALUE to select CHORD 5 Press ENTER The copy source designation sc...

Страница 79: ... Chords appears fig RE05 12 6 Specify the range of measures in the copy source Use CURSOR and VALUE to specify the starting measure and final measure When attempting to copy many measures at one time the message No More Memory may be displayed and you may not be able to copy the data In this case you can copy the data by dividing the measures to be copied into smaller sections and repeating the co...

Страница 80: ... the measures to be deleted press ENTER The delete confirmation screen appears fig RE05 18 To cancel press EXIT The Measure delete screen reappears 6 Press ENTER to delete the data The delete will be executed and when it is finished the display will indicate Completed Inserting Measures This inserts empty measures in the Form track and Chord track Even if you insert empty measures into the Song wh...

Страница 81: ...You can also delete data only from the Form track Chord track or Audio track 1 Select the User Song to be deleted You cannot select User Songs stored on memory cards if no card is inserted 2 While play is stopped press ERASE SHIFT UTILITY The Song Delete screen appears fig RE05 23 3 Turn VALUE to select the data to be deleted ALL All data in the selected song is deleted CHD FORM All Form track and...

Страница 82: ... Songs with no data recorded in them are indicated by an in the display 4 Press ENTER If the copy source Song contains audio data the audio data copy confirmation screen appears fig RE05 28 5 Specify whether or not you wish to copy audio data as well If you wish to copy audio data as well use CURSOR to make YES blink and press ENTER If you do not wish to copy audio data use CURSOR to make NO blink...

Страница 83: ... REC the settings will be saved immediately Adjusting the Volume for Each Part You can adjust the volume of each of the Parts INST 1 INST 2 DRUM and BASS and for the Audio track 1 Select a Song 2 Press PART 3 Press CURSOR to display 1 VOLUME fig RE06 01 4 Press PART MUTE SELECT to select the Part on which you want to change the volume or the Audio track When a User Song to which audio data is reco...

Страница 84: ...e procedure p 83 Changing the Amount of Chorus and Reverb Applied to Each Part You can change the amount of chorus and reverb applied to each of the Parts INST 1 INST 2 DRUM and BASS Furthermore you can simultaneously adjust the volume of the direct dry sound to get the proper balance between the reverb chorus sound and the direct sound fig RE06 05 To change the amount of reverb applied adjust the...

Страница 85: ...ng appears in the screen fig RE06 07 If you press START you can making the settings while listening to the performance When 0 is selected for all levels no sound is produced for the selected Part 6 Repeat Steps 4 and 5 as needed 7 Once you have finished making the settings press PART once more or press EXIT The original screen reappears If you wish to save the settings execute the Save procedure p...

Страница 86: ...f the display when data is being written as this can prevent the data from being written properly and may adversely affect later operations If you have changed the settings for the Preset Songs then if you want to save the settings copy them to a User Song p 82 If you press SHIFT REC the settings will be saved immediately Changing the Reverb Settings Select and change the reverb related settings p...

Страница 87: ...et the more continuous the delay sound becomes 5 REVERB HF DAMP This sets the cutoff frequency for the reverb sound s high end component The amount of attenuation cut in the reverb s high frequencies changes according to the wall material HF Damp High Frequency Damp is a parameter that simulates these conditions by cutting the high frequency components of the sound Setting this to a lower frequenc...

Страница 88: ...rdrive and Distortion You could think of each one of these effect as the equivalent of a separate effects device Some of these effect types include compound effects comprising two effects connected in sequence or in parallel You can select any one of the Parts either Drum Bass Inst 1 or Inst 2 with which to use the Insert Effects In some cases sound may be heard even if the output level of the ins...

Страница 89: ...EVERB p 103 OD CHO p 103 OD FL p 104 OD DLY p 104 DS CHO p 105 DS FL p 105 DS DLY p 105 EH CHO p 105 EH FL p 106 EH DLY p 106 CHO DLY p 107 FL DLY p 107 CHO FL p 108 CHO DLT p 108 FL DLY p 108 CHO FL p 108 Changing the Settings for Each Type This changes the settings parameters for the selected effect type The parameters that can be changed vary from one type to another 1 Press EFFECTS 2 Press CUR...

Страница 90: ...boost or cut will take place P2 Q Peaking 2 Q 0 5 1 0 2 0 4 0 8 0 Specify the width of the region centered on the P2 FREQ setting Higher settings will cause the region affected by P2 GAIN to be narrower P2 GAIN Peaking 2 Gain 15 15 dB Specify the gain amount of boost or cut that will take place in the region specified by P2 FREQ and P2 Q Positive settings will emphasize boost the region specified ...

Страница 91: ...arying change modulating the sound fig RE07 104 MANUAL 100 Hz 8 kHz Specify the center frequency at which the sound is modulated RATE Phaser Rate 0 05 10 0 Hz Specify the frequency of modulation DEPTH Phaser Depth 0 127 Specify the depth of modulation RESONANCE 0 127 Specify the amount of feedback for the phaser Higher settings will give the sound a stronger character MIX Mix Level 0 127 Specify t...

Страница 92: ... range LEVEL Output Level 0 127 Specify the output volume AUTO WAH Auto Wah cyclically moves the frequency of a filter to produce a wah effect cyclic modulation of the tone fig RE07 107 FILTER TYPE LPF BPF Specify the type of filter LPF Low pass Filter The wah effect will be produced over a wide frequency range BPF Bandpass Filter The wah effect will be produced over a narrow frequency range SENS ...

Страница 93: ...rotor and high range rotor SLOW The specified rotational speeds the LOW SLOW RATE HI SLOW RATE values will take effect FAST The specified rotational speeds the LOW FAST RATE HI FAST RATE values will take effect LEVEL Output Level 0 127 Specify the output volume COMPRESSOR Compressor is an effect which restricts high sound levels and boosts low sound levels thus smoothing out variations in volume f...

Страница 94: ...in stereo position between each of the chorus sounds With a setting of 0 all of the chorus sounds will be panned to the center With a setting of 20 each chorus sound will be panned at 60 degree intervals relative to the center BALANCE Effect Balance D100 0E D0 100E Specify the volume balance between the original sound and the chorus sound With a setting of D100 0E only the original sound will be o...

Страница 95: ...100E only the chorus sound will be output LEVEL Output Level 0 127 Specify the output volume STEREO CHO Stereo Chorus This is a stereo chorus A filter allows you to adjust the tone of the chorus sound fig RE07 114 PRE DELAY Pre Delay Time 0 0 100 ms Specify the time delay from the original sound until the chorus sound is heard RATE Chorus Rate 0 05 10 0 Hz Specify the modulation frequency of the c...

Страница 96: ...egion above the Cutoff Freq setting HPF High pass Filter Cut the frequency region below the Cutoff Freq setting CUTOFF Cutoff Frequency 200 8000 Hz Specify the frequency at which the filter will begin cutting LOW GAIN 15 15 dB Specify the gain amount of boost or cut for the low frequency range Positive settings will emphasize boost the low frequency range HI GAIN High Gain 15 15 dB Specify the gai...

Страница 97: ...alance D100 0E D0 100E Specify the volume balance between the original sound and the flanger sound With a setting of D100 0E only the original sound will be output and with a setting of D0 100E only the flanger sound will be output LEVEL Output Level 0 127 Specify the output volume STEREO DLY Stereo Delay This is a stereo delay When FB MODE parameter is NORMAL fig RE07 117a When FB MODE parameter ...

Страница 98: ...dulation Delay Modulation delay is an effect which adds modulation to the delay sound It produces a flanger like effect When FB MODE parameter is NORMAL fig RE07 118a When FB MODE parameter is CROSS fig RE07 118b DELAY L Delay Time Left 0 0 500 ms Specify the delay time from the original sound until the left delay sound is heard DELAY R Delay Time Right 0 0 500 ms Specify the delay time from the o...

Страница 99: ...ecify the delay time from the original sound until the center delay sound is heard When set with a note the Step Rate is synchronized to the MIDI clock of the JS 5 or an external device Use Clock Source p 133 a system parameter to select whether the MIDI clock of the JS 5 or the external device is to be used for synchronization When a note value has been selected as the setting and the tempo is sl...

Страница 100: ...as a note value the Delay Time can be synchronized with the module s internal clock or the MIDI clock arriving from an external device For details refer to 3 TAP DLY When a note value has been selected as the setting and the tempo is slowed so much that the resulting delay time exceeds the permissible range the actual delay time will be 1 2 1 4 1 8 of the selected note values in keeping with the t...

Страница 101: ...uency range Positive settings will emphasize boost the high frequency range BALANCE Effect Balance D100 0E D0 100E Specify the volume balance between the original sound and the delay sound With a setting of D100 0E only the original sound will be output and with a setting of D0 100E only the delay sound will be output LEVEL Output Level 0 127 Specify the output volume 2 P SHIFT 2 Voice Pitch Shift...

Страница 102: ... input with the original phase while negative settings produce an inverted phase LOW GAIN 15 15 dB Specify the gain amount of boost or cut of the low frequency range Positive settings will emphasize boost the low frequency range HI GAIN High Gain 15 15 dB Specify the gain amount of boost or cut of the high frequency range Positive settings will emphasize boost the high frequency range BALANCE Effe...

Страница 103: ...cify the gain amount of boost or cut of the high frequency range Positive settings will emphasize boost the high frequency range BALANCE Effect Balance D100 0E D0 100E Specify the volume balance between the original sound and the reverb sound With a setting of D100 0E only the original sound will be output and with a setting of D0 100E only the reverb sound will be output LEVEL Output Level 0 127 ...

Страница 104: ...27 Specify the output volume OD DLY Overdrive Delay This effect connects an overdrive and a delay in series fig RE07 128 OD DRIVE 0 127 Specify the amount of distortion for the overdrive The volume will change together with the amount of distortion DLY TIME Delay Time 0 0 500 ms Specify the time delay from the original sound until the delay sound is heard DLY FB Delay Feedback 98 98 Specify the pr...

Страница 105: ... Distortion Delay This effect connects distortion and delay in series fig RE07 131 The parameters are essentially the same as in OD DLY with the exception of the following two DS DRIVE Distortion Drive 0 127 Specify the amount of distortion for the overdrive The volume will change together with the amount of distortion DLY BAL Delay Balance D100 0E D0 100E Specify the volume balance between the di...

Страница 106: ...anger A setting of D100 0E will output only the enhancer sound and a setting of D0 100E will output only the enhancer sound that is passed through the flanger LEVEL Output Level 0 127 Specify the output volume EH DLY Enhancer Delay This effect connects an enhancer and delay in series fig RE07 134 EH SENS Enhancer Sensitivity 0 127 Specify the sensitivity of the enhancer EH MIX Enhancer Mix Level 0...

Страница 107: ...Pre delay 0 0 100 ms Specify the time delay from the original sound until the flanger sound is heard FL RATE Flanger Rate 0 05 10 0 Hz Specify the modulation frequency of the flanger sound FL DEPTH Flanger Depth 0 127 Specify the modulation depth of the flanger sound FL FEEDBACK Flanger Feedback 98 98 Specify the proportion of the flanger sound that is to be returned to the input Positive settings...

Страница 108: ...lance between the chorus sound that passes through the flanger and the chorus sound that does not pass through the flanger With a setting of D100 0E only the chorus sound will be output and with a setting of D0 100E only the chorus that passes through the flanger sound will be output LEVEL Output Level 0 127 Specify the output volume CHO DLY Chorus Delay This effect connects a chorus and a delay i...

Страница 109: ...he JS 5 while the still appears at the left of the display when data is being written as this can prevent the data from being written properly and may adversely affect later operations If you have changed the settings for the Preset Songs then if you want to save the settings copy them to a User Song p 82 If you press SHIFT REC the settings will be saved immediately Changing Drum Part Instruments ...

Страница 110: ...ars If you wish to save the settings execute the Save procedure p 109 Changing INST Part Instruments Change the Instrument used for the INST 1 or INST 2 Part with a different Instrument Some of the instruments are played monophonically Instrument List p 143 1 Select a Song 2 Press PART 3 Press CURSOR to select 4 INSTRUMENT 4 Press INST 1 or INST 2 getting the button to light The INST 1 or INST 2 P...

Страница 111: ...JS 5 will playback in synchronization under control from an external MIDI device it is not possible to record on the audio track Before Recording Before you begin to record here is an explanation of recording time and the parameters that are set during the recording process About Recording Time The following shows the recording time available using the User Memory Hi Fi 1 minute 35 seconds LONG 1 ...

Страница 112: ... not sounded when you start recording at a point later in the song even if you ve set it so a count in is to be played When starting audio recording at a point in the song other than the beginning you can have the song be played instead of a count in at the lead up to recording by setting the point where the song starts playing at a point several measures before the start of recording Recording Op...

Страница 113: ...yed back correctly if START is pressed too quickly after the STOP RESET RWD or FWD buttons are pressed In this case the message Operate Slowly appears in the display Redoing a Recording Rerecording If you are unable to get a good recording of a performance you can record the performance over again rerecord Since rerecording is executed over a specified range in measure units you can rerecord only ...

Страница 114: ...r than the starting measure for recording 8 Press START and recording begins When the count in is selected the count in is indicated in the left display while the count sound plays simultaneously After the count in is displayed recording begins fig RE09 50 The previously recorded performance is played back By playing along with these sounds the new recording is made only in the specified range 9 O...

Страница 115: ...lower tempos Connections fig RE09 16 REC INPUT in a monaural input for use with standard plugs If the device that you want to connect has stereo output connect the device to either of the L or R jacks Recording Procedures are the same as those in Recording Operations New Recordings p 112 Songs are played during recording and playback mute the Drum INST 2 Parts for procedures p 63 Set the tempo at ...

Страница 116: ...want to save the settings copy them to a User Song p 82 How to Play Loops For example if a Song has Measure 5 through Measure 8 set as Loop 1 and you start playing the Song from the beginning the Song progresses as shown below fig RE10 50 When you press FWD or the foot switch when set to EXIT LOOP p 117 while the loop is playing then once the end of Loop 1 is reached the loop is exited and the Son...

Страница 117: ...ng Foot Switch Functions This selects the function performed when FOOT SWITCH 1 or FOOT SWITCH 2 is pressed You can set FOOT SWITCH 1 and 2 to perform either the same or different functions When only one foot switch is connected this applies to FOOT SWITCH 1 1 Press UTILITY 2 Press CURSOR and select 4 FOOT SWITCH 1 or 5 FOOT SWITCH 2 fig RE10 07 3 Turn VALUE to select the foot switch function Star...

Страница 118: ...h time you press the foot switch the specified part will switch between mute silent and un muted sounding The button will be dark when muted and lit when sounding 4 Once you have finished making the settings press UTILITY once more or press EXIT The original screen appears ...

Страница 119: ... the scales of the notes making up the chords However since the OBBLIGATO settings allow you to play notes other than those making up the chords there may be times when depending on the data you may not be able to get a sense of the chords being played When playing Styles exactly as composed that is without the chords being converted input N C Non Chord Type to the Chord track p 72 Doing this allo...

Страница 120: ...ORM to select the Form to be recorded The button for the selected Form flashes 3 Press REC getting the button to light SONG STYLE CHORD and AUDIO TRACK flash and the Recording Track Selection screen appears The button for the selected form may temporarily go out When a Preset Song is selected STYLE lights up only fig RE11 30 To cancel press EXIT 4 Press STYLE The User Style s Record Standby screen...

Страница 121: ... for the part that you wish to record fig RE11 08 14 Turn VALUE to set the Arrange mode Settings values NO ARRANGE BASS OBBLIGATO ARPEGGIO About Arrange Mode p 119 15 Press CURSOR several times to select 1 COUNT IN fig RE11 09 16 Turn VALUE to select the count in Settings values OFF 1meas 2meas When using the count in set this to 1meas measure or 2meas measures When not using the count in set this...

Страница 122: ...User Style INTRO ENDING Delete the data of the selected Form 5 Press ENTER The delete confirmation screen appears fig RE11 12 To cancel press EXIT 6 Press ENTER to erase the data The delete will be executed and when it is finished the display will indicate Completed Erasing a performance If you wish to erase a recorded performance press ERASE SHIFT UTILITY to access the following screen fig RE11 4...

Страница 123: ...en you want to execute the copy The copy will be executed and when it is finished the display will indicate Completed Erasing Parts This erases the content of a specified Part except the Audio track in the currently selected Form 1 Display the User Style s Record Standby screen p 120 2 Press ERASE SHIFT UTILITY 3 Press CURSOR to select ERASE PART The Part s erase screen appears fig RE11 15 4 Turn ...

Страница 124: ...g the Style This adds names Style names to the Styles you create 1 Select the User Style to be named 2 Display the User Style s Record Standby screen p 120 3 Press CURSOR several times to select 5 EDIT NAME The Style Name input screen appears fig RE11 21 4 Use CURSOR and VALUE to input the characters If you press SHIFT the cursor will move to the beginning of the name If you press SHIFT the cursor...

Страница 125: ...s or allow them to become dirty or grimy Never remove the memory card or turn off the power to the JS 5 when carrying out an operation involving the card such as formatting or reading and writing data this may ruin your data or even render the card unusable Attaching a Write Protect sticker to the Write Protect area on a card disallows formatting and writing of data to the card For more detailed i...

Страница 126: ...se CURSOR and VALUE to enter the comments If you press SHIFT the cursor will move to the beginning of the comment If you press SHIFT the cursor will move to the end of the comment If you press INSERT SHIFT PART a space will be inserted at the cursor location If you press ERASE SHIFT UTILITY the character at the cursor location will be deleted and subsequent characters will be moved toward the left...

Страница 127: ...nfirmation screen appears fig RE12 17 To cancel press EXIT 7 Press ENTER The load begins fig RE12 18 Never turn off the power to the JS 5 or remove the memory card while the load is in progress When the Load is finished the display will indicate Completed Deleting Data on a Card This deletes unneeded Backup Files 1 Press UTILITY 2 Press CURSOR to select 15 SYSTEM DELETE BACKUP The Backup File dele...

Страница 128: ...E to perform tuning Settings values 427 4 456 2 Hz The displayed value is the frequency of the A4 key 4 To finish making the setting press UTILITY again or press EXIT Changing the Metronome Settings You can change the settings parameters for the metronome sound played during Realtime recording of a User Style 1 Press UTILITY 2 Press CURSOR to select 3 SETUP METRONOME fig RE13 03 3 Turn VALUE to ch...

Страница 129: ...ENTER to execute the delete The copy confirmation screen appears fig RE13 07 To cancel press EXIT 6 To copy the data press ENTER The copy is executed The following screen appears while the process is carried out fig RE13 08 When the copy is finished the display will indicate Completed Deleting Data in a Batch You can perform batch deletion of sequence data saved in User Memory on the unit or on a ...

Страница 130: ...is finished the display will indicate Completed Displaying Remaining Memory You can check the amount of available memory left in User memory the inserted memory card and the Temporary area The Temporary area is the temporary memory that is used for calling up data saved in the User Memory and on memory cards recording Songs and Styles and editing data 1 Press UTILITY 2 Press CURSOR to display the ...

Страница 131: ...Inst 2 Drum 10 Bass 2 Inst 1 3 Inst 2 4 Audio Track 5 Volume message only MIDI Information Handled by the JS 5 With MIDI various kinds of performance related information are transmitted so there is accordingly a variety of different types of data messages MIDI information is divided into that which is handled at the channel level Channel Messages and that which is not related to channels System Me...

Страница 132: ...formance Start Stop and Continue Start for restarting songs stopped while in progress In addition Active Sensing Messages help prevent stuck tones when using external MIDI devices connected by MIDI cables or by other means About the MIDI Implementation Chart Not all MIDI Messages can be exchanged between all devices the messages from a device must have some things in common with those of the conne...

Страница 133: ...onized to the tempo of the JS 5 AUTO Start Stop Controllable by either the JS 5 or the external MIDI instrument Tempo Synchronized to the tempo of the JS 5 when operation is started by the JS 5 and synchronized to the clock signal of the external MIDI instrument when operation is started by the external MIDI instrument If you cannot obtain an expected result in the Synchronized performance and the...

Страница 134: ...on 1 Press UTILITY 2 Press CURSOR and select 7 MIDI DEVICE ID The Device ID Setting screen appears fig RE14 10 3 Turn VALUE and set the device ID number Settings values 17 32 4 Press CURSOR and select 8 MIDI BULK DUMP The Bulk Dump screen appears fig RE14 11 5 Press ENTER The Bulk Dump Standby screen appears fig RE14 12 6 To perform a bulk dump press ENTER The bulk dump starts Be very sure never t...

Страница 135: ...R and select 9 MIDI BULK LOAD The Bulk Load screen appears fig RE14 16 3 Press ENTER The delete confirmation screen for Audio data appears fig RE14 50 To cancel press EXIT 4 Press ENTER to execute the delete The Bulk Load Standby screen appears fig RE14 17 5 Send the data from the external MIDI instrument When the data is received the data reception screen appears fig RE14 18 Never switch off the ...

Страница 136: ... specific percussion instrument does not sound Has that percussion instrument been muted If DRUM INST 2 is dark when you press SHIFT the corresponding percussion instrument sound is muted If you wish to play the instrument turn off the mute p 63 Effects Reverb Not Applied Could the Reverb Send Level be set to 0 Set the level to an appropriate value p 84 Chorus Not Applied Could the Chorus Send Lev...

Страница 137: ...match the instrument or device connected to REC INPUT p 111 Is the recording level adjusted to an appropriate setting Before you record adjust the recording level so that it is within the appropriate range p 113 MIDI Can t Get Sound from the JS 5 Using an External MIDI Device Have the MIDI channels been set correctly Set the MIDI channels so that they match the parts you want played p 131 Others L...

Страница 138: ...ey Transpose When you have set the Key Transpose p 60 the key of the chord actually being played will be changed according to what is set but the key shown in the screen will remain unchanged The progress of the chords will be different from that of the forms You might have selected the Style with a different beat If you combine a song and style with different beats like changing a song with 4 4 b...

Страница 139: ...Solution Completely and securely insert the memory card Unsupported Format Cause The JS 5 cannot recognize or use the format of the inserted memory card Solution Insert a memory card formatted for use with the JS 5 p 125 Unsupported Media Cause The memory card inserted is not compatible with the JS 5 Solution Use a memory card compatible with the JS 5 8 to 64 MB SmartMedia with a power source volt...

Страница 140: ...s STOP RESET or START in extremely rapid succession Tempo Too Slow Cause The playback tempo is significantly slower than the tempo used during recording thus preventing proper playback Solution Adjust the tempo Cause The current operation exceeds the JS 5 s internal processing capabilities and this is preventing the audio data from playing back Solution Do not make sudden changes in the tempo Do n...

Страница 141: ...5 Rockin Blues 006 RckBeatBlues 007 Medium Blues 008 Funky Blues 009 Jump Blues 010 BluesInMinor 011 Blues Brass 012 AcGtr Boogie 013 Gospel Shout R B 001 RhythmGtrFnk 002 Brass Funk 003 Psyche Funk 004 Cajun Funk 005 Funky Soul 1 006 Funky Soul 2 007 60 s Soul 008 70 s Soul 009 WstCoastSoul 010 Detroit Soul 011 Old R B 1 012 Old R B 2 013 R B Groove 1 014 R B Groove 2 015 R B Shuffle 016 Smooth R...

Страница 142: ...7 Medium Blues 08 Funky Blues 09 Jump Blues 10 BluesInMinor 11 Blues Brass 12 AcGtr Boogie 13 Gospel Shout R B 01 RhythmGtrFnk 02 Brass Funk 03 Psyche Funk 04 Cajun Funk 05 Funky Soul 1 06 Funky Soul 2 07 60 s Soul 08 70 s Soul 09 WstCoastSoul 10 Detroit Soul 11 Old R B 1 12 Old R B 2 13 R B Groove 1 14 R B Groove 2 15 R B Shuffle 16 Smooth R B JAZZ 01 DublTimeFeel 02 Organ Jazz 03 5 4 Jazz 04 Lat...

Страница 143: ...r For FX 2 055 Gtr For FX 3 056 Gtr For FX 4 057 Banjo 058 Sitar 059 Pedal Steel 060 Piano 1 061 Piano 2 062 Piano 3 063 Honky tonk 064 MIDI Piano 065 Bright EP 066 Rhodes EP 067 BrightRhodes 068 Mr Suitcase 069 FM EP 070 Digi Rhodes 071 MK 80 Rhodes 072 Clav 1 073 Clav 2 074 Funk Clav 075 Rock Organ 076 Tone Wh Solo 077 Dist Organ 1 078 Dist Organ 2 079 Rotary Organ 080 Jazz Organ 1 081 Jazz Orga...

Страница 144: ...k Wood Block Cuica Cuica Open Triangl Open Triangl Cabasa Cut Bongo Hi Bongo Lo Wood Block White Noise White Noise Elec Kick 909 Kick Old Kick 808 Kick 808 SN 909 Snare Rap Snr Natural SN2 MC500 Beep 2 R8 Click MC500 Beep 1 005 BrushKit Hybrid Kick1 Old Kick Side Stick Brush Swish Brush Slap Brush Roll BrushTomMid Pedal HiHat BrushTomMid Pedal HiHat BrushTomMid Op HiHat BrushTomHi BrushTomHi Crash...

Страница 145: ...Wood Block Wood Block Cuica Cuica Open Triangl Open Triangl Cabasa Cut Bongo Hi Bongo Lo Wood Block White Noise White Noise Techno BD2 909 Kick Elec Kick Dance Kick 3 808 SN 909 Snare Scratch 1 Scratch 2 MC500 Beep 2 HI_Q MC500 Beep 1 013 PopKit2 Dance Kick 3 Round Kick Dry Stick Hard Snare Hand Claps 909 Snare Tom Lo Cl HiHat 2 Tom Lo Pedal HiHat Tom Lo Op HiHat Tom Lo Tom Mid Crash 1 Tom Mid Rid...

Страница 146: ...ble chord conversion 26 types and N C consist of the following notes The following shows chord types with the root C fig RE15_71 Chord Type M9 M7 7 9 Maj 6 7 7 5 7 13 7 9 69 m6 m69 9 add9 madd9 mM9 m mM7 m9 dim sus4 aug aug7 N C m7 m7 5 7sus4 ...

Страница 147: ... changed System Realtime Message If the Sync mode is set at MIDI this message is never transmitted The Timing clock is transmitted even if no songs are played Timing Clock Status F8H Start Status FAH Continue Status FBH Stop Status FCH Active Sensing Status FEH Transmitted for checking MIDI connections between the JS 5 and external device 2 RECOGNIZED DATA Channel Voice Message Note Off Status 2nd...

Страница 148: ... mmH llH Master Fine Tuning mm ll 00H 00H 40H 00H 7FH 7FH 8192 x 100 8192 0 8192 x 100 8192 cent 00H 02H mmH Coarse Tuning mm 10H 40H 70H 48 0 48 semitones 7FH 7FH RPN reset No specified parameter is assigned to RPN and NRPN Current value is not affected Program Change Status 2nd byte CnH ppH n MIDI channel 1H 3H 9H ch 2 3 4 10 pp Program number 00H 7FH prog 1 prog 128 The first Note On after rece...

Страница 149: ...meters for kits system setup sequence user chord Model ID included in the exclusive message should be 00H 35H The device ID code should be System Exclusive Device ID of MIDI parameter Note that the actual value that set in device ID field is smaller by one than the value set System Exclusive Device ID of MIDI parameter Universal Non Realtime System Exclusive Message Inquiry Request Status data byt...

Страница 150: ... 64H 5 05H 37 25H 69 45H 101 65H 6 06H 38 26H 70 46H 102 66H 7 07H 39 27H 71 47H 103 67H 8 08H 40 28H 72 48H 104 68H 9 09H 41 29H 73 49H 105 69H 10 0AH 42 2AH 74 4AH 106 6AH 11 0BH 43 2BH 75 4BH 107 6BH 12 0CH 44 2CH 76 4CH 108 6CH 13 0DH 45 2DH 77 4DH 109 6DH 14 0EH 46 2EH 78 4EH 110 6EH 15 0FH 47 2FH 79 4FH 111 6FH 16 10H 48 30H 80 50H 112 70H 17 11H 49 31H 81 51H 113 71H 18 12H 50 32H 82 52H 11...

Страница 151: ...when the exclusive message to be transmitted has an address of aa bb cc ddH and data or size of ee ffH aa bb cc dd ee ff total total 128 quotient remainder 128 remainder checksum Checksum is 0 if the remainder is 0 Example Request to transfer the kit parameter See the Parameter Address Map address 00 00 00 00H size 30 00 00 00H F0 41 11 00 13 11 00 00 00 00 30 00 00 00 F7 1 2 3 4 5 address size ch...

Страница 152: ...ollers Active Sensing System Reset 2 3 4 10 X Mode 3 X O O 0 127 X X X X X X X X X X X X O O O 4 O O O O O O X O O 1 O 1 X O 1 O 1 X X X X O 1 X 2 3 4 10 X Mode 3 Mode 3 4 M 1 O O 0 127 0 127 X X O Resolution 9 bit O 0 127 O O 2 O 2 X O 3 O 2 X O O O O X Modulation Data entry Volume Panpot Expression Hold 1 Effect 1 Reverb Send Level Effect 3 Chorus Send Level RPN MSB LSB 1 Except SYNC Mode EXT 2 ...

Страница 153: ...other songs will decrease and in some cases recording may not be possible The available recording time is the maximum recording time available in the internal memory and memory card This figure may be smaller depending on the memory used for recording User or Card Songs and any data backed up to the memory card Display 16 Characters x 2 Lines LCD 3 Characters 7 Segment LED Connectors Recording Inp...

Страница 154: ...e 69 73 75 76 122 123 EXIT LOOP 117 EZ Compose 34 65 F Factory Reset 130 FILL 27 55 Foot Switch 117 Form 27 55 62 Form Track 33 55 Format 125 H Hi Fi 52 111 I Initialize 125 Insert 80 Insert Effects 88 INST Part 110 Instrument 109 INT 133 INTRO 27 55 J Jump 64 K Key Transpose 44 60 L Load 127 LONG 52 111 Loop Play 116 M Memory 57 Memory Card 57 111 125 130 Metronome 128 MIDI 131 133 MIDI Channel 1...

Страница 155: ...ot 23 S Save 59 83 86 109 Sequence Track 55 SmartMedia 57 125 Song 55 Song Chain 64 Song Name 74 SONG STYLE BANK 25 59 61 Step Recording 41 68 71 Style 25 33 55 Style Name 124 Synchronize a Performance 133 System Memory 57 T Tempo 22 60 133 Temporary Area 130 Track 55 Transpose 44 Tuning 128 U User Memory 57 130 User Song 33 55 56 66 User Style 56 119 V VALUE 58 VERSE 27 55 Volume of Each Part 45 ...

Страница 156: ...156 MEMO ...

Страница 157: ...157 MEMO ...

Страница 158: ...158 MEMO ...

Страница 159: ...ead the instructions below and the Owner s Manual 002c Do not open or modify in any way the unit or its AC adaptor 003 Do not attempt to repair the unit or replace parts within it except when this manual provides specific instructions directing you to do so Refer all servicing to your retailer the nearest Roland Service Center or an authorized Roland distributor as listed on the Information page 0...

Страница 160: ...portant information concerning the proper operation of the unit Additionally in order to feel assured that you have gained a good grasp of every feature provided by your new unit Owner s manual should be read in its entirety The manual should be saved and kept on hand as a convenient reference Copyright 2000 BOSS CORPORATION All rights reserved No part of this publication may be reproduced in any ...

Отзывы: