background image


Editing

Mastering

Using USB

Con

venient 

Functions

Appendix

es

Quic

k Star

t

Getting Read

to Recor

d

Recor

ding/

Pla

ybac

k

Using 

Eff

ects

Using 

Rh

ythm


77


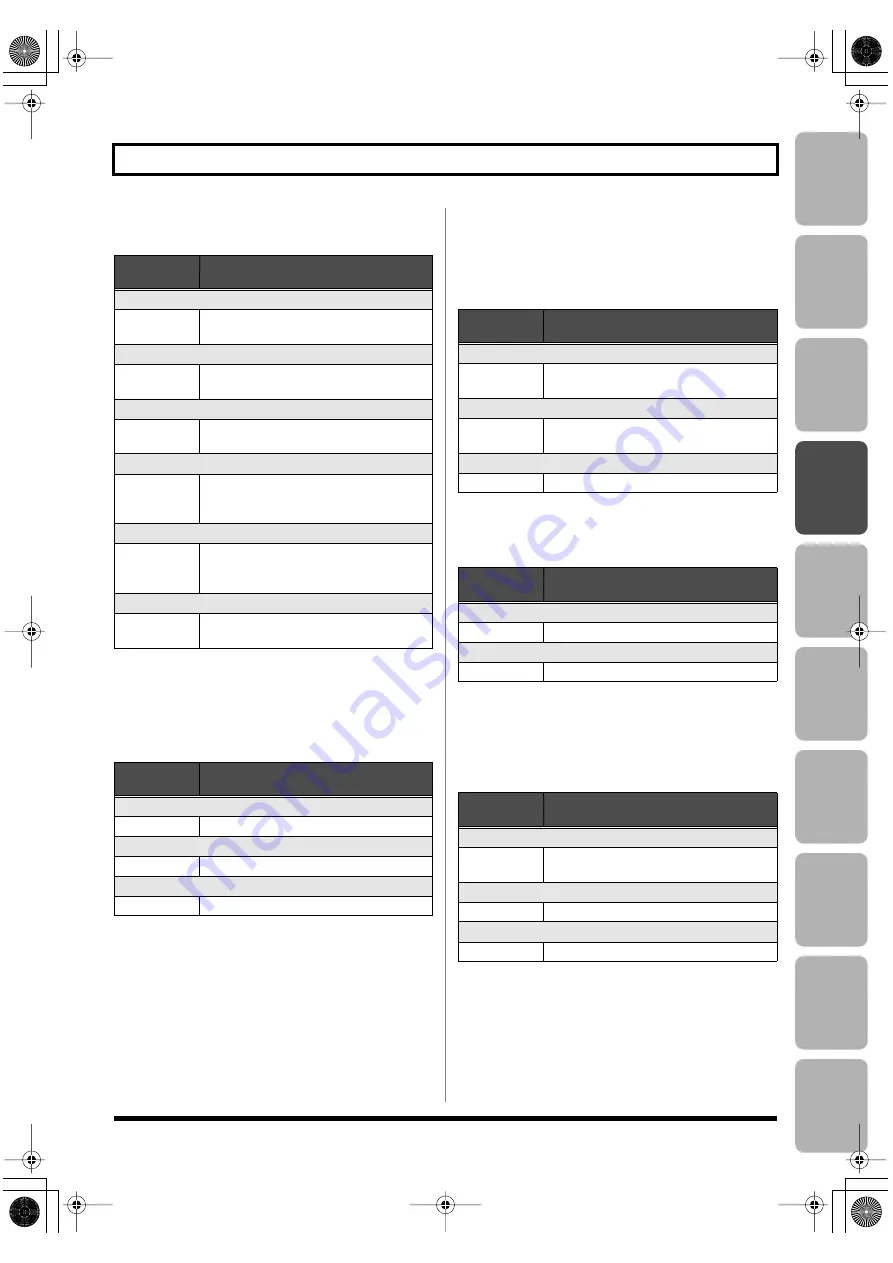
Using Insert Effects


ROTARY


This produces an effect like the sound of a rotary speaker.


UNI-V (Uni-Vibe)


This models a Uni-Vibe. 

Although this resembles a phaser effect, it also provides a 
unique undulation that you can’t get with a regular phaser.


PAN


With the volume level of the left and right sides alternately 
changing, when playing sound in stereo, you can get an 
effect that makes the guitar sound appear to fly back and 
forth between the speakers.


VIBRATO


This effect creates vibrato by slightly modulating the pitch.


RING MOD (Ring Modulator)


This creates a bell-like sound by ring-modulating the guitar 
sound with the signal from the internal oscillator. The 
sound can be unmusical and lack distinctive pitches.


Parameter/
Range

Explanation


SPEED SEL (Speed Select)


SLOW, FAST

This parameter changes the simulated 
speaker’s rotating speed (SLOW or FAST).


RATE-SLOW


0–100

This parameter adjusts the SPEED SEL of 
rotation when set to “SLOW.”


RATE-FAST


0–100

This parameter adjusts the SPEED SEL of 
rotation when set to “FAST.”


RISE TIME


0–100

This parameter adjusts the time it takes for 
the rotation SPEED SEL to change when 
switched from “SLOW” to “FAST.”


FALL TIME


0–100

This parameter adjusts the time it takes for 
the rotation SPEED SEL to change when 
switched from “FAST” to “SLOW.”


DEPTH


0–100

This parameter adjusts the amount of 
depth in the rotary effect.


Parameter/
Range

Explanation


RATE


0–100

Adjusts the rate of the UNI-V effect.


DEPTH


0–100

Adjusts the depth of the UNI-V effect.


LEVEL


0–100

Adjusts the volume.


Parameter/
Range

Explanation


WAVE SHAPE


0–100

Adjusts changes in volume level. 
A higher value will steepen wave’s shape.


RATE


0–100

Adjusts the frequency (speed) of the 
change.


DEPTH


0–100

Adjusts the depth of the effect.


Parameter/
Range

Explanation


RATE


0–100

Adjusts the rate of the vibrato.


DEPTH


0–100

Adjusts the depth of the vibrato.


Parameter/
Range

Explanation


FREQUENCY


0–100

Adjusts the frequency of the internal oscil-
lator.


E.LEVEL (Effect Level)


0–100

Adjusts the volume of the effect sound.


D.LEVEL (Direct Level)


0–100

Adjusts the volume of the direct sound.

BR800_e.book 77 ページ 2010年11月2日 火曜日 午前8時28分

Содержание BR-800

Страница 1: ......

Страница 2: ...811 CROATIA ART CENTAR Degenova 3 HR 10000 Zagreb CROATIA TEL 1 466 8493 CZECH REP CZECH REPUBLIC DISTRIBUTOR s r o Voct rova 247 16 180 00 Praha 8 CZECH REP TEL 2 830 20270 DENMARK Roland Scandinavia...

Страница 3: ...e Insert Effect On Off p 55 Easily Edit the Insert Effect p 55 Turn Rhythm On Off p 90 Play Patterns p 91 Copy or Erase Tracks p 105 Name Your Song p 108 Using Mastering in Creating a Song p 112 Makin...

Страница 4: ...material coins pins or liquids of any kind water soft drinks etc to penetrate the unit 012c If any of the following occurs immediately turn off the power remove the AC adaptor from the outlet and disc...

Страница 5: ...cords coming from external devices 109b Before cleaning the unit turn off the power and unplug the AC adaptor from the outlet p 32 110b Whenever you suspect the possibility of lightning in your area d...

Страница 6: ...olor the unit 355b When moved from one location to another where the temperature and or humidity is very different water droplets condensation may form inside the unit Damage or malfunction may result...

Страница 7: ...disassemble or modify the cards Handling DVD ROMs 801 Avoid touching or scratching the shiny underside encoded surface of the disc Damaged or dirty DVD ROM discs may not be read properly Keep your di...

Страница 8: ...electing the Input Source 37 Adjusting the Input Sensitivity 37 Adjusting the Recording Level 38 Selecting the Track s for Recording 38 Selecting V Tracks 39 Adjusting the Stereo Feel of the Input Sou...

Страница 9: ...Using TAP TEMPO Button to Set the Tempo 94 Changing the Drum Sounds Drum Kit 95 Selecting a Drum Kit 95 Creating an Original Arrangement 96 Inserting a Step 98 Erasing a Step 98 Naming an Arrangement...

Страница 10: ...Mixing the Sound from an Audio Device LINE IN MIX 134 Output Settings OUTPUT 135 Output Settings for LINE OUT and Headphone OUTPUT MODE 135 Adjusting the Headphone Volume PHONES LEVEL 135 Practicing P...

Страница 11: ...etch function lets you record and play back stereo WAV files This is a convenient way to record audio memos of your musical ideas and phrases There are three ways of powering the unit with an AC adapt...

Страница 12: ...PUT 1 4 jacks or with the internal stereo microphones input sources The indicator will light approximately 6 dB below the level at which distortion begins Use the INPUT SENS knobs to adjust the input...

Страница 13: ...turn the mastering effect on off and edit its settings Mastering p 111 RETRY button This button returns to the time location at which you last started recording REPEAT button Use this button to speci...

Страница 14: ...rward or rewind When making settings for various functions this dial is used to edit values CURSOR buttons These buttons move the cursor EFFECTS button This button accesses a screen in which you can t...

Страница 15: ...Tempo This indicates the tempo of the rhythm Level meter This indicates the volume On the BR 800 the main screen that appears for example immediately after the power is turned on see below is called...

Страница 16: ...low you to hear the same sound as the LINE OUT jacks outputs Use the MASTER fader to adjust the headphone volume GUITAR BASS jack Connect your guitar or bass here This is a high impedance input jack F...

Страница 17: ...is connected you can use your foot to control the insert effect Using a Foot Switch Expression Pedal p 131 LINE IN jack This is an input jack for analog audio signals You can connect the output of you...

Страница 18: ...included AC adaptor here p 32 Side Panel Position Explanation ON Power is on when using the included AC adaptor or batteries OFF Power is off USB Power is on when connected via USB cable USB bus powe...

Страница 19: ...rrect polarity Avoid using new batteries together with used ones In addition avoid mixing different types of batteries Remove the batteries whenever the unit is to remain unused for an extended period...

Страница 20: ...MEMO 20 BR800_e book 20...

Страница 21: ...21 Quick Start BR800_e book 21...

Страница 22: ...With the power switched off on both the BR 800 and your monitor speakers make connections as shown below fig Quick_EZ1 e eps 1 Make Connections Monitor speakers AC adaptor To the LINE OUT jacks Stereo...

Страница 23: ...or speaker damage 2 Turn on the Power 1 Lower the BR 800 s MASTER fader fig Quick_DemoSong2 1 eps 2 Turn on the POWER switch fig Quick_DemoSong2 2 eps 3 Turn on the power of your monitor speakers Turn...

Страница 24: ...ttons to move the cursor to SONG and press the ENTER button The SONG screen will appear D_Song_New eps 3 Use the CURSOR buttons to move the cursor to SELECT and press the ENTER button The SONG SELECT...

Страница 25: ...raise the MASTER fader to adjust the volume fig Quick_DemoSong3 6 eps 7 Move the track faders to adjust each track s volume as desired 8 Press the STOP button to stop playback fig Quick_DemoSong3 5 ep...

Страница 26: ...screen will appear D_EZ_Rec_New eps 2 Use the CURSOR buttons to move the cursor to NEW SONG and press the ENTER button The EZ REC 2 screen will appear D_EZ_Rec_Souce eps A new song will be created if...

Страница 27: ...are shown D_EZ_Rec_Result_Guitar eps You can use the CURSOR buttons and the dial to change the effect or rhythm 5 Press the ENTER button This completes the recording settings 1 Set the faders to the p...

Страница 28: ...ecording standby mode fig Quick_EZ2 4 e eps Blinking 5 Press the PLAY button The PLAY button will light green the REC button will light red and recording will begin At the same time that recording beg...

Страница 29: ...ZERO button to return to the beginning of the song The current time location will change to 00 00 00 00 0 fig Quick_EZ3 1 eps 2 Press the PLAY button Song playback will start Use the MASTER fader to...

Страница 30: ...GUITAR BASS jack simultaneously with the vocals via a microphone connected to the INPUT4 jack SIMUL AC IN4 Choose this when recording an acous tic guitar connected to the GUITAR BASS jack simultaneou...

Страница 31: ...31 Getting Ready to Record BR800_e book 31...

Страница 32: ...equipment is switched off before you make connections fig panel e eps Side Panel Computer AC adaptor Rear Panel Monitor speakers etc Foot switch FS 5U etc Expression pedal Roland EV 5 etc Portable aud...

Страница 33: ...ng the wiring diagrams of other equipment you intend to connect The XLR connector of INPUT 4 can provide 48 V phantom power allowing you to connect a phantom powered condenser microphone p 142 fig XLR...

Страница 34: ...re you switch off the BR 800 s power If you turn off the power during recording or playback the data mixer settings or effect patch data will be lost When using the AC adaptor take care that the AC ad...

Страница 35: ...35 Recording Playback BR800_e book 35...

Страница 36: ...ile the data is being updated Never turn off the power while this message is shown Select the song that you want to record 1 Press the MENU button 2 Use the CURSOR buttons to move the cursor to SONG a...

Страница 37: ...one or instrument connected to the INPUT4 jack LINE IN Choose this when recording the sound from a portable audio player or other device connected to the LINE IN jack USB Choose this when recording th...

Страница 38: ...Level Try to record at the highest volume possible before the sound begins to distort If you want to decrease the monitoring volume lower the MASTER fader Selecting the Track s for Recording Indicator...

Страница 39: ...V track you want to switch 4 Use the dial to switch the V track V MST of track 7 8 is the V track for mastering It can also be used for conventional recording 5 Press the EXIT button a number of times...

Страница 40: ...ght red fig Rec04 e eps 3 To stop recording press the STOP button The track PLAY button will light green indicating that sound has been recorded on that track It s not possible to play back sound that...

Страница 41: ...red track 1 7 8 REC button a number of times to make track 1 7 8 REC button blink fig LoopRec eps 2 Record as described in Recording p 40 When recording ends the recorded data will be copied so that i...

Страница 42: ...e of the input source the sound will be recorded on the track at a lower volume This might cause noise to be more obtrusive when you raise the track s volume during playback If you want to lower the m...

Страница 43: ...eating point B fig Repeat01 eps The Repeat B symbol will appear in the screen indicating that the repeat region A B has been specified 3 When you want to clear the repeat setting press the REPEAT butt...

Страница 44: ...URSOR buttons to move the cursor to SYSTEM and press the ENTER button 3 Use the CURSOR buttons to move the cursor to AB QUANTIZE and use the dial to change the setting to ON If this if OFF Quantize wi...

Страница 45: ...e illustration fig Panchin01 eps 3 Play back the song and use the REC LEVEL knob to adjust the volume of the input source While listening to compare the track to be re recorded with the input source u...

Страница 46: ...in out is the operation of automatically punching in out at the locations you specify beforehand This is useful when you want to punch in out at precise locations or when you want punch in out to occu...

Страница 47: ...ng to compare the track to be re recorded with the input source use the REC LEVEL knob to adjust the input source so that there is no difference in volume 4 Move to a location earlier than where you w...

Страница 48: ...return to the state just after the second recording 1 Press the MENU button 2 Use the CURSOR buttons to move the cursor to UNDO REDO and press the ENTER button The UNDO REDO will appear D_Undo eps 3 T...

Страница 49: ...IME display area will show the remaining time fig Remain eps Here s how to view information about the song 1 Press the MENU button 2 Use the CURSOR buttons to move the cursor to SONG and press the ENT...

Страница 50: ...Current time Move the time location Rhythm fig SongScketch_Rhythm e eps File name Current time During playback length of the file During recording remaining recording time Rhythm During playback outp...

Страница 51: ...o stop playback press the STOP button Here s how to erase a WAV file 1 Press the SONG SKETCH button The SONG SKETCH screen will appear 2 Use the CURSOR buttons to move the cursor to the file name and...

Страница 52: ...of times to return to the SONG SKETCH screen Here s how to view information about the WAV file 1 Press the SONG SKETCH button The SONG SKETCH screen will appear 2 Use the CURSOR buttons to move the cu...

Страница 53: ...53 Using Effects BR800_e book 53...

Страница 54: ...d the user patch data is stored in the BR 800 s internal memory If you ve created a patch and would like to use it in another song as well it s convenient to store it as a user patch Song patches Song...

Страница 55: ...t to the sound you have in mind Use the CURSOR buttons and dial to select the bank preset song user and number 3 Use the CURSOR buttons to move the cursor to EZ TONE and press the ENTER button The EZ...

Страница 56: ...ll appear and the algorithm the available effects and their connection order will be displayed D_Effect_Edit eps The effect settings you edit are temporary If you exit the effect edit screen without s...

Страница 57: ...Write eps 3 If you want to enter a patch name press the CURSOR button If you don t need to change the patch name proceed to step 6 D_Effect_Name eps 4 Use the CURSOR buttons and the dial to enter the...

Страница 58: ...e insert effect but the sound unprocessed by the effect i e the dry sound will be recorded Use this setting if you want to try out various effects after recording fig 03 120 eps TRACK 1 8 1 2 3 4 5 6...

Страница 59: ...put two lines Ex fig 03 160 This is a multi effect designed for electric guitar This provides an amp sound using a preamp and speaker simulator fig EGuitarMulti eps Compressor Limiter Wah Distortion A...

Страница 60: ...coustic guitar is connected at line level this provides a warm sound similar to what is obtained through a microphone fig AGuitarMulti eps Acoustic Processor Compressor Limiter Equalizer Noise Suppres...

Страница 61: ...for a microphone fig MICMulti eps Low Cut Compressor Limiter Equalizer Noise Suppressor Modulation Enhancer Pitch Shifter Phaser Flanger Tremolo Pan Vibrato Ring Mod Chorus Doubling Delay Delay This a...

Страница 62: ...p Equalizer Noise Suppressor Modulation Enhancer Guitar Sim Slow Gear Sitar Sim Octave Pitch Shifter Phaser Flanger Tremolo Rotary Uni v Vibrato Ring Mod Chorus Doubling Delay Delay MIC fig VOGTAMPMic...

Страница 63: ...zer Noise Suppressor Modulation Enhancer Pitch Shifter Phaser Flanger Tremolo Vibrato Ring Mod Chorus Doubling Delay Delay This algorithm is for use when simultaneously recording a vocal and acoustic...

Страница 64: ...TER mode COMPRESSOR The effect operates as a compressor LIMITER The effect operates as a limiter TYPE COMPRESSOR BOSS COMP Models the BOSS CS 3 compact effects processor HI BAND This is a compressor t...

Страница 65: ...This models a UREI 1178 Parameter Range Explanation LIMITER MULTI BAND This limiter lets you divide the input signal into four separate bands ultra low low high and ultra high frequen cy ranges and a...

Страница 66: ...RIVE 5 0 100 Adjusts the range time over which low level signals are boosted Larger values will result in longer sus tain LEVEL 0 100 Adjusts the volume Parameter Range Explanation WAH Parameter Range...

Страница 67: ...ht charac teristics Parameter Range Explanation BLUES BLUES OD This is a crunch sound of the BOSS BD 2 This produces distortion that faithfully reproduces the nuances of picking CRUNCH A lustrous crun...

Страница 68: ...igh frequency sounds and not to the sounds in the low frequency range DRIVE 0 100 Adjusts the depth of distortion TONE 50 50 Adjusts the tone Parameter Range Explanation E LEVEL Effect Level 0 100 Adj...

Страница 69: ...AMP CRNCH This models a Hughes Kettner Tri amp AMP2 T AMP CLEAN This models a Hughes Kettner Tri amp AMP1 HI GAIN BOSS DRIVE This is a drive sound producing awe some distortion SLDN This models a Sold...

Страница 70: ...s the distance between the microphone and speaker OFF MIC This setting points the microphone away from the speaker ON MIC Provides conditions whereby the micro phone is directed more towards the speak...

Страница 71: ...s controls the clarity and presence of the sound RESPONSE 1 BASS FLAT This controls the overall amp characteris tics Select the position corresponding to the characteristics for one of the two types o...

Страница 72: ...tone HI MID F High Middle Frequency 20 0Hz 10 0kHz Specifies the center of the frequency range that will be adjusted by the HI MID G HI MID Q High Middle Q 0 5 16 Adjusts the width of the area affect...

Страница 73: ...77 CHORUS Chorus p 78 DBL DELAY Doubling Delay p 78 Parameter Range Explanation SENS Sensitivity 0 100 This adjusts the Enhancer sensitivity The more the value is increased the more softly you can pla...

Страница 74: ...tone LOW 50 50 Adjusts the tone for the low frequency range HIGH 50 50 Adjusts the tone for the high frequency range BODY 0 100 Adjusts the way the body sounds when Type is set to SLD HLW SGL ACO or H...

Страница 75: ...el 0 100 Adjust the volume of the sitar sound D LEVEL Direct Level 0 100 Adjust the volume of the direct sound Parameter Range Explanation OCT LEVEL Octave Level 0 100 Adjusts the volume of the sound...

Страница 76: ...effect creating a more unusual sound STEP RATE OFF 0 100 This sets the cycle of the step function that changes the rate and depth When it is set to a higher value the change will be finer Set this to...

Страница 77: ...This parameter adjusts the SPEED SEL of rotation when set to SLOW RATE FAST 0 100 This parameter adjusts the SPEED SEL of rotation when set to FAST RISE TIME 0 100 This parameter adjusts the time it t...

Страница 78: ...output in the R channel RATE 0 100 Adjusts the rate of the chorus effect DEPTH 0 100 Adjusts the depth of the chorus effect To use it for doubling effect set the value to 0 PRE DELAY 0 0ms 40 0ms Adj...

Страница 79: ...l increase the number of the delay repeats Feedback is returning a delay signal to the input HIGH CUT High Cut Filter 700Hz 11kHz FLAT This sets the frequency at which the high cut filter begins to ta...

Страница 80: ...e of acoustic processor BRIGHT This is a bright sound that emphasizes the string resonances WARM This is a warm sound that emphasizes the body resonances BODY 0 100 This adjusts the sound of the body...

Страница 81: ...LE HARMONY Parameter Range Explanation ON OFF OFF ON Turns the DOUBLE HARMONY effect on off PART1TYPE DOUBLE Produces a double tracking effect 1OCT 1OCT If you ve specified the key of your song harmon...

Страница 82: ...VINYL set ting It simulates the wow and flutter that occur when the speed of the turntable is not con stant NOISE 3 0 100 This parameter is used to simulate noise FILTER 3 0 100 This parameter adjust...

Страница 83: ...re s how to adjust the send level of each track to change the depth of the loop effect 1 Press the TRACK button 2 Use the CURSOR buttons to move the cursor to REVERB or CHO DLY and press the ENTER but...

Страница 84: ...ng the reverberation this reverb is used to produce a sense of openness and depth ROOM Simulates the reverberation in a small room Provides warm reverberations HALL 1 Simulates the reverberation in a...

Страница 85: ...ct sound making the final out put sound thicker and broader DELAY This creates a thicker sound by applying a delayed sound to the direct sound RATE 1 0 100 Adjusts the rate of the Chorus effect DEPTH...

Страница 86: ...ot have patches Track EQ settings are saved as part of the song data Parameter List Parameter Range Explanation ON OFF OFF ON Turns the EQUALIZER effect on off LOW GAIN 12 12dB Adjusts the low frequen...

Страница 87: ...87 Using Rhythm BR800_e book 87...

Страница 88: ...peatedly fig 04 onpu eps Pattern Kick drum Snare drum Repeat The preset patterns include patterns for intro verse fill and ending The various types can be distinguished by the characters at the end of...

Страница 89: ...fifty preset arrangements P01 P50 that are suitable for styles such as rock or jazz You can t edit the preset arrangements or rewrite the data The preset arrangements except for Metro 4 4 have a three...

Страница 90: ...of the song Arrangement mode Patterns will switch as the song progresses according to the order of patterns specified in the arrangement 1 Press the RHYTHM button 2 Use the CURSOR buttons to move the...

Страница 91: ...ay D_Rhythm_Pattern eps 1 On your computer you can create your own original patterns using BR 800 Rhythm Editor Using BR 800 Rhythm Editor p 88 6 Press the EXIT button a number of times to return to t...

Страница 92: ...P TEMPO button at the desired timing Press the TAP TEMPO button at least four times in succession the tempo will be set to the timing at which you pressed the button fig 04 290 eps Changing the Tempo...

Страница 93: ...Use the CURSOR buttons and the dial to choose the arrangement that you want to play D_Rhythm_Arrange eps 6 Press the EXIT button a number of times to return to the play screen 7 Press the ZERO button...

Страница 94: ...by pressing the TAP TEMPO button at the desired timing Press the TAP TEMPO button at least four times in succession the tempo will be set to the timing at which you pressed the button fig 04 290 eps C...

Страница 95: ...Turn the dial to select a drum kit 4 Press the EXIT button a number of times to return to the play screen BR 800 Preset Drum Kit 9 Preset Drum Kit 3 Preset Drum Kit 2 Preset Drum Kit 1 Kick Snare Clo...

Страница 96: ...ial to select the step that you want to edit You can move to the previous step by pressing the REW button or to the next step by pressing the FF button Steps You create a song arrangement by specifyin...

Страница 97: ...ile the data is being updated Do not turn off the power while this message is shown 001 005 005 009 013 009 013 Intro 6 measures Verse 2measures 001 007 Set the starting measure to 007 in step 2 Intro...

Страница 98: ...s how to erase the selected step The erased step will inherit the contents of the following step fig 04 570 eps 1 Access the ARRANGE STEP screen as described in steps 1 5 of Creating an Original Arra...

Страница 99: ...sor to ARRNG D_Rhythm_Arrange eps 5 Use the CURSOR buttons and the dial to select a song arrangement S01 05 6 Use the CURSOR buttons to move the cursor to EDIT and press the ENTER button 7 Use the CUR...

Страница 100: ...rangement P01 P50 S01 05 6 Use the CURSOR buttons to move the cursor to EDIT and press ENTER 7 Use the CURSOR buttons to move the cursor to COPY and press the ENTER button The ARRANGE COPY screen will...

Страница 101: ...T and press the ENTER button 5 Use the CURSOR buttons to move the cursor to ERASE and press the ENTER button The ARRANGE ERASE screen will appear D_Arrange_Erase eps 6 Use the dial to select the song...

Страница 102: ...the ENTER button D_Rhythm_Offset eps 3 Use the CURSOR buttons and the dial to specify the desired offset time Range 00 00 00 00 0 23 59 59 29 9 For example if you want the pattern or arrangement to st...

Страница 103: ...103 Editing BR800_e book 103...

Страница 104: ...link and scrub playback will begin The tempo indication area will show either SCRUB FROM or SCRUB TO indicating the scrub point for the current location When the cursor is at the scrub point indicatio...

Страница 105: ...uttons to move the cursor to COPY and press the ENTER button 4 Use the CURSOR buttons and the dial to select the copy source track V track and copy destination track V track D_Track_Copy eps 5 To copy...

Страница 106: ...n 2 Use the CURSOR buttons to move the cursor to TRACK EDIT and press the ENTER button D_Track_Edit_Copy eps 3 Use the CURSOR buttons to move the cursor to SONG SKETCH IMPORT and press the ENTER butto...

Страница 107: ...d press the ENTER button 3 Use the CURSOR buttons to move the cursor to ERASE and press the ENTER button The SONG ERASE screen will appear D_Song_Erase_Select eps 4 Use the CURSOR buttons to select th...

Страница 108: ...ou ve created can be inadvertently recorded over or unintentionally erased To prevent such accidents you can protect the song data from being rewritten Song Protect If Song Protect is enabled the foll...

Страница 109: ...r 4 To save the song press the ENTER button While the data is being updated the display will indicate Keep power on Do not turn off the power while this message is shown 5 Press the EXIT button a numb...

Страница 110: ...MEMO 110 BR800_e book 110...

Страница 111: ...111 Mastering BR800_e book 111...

Страница 112: ...to the maximum in spite of the fact that the actual sound does not appear to be loud This can also make your music sound less powerful By using the mastering effect you can make the volume of your so...

Страница 113: ...ume as far as possible without causing the sound to distort If there are any tracks that you don t want to appear in the mix lower their faders If you want to record the rhythm as part of the mix rais...

Страница 114: ...MASTER FX button The MASTER FX select screen will appear MasteringFX e eps 2 Choose a mastering effect Use the CURSOR buttons and the dial to select preset song user and the desired number 3 Press the...

Страница 115: ...tering Effect Settings Write Parameter List Parameter Value Explanation DYNAMICS 20 20 This adjusts the variation in volume be tween loud and soft passages in the per formance Raising this setting wil...

Страница 116: ...them For details refer to the owner s manual of your software Using BOSS BR Series Wave Converter p 122 Here s how to record your mastered song onto your CD recorder or other device 1 Connect the BR...

Страница 117: ...117 Using USB BR800_e book 117...

Страница 118: ...ROM You should also carefully read the Readme htm file in the folder containing the driver for each operating system The folders and files created on the SD card are in the following structure Do not...

Страница 119: ...the audio output destination to the BR 800 For details on how to switch the output destination refer to the owner s manual for the software you re using Here s how audio data played back by your comp...

Страница 120: ...t the BR 800 to your computer 2 Press the MENU button The MENU screen will appear 3 Use the CURSOR buttons to move the cursor to USB and press the ENTER button The USB screen will appear 4 Use the CUR...

Страница 121: ...ack groups 1 6 in your DAW software To control other tracks use the TAP TEMPO button or MASTER FX button to shift the selected group The following controllers have no function in Control Surface mode...

Страница 122: ...s 4 Use the CURSOR buttons to move the cursor to BACKUP and press the ENTER button The BACKUP screen will appear D_USB_Backup eps Using BOSS BR Series Wave Converter You must install the USB driver be...

Страница 123: ...mputer When copying is completed the Idling screen will reappear To copy a WAV file from your computer to the BR 800 1 Double click the BOSS_BR 800 icon or the removable disk icon the ROLAND folder wi...

Страница 124: ...Use the CURSOR buttons to move the cursor to BACKUP and press the ENTER button The BACKUP screen will appear D_USB_Backup eps 5 Press ENTER The Idling screen will appear D_USB_Idling eps A BOSS_BR 80...

Страница 125: ...n appears press the ENTER button D_USB_Disconnect eps When backing up or recovering you must drag and drop the entire ROLAND folder If you copy only a portion of the folders the data might not be usab...

Страница 126: ...e sent to the PHONES jack and LINE OUT jacks fig block direct_e eps OFF Choose the OFF setting if the audio data is being passed thru your computer If this setting is selected you won t hear the sound...

Страница 127: ...ntrol Surface mode the signal as it is immediately after passing through the REC LEVEL knob will be output MASTER The signal as it is immediately after pass ing through the MASTER fader will be output...

Страница 128: ...MEMO 128 BR800_e book 128...

Страница 129: ...129 Convenient Functions BR800_e book 129...

Страница 130: ...ceed as follows to adjust the display s contrast 1 Press the MENU button 2 Use the CURSOR buttons to move the cursor to SYSTEM and press the ENTER button 3 Use the CURSOR buttons to move the cursor to...

Страница 131: ...expression pedal will function as a volume pedal Here s how to assign the function of the foot switch 1 Press the MENU button 2 Use the CURSOR buttons to move the cursor to SYSTEM and press the ENTER...

Страница 132: ...name and tuning guide fig 06 080 e eps The tuning guide indicates the difference between the input pitch and the displayed note name If the difference between the input and the correct pitch is within...

Страница 133: ...eps 4 Repeat steps 1 3 to tune each string of your instrument When tuning an instrument the reference pitch is conventionally given as the frequency of the A4 note middle A on a piano keyboard You can...

Страница 134: ...tons to move the cursor to SYSTEM and press the ENTER button 3 Use the CURSOR buttons to move the cursor to LINE IN MIX and use the dial to turn the setting ON D_System_LineMix eps 4 Press the EXIT bu...

Страница 135: ...move the cursor to PHONES and use the dial to adjust the headphone volume 5 Press the EXIT button a number of times to return to the play screen 1 Press the MENU button 2 Use the CURSOR buttons to mo...

Страница 136: ...record the phrase that you want to practice 2 Press the MENU button 3 Use the CURSOR buttons to move the cursor to PHRASE TRAINER and press the ENTER button 4 Use the CURSOR buttons to move the curso...

Страница 137: ...ou want to boost the sound of the bass proceed as follows 4 If you want to boost the sound of the bass use the CURSOR buttons to move the cursor to LOW BOOST and use the dial to adjust the sound of th...

Страница 138: ...elected song will be initialized 4 Press the ENTER button The message Are you sure will ask you for confirmation D_FactoryReset_Sure eps 5 Press the ENTER button if you want to execute the Factory Res...

Страница 139: ...and a new song will be automatically created When the song has been created you will return to the play screen When you format a card the entire contents of that card will be lost Be sure to back up...

Страница 140: ...button 3 Use the CURSOR buttons to move the cursor to INFORMATION and press the ENTER button D_SD_Info2 eps The SD card s usage status will be displayed 4 Press the EXIT button a number of times to re...

Страница 141: ...hown in the display D_PowerSave eps 1 Press the MENU button 2 Use the CURSOR buttons to move the cursor to SYSTEM and press the ENTER button 3 Use the CURSOR buttons to move the cursor to POWER SAVE a...

Страница 142: ...our microphone refer to the owner s manual for the microphone you re using The BR 800 s phantom power supply is DC 48V 10mA Max Before turning the phantom power on off you must make sure that the BR 8...

Страница 143: ...creen appears The SW SENSITIVITY screen for adjusting the sensitivity of the touch sensors will appear 5 Using the dial adjust the sensitivity Range 1 10 When the instrument is shipped from the factor...

Страница 144: ...MEMO 144 BR800_e book 144...

Страница 145: ...145 Appendixes BR800_e book 145...

Страница 146: ...m the card cover on the bottom panel fig CardSlot01 eps 3 Pull out the card cover in the direction shown by the arrow in the illustration below fig CardSlot02 eps SD card capacity Recording time Norma...

Страница 147: ...f the SD card to the LOCK position Unlock write protect to delete data on the SD card fig SD_SW e eps When turning the unit upside down get a bunch of newspapers or magazines and place them under the...

Страница 148: ...oPickBs 71 4BandLMT 72 TWahFUNK 73 Fltr Slp 74 Chrs Slp 75 OctGroov 76 FRETLESS 77 DRIVE810 78 Vntg Drv 79 METAL 80 EARTHQAK BANK MICROPHONE VOCAL MULTI 1 ROCK 2 POP 3 VOI PERC 4 DOUBLE 5 TRIPLE 6 6 V...

Страница 149: ...struments INPUT2 for any instruments INPUT3 for any instruments INPUT4 for any instruments 3 Drums INPUT1 Kick Mic INPUT2 Snare Mic INPUT3 Top L Mic INPUT4 Top R Mic 4 RockBand INPUT1 Guitar Amp Mic I...

Страница 150: ...140 4 4 1 3 6 7 10 11 13 16 18 ROOM P22 POP6 96 4 4 1 3 6 7 10 11 13 15 18 STD 1 P23 POP7 66 4 4 1 4 7 8 11 12 14 16 19 STD 2 P24 POP8 151 4 4 1 5 8 9 16 17 21 24 27 STD 1 P25 BALLAD1 70 4 4 1 5 8 9...

Страница 151: ...2 1 1 POP1 118 4 4 2 2 1 2 1 4 POP2 118 4 4 2 2 1 2 1 2 POP3 118 4 4 2 2 1 2 1 2 POP4 118 4 4 2 1 1 1 1 4 POP5 140 4 4 2 1 1 1 1 3 POP6 96 4 4 2 2 1 2 1 2 POP7 66 4 4 3 2 1 2 1 2 POP8 151 4 4 4 2 1 2...

Страница 152: ...a hub that contains a power supply Problems with the Sound Item Explanation Page No sound Is power to the BR 800 and any connected equipment turned on p 34 Could the PHONES LEVEL be set to 0 p 135 Ar...

Страница 153: ...e If there is noise or distortion following mastering the track output levels are too high Could a microphone with high output impedance be connected directly to the BR 800 Since the INPUT 1 4 jacks a...

Страница 154: ...ing gloves Could you be operating the buttons with an object other than your finger such as a pen Could there be droplets of water on the BR 800 Turn off the power wipe off the water droplets and turn...

Страница 155: ...s p 96 The song arrangement exceeded 999 measures A song arrangement cannot have more than 999 measures p 96 Cannot undo redo Undo Redo is not possible when there is no editing history Perform undo re...

Страница 156: ...ll appear No card You performed a recorder or SD card operation when no SD card was in serted or the card was incompletely inserted Turn off the power firmly reinsert the SD card and then turn the pow...

Страница 157: ...gs You attempted to create more than 100 songs Delete unneeded songs p 107 Unformatted card The SD card is of a type that cannot be used on the BR 800 Turn off the power firmly reinsert the SD card an...

Страница 158: ...edance LINE OUT jacks 1 k ohm Recommended Load Impedance LINE OUT jacks 20 k ohms or greater PHONES jack 32 100 ohms Residual Noise Level LINE OUT jacks 85 dBu or less IHF A Typ Display 128 x 64 dots...

Страница 159: ...11 D DBL DELAY 73 78 DC IN 18 DEFRETTER 73 74 DELAY 79 Display 15 130 DISTORTION 67 DOUBLE HARMONY 81 Drum kit 95 DYNAMICS 80 E E GUITAR MULTI 59 Effect Insert effect 54 83 Loop effect 83 Mastering ef...

Страница 160: ...73 77 Ring Modulator 73 77 ROTARY 73 77 S Saving Insert effect 57 Mastering effect 115 Song 109 SCRUB 104 SD CARD FORMAT 139 INFORMATION 140 SD card 18 146 Sitar 75 SITAR SIM 73 75 Sitar Simulator 73...

Страница 161: ...161 fig 15_WEEE_Small eps fig 16_ChineseRoHS eps For EU Countries For China BR800_e book 161...

Страница 162: ...e determined by turning the equipment off and on the user is encouraged to try to correct the interference by one or more of the following measures Reorient or relocate the receiving antenna Increase...

Страница 163: ...811 CROATIA ART CENTAR Degenova 3 HR 10000 Zagreb CROATIA TEL 1 466 8493 CZECH REP CZECH REPUBLIC DISTRIBUTOR s r o Voct rova 247 16 180 00 Praha 8 CZECH REP TEL 2 830 20270 DENMARK Roland Scandinavia...

Страница 164: ......

Отзывы: