


11
Bosch Security Systems 12/14 BLCC610U
Solution 6000 User Guide
[2] [5] [8] [0] + [#]
= Log ON
[2] + [6] + [#] + [2]
= Turn Output 6 OFF
i
Note
If the DTMF Quick Arm option is enabled then it is possible
to remotely turn on all areas without logging onto the
panel. Simply enter [0] + [#] following the welcome jingle.
Make sure that the telephone being used to
remotely control the panel is set to transmit DTMF
tones when keys are pressed during the call. This
option is disabled by default on some telephones.
Programming Text Using The Keypad
When programming text via the keypad, various keys on
the keypad operate differently.
A group of characters is assigned to each of the numeric
keys on the keypad. Pressing the same numeric key again
will toggle to the next character assigned to the key (eg.
Press the [2] key will display the ‘A’ character, press the [2]
key again will toggle to the ‘B’ character, press the [2] key
again will toggle to the ‘C’ character etc).
Once the correct character is display use the arrow keys to
move to the next letter of the word you are entering. The
key assignments are identical to those found on most fixed
and mobile phones.
When programming text, each numeric key represents a
different group of characters.
Pressing the same numeric key repeatedly will step you
through the available characters assigned to the key. The
text key layout is the same as most phones. Refer to the
table below for detailed character information.
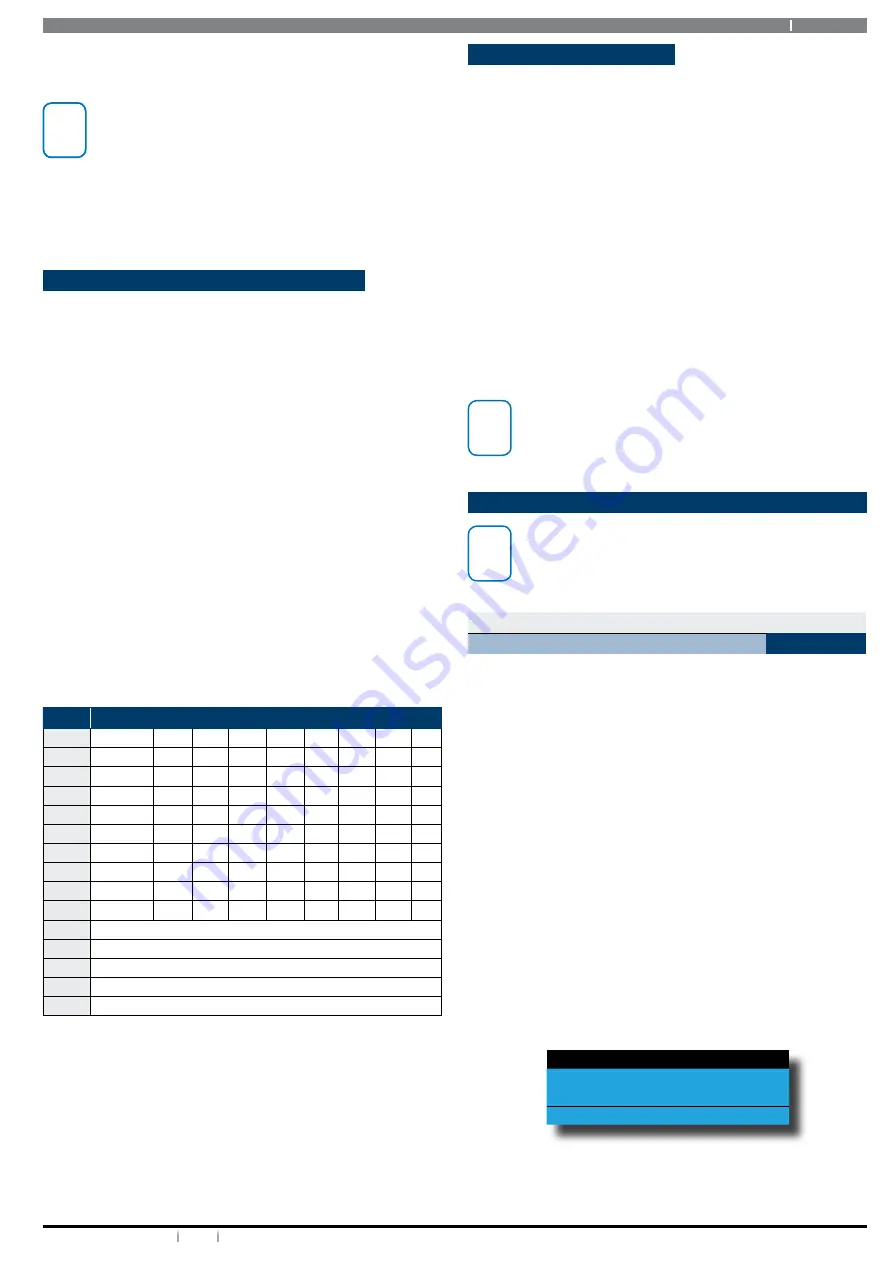
Refer to the following table for more information.
Key
Characters Assigned To Each Numeric Key
1
.
,
?
!
-
&
`
1
2
A
B
C
a
b
c
2
3
D
E
F
d
e
f
3
4
G
H
I
g
h
i
4
5
J
K
L
j
k
l
5
6
M
N
O
m
n
o
6
7
P
Q
R
S
p
q
r
s
7
8
T
U
V
t
u
v
8
9
W
X
Y
Z
w
x
y
z
9
0
SPACE
0
Scroll Up through entire character list
Scroll Down through entire character list
Move to left one character position
Move to right one character position
OFF Clear from cursor postiion to end of line
Table 6: Text Keypad Character Set
Once the desired character is displayed press the right [
]
arrow key to move to the next character position. To save
programming changes, press [OK], or press [MENU] to exit
without saving.
The following additional special characters are available
by scrolling using the up and down arrow keys.
+ - @ # $ “ & % * : ( ) / < > =
Duress or Silent Alarms
A Duress or Silent Panic alarm can be easily triggered via
the keypad if you are being forced to operate the system
against your will.
To trigger a duress, enter your normal user PIN followed by
the last 2 digits of your user PIN followed by the ON or OFF
key. See the following examples.
1. If your PIN is 2580, to send a duress report when the
area is off, Enter, [2] + [5] + [8] + [0] + [8] + [0] + [OK]
or [ON].
2. If your PIN is 2580, to send a duress report when
the area is on, Enter, [2] + [5] + [8] + [0] + [8] + [0] +
[OFF].
i
Note
Duress alarms are triggered by entering the user PIN
followed by the last 2 digits of the user PIN followed
by the ON or OFF key.
System Programming
i
Note
Some of the examples shown in the following section
assume that you are already in programming
mode. To enter programming mode simply enter
your PIN and press the MENU key on the keypad.
Access > Commands >
Erase User
MENU 1-0-0
This menu allows the installer or master user, to erase
another user. When a user is erased, it will return back to
factory default all information relating to the following:
PIN
Token ID
RF Keyfob ID
Fingerprint ID
Name
TimeZone Access
Door Assignment
Area Assignment
Enter [MENU] + [1] + [0] + [0].
1. Use the arrow keys to highlight the user to be erased
then press [OK].
Ur1 John Smith
Ur2 Debbie Smith
Ur3 User 3 Name
Press
OK or MENU
2. Verify the user name to be erased and press [OK].
To abort press [MENU].


