background image

en 

Hob-based hood control

8

7.14 Resetting the saturation indicator

After cleaning the grease filter or after changing the
odour filter, the saturation indicator can be reset.

Requirements

¡

After the appliance has been switched off, LED 1
flashes in the LED display for the grease filter satura-
tion display and/or LED 2 flashes for the saturation
indicator for the odour filter.

¡

A repeated signal tone sounds.

Press  .

a

The saturation indicator is reset.

7.15 Switching on the lighting

Press   to switch on the lighting.

Note: 

Colour temperature settings are available in the

Home Connect app provided the appliance has this
function.

7.16 Setting the brightness

Press and hold   or  ⁠.

Note: 

Colour temperature settings are available in the

Home Connect app provided the appliance has this
function.

7.17 Switching on the button tone

The button tones can be switched on.

Requirement:

 The appliance is switched off.

1.

Press and hold   and   for approx. three seconds.

a

In the LED display, the LED for the setting that is
currently selected lights up.

2.

Press   or   until LED 1 lights up in the LED dis-
play.
To cancel the setting, press  ⁠.

3.

To save the setting, press and hold   and   for ap-
prox. three seconds.
Or wait approx. 10 seconds until the setting is
saved automatically.

a

A signal tone sounds as soon as the selected set-
ting is saved.

7.18 Switching the button tone off

The button tones can be switched off.

Note: 

Signal tones for the appliance are always

switched on and cannot be switched off.

Requirement:

 The appliance is switched off.

1.

Press and hold   and   for approx. three seconds.

a

In the LED display, the LED for the setting that is
currently selected lights up.

2.

Press   or   until LED 2 lights up in the LED dis-
play.
To cancel the setting, press  ⁠.

3.

To save the setting, press and hold   and   for ap-
prox. three seconds.
Or wait approx. 10 seconds until the setting is
saved automatically.

a

A signal tone sounds as soon as the selected set-
ting is saved.

8  Hob-based hood control

You can connect your appliance to a suitable hob and,
in this way, control the functions of your appliance via
the hob.
You have the following options for connecting the
appliances with each other:

¡

Connecting the appliance via the Home Connect
app. If both appliances are Home Connect-compat-
ible, they can be connected using the Home Con-
nect app. Follow the instructions in the app.

¡

Connecting appliances directly with each other.

¡

Connecting appliances via the Wi-Fi home network.

Note: 

Please note the safety precautions in the instruc-

tion manual for your appliance and ensure that they are
also observed when operating the appliance via the
hob-based hood control.

Tip: 

Operating your appliance always takes priority. It is

not possible to use the hood controls on the hob dur-
ing this time.

8.1 Connecting directly

Requirements

¡

Your appliance is now switched off.

¡

Before connecting the appliances, reset all connec-
tions to your home network or other appliances. If
your appliance is connected directly to the hob, it
cannot be connected to your home network as well
and you will not be able to use Home Connect.

1. Note: 

Refer to the section entitled "Hob-based hood

control" in the instruction manual for your hob.
Switch on the hob and select the search mode.

2.

Press and hold the 

 button until the LED for

Home Connect flashes in the LED display.

a

The appliance is connected to the hob if the LED for
Home Connect no longer flashes and lights up per-
manently.

8.2 Connecting via your home network

1.

Follow the instructions in 

→ 

"Automatically connecting the appliance to the

WLAN home network (Wi-Fi)", Page 9

 or 

→ 

"Manually connecting the appliance to the WLAN

home network (Wi-Fi)", Page 9

.

2.

As soon as the appliance is connected to the home
network, establish the connection to the hob via the
Home Connect app.

3.

Follow the instructions on your mobile device.

Содержание I94CAQ6N0B

Страница 1: ...Ceiling mounted ventilation system en User manual and installation instructions I94CAQ6N0B ...

Страница 2: ...ial installation instructions The appliance can only be used safely if it is correctly installed according to the safety in structions The installer is responsible for en suring that the appliance works perfectly at its installation location Only use this appliance For extracting cooking vapour In private households and in enclosed spaces in a domestic environment Up to an altitude of max 2000 m a...

Страница 3: ...vely in air recir culation mode WARNING Risk of fire Fatty deposits in the grease filters may catch fire Never operate the appliance without a grease filter Clean the grease filters regularly Never work with naked flames close to the appliance e g flambéing Do not install the appliance near a solid fuel heating appliance e g wood or coal burning unless the heating appliance has a sealed non remova...

Страница 4: ...ice Page 14 Repairs to the appliance should only be carried out by trained specialist staff Improper repairs are dangerous Repairs to the appliance should only be carried out by trained specialist staff Only use genuine spare parts when repair ing the appliance If the power cord of this appliance is dam aged it must be replaced by trained spe cialist staff An ingress of moisture can cause an elect...

Страница 5: ...quired If cooking produces large amounts of steam select a higher fan speed in good time The odours are distributed around the room less Switch the appliance off when you are not using it The appliance does not consume any energy Switch off the lighting if you no longer require it The lighting does not consume any energy Clean or replace the filters at regular intervals The effectiveness of the fi...

Страница 6: ...efore using for the first time Configure the settings for initial start up Clean the ap pliance and accessories 6 1 Setting an operating mode Your appliance is set to air extraction mode by default To use it in circulating air mode you must set the oper ating mode Note For use in circulating air mode you require addi tional Accessories Requirement The appliance is switched off 1 Press and hold and...

Страница 7: ...th the Home Connect app If the interval ventilation is switched on LED 6 continu ously flashes in the LED display for the interval ventila tion and the LED for the selected fan setting lights up As soon as the ventilation time ends the LED for the fan setting you have selected goes out LED 6 contin ues to flash 7 11 Sensor control1 In automatic mode a sensor in the appliance detects the intensity ...

Страница 8: ...ait approx 10 seconds until the setting is saved automatically a A signal tone sounds as soon as the selected set ting is saved 8 Hob based hood control You can connect your appliance to a suitable hob and in this way control the functions of your appliance via the hob You have the following options for connecting the appliances with each other Connecting the appliance via the Home Connect app If ...

Страница 9: ...Wi Fi on the router is activated The appliance receives signals from the WLAN home network Wi Fi at its installation location The Home Connect app is installed on your mobile device The appliance and the light are switched off 1 Press and hold the button until LED 7 flashes in the LED display 2 Press a LED 1 and LED 7 flash in the LED display 3 Press the WPS button on the router within the next 2 ...

Страница 10: ...nnect server initial registration Unique appliance identification consisting of appli ance codes as well as the MAC address of the Wi Fi communication module installed Security certificate of the Wi Fi communication mod ule to ensure a secure data connection The current software and hardware version of your appliance Status of any previous reset to factory settings This initial registration prepar...

Страница 11: ...rfaces in the direction of the finish using a sponge cloth and hot soapy water Clean painted surfaces using a damp sponge cloth and hot soapy water Clean aluminium using a soft cloth and glass cleaner Clean plastic using a soft cloth and glass cleaner Clean glass using a soft cloth and glass cleaner 3 Dry with a soft cloth 4 Apply a thin layer of the stainless steel cleaning product to stainless s...

Страница 12: ...The grease filters filter the grease from the cooking va pour Regularly cleaned grease filters guarantee a high level of grease removal WARNING Risk of fire Fatty deposits in the grease filters may catch fire Clean the grease filters regularly Requirement The grease filters have been removed Removing the grease filter Page 11 1 Observe the information regarding the cleaning agents Cleaning product...

Страница 13: ...t staff 11 1 Malfunctions Fault Cause and troubleshooting The appliance is not working The mains plug of the power cord is not plugged in Connect the appliance to the power supply The circuit breaker is faulty Check the circuit breaker in the fuse box There has been a power cut Check whether the lighting in your kitchen or other appliances are working The lighting does not work Different causes ar...

Страница 14: ...plate can be found Inside the appliance remove grease filters for ac cess On top of the appliance Make a note of your appliance s details and the Cus tomer Service telephone number to find them again quickly 13 Accessories Only use original accessories These have been made especially for your appliance Here you can find an overview of your appliance s accessories and how to use them Accessories Or...

Страница 15: ...ed on air is extracted from the kitchen and the adjacent rooms Without an adequate supply of air the air pressure falls below atmospheric pressure Toxic gases from the flue or the extraction shaft are sucked back into the living space Always ensure adequate fresh air in the room if the appliance is being operated in exhaust air mode at the same time as a room air dependent heat produ cing applianc...

Страница 16: ...ance may damage the connecting cable Do not kink or trap the connecting cable If the appliance or the power cord is damaged this is dangerous Never operate a damaged appliance Never pull on the power cord to unplug the appli ance Always unplug the appliance at the mains If the appliance or the power cord is damaged im mediately unplug the power cord or switch off the fuse in the fuse box Call Cust...

Страница 17: ... must be integrated into the permanent electrical in stallation according to the conditions of overvoltage category III and according to the installation regula tions The permanent electrical installation must only be wired by a professional electrician We recommend installing a residual current circuit breaker RCCB in the appliance s power supply circuit Sharp edged components inside the applianc...

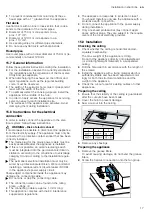
Страница 18: ...gage 2 Carefully screw in diagonally opposite screws 5 Tighten the screws one at a time so that the appli ance is not wedged in the cut out 3 Note To ensure that the appliance is not damaged do not overtighten the screws Carefully tighten screws in succession until the ap pliance is flush mounted on the ceiling Connecting the appliance 1 Undo the screws on the top frame assembly using a screwdrive...

Страница 19: ...ack 2 Insert the extension cable 3 Hook the cable into the cable guides 1 and 2 Turning the air outlet to the front 1 Starting with the delivery condition turn the fan box anti clockwise so that the air outlet is pointing to the front 2 Undo the screw on the metal hook 20 3 Pull the cable through behind the metal hook and hook it in the cable guides 4 Store the remaining cable in the gap 5 Tighten...

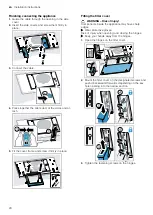
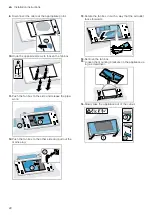
Страница 20: ... frame and screw it firmly in place Fitting the filter cover WARNING Risk of injury Components inside the appliance may have sharp edges Wear protective gloves Risk of injury when opening and closing the hinges Keep your hands away from the hinges 1 Open the hinges on the filter cover 25 2 Mount the filter cover on the designated screws and push it backwards forwards depending on the key hole open...

Страница 21: ...harp edges Wear protective gloves Risk of injury when opening and closing the hinges Keep your hands away from the hinges 1 Disconnect the appliance from the power supply 2 Remove the grease filters To avoid causing damage do not bend the grease filters 3 Open the cable duct on the filter cover and loosen the cable 4 Undo the screws on the hinges up to approx 7 mm Do not loosen the screws fully 5 ...

Страница 22: ...0 11 Push the fan box to the side and release the pipe work 12 Push the fan box to the other side and pull out the mains plug 13 Rotate the fan box in such a way that the air outlet faces forwards 14 Remove the fan box 15 Loosen the mounting brackets on the appliance us ing a screwdriver 16 Slowly take the appliance out of the cutout ...

Страница 23: ......

Страница 24: ...l Wery Straße 34 81739 München GERMANY 9001482617 9001482617 010120 en Valid within Great Britain Imported to Great Britain by BSH Home Appliances Ltd Grand Union House Old Wolverton Road Wolverton Milton Keynes MK12 5PT United Kingdom ...

Отзывы: