background image

18

Care and cleaning

With attentive care and cleaning, your hob and oven will retain 

its looks and remain in good working order for a long time. We 

will explain here how you should care for and clean them 

correctly.

Notes

Slight differences in the colours on the front of the oven are 

caused by the use of different materials, such as glass, 

plastic and metal.

Shadows on the door panel which look like streaks, are 

caused by reflections made by the oven light.

Enamel is baked on at very high temperatures. This can 

cause some slight colour variations. This is normal and does 

not affect operation. The edges of thin trays cannot be 

completely enamelled. As a result, these edges can be 

rough. This will not impair the anti-corrosion protection.

Risk of electric shock!

Do not use any high-pressure cleaners or steam cleaners, 
which can result in an electric shock.

Risk of burns!

The appliance becomes very hot. Never touch the interior 
surfaces of the cooking compartment or the heating elements. 
Always allow the appliance to cool down. Keep children at a 
safe distance.

Cleaning agents

Damage to the various different surfaces caused by using the 

wrong cleaning agent can be avoided by observing the 

following instructions.

When cleaning the hob do not use

undiluted washing-up liquid or dishwasher detergent,

scouring pads,

abrasive cleaning agents such as oven cleaner or stain 

remover,

high-pressure cleaners or steam jets.

Do not clean individual parts in the dishwasher.

When cleaning the oven do not use

sharp or abrasive cleaning agents,

cleaning agent with a high alcohol content,

scouring pads,

high-pressure cleaners or steam jets.

Do not clean individual parts in the dishwasher.

Wash new sponges thoroughly before first use.

Zone

Cleaning agent

Stainless steel sur-

faces*
(depending on 

appliance model)

Hot soapy water: 

Clean with a dish cloth and dry with a 

soft cloth. On stainless steel surfaces, 

always wipe parallel to the natural grain. 

Otherwise, you may scratch the surface. 

Remove patches and splashes of limes-

cale, grease, starch and albumin (e.g. 

egg white) immediately. Corrosion can 

form under such patches and splashes.
Special care products suitable for hot 

stainless steel surfaces are available 

from our after-sales service and from 

specialist retailers. Apply a thin layer of 

care product with a soft cloth.

* Optional (available for some appliances, depending on the 

appliance model)

Enamel, painted, 

plastic and screen-

printed surfaces*
(depending on 

appliance model)

Hot soapy water: 

Clean with a dish cloth and dry with a 

soft cloth. Do not use glass cleaner or 

glass scrapers for cleaning.

Control panel

Hot soapy water: 

Clean with a dish cloth and dry with a 

soft cloth. Do not use glass cleaner or 

glass scrapers for cleaning.

Upper glass cover*
(depending on 

appliance model)

Glass cleaner:  

Clean with a soft cloth.  

You can remove the upper glass cover 

for cleaning. To find out how to do this, 

please refer to the section 

Upper glass 

cover

.

Rotary knobs 

Do not remove.

Hot soapy water: 

Clean with a dish cloth and dry with a 

soft cloth. 

Hob surround

Hot soapy water: 

Do not clean with a glass scraper, lemon 

juice or vinegar.

Gas hob and pan 

supports*
(depending on 

appliance model)

Hot soapy water. 

Use very little water. Water must not be 

allowed to enter the appliance through 

the base of the burners. 

Clean off boiled-over liquids and spilt 

food immediately. 

You can remove the pan supports.
Cast iron pan supports*: 

Do not clean in the dishwasher.

Gas burners*
(depending on 

appliance model)

Remove the burner head and cap and 

clean with hot soapy water.  

Do not clean in the dishwasher. 

The gas outlet openings must remain 

unobstructed at all times.  

Ignition plugs: Small, soft brush.  

The gas burners only work properly when 

the ignition plugs are dry. Dry all parts 

thoroughly. Ensure that they are refitted 

correctly.  

The burner caps are coated in black 

enamel. The colour may change over 

time. This does not impair their perfor-

mance.

Electric hotplate*
(depending on 

appliance model)

Abrasive materials or sponges: 

Briefly heat up the hotplate afterwards, 

so that it dries. Hotplates can rust over 

time if they remain wet. Apply care prod-

uct to finish.  

Clean off boiled-over liquids and spilt 

food immediately.

Hotplate ring*
(depending on 

appliance model)

Remove yellow to blue iridescent discol-

ouration from the hotplate ring with a 

steel care product.  

Do not use any abrasive materials that 

may scratch surfaces.

Zone

Cleaning agent

* Optional (available for some appliances, depending on the 

appliance model)

Содержание HGK90VQ5.M

Страница 1: ...Free standing cooker HGK90VQ5 M ...

Страница 2: ......

Страница 3: ...hob 10 Environmentally friendly disposal 10 Your new appliance 11 The control panel 11 The electronic clock 12 The hob 12 Oven 13 The cooking compartment 13 The storage compartment 13 Accessories 14 Before using for the first time 14 Baking out the oven 14 Cleaning the burner caps and cups 14 Cleaning the accessories 14 Operating the appliance 15 Hob 15 Oven 15 Using combi mode 16 Rotary spit 16 T...

Страница 4: ...additional ventilation for example opening of a window or more effective ventilation for example increasing the level of mechanical ventilation where present This appliance is not designed for operation with an external timer or by remote control Do not use inappropriate child safety shields or hob guards These can cause accidents This appliance may be used by children over the age of 8 years old ...

Страница 5: ... prepare food containing large quantities of drinks with a high alcohol content Only use small quantities of drinks with a high alcohol content Open the appliance door with care Risk of burns The hotplates and surrounding area particularly the hob surround if fitted become very hot Never touch the hot surfaces Keep children at a safe distance Risk of burns During operation the surfaces of the appl...

Страница 6: ...allation Risk of electric shock Incorrect repairs are dangerous Repairs may only be carried out by one of our trained after sales engineers If the appliance is faulty unplug the mains plug or switch off the fuse in the fuse box Contact the after sales service Risk of electric shock and serious injury The cable insulation on electrical appliances may melt when touching hot parts of the appliance Ne...

Страница 7: ...partment to cool when it is closed Even if the appliance door is only open a little front panels of adjacent units could be damaged over time Very dirty door seal If the door seal is very dirty the appliance door will no longer close properly when the appliance is in use The fronts of adjacent units could be damaged Always keep the door seal clean Appliance door as a seat shelf or worktop Do not s...

Страница 8: ...tenance work The ground underneath must be hard and firm The wall immediately behind the appliance must be made from non flammable material e g tiles If you need to move the appliance in order to position it make sure that the adjustable feet are fully screwed in Aligning the appliance Turn the adjustable feet to align the appliance Note Do not align the appliance until all other work has been com...

Страница 9: ...e appropriate room and the appliance Ensure unhindered access to this valve Checking for leaks After connecting the gas line check the connections for leaks using soapy water Initial use Switch the appliance on as described in the instructions for use Light all the burners and check that the flames remain stable at both the high and low settings Faults in the gas installation smell of gas If you n...

Страница 10: ...rces Energy and environment tips Here you can find tips on how to save energy when baking and roasting in the oven and when cooking on the hob and how to dispose of your appliance properly Saving energy Only preheat the oven if this is specified in the recipe or in the tables in the instruction manual Use dark black lacquered or enamelled baking tins because they absorb heat particularly well Open...

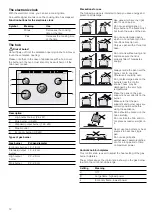
Страница 11: ...es Depending on the appliance model individual details may differ The control panel Explanation 1 Hob cover 2 Hob 3 Control panel 4 Oven 5 Storage compartment Description 1 Fan button 2 Control knob for the oven gas grill 3 Control knob for the oven 4 Control knob for the oven light and rotisserie spit 5 Electronic clock 6 Control knob for the gas hotplates ...

Страница 12: ...urner 0 9 kW Gas burner Pot pan diameter Economy burner 12 18 cm Standard output burner 14 22 cm High output burner 22 26 cm Wok burner 22 26 cm Use pans which are the right size for each burner Do not use small pans on large burners The flame must not touch the sides of the pan Do not use damaged pans which do not sit evenly on the hob Pans may tip over Only use pans with a thick flat base Do not...

Страница 13: ...ature that has been set The cooking compartment The oven light is located in the cooking compartment Steam outlet The hot air from the cooking compartment escapes at the rear of the hob Caution do not cover the ventilation slots Otherwise the oven will overheat Cooling fan The hot air escapes via the ventilation opening This cooling fan switches on and off as required Caution Do not cover the vent...

Страница 14: ...racks from the cooking compartment 2 Fully remove any remaining packaging such as small pieces of polystyrene from the cooking compartment 3 Some parts are covered with a protective film Remove the protective film 4 Clean the outside of the appliance with a soft damp cloth 5 Clean the cooking compartment with hot soapy water Heating up the oven To remove the new cooker smell heat up the oven when ...

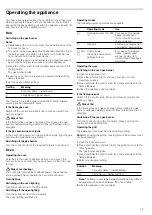
Страница 15: ...power Oven lighting Switching on the oven lighting Turn the control knob to the position Switching off the oven lighting Turn the control knob to the Û position The oven lighting switches off Operating modes The following operating modes are available Operating the oven Switching on the oven gas burner 1 Open the appliance door 2 Press the control knob for the oven and turn it to the maximum posit...

Страница 16: ... and slide the baking try in Notes If the gas burner does not ignite within 15 seconds stop attempting to ignite the flame open the appliance door and wait for 60 seconds If the flame inadvertently goes out turn the control knob to the Û position and wait for 60 seconds Switching on the grill To achieve an extra gold top on certain dishes the grill can be switched on briefly at the end of the cook...

Страница 17: ...er a power cut 12 00 will flash in the display The current time must be set in order for the oven to be switched on 1 Press the and buttons at the same time The settings can be configured once the Ú symbol starts flashing in the display 2 Use the and buttons to set the current time If the buttons are not pressed for a long time the symbols will stop flashing and the display will show the set time ...

Страница 18: ...cts suitable for hot stainless steel surfaces are available from our after sales service and from specialist retailers Apply a thin layer of care product with a soft cloth Optional available for some appliances depending on the appliance model Enamel painted plastic and screen printed surfaces depending on appliance model Hot soapy water Clean with a dish cloth and dry with a soft cloth Do not use...

Страница 19: ...clean self cleaning surfaces To find out how to do this please refer to the section Self cleaning Caution Never use oven cleaner on self cleaning surfaces Glass cover for the oven light Hot soapy water Clean with a dish cloth Zone Cleaning agent Optional available for some appliances depending on the appliance model Shelf Hot soapy water Clean with a dish cloth or a brush You can remove the shelve...

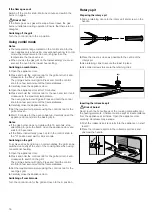
Страница 20: ...2 Then pull the rail upwards and remove it figure B Clean the rails with washing up liquid and a sponge Use a brush to remove stubborn dirt deposits Hooking in the rails 1 Place the two hooks at the top of the rail into the upper holes 2 Both hooks must be inserted fully into the upper holes Now move the rail down slowly and carefully and hook it into the lower holes 3 Hook both rails into the sid...

Страница 21: ...ssible cause Remedy information The appliance is not working The circuit breaker is faulty Look in the fuse box and check that the circuit breaker is in working order Power cut Check whether the kitchen light works The oven light has failed Faulty oven light Change the oven light bulb See section Replacing the oven light The gas burner will not ignite Power cut or damp ignition plugs Light the gas...

Страница 22: ...or the oven light bulb back on 7 Remove the tea towel and switch the circuit breaker back on or plug the mains plug in again 8 Switch on the oven light and check that it is working correctly After sales service Our after sales service is there for you if your appliance needs to be repaired We will always find the right solution in order to avoid unnecessary visits from a service technician E numbe...

Страница 23: ......

Страница 24: ...01 191096 9001249154 9001249154 Robert Bosch Hausgeräte GmbH Carl Wery Straße 34 81739 München Germany www bosch home com ...

Отзывы: