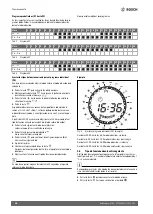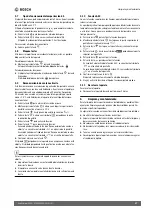
background image

Datos sobre el producto

33

Heat Radiator 4500 – 6720883002 (2019/10)

1.2

Indicaciones generales de seguridad

H

Indicaciones de seguridad generales

La inobservancia de las indicaciones de seguridad 
puede provocar daños personales graves, incluso la 
muerte, así como daños materiales y medioambienta-
les.

▶ La instalación, la puesta en marcha, así como el 

mantenimiento y la conservación solo deben lle-
varse a cabo por una empresa especializada en 
calefacciones autorizada.

▶ Leer las instrucciones atentamente.
▶ Realizar únicamente los trabajos descritos para el 

grupo de usuarios (usuario, técnicos). La realiza-
ción de otras tareas puede causar fallos de funcio-
namiento, así como daños materiales y personales.

▶ Realizar la limpieza y el mantenimiento al menos 

una vez al año. Comprobar si toda la instalación fun-
ciona de manera correcta. 

▶ Reparar de inmediato los defectos encontrados.

H

Seguridad de aparatos eléctricos para el uso 
doméstico y fines similares

Para evitar peligros en aparatos eléctricos son válidas 
las siguientes normas, según EN 60335-1:

“Este aparato puede ser utilizado por niños a partir de 
8 años y por personas con capacidades físicas, senso-
riales o mentales mermadas o que carezcan de expe-
riencia y conocimiento, siempre y cuando estén bajo 
la supervisión de otra personas o hayan sido instrui-
das sobre el manejo seguro del aparato y comprendan 
los peligros que de él pueden derivarse. Los niños no 
deben jugar con el aparato. Los niños sin supervisión 
no deben llevar a cabo la limpieza ni el mantenimiento 
de usuario.”

“Si el cable de conexión a red sufre daños, tendrá que 
ser sustituido por el fabricante, su servicio técnico u 
otra persona igualmente cualificada para evitar peli-
gros.”

H

Peligro de muerte por corriente eléctrica

▶ Los trabajos en instalaciones eléctricas deberán 

realizarse según las disposiciones legales vigentes.

▶ La instalación, la puesta en marcha y el manteni-

miento solo deben llevarse a cabo por un servicio 
técnico autorizado.

▶ No abrir el aparato.
▶ No activar o utilizar el aparato si el regulador o las 

conexiones están averiados.

2

Datos sobre el producto

Las presentes instrucciones contienen información importante para el 
usuario de la instalación para el manejo seguro del radiador.

▶ Observe las instrucciones del aparato de regulación.

2.1

Declaración de conformidad

La construcción y el funcionamiento de este producto cum-
plen con las directivas europeas, así como con los requisitos 
complementarios nacionales. La conformidad se ha pro-

bado con la marca CE .

Puede solicitar la declaración de conformidad del producto. Para ello, 
diríjase a la dirección que se encuentra en la página posterior de estas 
instrucciones.

2.2

Glosario

El radiador eléctrico de baño Heat Radiator 4500 se designará en este 
documento como Radiador o Aparato. 

2.3

Uso conforme al empleo previsto

El radiador ha sido concebido para el uso en habitaciones.

▶ Cumplir con las condiciones de conexión según lo indicado en los 

datos técnicos y en las normas y prescripciones locales.

▶ No incluir el aparato en sistemas de calefacción.

Cualquier otro uso se considera inapropiado. La empresa no asume nin-
guna responsabilidad por los daños causados por el uso inapropiado del 
radiador.

2.4

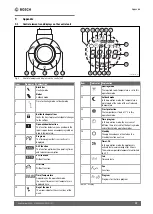
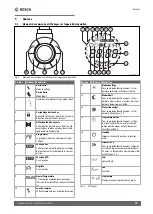
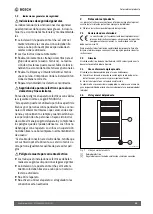
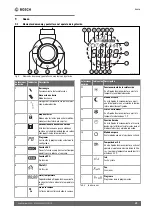
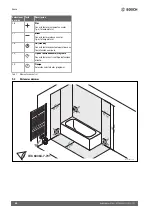
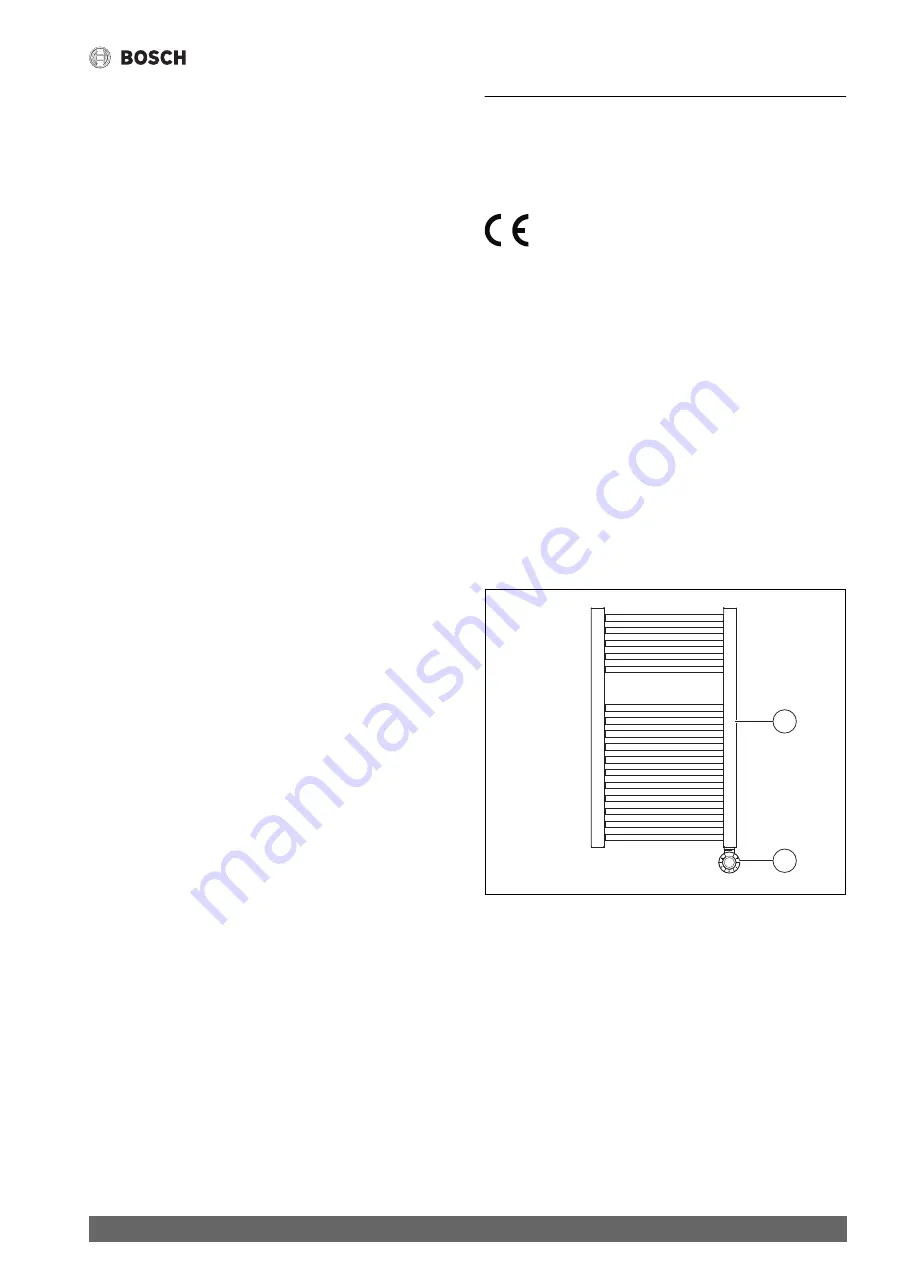
Vista general del producto

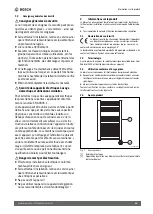
Fig. 1  

Vista general del producto

[1]

Radiador eléctrico

[2]

Regulador con cartucho de calefacción y cable de conexión

0010028876-001

1

2

Содержание Heat Radiator 4500

Страница 1: ...n 22 es Radiador eléctrico de baño Instrucciones de instalación y de uso 32 it Scaldasalviette elettrico Istruzioni per l installazione e per l uso 42 fl Elektrische badkamerverwarming Installatie en bedieningshandleiding 52 el Ηλεκτρικό θερμαντικό σώμα μπάνιου Οδηγία εγκατάστασης και χρήσης 62 hr Električni kupaonski radijator Upute za instalaciju i rukovanje 72 pt Toalheiro elétrico Instruções d...

Страница 2: ...lärung und Sicherheitshinweise 2 1 1 Symbolerklärung 2 1 2 Allgemeine Sicherheitshinweise 3 2 Angaben zum Produkt 3 2 1 Declaration of Conformity 13 2 2 Begriffserklärung 3 2 3 Bestimmungsgemäße Verwendung 3 2 4 Produktübersicht 3 3 Installation 4 3 1 Hinweise zur Installation 4 3 2 Mindestabstände 4 3 3 Anschluss 4 4 Bedienung 4 4 1 Sicherheitshinweise zur Bedienung 4 5 Betrieb 5 5 1 Regler einsc...

Страница 3: ...Hersteller oder seinen Kunden dienst oder eine ähnlich qualifizierte Person ersetzt werden um Gefährdungen zu vermeiden H Lebensgefahr durch elektrischen Strom ArbeitenanElektroinstallationenentsprechendden geltenden Bestimmungen durchführen Installation Inbetriebnahme sowie Wartung und Instandhaltung nur durch einen zugelassenen Fach betrieb ausführen lassen Gerät nicht öffnen Gerät nicht betreib...

Страница 4: ...eckdose muss die Spannungswerte der technischen Daten Kapitel 9 3 Seite 11 aufweisen und mit einem Fehlerstromschutzschalter 30 mA ausgerüstet sein Keine Mehrfachsteckdose oder Verlängerung verwenden Keine gesteuerten Abschaltvorrichtungen z B Zeitschaltuhren verwenden 4 Bedienung 4 1 Sicherheitshinweise zur Bedienung H Überhitzungsgefahr Heizkörpernichtbesteigenundnichtdauerhaftund komplett abdec...

Страница 5: ...dby Funktion zurück Gewünschte Funktion oder Betriebsart auswählen und einschalten 5 3 Betriebsart Heizbetrieb DerReglerhältdenHeizkörper Raum aufdereingestelltenTemperatur Die gewünschte Temperatur kann von 7 C bis 32 C eingestellt werden Die Temperatur muss mindestens 0 5 C höher sein als die Temperatur die im Absenkbetrieb eingestellt ist Taste drücken um die Standby Funktion auszuschalten Tast...

Страница 6: ...art Absenkbetrieb Taste drücken Der Zeitbalken wird nicht angezeigt Um die Einstellung für Tag 1 zu bestätigen dieTaste drücken Der nächste Tag wird angezeigt Weitere Tage einstellen Einstellung jedes Tags mit der Taste bestätigen Nach der Konfiguration des 7 Tags kehrt das Gerät in die Standby Funktion zurück Gewünschte Funktion oder Betriebsart auswählen und einschalten Falls 10 Sekunden keine T...

Страница 7: ... so lange bis die Funktion Offenes Fenster Erkennung endet oder abgeschaltet wird In folgenden Fällen kann das Gerät ein offenes Fenster nicht erkennen DasGerätistineinemisoliertenBereichdesRaumsentferntvonZug luft platziert Das Gerät ist in der Nähe einer Heizquelle platziert Die Temperaturschwankung im Raum ist zu gering 5 10 ASC Funktion Mit dieser Funktion werden die Betriebszeiten des Geräts ...

Страница 8: ...schrottvorschrif ten z B Europäische Richtlinie 2012 19 EG über Elektro und Elek tronik Altgeräte Diese Vorschriften legen die Rahmenbedingungen fest diefürdieRückgabeunddasRecyclingvonElektronik Altgerätenin den einzelnen Ländern gelten Da elektronische Geräte Gefahrstoffe enthalten können müssen sie ver antwortungsbewusst recycelt werden um mögliche Umweltschäden und Gefahren für die menschliche...

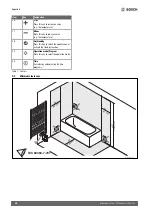
Страница 9: ...enkt 7 ECO Funktion Ohne Funktion 8 Fil Pilote Ohne Funktion 9 Uhrzeit Temperatur Hier wird je nach Betriebsart die aktuelle Uhr zeit beziehungsweise die aktuelle Tempera tur angezeigt 10 Wochentag Der Pfeil zeigt den aktuellen Wochentag an 11 Heizbetrieb In dieser Betriebsart wird die gewünschte Raumtemperatur eingestellt 12 Absenkbetrieb In dieser Betriebsart wird die Temperatur auf dem Wert der...

Страница 10: ...atur erhöht 17 Minus Mit dieser Taste wird ein Wert z B die Temperatur verringert 18 Ein Standby Mit dieser Taste wird das Gerät eingeschaltet oder die Standby Funktion aktiviert 19 Betriebsart Programm Mit dieser Taste wird die Betriebsart ausgewählt 20 Zeit Auswahl und Einstellung der Zeitprogramme 0010023917 001 24 60 cm 89 225 cm 24 60 cm 24 60 cm IEC 60364 7 701 ...

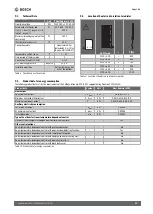
Страница 11: ...Max Betriebsdruck bar MPa 10 1 0 Montageposition Senkrecht mit Regler unten H x B mm P W 1110 500 500 1110 600 600 1420 500 750 1420 600 900 1700 500 900 1700 600 1000 8 19 Produktdaten Symbol Einheit Heat Radiator 4500 Heizleistung Nennwärmeleistung Pnenn kW 0 5 0 6 0 9 1 0 Minimale Heizleistung indikativ Pmin kW 0 45 0 54 0 875 0 9 Maximale Dauerleistung Pmax c kW 0 525 0 630 0 93 1 05 Hilfsstro...

Страница 12: ...ety instructions 13 2 Product Information 13 2 1 Declaration of Conformity 13 2 2 Definition 13 2 3 Intended use 13 2 4 Product overview 13 3 Installation 14 3 1 Notices regarding installation 14 3 2 Minimum clearances 14 3 3 Connection 14 4 Operating the appliance 14 4 1 Safety instructions regarding operation 14 5 Operating 15 5 1 Switching on the control unit 15 5 2 Setting the day and time 15 ...

Страница 13: ...wer cable is damaged it must be replaced by the manufacturer its customer service department or a similarly qualified person so that risks are avoided H Danger to life due to current Observe the relevant requirements when working on electrical installations Installation commissioning as well as maintenance andrepairsmustonlybecarriedoutbyanapproved contractor Do not open the appliance Do not opera...

Страница 14: ...oftheelectricalconnection socket mustcorrespond tothespecifications Chapter 9 3 page 21 andtheconnectionmust be equipped with a residual current protective device 30 mA Do not use a multiple socket outlet or extension Do not use controlled interrupting devices e g timers 4 Operating the appliance 4 1 Safety instructions regarding operation H Risk of overheating Donotclimbontheradiatororcoveritperm...

Страница 15: ...lowing the configuration the appliance reverts to the standby function Select and switch on the required function or operating mode 5 3 Heating mode operation mode The control unit keeps the radiator room at the set temperature Therequiredtemperaturecanbesetfrom7 Cto32 C Thetemperature mustbeatleast0 5 Chigherthanthetemperaturesetinsetbackmode Press the key to switch off the standby function Press...

Страница 16: ... Press the key to select the setback mode operation mode The time bar disappears Press the key to confirm the setting for day 1 The next day is displayed Setting further days Press the key to confirm the setting for each day Once day 7 is configured the appliance reverts to the standby function Select and switch on the required function or operating mode If no key is pressed for 10 seconds the app...

Страница 17: ...ndow detection function ends or is switched off The appliance cannot detect if a window is open in the following cases Theapplianceislocatedinanisolatedpartoftheroomwhereitisnot exposed to draughts The appliance is positioned near a heat source The temperature fluctuation in the room is insufficient 5 10 ASC function This function optimises the operating times of the appliance in order to reduce c...

Страница 18: ... countries with electronic waste regulations for example the European Waste Electrical and Electronic Equipment Directive 2012 19 EU These regulations determine the framework for the return and recycling of used electronic appliances as applicable within each country As electronic equipment may contain hazardous substances it needs to be recycled responsibly in order to minimize any potential harm...

Страница 19: ...on 7 ECO function Without function 8 Fil Pilote Without function 9 Time Temperature Depending on the operation mode the current time or current temperature is displayed here 10 Day of the week The arrow indicates the current day of the week 11 Heating mode The required room temperature is set in this operation mode 12 Setback mode In this operation mode the temperature is maintained at the value o...

Страница 20: ... the temperature 17 Minus Press this key to reduce a value e g the temperature 18 On Standby Press this key to switch the appliance on or activate the standby function 19 Operation mode Program Press this key to select the operation mode 20 Time For selecting and adjusting the time programs 0010023917 001 24 60 cm 89 225 cm 24 60 cm 24 60 cm IEC 60364 7 701 ...

Страница 21: ...tion position Vertically with control unit at the bottom H x W mm P W 1110 500 500 1110 600 600 1420 500 750 1420 600 900 1700 500 900 1700 600 1000 8 19 Product data Symbol Unit Heat Radiator 4500 Heat output Specified heat output Prated KW 0 5 0 6 0 9 1 0 Minimum heat output indicative Pmin KW 0 45 0 54 0 875 0 9 Maximum continuous output Pmax c KW 0 525 0 630 0 93 1 05 Auxiliary electricity con...

Страница 22: ...ration of Conformity 13 2 2 Terminologie 23 2 3 Utilisation conforme à l usage prévu 23 2 4 Aperçu produit 23 3 Installation 24 3 1 Consignes d installation 24 3 2 Distances minimales 24 3 3 Raccordement 24 4 Utilisation 24 4 1 Consignes de sécurité pour la commande 24 5 Fonctionnement 25 5 1 Mise en marche de l appareil de régulation 25 5 2 Réglage du jour et de l heure 25 5 3 Mode de fonctionnem...

Страница 23: ...t être remplacé par le fabricant son ser vice après vente ou une personne disposant d une qualification similaire pour éviter tout danger H Danger de mort par électrocution Effectuer les installations électriques conformé ment aux directives en vigueur Faireeffectuerl installation lamiseenserviceainsi quel entretienetlamaintenanceexclusivementpar une entreprise spécialisée Ne pas ouvrir l appareil...

Страница 24: ... de cou rant Leraccordementélectrique prisedecourant doitprésenterlesvaleurs de tension des caractéristiques techniques chap 9 3 page 31 et être équipé d un disjoncteur différentiel 30 mA Ne pas utiliser de prise multiple ou de rallonge Ne pas utiliser de dispositif de coupure piloté par ex minuteurs 4 Utilisation 4 1 Consignes de sécurité pour la commande H Risque de surchauffe Ne pas grimper sur...

Страница 25: ...nfiguration Sélectionneretactiverlafonctionoulemodedefonctionnementsou haité e 5 3 Mode de fonctionnement chauffage L appareilderégulationmaintientleradiateur lapièce àlatempérature réglée La température souhaitée peut être réglée entre 7 C et 32 C La tempé rature doit être supérieure d au moins 0 5 C à la température réglée en mode réduit Appuyer sur la touche pour désactiver la fonction veille A...

Страница 26: ...n noir Appuyer sur la touche pour le mode de fonctionnement réduit La barre de temps n est plus affichée Appuyer sur la touche pour confirmer le réglage pour le jour 1 Le jour suivant est affiché Régler les autres jours Confirmer le réglage de chaque jour en appuyant sur la touche Une fois la configuration du 7e jour terminée l appareil revient dans la fonction veille Sélectionneretactiverlafoncti...

Страница 27: ...tre est ouverte le symbole cli gnote Le symbole clignote jusqu à ce que la fonction Détection fenêtre ouverte s arrête ou soit désactivée L appareil ne peut pas détecter une fenêtre ouverte dans les cas suivants L appareil est placé dans une zone isolée de la pièce loin des cou rants d air L appareil est placé à proximité d une source de chaleur Les variations de température dans la pièce sont tro...

Страница 28: ...ys soumis à des directives sur les déchets électroniques telles que la Directive 2012 19 UE relative aux déchets d équipements électriques et électroniques Ces directives définissent le cadre applicable dans chaque pays pour le retour et le recyclage des équipements électroniques usagés Leséquipementsélectroniquespouvantcontenirdessubstancesdange reuses il est nécessaire de les recycler de façon r...

Страница 29: ...la consom mation 7 Fonction ECO Sans fonction 8 Fil pilote Sans fonction 9 Heure Température En fonction du mode de fonctionnement l heureoulatempératureactuelleestaffichée ici 10 Jour de semaine La flèche indique le jour actuel de la semaine 11 Mode chauffage Dans ce mode de fonctionnement la tem pérature ambiante souhaitée est réglée 12 Mode réduit Dans ce mode de fonctionnement la tem pérature ...

Страница 30: ...ature 17 Moins Cette touche permet de verrouiller une valeur par ex la température 18 Marche Veille Cette touche permet de mettre en marche l appareil ou d activer la fonction veille 19 Mode de fonctionnement Programme Cettetouchepermetdesélectionnerlemode de fonctionnement 20 Durée Sélection et réglage des programmes ho raires 0010023917 001 24 60 cm 89 225 cm 24 60 cm 24 60 cm IEC 60364 7 701 ...

Страница 31: ...lation en bas H x l mm P W 1110 500 500 1110 600 600 1420 500 750 1420 600 900 1700 500 900 1700 600 1000 8 19 Caractéristiques du produit Symbole Unité Heat Radiator 4500 Puissance calorifique Puissance thermique nominale Pnominale kW 0 5 0 6 0 9 1 0 Puissance calorifique minimale indicative Pmin kW 0 45 0 54 0 875 0 9 Puissance continue maximale Pmax c kW 0 525 0 630 0 93 1 05 Consommation d éle...

Страница 32: ...ndicaciones generales de seguridad 33 2 Datos sobre el producto 33 2 1 Declaration of Conformity 13 2 2 Glosario 33 2 3 Uso conforme al empleo previsto 33 2 4 Vista general del producto 33 3 Instalación 34 3 1 Indicaciones para la instalación 34 3 2 Distancias mínimas 34 3 3 Conexión 34 4 Funcionamiento 34 4 Funcionamiento 34 5 Funcionamiento 35 5 1 Conectar el aparato de regulación 35 5 2 Ajuste ...

Страница 33: ...os tendrá que ser sustituido por el fabricante su servicio técnico u otra persona igualmente cualificada para evitar peli gros H Peligro de muerte por corriente eléctrica Los trabajos en instalaciones eléctricas deberán realizarse según las disposiciones legales vigentes La instalación la puesta en marcha y el manteni miento solo deben llevarse a cabo por un servicio técnico autorizado No abrir el...

Страница 34: ...n eléctrica enchufe debe cumplir con los valores de tensión de los datos técnicos capítulo 9 3 página 41 y estar equipada con un interruptor diferencial 30 mA No usar un enchufe múltiple o una prolongación No utilizar dispositivos de desconexión controlados p ej relojes conmutadores 4 Funcionamiento 4 1 Indicaciones de seguridad para el manejo H Peligro de sobrecalentamiento No subirse al radiador...

Страница 35: ...os y se con firma la selección con la tecla Al final de la configuración el aparato retorna al modo de espera Elegir y activar la función o el tipo de funcionamiento deseado 5 3 Modo de calefacción El aparato de regulación mantiene el radiador ambiente en la tempera tura configurada Es posible ajustar la temperatura deseada entre 7 C y 32 C La tempe ratura debe ser mayor por por lo menos 0 5 C que...

Страница 36: ...se visualiza la barra temporal Pulsar la tecla para confirmar la configuración para el día 1 Se visualiza el siguiente día Ajustar otros días Confirmar el ajuste cada día con la tecla Después de la configuración del 7o día el aparato retorna al modo de espera Elegir y activar la función o el tipo de funcionamiento deseado En caso de no pulsar ninguna tecla durante 10 segundos el aparato retorna al...

Страница 37: ...earásielaparatoreconocequeunaventanaestá abierta El símbolo parpadeará hasta que finalice o se desconecte la fun ción Reconocimiento de ventana abierta En los siguientes casos el aparato no podrá reconocer una ventana abierta Elaparatoestáubicadoenunsectoraisladodelahabitación lejosde la corriente de aire El aparato se encuentra cerca de una fuente de calor Lavariacióndetemperaturaenlahabitaciónno...

Страница 38: ...El símbolo vale para países con regulaciones de desechos electrónicos por ejemplo la Directiva Europea de desechos de equipos eléctricosyelectrónicos2012 19 UE Estasregulacionesdeterminanel marco para el retorno y el reciclaje de aparatos electrónicos según sea aplicable en cada país Cadaequipoelectrónicopuedecontenersustanciaspeligrosas necesita ser reciclado de manera responsable a fin de minimi...

Страница 39: ...os operativos y se reduce el consumo 7 Función ECO Sin función 8 Piloto Fil Sin función 9 Hora Temperatura Dependiendo del tipo de funcionamiento se visualiza la hora actual o la temperatura actual 10 Día de la semana La flecha indica el día actual de la semana 11 Funcionamiento de la calefacción En el tipo de funcionamiento se ajusta la temperatura ambiente deseada 12 Modo descenso En este tipo d...

Страница 40: ...n valor p ej la temperatura 17 Minus Con esta tecla se reduce un valor p ej la temperatura 18 ON Standby Con esta tecla se conecta el aparato o se ac tiva la función en espera 19 Tipo de funcionamiento Programa Con esta tecla se activa el tipo de funciona miento 20 Tiempo Selección y ajuste de los programas 0010023917 001 24 60 cm 89 225 cm 24 60 cm 24 60 cm IEC 60364 7 701 ...

Страница 41: ... 1110 500 500 1110 600 600 1420 500 750 1420 600 900 1700 500 900 1700 600 1000 8 19 Datos del producto Símbolo Unidad Heat Radiator 4500 Potencia calorífica Potencia térmica nominal Pnom kW 0 5 0 6 0 9 1 0 Rendimiento calorífico mínimo indicativo Pmin kW 0 45 0 54 0 875 0 9 Potencia máxima de funcionamiento Pmax c kW 0 525 0 630 0 93 1 05 Consumo de electricidad auxiliar Potencia térmica nominal ...

Страница 42: ...on of Conformity 13 2 2 Significato del termine 43 2 3 Utilizzo conforme alle indicazioni 43 2 4 Panoramica del prodotto 43 3 Installazione 44 3 1 Avvertenze per l installazione 44 3 2 Distanze minime 44 3 3 Attacco 44 4 Utilizzo 44 4 1 Avvertenze di sicurezza per impostazione di comando 44 5 Funzionamento 45 5 1 Accendere il temostato digitale 45 5 2 Impostare il giorno della settimana e l ora 45...

Страница 43: ... rete questo deve essere sostituito dal produttore dal suoserviziodiassistenzaclientiodaunapersonapari menti qualificata al fine di evitare pericoli H Pericolo di morte a causa della corrente elettrica Eseguire gli interventi sugli impianti di alimentazione elettrica nel rispetto delle norme di legge in vigore L installazione e la messa in funzione così come le operazioni di manutenzione e di ripa...

Страница 44: ...essione elettrica presa di corrente deve presentare i valori di tensione dei dati tecnici capitolo 9 3 pag 51 e deve essere dotata di un interruttore differenziale 30 mA Non utilizzare prese multiple o prolunghe Non utilizzare dispositivi di spegnimento controllati ad esempio orologi programmatori 4 Utilizzo 4 1 Avvertenze di sicurezza per impostazione di comando H Pericolo di surriscaldamento Non...

Страница 45: ...ionare la funzione desiderata o il tipo di funzionamento ed accendere 5 3 Tipo di funzionamento Funzionamento in riscalda mento Il termostato digitale mantiene il radiatore ambiente alla temperatura impostata Latemperaturadesideratapuòessereimpostatada7 Ca32 C Latem peratura deve essere almeno 0 5 C superiore alla temperatura impo stata nel funzionamento in attenuazione Premere il tasto per spegne...

Страница 46: ...e mere il tasto La barra del tempo non viene visualizzata Per confermare l impostazione per il giorno 1 premere il tasto Viene visualizzato il giorno successivo Impostare altri giorni Confermare l impostazione di ogni giorno con il tasto Dopo la configurazione del 7 giorno l apparecchio ritorna alla fun zione Standby Selezionare la funzione desiderata o il tipo di funzionamento ed accendere Se non...

Страница 47: ...inchélafunzione Riconoscimentofine stra aperta non termina o non viene disattivata Nei seguenti casi l apparecchio può non riconoscere una finestra aperta l apparecchio è posizionato in una zona isolata della stanza lontano da correnti d aria L apparecchio è nelle vicinanze di una fonte di calore L oscillazione di temperatura nella stanza è troppo bassa 5 10 Funzione ASC Con questa funzione vengon...

Страница 48: ...ettrici per esempio la Diret tiva europea relativa ai rifiuti di apparecchiature elettriche ed elettroni che 2012 19 EU Tali regolamentazioni determinano l ambito di restituzione e riciclaggio degli apparecchi elettronici usati applicabile in ogni paese Siccome possono contenere sostanze pericolose le apparecchiature elettroniche devono essere riciclate in modo responsabile al fine di ridurrealmin...

Страница 49: ... il consumo 7 Funzione ECO Privo di funzione 8 Fil Pilote Privo di funzione 9 Ora temperatura Qui viene visualizzata a seconda del tipo di funzionamento l ora o la temperatura attuale 10 Giorno della settimana La freccia indica il giorno della settimana attuale 11 Funzionamento in riscaldamento In questo tipo di funzionamento viene impos tata la temperatura ambiente desiderata 12 Funzionamento in ...

Страница 50: ...eratura 17 Meno Con questo tasto viene ridotto un valore ad es la temperatura 18 On Standby Premere questo tasto per accendere l appa recchio o attivare la funzione Standby 19 Tipo di funzionamento Programma Con questo tasto viene selezionato il tipo di funzionamento 20 Tempo Selezione ed impostazione dei programmi orari 0010023917 001 24 60 cm 89 225 cm 24 60 cm 24 60 cm IEC 60364 7 701 ...

Страница 51: ... 1110 500 500 1110 600 600 1420 500 750 1420 600 900 1700 500 900 1700 600 1000 8 19 Dati sul prodotto Simbolo Unità Heat Radiator 4500 Potenza riscaldamento Potenza termica nominale Pnom kW 0 5 0 6 0 9 1 0 Potenza termica minima indicativa Pmin kW 0 45 0 54 0 875 0 9 Potenza resa in continuo massima Pmax c kW 0 525 0 630 0 93 1 05 Consumo ausiliario di elettricità Con potenza termica nominale elm...

Страница 52: ...aringen 52 1 2 Algemene veiligheidsvoorschriften 53 2 Gegevens betreffende het product 53 2 1 Declaration of Conformity 13 2 2 Verklaring begrippen 53 2 3 Gebruik volgens de voorschriften 53 2 4 Productoverzicht 53 3 Installatie 54 3 1 Aanwijzingen betreffende de installatie 54 3 2 Minimale afstanden 54 3 3 Aansluiting 54 4 Bediening 54 4 1 Veiligheidsinstructies voor de bediening 54 5 Bedrijf 55 ...

Страница 53: ...eer de netaansluitkabel wordt beschadigd moet deze door de fabrikant of haar servicedienst of een gekwalificeerde persoon worden vervangen om gevaar te vermijden H Levensgevaar door elektrische stroom Voerdewerkzaamhedenaandeelektrischeinstalla ties conform de geldende wettelijke bepalingen uit Installatie inbedrijfstelling en onderhoud mogen uitsluitend door een erkend vakman uitgevoerd worden To...

Страница 54: ...ctdoos moet de spanningswaarden van de technische gegevens hoofdstuk 9 3 pagina 61 hebben en met een aardlekschakelaar 30 mA zijn uitgerust Gebruik geen meervoudige contactdoos of verlenging Gebruik geen geregelde uitschakelinrichtingen bijvoorbeeld schakelklokken 4 Bediening 4 1 Veiligheidsinstructies voor de bediening H Oververhittingsgevaar Beklim de radiator niet en dek deze nooit perma nent e...

Страница 55: ...ctie Gewenste functie of bedrijfsmodus kiezen en inschakelen 5 3 Bedrijfsmodus cv bedrijf De regelaar houdt de radiator ruimte op de ingestelde temperatuur Degewenstetemperatuurkantussen7 Cen32 Cwordeningesteld De temperatuur moet minimaal 0 5 C hoger zijn dan de temperatuur die voor het verlaagd regime is ingesteld Druk op toets om de stand by functie uit te schakelen Druk toets in tot op het dis...

Страница 56: ...oets De tijdsbalken worden niet getoond Druk op de toets om de instelling voor dag 1 te bevestigen De volgende dag wordt getoond Instellen overige dagen Instelling van elke dag met de toets bevestigen Na de configuratie van de 7e dag keert het toestel terug naar de stand by functie Gewenste functie of bedrijfsmodus kiezen en inschakelen Indien gedurende 10 seconden geen toets wordt ingedrukt keert...

Страница 57: ...l Het symbool knippert net zolang tot de functie Herkenning open raam eindigt of wordt uitgeschakeld In de volgende situaties kan het toestel een open raam niet herkennen Het toestel is in een geïsoleerd bereik van de ruimte op afstand van tocht geplaatst Het toestel is in de buurt van een verwarmingsbron geplaatst De temperatuurvariatie in de ruimte is te gering 5 10 ASC functie Met deze functie ...

Страница 58: ...tronisch afval bijvoorbeeld de Europese richt lijn voor afgedankte elektrische en elektronische apparatuur 2012 19 EU Deze voorschriften bepalen het kader voor de terugname en recy cling van gebruikte elektronische toestellen zoals van toepassing in elk land Aangezien elektronische apparatuur gevaarlijke stoffen kan bevatten moet deze op verantwoorde wijze worden gerecycled om mogelijke schade aan...

Страница 59: ...t verb ruik gereduceerd 7 ECO functie Geen functie 8 Fil Pilote Geen functie 9 Tijd temperatuur Hier wordt afhankelijk van de bedrijfsmodus de actuele tijd respectievelijk de actuele tijd weergegeven 10 Weekdag De pijl wijst de actuele weekdag aan 11 Cv bedrijf In deze bedrijfsmodus wordt de gewenste ka mertemperatuur ingesteld 12 Verlaagd regime In deze bedrijfsmodus wordt de temperatuur op de wa...

Страница 60: ...atuur verhoogd 17 Minus Met deze toets wordt een waarde bijvoorbeeld de temperatuur verlaagd 18 Aan stand by Met deze toets wordt het toestel ingescha keld of wordt de stand by functie geacti veerd 19 Bedrijfsmodus programma Met deze toets wordt de bedrijfsmodus geko zen 20 Tijd Keuze en instelling van de tijdprogramma s 0010023917 001 24 60 cm 89 225 cm 24 60 cm 24 60 cm IEC 60364 7 701 ...

Страница 61: ... x B mm Geluidsvermo gen W 1110 500 500 1110 600 600 1420 500 750 1420 600 900 1700 500 900 1700 600 1000 8 19 Productgegevens Symbool Eenheid Heat Radiator 4500 Verwarmingsvermogen Nominaal warmtevermogen Pnom kW 0 5 0 6 0 9 1 0 Minimale verwarmingsvermogen indicatief Pmin kW 0 45 0 54 0 875 0 9 Maximaal continu vermogen Pmax c kW 0 525 0 630 0 93 1 05 Supplementair elektriciteitsverbruik Bij nom...

Страница 62: ...λων 62 1 2 Γενικές υποδείξεις ασφαλείας 63 2 Στοιχεία για το προϊόν 63 2 1 Declaration of Conformity 13 2 2 Επεξήγηση όρων 63 2 3 Προβλεπόμενη χρήση 63 2 4 Επισκόπηση του προϊόντος 63 3 Εγκατάσταση 64 3 1 Υποδείξεις για την εγκατάσταση 64 3 2 Ελάχιστες αποστάσεις 64 3 3 Σύνδεση 64 4 Χειρισμός 64 4 1 Υποδείξεις ασφαλείας για τον χειρισμό 64 5 Λειτουργία 65 5 1 Ενεργοποίηση πίνακα ελέγχου 65 5 2 Ρύθ...

Страница 63: ...ευαστή ή το σχετικό τμήμα εξυπηρέτησης πελατών ή από άτομο με κατάλληλη κατάρτιση προκειμένου να αποφευχθούν οι κίνδυνοι H Κίνδυνος θανάτου από ηλεκτροπληξία Εκτελείτε τις εργασίες σε ηλεκτρικές εγκαταστάσεις σύμφωνα με τις ισχύουσες νομικές διατάξεις Η εγκατάσταση η πρώτη θέση σε λειτουργία η συντήρηση και η επισκευή πρέπει να εκτελούνται αποκλειστικά από εξουσιοδοτημένη εξειδικευμένη τεχνική ετα...

Страница 64: ...ι να συμφωνεί με τις τιμές τάσης των τεχνικών χαρακτηριστικών κεφάλαιο 9 3 Σελίδα 71 και να διαθέτει διακόπτη κυκλώματος βλάβης γείωσης 30 mA Μην χρησιμοποιείτε πολύπριζο ή επέκταση Μην χρησιμοποιείτε ελεγχόμενες διατάξεις απενεργοποίησης π χ χρονοδιακόπτες 4 Χειρισμός 4 1 Υποδείξεις ασφαλείας για τον χειρισμό H Κίνδυνος υπερθέρμανσης Μην ανεβαίνετε στο θερμαντικό σώμα και μην το αφήνετε συνεχώς κ...

Страница 65: ...λέξτε και ενεργοποιήστε τη λειτουργία ή τον τρόπο λειτουργίας που θέλετε 5 3 Τρόπος λειτουργίας θέρμανσης Ο πίνακας ελέγχου διατηρεί το θερμαντικό σώμα χώρο στη ρυθμισμένη θερμοκρασία Η επιθυμητή θερμοκρασία μπορεί να ρυθμιστεί από 7 C έως 32 C Η θερμοκρασία πρέπει να είναι τουλάχιστον 0 5 C υψηλότερη από τη θερμοκρασία που έχει ρυθμιστεί στη λειτουργία μείωσης Πατήστε το πλήκτρο για να απενεργοπο...

Страница 66: ... ώρας δεν εμφανίζεται Για να επιβεβαιώσετε τη ρύθμιση για την ημέρα 1 πατήστε το πλήκτρο Εμφανίζεται η επόμενη μέρα Ρυθμίστε τις υπόλοιπες ημέρες Επιβεβαιώστε τη ρύθμιση κάθε μέρας με το πλήκτρο Μετά τη διαμόρφωση της 7ης ημέρας η συσκευή επιστρέφει στη λειτουργία standby Επιλέξτε και ενεργοποιήστε τη λειτουργία ή τον τρόπο λειτουργίας που θέλετε Αν για 10 δευτερόλεπτα δεν πατηθεί κανένα πλήκτρο η...

Страница 67: ... αναβοσβήνει το σύμβολο Το σύμβολο αναβοσβήνει μέχρι να λήξει ή να απενεργοποιηθεί η λειτουργία αναγνώρισης ανοιχτού παραθύρου Στις παρακάτω περιπτώσεις η συσκευή δεν μπορεί να αναγνωρίσει ανοιχτό παράθυρο Η συσκευή έχει τοποθετηθεί σε απομονωμένο σημείο του χώρου μακριά από ρεύματα αέρα Η συσκευή έχει τοποθετηθεί κοντά σε πηγή θερμότητας Οι διακυμάνσεις θερμοκρασίας στον χώρο είναι ελάχιστες 5 10...

Страница 68: ... σύμβολο ισχύει σε χώρες με κανονισμούς περί ηλεκτρονικών αποβλήτων για παράδειγμα όπως η ευρωπαϊκή οδηγία περί αποβλήτων ηλεκτρικού και ηλεκτρονικού εξοπλισμού 2012 19 EΕ Οι κανονισμοί αυτοί διέπουν το πλαίσιο επιστροφής και ανακύκλωσης μεταχειρισμένων ηλεκτρονικών συσκευών όπως αυτό εφαρμόζεται εντός κάθε χώρας Καθώς ο ηλεκτρονικός εξοπλισμός ενδέχεται να περιέχει επικίνδυνες ουσίες θα πρέπει να...

Страница 69: ...ωση 7 ΛειτουργίαECO Δεν χρησιμοποιείται 8 Fil Pilote Δεν χρησιμοποιείται 9 Ώρα Θερμοκρασία Εδώ ανάλογα με τον τρόπο λειτουργίας εμφανίζεται η τρέχουσα ώρα και θερμοκρασία 10 Ημέρα Το βέλος υποδεικνύει την τρέχουσα ημέρα της εβδομάδας 11 Λειτουργία θέρμανσης Σε αυτόν τον τρόπο λειτουργίας ρυθμίζεται η επιθυμητή θερμοκρασία χώρου 12 Λειτουργία μείωσης Σεαυτόντοντρόπολειτουργίαςδιατηρείταιητιμή της ρ...

Страница 70: ...α τιμή π χ η θερμοκρασία 17 Μείον Με αυτό το πλήκτρο μειώνεται μια τιμή π χ η θερμοκρασία 18 On Standby Με αυτό το πλήκτρο ενεργοποιείται η συσκευή ή η λειτουργία standby 19 Τρόπος λειτουργίας πρόγραμμα Με αυτό το πλήκτρο επιλέγεται ο τρόπος λειτουργίας 20 Χρόνος Επιλογή και ρύθμιση των προγραμμάτων χρόνου 0010023917 001 24 60 cm 89 225 cm 24 60 cm 24 60 cm IEC 60364 7 701 ...

Страница 71: ...είο τοποθέτησης Κατακόρυφα με τον πίνακα ελέγχου κάτω Υ x Π mm P W 1110 500 500 1110 600 600 1420 500 750 1420 600 900 1700 500 900 1700 600 1000 8 19 Δελτίο προϊόντος Σύμβολο Μονάδα Heat Radiator 4500 Θερμική ισχύς Ονομαστική θερμική ισχύς Pονομ kW 0 5 0 6 0 9 1 0 Ελάχιστη θερμαντική ισχύς ενδεικτική Pmin kW 0 45 0 54 0 875 0 9 Μέγιστη συνεχής απόδοση Pmax c kW 0 525 0 630 0 93 1 05 Βοηθητική κατ...

Страница 72: ...upute 73 2 Podaci o proizvodu 73 2 1 Declaration of Conformity 13 2 2 Objašnjenje pojmova 73 2 3 Pravilna uporaba 73 2 4 Pregled proizvoda 73 3 Instalacija 74 3 1 Upute za instalaciju 74 3 2 Minimalni razmaci 74 3 3 Priključak 74 4 Rukovanje 74 4 1 Sigurnosne upute za rukovanje 74 5 Pogon 75 5 1 Uključivanje regulatora 75 5 2 Podešavanje dana i vremena na satu 75 5 3 Način rada pogon grijanja 75 5...

Страница 73: ...i ga moraju proizvođač služba za korisnike ili neka druga kvalificirana osoba kako bi se izbjegle opasnosti H Opasnost za život zbog električne struje Provedite radove na elektroinstalacijama u skladu s važećim odredbama Instalaciju puštanje u pogon kao i održavanje i popravak smije obavljati samo ovlašteni stručni servis Ne otvarati uređaj Nemojte pokretati ili upotrebljavati uređaj ako su regula...

Страница 74: ...iztehničkih podataka pogl 9 3 str 81 i biti opremljen zaštitnim prekidačem 30 mA Nemojte rabiti višestruku utičnicu ili produžni kabel Nemojte upotrebljavati upravljane naprave za isključivanje npr vremenske satove 4 Rukovanje 4 1 Sigurnosne upute za rukovanje H Opasnost od pregrijavanja Nemojte se penjati po radijatoru i nemojte ga trajno potpuno pokriti Pobrinite se za neometanu potrošnju toplin...

Страница 75: ...berite i uključite željenu funkciju ili način rada 5 3 Način rada pogon grijanja Regulator radijator prostor drži na podešenoj temperaturi Željena se temperatura može podesiti od 7 C do 32 C Temperatura mora biti najmanje 0 5 C viša od temperature podešene u pogonu snižavanja Pritisnite tipku da biste isključili funkciju mirovanja Pritisnuti tipku dok se na zaslonu ne pojavi simbol Tipkama i posta...

Страница 76: ...ki se stupac ne prikazuje Da biste potvrdili postavke za dan 1 pritisnite tipku Prikazuje se sljedeći dan Podesite druge dane Potvrdite postavku svakog dana tipkom Nakon konfiguracije 7 dana uređaj se vraća u funkciju mirovanja Odaberite i uključite željenu funkciju ili način rada Akose10 sekundinepritisnetipka uređajsevraćaufunkcijumirovanja Primjer Sl 4 Podešavanje individualnog programa P4 prim...

Страница 77: ...i Simboltreperidokseprepoznavanjeotvorenogprozoranezavršiiligavi ne isključite U sljedećim slučajevima uređaj ne može prepoznati otvoreni prozor Uređaj je postavljen u izoliranom području prostorije udaljeno od propuha Uređaj je postavljen u blizini izvora topline Promjena temperature u prostoriji nije dovoljno visoka 5 10 Funkcija ASC Ovom se funkcijom optimiziraju vremena rada uređaja kako bi se...

Страница 78: ...bol se odnosi na države u kojima postoje propisi o elektroničkom otpadu primjerice Direktiva 2012 19 EU o otpadnoj električnoj i elektroničkoj opremi OEEO Ti propisi određuju okvir za povrat i reciklažu rabljenih elektroničkih uređaja koji se primjenjuje u svakoj državi Budući da elektronička oprema može sadržavati opasne tvari mora se reciklirati zasebno kako bi se smanjila bilo kakva potencijaln...

Страница 79: ... vremena rada i smanjuje potrošnja 7 ECO funkcija Bez funkcije 8 Fil piloti Bez funkcije 9 Vrijeme temperatura Ovdje se ovisno o načinu rada prikazuje aktualno vrijeme odnosno aktualna temperatura 10 Dan u tjednu Strelica prikazuje aktualni dan u tjednu 11 Pogon grijanja U ovom se načinu rada podešava željena temperatura prostorije 12 Način spuštanja U ovom se načinu rada temperatura drži na vrije...

Страница 80: ...ovisuje vrijednost npr temperatura 17 Minus Ovom se tipkom snizuje vrijednost npr temperatura 18 Uključeno mirovanje Ovomsetipkomuređajuključujeiliseaktivira funkcija mirovanja 19 Način rada program Ovom se tipkom bira način rada 20 Vrijeme Odabir i podešavanje vremenskih programa 0010023917 001 24 60 cm 89 225 cm 24 60 cm 24 60 cm IEC 60364 7 701 ...

Страница 81: ... W 1110 500 500 1110 600 600 1420 500 750 1420 600 900 1700 500 900 1700 600 1000 8 19 Podaci o proizvodu Simbol Jedinica Heat Radiator 4500 Snaga grijanja Nazivni toplinski učinak Pnenn kW 0 5 0 6 0 9 1 0 Minimalni učinak grijanja indikativno Pmin kW 0 45 0 54 0 875 0 9 Maksimalna trajna snaga Pmax c kW 0 525 0 630 0 93 1 05 Potrošnja pomoćne energije Pri nazivnoj toplinskoj snazi elmaks kW 0 000...

Страница 82: ...laration of Conformity 13 2 2 Explicação dos termos 83 2 3 Utilização conforme as disposições 83 2 4 Vista geral do produto 83 3 Instalação 84 3 1 Indicações relativas à instalação 84 3 2 Distâncias mínimas 84 3 3 Ligação 84 4 Operação 84 4 1 Indicações de segurança para a operação 84 5 Funcionamento 85 5 1 Ligar o aparelho de regulação 85 5 2 Ajustar o dia e a hora 85 5 3 Modo de funcionamento Mo...

Страница 83: ...ja danificado deve ser substituído pelo fabricante pelo seu serviço de apoioaoclienteouumapessoacomqualificaçãoidên tica para evitar perigos H Perigo de morte devido a corrente elétrica Executar os trabalhos em instalações elétricas de acordo com as disposições vigentes A instalação colocação em funcionamento e manu tenção devem ser entregues apenas a empresas especializadas autorizadas Não abrir ...

Страница 84: ...cto de segurança A alimentação elétrica tomada deve possuir os valores de tensão das caraterísticas técnicas capítulo 9 3 página 91 e estar equipada com um disjuntor diferencial 30 mA Não usar tomadas múltiplas ou extensões Não utilizar quaisquer dispositivos de desativação controlada por ex temporizadores 4 Operação 4 1 Indicações de segurança para a operação H Perigo de sobreaquecimento Não subi...

Страница 85: ...funçãoouomododefuncionamentopretendidoeativar 5 3 Modo de funcionamento Modo de aquecimento O aparelho de regulação mantém o radiador divisão na temperatura definida A temperatura pretendida pode ser definida de 7 C até 32 C A tempe ratura deve estar no mínimo 0 5 C mais elevada do que a temperatura que está definida na operação descendente Premir a tecla para desativar a função de Standby Pressio...

Страница 86: ...amento Operação descendente premir a tecla A barra de tempo não é exibida Para confirmar a definição para dia 1 premir a tecla É exibido o dia seguinte Definir outros dias Confirmar a definição de cada dia com a tecla Após a configuração do 7º dia o aparelho retorna para a função de Standby Selecionarafunçãoouomododefuncionamentopretendidoeativar Se não for premida qualquer tecla durante 10 segund...

Страница 87: ...a janela pisca o símbolo O símbolo pisca até que a função Deteção de janela aberta seja terminada ou desativada Nos seguintes casos o aparelho não consegue detetar uma janela aberta O aparelho está posicionado numa área isolada da divisão distante de correntes de ar Oaparelhoestáposicionadonasproximidadesdeumafontedecalor A oscilação de temperatura na divisão é muito reduzida 5 10 Função de ASC Co...

Страница 88: ...regulamentosderesíduos eletrónicos como por exemplo a Diretiva de Resíduos de Equipamentos EléctricoseElectrónicos2012 19 UE Estesregulamentosdeterminam a estrutura para o retorno e reciclagem de aparelhos elétricos conforme aplicável dentro de cada país Uma vez que o equipamento eletrónico poderá conter substâncias peri gosas esteterádeserrecicladodeformaresponsáveldemaneiraamini mizarqualquerper...

Страница 89: ... diminuído o consumo 7 Função ECO Sem função 8 Fil Pilote Sem função 9 Hora Temperatura Aquiéexibidaahoraatuale ouatemperatura atual consoante o modo de funcionamento 10 Dia da semana A seta indica o dia atual da semana 11 Modo de aquecimento Neste modo de funcionamento é definida a temperatura ambiente pretendida 12 Operação descendente Neste modo de funcionamento é mantida a temperatura no valor...

Страница 90: ... a temperatura 17 Menos Com esta tecla é reduzido um valor p ex a temperatura 18 Lig Standby Com esta tecla é ligado o aparelho ou é ativa da a função de Standby 19 Modo de funcionamento Programa Com esta tecla é selecionado o modo de fun cionamento 20 Tempo Seleçãoeconfiguraçãodasprogramaçõesde horário 0010023917 001 24 60 cm 89 225 cm 24 60 cm 24 60 cm IEC 60364 7 701 ...

Страница 91: ...sição de montagem Na vertical com aparelho de regulação em baixo A x L mm P W 1110 500 500 1110 600 600 1420 500 750 1420 600 900 1700 500 900 1700 600 1000 8 19 Dados do produto Clicarno símbolo Unidades Heat Radiator 4500 Potência calorífica Potência térmica nominal Pnom kW 0 5 0 6 0 9 1 0 Potência mínima de aquecimento indicativo Pmin kW 0 45 0 54 0 875 0 9 Potência contínua máxima Pmáx c kW 0 ...

Страница 92: ...Bosch Thermotechnik GmbH Junkersstrasse 20 24 D 73249 Wernau www bosch thermotechnology com ...

Отзывы: