background image

Содержание HBJ538EB0M

Страница 1: ...3FHJTUFS ZPVS OFX EFWJDF PO Z PTDI OPX BOE HFU GSFF CFOFGJUT CPTDI IPNF DPN XFMDPNF en Instruction manual Built in oven Built in oven HBJ538EB0M ...

Страница 2: ......

Страница 3: ...time 15 Setting the timer 16 Setting the time 16 A Childproof lock 17 Activating and deactivating 17 Q Basic settings 17 List of basic settings 17 Changing the basic settings 18 D Cleaning 18 Suitable cleaning agents 18 Surfaces in the cooking compartment 19 Keeping the appliance clean 20 p Rails 20 Detaching and refitting the rails 20 q Appliance door 21 Detaching and attaching the oven door 21 R...

Страница 4: ...antsafetyinformationGeneral information Warning Risk of fire Combustible items stored in the cooking compartment may catch fire Never store combustible items in the cooking compartment Never open the appliance door if there is smoke inside Switch off the appliance and unplug it from the mains or switch off the circuit breaker in the fuse box Risk of fire Loose food remnants fat and meat juices may...

Страница 5: ...the mains or switch off the circuit breaker in the fuse box Contact the after sales service Risk of electric shock and serious injury The cable insulation on electrical appliances may melt when touching hot parts of the appliance Never bring electrical appliance cables into contact with hot parts of the appliance Risk of electric shock Do not use any high pressure cleaners or steam cleaners which ...

Страница 6: ...liance door Inserting accessories depending on the appliance model accessories can scratch the door panel when closing the appliance door Always insert the accessories into the cooking compartment as far as they will go Carrying the appliance do not carry or hold the appliance by the door handle The door handle cannot support the weight of the appliance and could break 5Installation and connection...

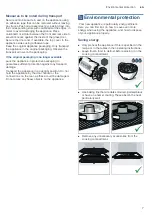
Страница 7: ...e pack the appliance in protective packaging to guarantee sufficient protection against any transport damage Transport the appliance in an upright position Do not hold the appliance by the door handle or the connections on the rear as these could be damaged Do not place any heavy objects on the appliance 7Environmental protection EnvironmentalprotectionYour new appliance is particularly energy eff...

Страница 8: ...tions of your appliance Note Depending on the appliance model individual details and colours may differ Control panel You can set your appliance s various functions on the control panel Below you will see an overview of the control panel and the layout of the controls This appliance is labelled in accordance with European Directive 2012 19 EU concerning used electrical and electronic appliances wa...

Страница 9: ...me A Minus Plus Reduce setting values Increase setting values D Childproof lock Lock and unlock the oven functions on the control panel Type of heating Use 3D hot air For baking and roasting on one or more levels The fan distributes the heat from the ring heating element in the back panel evenly around the cooking compartment 6 Gentle hot air For gently cooking selected types of food on one level ...

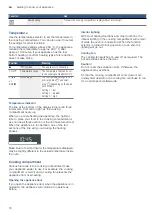
Страница 10: ...r to use For example the cooking compartment is well lit and a cooling fan prevents the appliance from overheating Opening the appliance door If you open the appliance door when the appliance is in operation the appliance will continue to operate as before Interior lighting With most heating functions and other functions the interior lighting in the cooking compartment will remain lit while the ov...

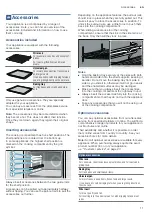
Страница 11: ...the shelf supports keeping it parallel Do not move the baking tray from side to side as you slide it in otherwise it will not go in easily and the enamelled surfaces may be damaged Make sure that you always insert the accessories into the cooking compartment the right way round Always insert the accessories fully into the cooking compartment so that they do not touch the appliance door Take any ac...

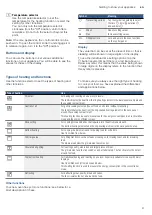
Страница 12: ...or move the functional strip This could impair the functions of the appliance Before heating the appliance wipe the smooth surfaces in the cooking compartment with a soft damp cloth Keep the kitchen ventilated while the appliance is heating Make the settings indicated You can find out how to set the heating function and the temperature in the next section Operating the appliance on page 13 Profess...

Страница 13: ...ion Setting the heating function and temperature The function selector and temperature selector make it very easy to apply the settings you require to your appliance To find out which heating function is best for which type of food please refer to the beginning of the instruction manual Getting to know your appliance on page 8 Example in the picture Top bottom heating at 190 C 1 Use the function s...

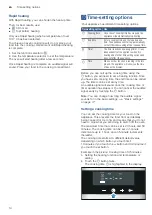
Страница 14: ...ge 17 Setting a cooking time You can set the cooking time for your food on the appliance This prevents the food from accidentally being cooked for too long and means that you do not have to stop what you are doing to switch off the oven The maximum time that can be set is 23 hours and 59 minutes The cooking time can be set in 1 minute increments up to 1 hour and in 5 minute increments thereafter T...

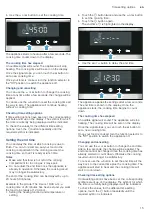
Страница 15: ...actory The end of the cooking time can be delayed by up to 23 hours 59 minutes Example in the picture The time is 10 30 a m a cooking time of 45 minutes has been set and you want the food to be ready at 12 30 p m 1 Setting the heating function and temperature or setting 2 Touch the v button twice and use the A or button to set the cooking time 3 Touch the v button again The end time is highlighted...

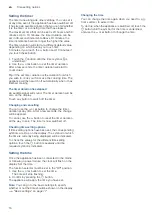
Страница 16: ...on to switch off the timer Changing and cancelling You can use the A or button to change the timer duration at any time After a few seconds the change will be applied To cancel use the A button to reset the timer duration all the way to zero The timer is now switched off Checking time setting options If time setting options have been set the corresponding symbols are lit up on the display The symb...

Страница 17: ...dproof lock press and hold the D button again for approx 4 seconds until the symbol goes out on the display QBasic settings BasicsettingsThere are various settings available to you in order to help use your appliance effectively and simply You can change these settings as required List of basic settings Depending on the features of your appliance not all basic settings will be available Basic sett...

Страница 18: ...urface damage Do not use Harsh or abrasive cleaning agents Cleaning agents with a high alcohol content Hard scouring pads or cleaning sponges High pressure cleaners or steam cleaners Special cleaners for cleaning the appliance while it is hot Wash new sponge cloths thoroughly before use Tip Highly recommended cleaning and care products can be purchased through the after sales service Observe the r...

Страница 19: ...on the interior lighting 1 Set the 3D hot air type of heating 2 Set the maximum temperature 3 Start the mode and leave it to run for at least one hour The ceramic coating is regenerated When the cooking compartment has cooled down remove the brown or white residue with water and a soft sponge Note During operation reddish spots form on the surfaces This is not rust but residues from food These spo...

Страница 20: ...ilsWith good care and cleaning your appliance will retain its appearance and remain fully functional for a long time to come This will tell you how to remove the shelves and clean them Detaching and refitting the rails The rails can be removed for cleaning The oven must have cooled down Detaching the rails 1 Lift up the front of the rail 2 and unhook it figure A 3 Then pull the whole rail forward ...

Страница 21: ...door on the left and right hand sides Close the door a little further and pull it out figure B Attaching the door Reattach the oven door in the reverse sequence to removal 1 When attaching the oven door ensure that both hinges are inserted straight into the opening figure A 2 The notch on the hinge must engage on both sides figure B 3 Fold back both locking levers figure C Close the oven door Warn...

Страница 22: ...ctions at the end of this instruction manual Tested for you in our cooking studio on page 24 Warning Risk of injury Incorrect repairs are dangerous Do not attempt to repair the appliance yourself Repairs must only be carried out by one of our trained after sales engineers If the appliance is defective call the after sales service Warning Risk of electric shock Incorrect repairs are dangerous Repai...

Страница 23: ... the correct position Push the bulb in firmly 4 Screw the glass cover back on Depending on the appliance model the glass cover may have a sealing ring If the glass cover has a sealing ring put it back in place before screwing the cover back on 5 Remove the tea towel and switch on the circuit breaker 4Customer service CustomerserviceOur after sales service is there for you if your appliance needs t...

Страница 24: ...ional information can be found in the baking tips listed after the settings tables Remove any accessories that are not being used from the cooking compartment This will allow you to achieve optimal cooking results while saving energy Gentle hot air heating function Gentle hot air is an intelligent heating function that allows you to gently cook meat fish and baked items The appliance optimally con...

Страница 25: ...ace cookware containing water onto the bottom of the cooking compartment The change in temperature can cause damage to the enamel Some food turns out better if it is baked in several stages These dishes are indicated in the table The setting values for bread dough apply to both dough placed on a baking tray and dough placed in a loaf tin Cakes in tins Cakes on trays Dish Accessories cookware Shelf...

Страница 26: ...baking tray 3 1 180 200 25 35 Puff pastry 3 levels Baking trays universal pan 5 3 1 170 190 30 45 Choux pastry Universal pan 3 190 210 35 50 Choux pastry 2 levels Universal pan baking tray 3 1 190 210 35 45 Dish Accessories cookware Shelf position Heating function Temperature in C Cooking time in mins Viennese whirls Universal pan 3 140 150 30 40 Viennese whirls 2 levels Universal pan baking tray ...

Страница 27: ...200 20 25 Pizza frozen deep pan x 2 Universal pan wire rack 3 1 170 190 20 30 Mini pizzas Universal pan 3 190 210 10 20 Savoury cakes in a tin 28 cm springform cake tin 2 170 190 40 50 Quiche Tart dish or tin 2 190 210 35 45 Tart Ovenproof dish 2 170 190 55 65 Empanadas Universal pan 3 180 190 35 45 Börek Universal pan 2 220 240 30 40 Preheat You want to find out whether the baked item is complete...

Страница 28: ...okware fits in the cooking compartment The baked item is too light on top and too dark underneath Bake the cake one level higher in the oven the next time The baked item is too dark on top and too light underneath Bake the cake one level lower in the oven the next time Select a lower temperature and extend the baking time The baked item is too dark in a tin or loaf tin Place the baking tray in the...

Страница 29: ...ded setting values The setting values are based on the assumption that unstuffed chilled ready to roast poultry meat or fish is placed into a cold cooking compartment In the table you can find specifications for poultry meat and fish with default values for the weight If you wish to prepare heavier poultry meat or fish always use the lower temperature If roasting several joints use the weight of t...

Страница 30: ... 50 Small turkey 2 5 kg Wire rack 2 7 180 200 80 100 Turkey breast boned 1 kg Cookware covered 2 240 260 80 100 Turkey thigh bone in 1 kg Wire rack 2 7 180 200 90 100 Dish Accessories cook ware Shelf posi tion Heating function Step Temperature in C Cooking time in min Fillet of beef medium 1 kg Cookware uncovered 3 210 220 45 55 Pot roasted beef 1 5 kg Cookware uncovered 2 6 200 220 100 120 Sirloi...

Страница 31: ...he roast is too dark and the crack ling is burned in places and or the roast is too dry Check the shelf position and temperature Select a lower temperature the next time and reduce the roasting time if necessary The crackling is too thin Increase the temperature or switch on the grill briefly at the end of the roasting time The roast looks good but the juices are burnt Next time use a smaller roas...

Страница 32: ...for round one litre jars Caution Do not use jars that are larger or taller than this The lids could crack Only use fruit and vegetables in good condition Wash them thoroughly The times given in the tables are a guide only The time will depend on the room temperature number of jars and the quantity and temperature of the contents Before you switch off the appliance or change the cooking mode check ...

Страница 33: ... the ingredients For this reason the values indicated in the settings table are intended as a guide only Defrosting For defrosting frozen fruit vegetables and baked items Poultry meat and fish should ideally be defrosted in the refrigerator Not suitable for cream cakes or cream gateaux Use the following shelf positions when defrosting 1 wire rack Position 2 2 wire racks Positions 3 1 Tip Food that...

Страница 34: ...ngs listed in the table for similar food as reference Additional information can be found in the baking tips listed after the settings tables Frozen food Accessories Position Heating function Temperature For example cream gateaux buttercream cakes gateaux with chocolate or sugar icing fruit chicken sausage and meat bread and bread rolls cakes and other baked items Wire rack 2 B Thetemperatureselec...

Страница 35: ...6 ...

Страница 36: ...JBODFT 4FSWJDF SFF BOE FBTZ SFHJTUSBUJPO o BMTP PO NPCJMF QIPOFT XXX CPTDI IPNF DPN XFMDPNF PPLJOH GPS IFMQ PV MM GJOE JU IFSF YQFSU BEWJDF GPS ZPVS PTDI IPNF BQQMJBODFT OFFE IFMQ XJUI QSPCMFNT PS B SFQBJS GSPN PTDI FYQFSUT JOE PVU FWFSZUIJOH BCPVU UIF NBOZ XBZT PTDI DBO TVQQPSU ZPV XXX CPTDI IPNF DPN TFSWJDF POUBDU EBUB PG BMM DPVOUSJFT BSF MJTUFE JO UIF BUUBDIFE TFSWJDF EJSFDUPSZ 3PCFSU PTDI BVT...

Отзывы: