background image

Time-setting options

 en

11

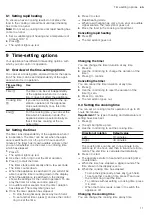
8.1 Setting rapid heating

To ensure an even cooking result, do not place the
food in the cooking compartment until rapid heating
has come to an end.

Note: 

Do not set a cooking time until rapid heating has

come to an end.

1.

Set a suitable type of heating and a temperature of
at least 100 °C.

2.

Press  ⁠.

a

The symbol lights up red.

3.

Press   to start.

a

Rapid heating starts.

a

When rapid heating has come to an end, an audible
signal sounds. The red symbol goes out.

4.

Place the food in the cooking compartment.

Cancelling rapid heating

Press  ⁠.

a

The red symbol goes out.

9  Time-setting options

Your appliance has different time-setting options, with
which you can control its operation.

9.1 Overview of the time-setting options

You can set a cooking time and end time for the opera-
tion. The timer can be set independently of the appli-
ance when it is in operation.

Time-setting
option

Use

Timer 

The timer can be set independently
of the appliance when it is in opera-
tion. It does not affect the appliance.

Cooking time

If you set a cooking time for the op-
eration, operation of the appliance
stops automatically once this time
has elapsed.

End 

For the cooking time, you can set the
time at which operation ends. The
appliance starts up automatically so
that it finishes cooking at the re-
quired time.

9.2 Setting the timer

The timer runs independently of the appliance when it
is in operation. The timer can be set when the appli-
ance is switched on or off, up to 23 hours and 59
minutes. The timer has its own audible signal so that
you can tell whether it is the timer or a cooking time
which has elapsed.

1.

Press  ⁠.

a

The symbol lights up red.

2.

Use the control ring to set the timer duration.

3.

Press   to start the timer.
The timer starts automatically after a few seconds.

a

The timer counts down.

a

When the appliance is switched off, you will still be
able to see the timer counting down in the display.

a

When the appliance is switched on, the display
shows the settings for the current operation. To dis-
play the timer for a few seconds, press  ⁠.

a

An audible signal sounds once the timer duration
has elapsed. The red symbol goes out.

4.

Once the timer duration has elapsed:

To stop the signal early, press any touch field.

To set another timer, press   and use the control
ring to set the time.

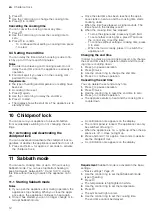
Changing the timer

You can change the timer duration at any time.

1.

Press  ⁠.

2.

Use the control ring to change the duration of the
timer.

3.

Press   to confirm.

Cancelling the timer

You can cancel the timer duration at any time.

1.

Press  ⁠.

2.

Use the control ring to reset the duration of the
timer to zero.

3.

Press   to confirm.

a

The red symbol goes out.

9.3 Setting the cooking time

You can set a cooking time for operation of up to 23
hours 59 minutes.

Requirement:

 The type of heating and temperature or

setting have been set.

1.

Press  ⁠.

a

The symbol lights up red.

2.

Use the control ring to set the cooking time.

Direction of rotation

Default value

Left

10 minutes

Right

30 minutes

The cooking time can be set in one-minute incre-
ments up to one hour, and then in five-minute incre-
ments. The end time is calculated automatically.

3.

Press   to start.

a

The appliance starts to heat and the cooking time
counts down.

a

When the time has elapsed, a signal sounds. The
time shown in the display is zero.

4.

When the cooking time has elapsed:

To stop the signal early, press any touch field.

To set another cooking time, press   and use
the control ring to set the time.

To continue without setting a cooking time, press

 to start.

When the food is ready, press   to switch the
appliance off.

Changing the cooking time

You can change the cooking time at any time.

Содержание HBG633B.1

Страница 1: ...Register your new device on MyBosch now and get free benefits bosch home com welcome Oven HBG633B 1 en User manual and installation instructions ...

Страница 2: ...ls and drinks In private households and in enclosed spaces in a domestic environment Up to an altitude of max 4000 m above sea level 1 3 Restriction on user group This appliance may be used by children aged 8 or over and by people who have reduced physical sensory or mental abilities or inad equate experience and or knowledge provided that they are supervised or have been instructed on how to use ...

Страница 3: ...e hinges on the appliance door move when the door is opened and closed which could trap your fingers Keep your hands away from the hinges Components inside the appliance door may have sharp edges Wear protective gloves WARNING Risk of electric shock Incorrect repairs are dangerous Repairs to the appliance should only be carried out by trained specialist staff Only use genuine spare parts when repa...

Страница 4: ... cooking compartment Leaving the appliance to cool down with the door open will damage the front of neighbouring kitchen units over time Always allow the cooking compartment to cool down with the door closed after cooking at high temperatures Take care not to trap anything in the appliance door Only leave the cooking compartment to dry with the door open if a lot of moisture was produced during op...

Страница 5: ...o so in succession or in parallel The cooking compartment is heated after baking the first dish This reduces the baking time for the second cake If the cooking time is relatively long you can switch the appliance off 10 minutes before the cooking time ends There will be enough residual heat to finish cooking the dish Remove any accessories that are not being used from the cooking compartment Acces...

Страница 6: ...e current settings options or relevant information 4 2 Buttons Use the buttons on the left and right hand side of the control panel to switch your device or the operating mode on and off Button Function Use On Off Switch the appliance on or off Start Stop Short press Start or pause operation Press and hold for approx three seconds Cancel operation 4 3 Touch fields Use the touch fields to select di...

Страница 7: ...ows you where you are in the selection list The display ring may be continuous or divided into segments de pending on the settings area and the length of the selection list Progress indicator During operation the display ring displays the pro gress and turns red at second long intervals As the cooking time counts down one segment of the display ring disappears every second Temperature display The ...

Страница 8: ...ically 5 Accessories Use original accessories These have been made espe cially for your appliance Note Accessories may become deformed if they get hot Deformation has no effect on function As the ac cessory cools down it will regain its original shape The accessories supplied may differ depending on the appliance model Accessories Use Wire rack Cake tins Ovenproof dishes Cookware Meat e g roasting...

Страница 9: ...he first time or following a lengthy power cut you need to configure the settings before you can use it It may take a few seconds for the settings to appear in the display 1 Turn the control ring to change the setting as re quired Possible settings Language Clock 2 Press to confirm a The next setting appears 3 Work through the settings and make changes as re quired a After the last setting a note ...

Страница 10: ...st suitable type of heating for your food can be found in the description of the type of heating Note You can also set a cooking time and end time on the appliance Time setting options Page 11 Changing the type of heating When you change the type of heating the other set tings will also be reset 1 Press to pause operation 2 Press a The first type of heating appears in the display with the correspo...

Страница 11: ...ss to start the timer The timer starts automatically after a few seconds a The timer counts down a When the appliance is switched off you will still be able to see the timer counting down in the display a When the appliance is switched on the display shows the settings for the current operation To dis play the timer for a few seconds press a An audible signal sounds once the timer duration has ela...

Страница 12: ...continue operation Cancelling the end time You can delete the set end at any time 1 Press to pause operation 2 Press twice 3 Use the control ring to reset the end time to zero 4 Press to continue operation a The appliance starts to heat and the cooking time counts down 10 Childproof lock You can secure your appliance to prevent children from accidentally switching it on or changing the set tings 1...

Страница 13: ...to confirm the messages in the display a The first basic setting is shown in the display 3 Use the control ring to change the basic setting 4 Press a The next basic setting appears in the display 5 Use to scroll through the basic settings and if re quired use the control ring to change any of these settings 6 To save the changes press and hold for approx three seconds Note Your changes to the basi...

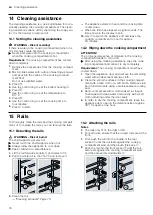
Страница 14: ...ance door Page 17 Door cover Made of stainless steel Stainless steel cleaner Made of plastic Hot soapy water Do not use glass cleaner or a glass scraper Do not use stainless steel care products Tip Remove the door cover for thorough cleaning Appliance door Page 17 Stainless steel in terior door frame Stainless steel cleaner Discolouration can be removed using stainless steel cleaner Do not use sta...

Страница 15: ...is in operation the self clean ing surfaces absorb splashes from baking roasting or grilling and break them down If the self cleaning sur faces no longer clean themselves adequately during operation heat up the cooking compartment specific ally to the right temperature ATTENTION If you do not clean the self cleaning surfaces regularly they may become damaged If dark stains are visible on the self ...

Страница 16: ...osion After using the cleaning assistance wipe the cook ing compartment and allow it to dry completely Requirement The cooking compartment must have cooled down 1 Open the appliance door and remove the remaining water with an absorbent sponge cloth 2 Clean the smooth surfaces in the cooking compart ment with a dish cloth or a soft brush Remove stub born food remnants using a stainless steel scouri...

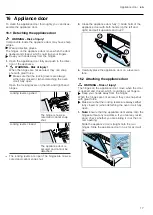
Страница 17: ... shut Locking levers closed The appliance door is secured and cannot be detached a The locking levers are open The hinges are now se cured and cannot snap shut 3 Close the appliance door fully Grab hold of the appliance door with both hands on the left and right and pull it upwards and out 4 Carefully place the appliance door on a level sur face 16 2 Attaching the appliance door WARNING Risk of in...

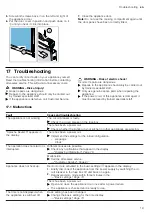
Страница 18: ...n the appliance door 6 Place a folded up tea towel in the appliance door Pull the front pane up and out 7 Set the front pane down on a level surface with the door handle facing down 8 WARNING Risk of injury Scratched glass in the appliance door may develop into a crack Do not use any harsh or abrasive cleaners or sharp metal scrapers to clean the glass on the oven door as they may scratch the surf...

Страница 19: ... Fault Cause and troubleshooting The appliance is not working The circuit breaker is faulty Check the circuit breaker in the fuse box There has been a power cut Check whether the lighting in your kitchen or other appliances are working Sprache Deutsch appears in the display There has been a power cut Implement the settings for the initial configuration Language Clock The operation does not start o...

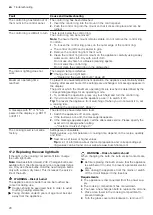
Страница 20: ...e Page 11 A message with D or E ap pears in the display e g D0111 or E0111 The electronics have detected a fault 1 Switch the appliance off and on again a If the fault was a one off the message disappears 2 If the message appears again call the after sales service Please specify the exact error message when calling Customer Service Page 21 The cooking result is not satis factory Settings were unsu...

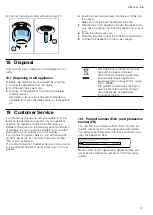
Страница 21: ...l and electronic appliances waste electrical and electronic equip ment WEEE The guideline determines the frame work for the return and recycling of used appliances as applicable throughout the EU 19 Customer Service If you have any queries on use are unable to rectify faults on the appliance yourself or if your appliance needs to be repaired contact Customer Service Detailed information on the war...

Страница 22: ...ition 2 levels Universal pan Baking tray 3 1 2 levels Baking tins on two wire racks 3 1 Baking on two or more levels Shelf position 3 levels Baking tray Universal pan Baking tray 5 3 1 4 levels 4 wire racks with greaseproof pa per 5 3 2 1 Use the 4D hot air heating function Note Items that are placed in the appliance on baking trays or in baking tins dishes at the same time will not necessarily be...

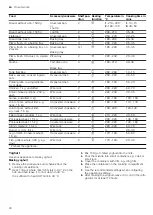
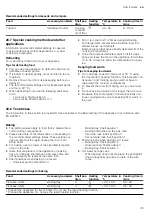
Страница 23: ... after baking 20 5 Cooking ready meals Take ready meals out of the packaging If you are warming or cooking the ready meal in cookware make sure that the cookware is heat res istant 20 6 List of foods Recommended settings for a variety of foods sorted into food categories Recommended settings for various types of food Food Accessory cookware Shelf pos ition Heating function Temperature in C Cooking...

Страница 24: ...g neck 1 5 kg Uncovered cookware 2 180 190 110 130 Joint of pork without rind e g neck 1 5 kg Uncovered cookware 2 190 200 120 140 Fillet of beef medium 1 kg Wire rack 2 210 220 40 50 Pot roasted beef 1 5 kg Covered cookware 2 200 220 130 160 Pot roasted beef 1 5 kg Covered cookware 2 200 220 140 160 Sirloin medium 1 5 kg Wire rack 2 220 230 60 70 Burger 3 4 cm thick Wire rack 4 3 25 30 Leg of lam...

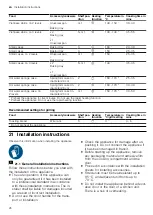
Страница 25: ...ent To prevent the food from drying out you can cover it Do not keep food warming for longer than 2 hours Be aware that some types of food will actually con tinue cooking when you are keeping them warm in the oven 20 8 Test dishes The information in this section is provided for test institutes to facilitate testing of the appliance in accordance with EN 60350 1 Baking The setting values apply to f...

Страница 26: ...ng function Temperature in C grill setting Cooking time in mins Toasting bread Wire rack 5 3 1 4 6 1 Do not preheat the appliance 21 Installation instructions Observe this information when installing the appliance 21 1 General installation instructions Follow these instructions before you start with the installation of the appliance The safe operation of this appliance can only be guaranteed if it...

Страница 27: ... of electronic implants must stay at least 10 cm away from the control panel or controls during the installation WARNING Risk of fire It is dangerous to use an extended power cord and non approved adapters Do not use extension cables or multiple socket strips If the power cord is too short contact Cus tomer Service Only use adapters approved by the manu facturer ATTENTION Carrying the appliance by...

Страница 28: ...fit the appliance up to a height which allows accessories to be easily removed 21 6 Corner installation Observe the installation dimensions and the installation instructions when installing in a corner To ensure that the appliance door can be opened you must take the minimum dimensions into consid eration when installing in a corner The dimension is dependent on the thickness of the unit front and...

Страница 29: ... a protective contact plug Note Only a licensed professional may connect the ap pliance Damage caused by incorrect connection is not covered under the warranty An all pole isolating switch must be integrated into the permanent electrical installation according to the install ation regulations 1 Identify the phase and neutral conductors in the socket The appliance may be damaged if it is not connec...

Страница 30: ......

Страница 31: ......

Страница 32: ...ooking for help You ll find it here Expert advice for your Bosch home appliances help with problems or a repair from Bosch experts Find out everything about the many ways Bosch can support you www bosch home com service Contact data of all countries are listed in the attached service directory 9001626365 9001626365 010215 en Robert Bosch Hausgeräte GmbH Carl Wery Straße 34 81739 München GERMANY ww...

Отзывы: