background image

Operating the appliance       

en

5

Air recirculation

Note: 

To bind odours in air recirculation mode, you 

must install an activated carbon filter. The different 

options for operating the appliance in air recirculation 

mode can be found in the brochure. Alternatively, ask 

your dealer. The required accessories are available 

from specialist retailers, from customer service or from 

the Online Shop.

1

Operating the appliance

Operating the appliance

These instructions apply to several appliance variants. 

It is possible that individual features are described 

which do not apply to your appliance.

Note: 

Switch on the extractor hood when you start 

cooking and switch it off again several minutes after you 

have finished cooking. This is the most effective way of 

removing the kitchen fumes.

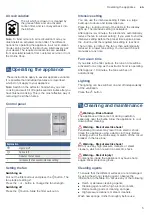
Control panel

Setting the fan

Switching on

Pull out the filter pull-out and press the 

#

 button. The 

fan starts at setting 2.
Press the + or - button to change the fan strength.

Switching off

Press the 

#

 button. Slide the filter pull-out in.

Intensive setting

You can use the intensive setting if there is a large 

build-up of odours and fumes/vapours.
Press the + button until all of the LEDs in the display 

light up. The intensive setting is activated. 
After approx. six minutes, the electronics automatically 

reduce the fan to a lower setting . If you want to end the 

intensive setting before the preset time expires, press 

the - button until the required fan setting is reached.
The run time is limited. The fan is then automatically 

reduced to a lower fan setting. You can switch back 

manually at any time.

Fan run-on time

If you slide in the filter pull-out, the run-on time will be 

activated for as long as the extractor hood is operating.
After approx. 10 minutes, the fan switches off 

automatically.

Lighting

The lighting can be switched on and off independently 

of the ventilation.
Press the 

A

 button.

2

Cleaning and maintenance

Cleaning and maintenance

:

Warning – Risk of burns! 

The appliance will become hot during operation, 

especially near the bulbs. Allow the appliance to cool 

down before cleaning.

:

Warning – Risk of electric shock! 

Penetrating moisture may result in an electric shock. 

Clean the appliance using a damp cloth only. Before 

cleaning, pull out the mains plug or switch off the circuit 

breaker in the fuse box.

:

Warning – Risk of electric shock! 

Do not use any high-pressure cleaners or steam 

cleaners, which can result in an electric shock.

:

Warning – Risk of injury! 

Components inside the appliance may have sharp 

edges. Wear protective gloves.

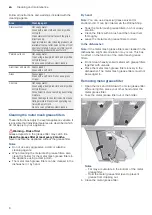
Cleaning agents

To ensure that the different surfaces are not damaged 

by using the wrong cleaning agent, observe the 

information in the table. Do not use any of the following:

Harsh or abrasive cleaning agents,

Cleaning agents with a high alcohol content,

Hard scouring pads or cleaning sponges,

High-pressure cleaners or steam cleaners.

Wash new sponge cloths thoroughly before use.

The air which is drawn in is cleaned by 

the grease filters and an activated 

carbon filter, and is conveyed back into 

the kitchen.

Explanation

<

Light on/off

#

Fan on/off

-

Reduces the fan speed

+

Increases the fan speeds/intensive setting

Содержание DFS067A50A

Страница 1: ...3FHJTUFS RXU QHZ GHYLFH RQ 0 RVFK QRZ DQG JHW IUHH EHQHILWV CPTDI IPNF DPN XFMDPNF en Instructions for installation and use Extractor hood Extractor hood ...

Страница 2: ... location This appliance is intended for domestic use and the household environment only The appliance is not intended for use outside Do not leave the appliance unattended during operation The manufacturer is not liable for damage which is caused by improper use or incorrect operation This appliance is intended for use up to a maximum height of 2000 metres above sea level This appliance may be us...

Страница 3: ...ase consult your responsible Master Chimney Sweep He is able to assess the house s entire ventilation setup and will suggest the suitable ventilation measures to you Unrestricted operation is possible if the vapour extractor hood is operated exclusively in the circulating air mode Warning Risk of fire Grease deposits in the grease filter may catch fire Clean the grease filter at least every 2 mont...

Страница 4: ...1 slope 7Environmental protection EnvironmentalprotectionYour new appliance is particularly energy efficient Here you can find tips on how to save even more energy when using the appliance and how to dispose of your appliance properly Saving energy During cooking ensure that there is a sufficient supply of air to enable the extractor hood to work efficiently and with a low level of operating noise...

Страница 5: ...mited The fan is then automatically reduced to a lower fan setting You can switch back manually at any time Fan run on time If you slide in the filter pull out the run on time will be activated for as long as the extractor hood is operating After approx 10 minutes the fan switches off automatically Lighting The lighting can be switched on and off independently of the ventilation Press the A button...

Страница 6: ... mesh grease filters together with utensils Place the metal mesh grease filters loosely in the dishwasher The metal mesh grease filters must not be wedged in Removing metal grease filter 1 Open the lock and fold down the metal grease filter While doing this place your other hand under the metal grease filter 2 Take the metal grease filter out of the holder Notes Fat may accumulate in the bottom of...

Страница 7: ...ey have been switched off Allow the halogen bulbs to cool down before replacing them Warning Risk of electric shock When changing the bulbs the bulb socket contacts are live Before changing the bulb unplug the appliance from the mains or switch off the circuit breaker in the fuse box Important Only use bulbs of the same type and wattage Replacing halogen bulbs Note When inserting halogen bulbs do ...

Страница 8: ...he repair is carried out by trained service technicians who carry original spare parts for your appliances Accessories not included in the scope of delivery Note These instructions apply to several appliance models It may be the case that an optional accessory that is listed does not apply for your appliance Note Observe the installation instructions in the accessory E no FD no After sales service...

Страница 9: ...t individual features are described which do not apply to your appliance This appliance is installed in a upper cabinet Follow the enclosed installation instructions for additional special accessories e g for circulating air mode The surfaces of the appliance are sensitive Avoid damaging them during installation Appliance width 60 cm Appliance width 90 cm PP PP PP PP PP PP PP PP ...

Страница 10: ...pendent heat producing appliance is being operated Room air dependent heat producing appliances e g gas oil wood or coal operated heaters continuous flow heaters or water heaters obtain combustion air from the room in which they are installed and discharge the exhaust gases into the open air through an exhaust gas system e g a chimney In combination with an activated vapour extractor hood room air...

Страница 11: ...ording to the installation regulations The permanent electrical installation must only be wired by a professional electrician We recommend installing a residual current circuit breaker RCCB in the appliance s power supply circuit Warning Danger of suffocation Packaging material is dangerous to children Never allow children to play with packaging material KGeneral information GeneralinformationExha...

Страница 12: ...installing a residual current circuit breaker RCCB in the appliance s power supply circuit Preparing the units The fitted unit must be level and have sufficient load bearing capacity The max weight of the extractor hood is 18 kg Appliance dimensions and safety clearances Observe the appliance s dimensions Comply with the safety clearances If the installation instructions for the gas cooking applia...

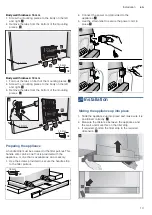
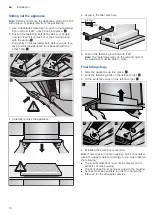
Страница 13: ...the filter pull out This handle strip can be one that is provided with the appliance or one that is available as an accessory 1 Use the screws provided to secure the handle strip to the filter pull out 2 Connect the power cord provided to the appliance 3 Use the strain relief to secure the power cord in place 5Installation InstallationSliding the appliance up into place 1 Slide the appliance up in...

Страница 14: ...the appliance 4 Screw in the filler strip fully 5 Push in the fastening bolt and turn it 90 Note The fastening pieces on the left and right of the appliance must be able to move Final fitting stage 1 Slide the appliance up into place 2 Lock the fastening bolts on the left and right 3 Fit the protective caps on the left and right ª 4 Establish the electrical connection Note The extractor hood s hou...

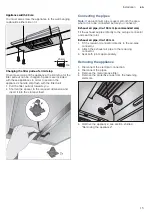
Страница 15: ...lot specified Connecting the pipes Note If an aluminium pipe is used smooth the area where it is to be connected before you connect it Exhaust air pipe dia 150 mm recommended size Fit the exhaust air pipe directly to the air pipe connector and seal the joint Exhaust air pipe dia 120 mm 1 Fit the reducing connector directly to the air pipe connector 2 Attach the exhaust air pipe to the reducing con...

Страница 16: ... QQMJBODFT 4FSWJDF UHH DQG HDV UHJLVWUDWLRQ DOVR RQ PRELOH SKRQHV XXX CPTDI IPNF DPN XFMDPNF PPLJOH GPS IFMQ PV MM GJOE JU IFSF SHUW DGYLFH IRU RXU RVFK KRPH DSSOLDQFHV QHHG KHOS ZLWK SUREOHPV RU D UHSDLU IURP RVFK H SHUWV LQG RXW HYHU WKLQJ DERXW WKH PDQ ZD V RVFK FDQ VXSSRUW RX XXX CPTDI IPNF DPN TFSWJDF POUBDU EBUB PG BMM DPVOUSJFT BSF MJTUFE JO UIF BUUBDIFE TFSWJDF EJSFDUPSZ 3PCFSU PTDI BVTHFS...

Отзывы: