background image

IT

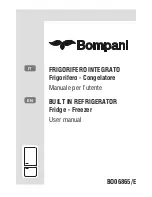
FRIGORIFERO INTEGRATO

Frigorifero - Congelatore

Manuale per l’utente

BO06865/E

EN

BUILT IN REFRIGERATOR

Fridge - Freezer

User manual

Содержание BO06865

Страница 1: ...IT FRIGORIFERO INTEGRATO Frigorifero Congelatore Manuale per l utente BO06865 E EN BUILT IN REFRIGERATOR Fridge Freezer User manual...

Страница 2: ......

Страница 3: ...9 Raschietto in plastica 9 Portabottiglie 9 SISTEMAZIONE DEL CIBO NELL ELETTRODOMESTICO 10 Scomparto frigo 10 Scomparto congelatore 10 PULIZIA E MANUTENZIONE 11 Sbrinamento dello Scomparto frigorifero...

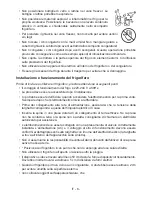
Страница 4: ...rigerante possibile consultare l etichetta incollata sul dispositivo sarebbe opportuno prestare particolare attenzione in fase di trasporto e di installazione al fine di evitare il danneggiamento degl...

Страница 5: ...bambini per evitare che giochino con l apparecchiatura Una presa speciale a terra in dotazione con il cavo di rete del frigorifero Questa presa dovrebbe essere utilizzata con una presa speciale a ter...

Страница 6: ...icati Non progettato per scopi industriali o commerciali Un uso di questo tipo provocher un annullamento della garanzia e la nostra azienda non si render responsabile di eventuali perdite verificatesi...

Страница 7: ...ce solare diretta Non utilizzare il frigorifero all aperto o lasciare sotto la pioggia Il dispositivo si deve trovare ad almeno 50 cm da stufe forni e dispositivi di riscaldamento Dovrebbe inoltre tro...

Страница 8: ...per essere usato esclusivamente in cucine componibili adatte I piedini anteriori regolabili dovrebbero essere fissati all altezza giusta per consentire al frigorifero di funzionare in modo stabile e...

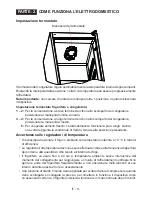
Страница 9: ...a condizione di freddo tornare alla posizione precedente Avvertenze sulle regolazioni di temperatura Si sconsiglia di azionare il frigo in ambienti con temperature inferiore a 10 C in termini di effic...

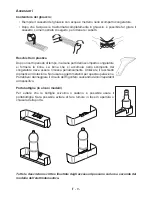
Страница 10: ...rumore in fase di apertura o chiusura della porta Tutte le descrizioni scritte e illustrate degli accessori possono variare a seconda del modello dell elettrodomestico Raschietto in plastica Dopo un c...

Страница 11: ...ti speciali da congelatore carta argentata di un certo spessore nel dubbio incartare due volte sacchetti in polietilene e contenitori di plastica sono l ideale Non lasciare che gli alimenti freschi da...

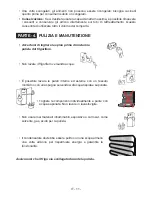
Страница 12: ...abili espositivo o corrosivi come solvente gas acido per la pulizia Il condensatore dovrebbe essere pulito con una scopa almeno una volta all anno per risparmiare energia e garantire la funzionalit As...

Страница 13: ...o del congelatore deve essere rimossa periodicamente Non usare oggetti metallici per questa operazione Potrebbero danneggiare il circuito del frigorifero causando danni irreparabili al dispositivo Uti...

Страница 14: ...e fasce in fase di riposizionamento e trasporto Mettere il frigorifero in posizione eretta TRASPORTO E RIPOSIZIONAMENTO PARTE 5 PRIMA DI CHIAMARE IL SERVIZIO ASSISTENZA PARTE 6 Se il frigorifero non f...

Страница 15: ...raffreddamento Classe climatica Temperatura ambiente o C T Tra 16 e 43 o C ST Tra 16 e 38 o C N Tra 16 e 32 o C SN Tra 10 e 32 o C Avvertenze Il fusibile termico di protezione del compressore si danne...

Страница 16: ...la porta dell elettrodomestico a lungo 6 Mantenere chiusi i coperchi di ogni vano a diversa temperatura nell elettrodomestico vano verdure ripiani congelatori ecc 7 Le guarnizioni della porta devono...

Страница 17: ...ELETTRODOMESTICO E SCOMPARTI PARTE 7 A Vano del frigorifero A Vano del freezer 1 Manopola del termostato 2 Copertura lampadina frigorifero 3 Ripiani frigorifero 4 Ripiano del cassetto verdura 5 Vano...

Страница 18: ...rire al lato opposto della cerniere dello sportello fig D fig E 5 Sollevare l elettrodomestico ed inserirlo nel mobile da cucina Spingere l apparecchio verso il lato opposto alle cerniere della porta...

Страница 19: ...IT 18 Figure A A B C D E 1770 772 684 934 1770 1790 mm Figure B Figure C Figure D Figure E...

Страница 20: ...IT 19 Figure F Figure G Figure H Figure J...

Страница 21: ...a porta inferiore18 sul lato opposto 5 Spostare i tappi dei fori17 nei fori vuoti del lato opposto 6 Posizionare la porta inferiore10 sopra il perno della porta inferiore18 e chiuderla nel mobile cont...

Страница 22: ...e Ricambi Originali rivolgersi al numero unico Oppure visitare il sito www bompani it al costo massimo di 2 centesimi di euro al minuto iva inclusa anche da cellulare CONDIZIONI DI GARANZIA Le Condiz...

Страница 23: ...9 Bottle holder In some models 29 FOOD STORAGE IN THE APPLIANCE 30 Refrigerator Compartment 30 Freezer Compartment 30 CLEANING AND MAINTENANCE 31 Defrosting the Refrigerator Compartment 32 Defrosting...

Страница 24: ...ns If your appliance uses R600a as a refrigerant you can learn this information from the label on the cooler you should be careful during shipment and installation to prevent your appliance s cooler e...

Страница 25: ...that they do not play with the appliance A specially grounded plug has been connected to the power cable of your refrigerator This plug should be used with a specially grounded socket of 16 amperes If...

Страница 26: ...sible of the damage occurred due to misuse Follow all instructions on your appliance and instruction manual and keep this manual in a safe place to resolve the problems that may occur in the future Th...

Страница 27: ...hands Do not eat ice cream and ice cubes immediately after you take them out of the freezer department Do not re freeze the frozen goods after being melted This may cause health issues like food poiso...

Страница 28: ...given in the The installation procedure into the kitchen unit is given in the Installation Manual This product is intended to be used in proper kitchen units only The adjustable front legs should be a...

Страница 29: ...position Warnings about Temperature Adjustments It is not recommended that you operate your fridge in environments colder than 10 C in terms of its efficiency Temperature adjustments should be made ac...

Страница 30: ...you can twist the tray as shown below to get the ice cube Bottle holder In some models In order to prevent bottles from slipping or falling over you can use the bottle holder It also helps prevent noi...

Страница 31: ...al Do not allow the fresh food to be frozen to come into contact with the already frozen food Always mark the date and the content on the pack and do not exceed the stated storage time In case of a po...

Страница 32: ...or a sponge using warm and soapy water Remove the parts individually and clean with soapy water Do not wash in washing machine Never use flammable explosive or corrosive material like thinner gas acid...

Страница 33: ...the freezer compartment should be removed periodically Do not use sharp metal objects for this operation They could puncture the refrigerator circuit and cause irreparable damage to the unit Use the p...

Страница 34: ...sper should be taken out or fixed with bands in order to prevent movement Carry your fridge in the upright position SHIPMENT AND REPOSITIONING PART 5 BEFORE CALLING YOU RE AFTER SALES SERVICE PART 6 I...

Страница 35: ...system is not stabilised This is quite normal and the fridge will restart after 4 or 5 minutes The cooling unit of your refrigerator is hidden in the rear wall Therefore water droplets or icing may o...

Страница 36: ...and liquids they must be covered Otherwise humidity increases at the appliance Therefore the working time gets longer Also covering drinks and liquids helps preserve the smell and taste 5 When placin...

Страница 37: ...del PARTS OF THE APPLIANCE AND THE COMPARTMENTS PART 7 A Refrigerator compartment B Freezer compartment 1 Thermostat knob 2 Refrigerator lamp cover 3 Refrigerator shelves 4 Crisper shelf 5 Crisper 6 F...

Страница 38: ...on the side panel of the appliance and stick it on reverse side of the door hinges of the appliance fig D fig E 5 Raise appliance and slide into kitchen unit Push appliance to the reverse side of door...

Страница 39: ...EN 38 Figure A A B C D E 1770 772 684 934 1770 1790 mm Figure B Figure C Figure D Figure E...

Страница 40: ...EN 39 Figure F Figure G Figure H Figure J...

Страница 41: ...ge12 4 Take door lower pin18 to opposite side 5 Take hole plugs17 to empty holes on opposite side 6 Place lower door10 over door lower pin18 and close onto cabinet 7 Unscrew fixing bracket13 Position...

Страница 42: ......

Страница 43: ......

Страница 44: ...52131547...

Отзывы: