15
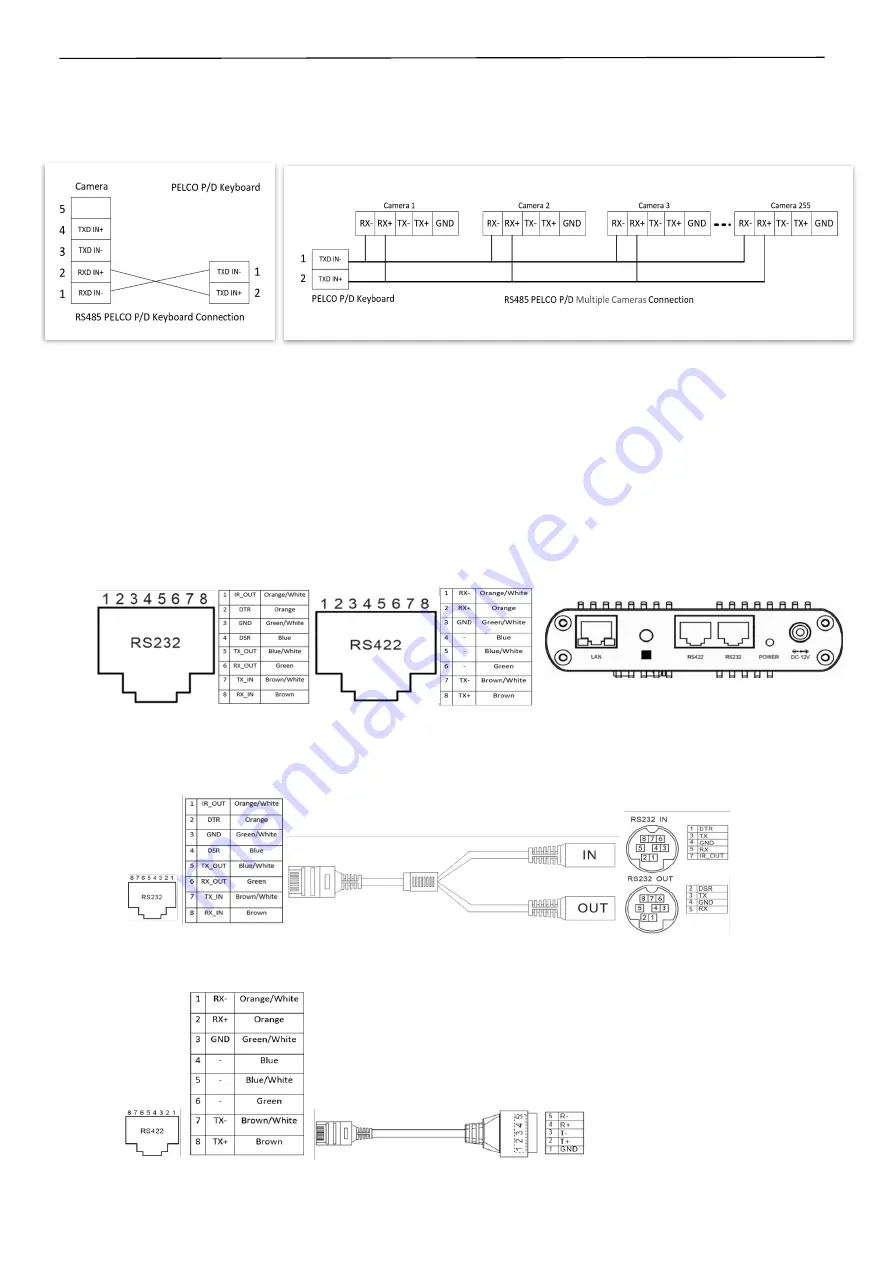
PELCO P/D Keyboard RS485 Connection
1.
Use PELCO P/D compatible keyboard.
2.
Use preset 95# on the keyboard to bring up/exit camera OSD menu.
3.
Use joystick and Button “OPEN” or “CLOSE” to navigate OSD menu.
4.
To operate keyboard, please refer to the user manual of the keyboard you are using.
Control the camera using HDBaseT Receiver
1.
Set RS232 control method on Bottom Dip Switch (See page 18).
2.
Set Baud Rate on Bottom Dip Switch to the same as Baud Rate setting on the keyboard you are using. (See page 18).
3.
Reboot the camera by turning it Off/On after the Bottom Dip Switch has been set up correctly.
4.
Device supports RS232 and RS422/485 control.
5.
RS232 on HDBaseT receiver supports daisy chain control.
6.
Use Cat 6 network cable to connect the camera to HDBaseT Receiver.
7.
Control connection in between HDBaseT Receiver and keyboard refer to the camera control connection.
RS232/RS422 Control Connection
There are two ways to make the RS232/RS422 control cable connection:
1.
Use Cat 6 network cable to make the RJ45 connectors to connect to the camera. RJ45 Connection instruction is
following:
2.
Use extension cables included to connect the RS232/RS422 control cable:
a)
RJ45 to RS232
extension adapter cable.
This extension cable supports daisy chain control. Use connector “IN/OUT” for 8-Pin Mini Din Serial RS232 Cable
connection.
b)
RJ45 to RS422
extension adapter cable.
You can use this extension cable to operate multiple cameras.
Содержание 8 Series
Страница 10: ...10 System Configuration Connection ...
Страница 27: ...27 Dimension Unit mm ...
Страница 28: ...28 Installation Screw up the rack mount on HDBaseT Securing the HDMI cable on metal cable rack ...
Страница 29: ...29 Specifications ...
Страница 30: ...30 ...
Страница 31: ...31 www bolintechnology com 2082 TECHNOLOGY LLC dba BOLIN TECHNOLOGY ...


