background image

NL

 I Gebruiksaanwijzing

EN

 I Instruction manual

FR

 I Mode d’emploi

22.352005.01.001 

22.352007.01.001 

22.352009.01.001 

22.352010.01.001

Содержание 22.352005.01.001

Страница 1: ...NL I Gebruiksaanwijzing EN I Instruction manual FR I Mode d emploi 22 352005 01 001 22 352007 01 001 22 352009 01 001 22 352010 01 001 ...

Страница 2: ...ONDERDELENBESCHRIJVING PARTS DESCRIPTION DESCRIPTION DES PIECES 1 3 4 5 6 7 2 8 12 13 10 11 9 ...

Страница 3: ...laat Waarschuw vooral kinderen voor deze gevaren Zorg dat het apparaat rechtop blijft staan wanneer u het vervoert en opbergt Zorg dat u altijd de stroomtoevoer uitschakelt en loskoppelt voordat u het apparaat reinigt Zorg dat u altijd de stroomtoevoer uitschakelt en loskoppelt voordat u het apparaat verplaatst WAARSCHUWING Om brandgevaar te voorkomen raden we u aan het apparaat niet te bedekken A...

Страница 4: ...loskoppelen als het netsnoer is beschadigd Laat het snoer vervangen door de dealer of een hiertoe aangewezen reparatiebedrijf Waarschuwing Volg uitsluitend het aanbevolen ontdooi en reinigingsproces van de fabrikant Probeer het ontdooi of reinigingsproces op geen enkele andere manier te versnellen Het apparaat moet worden opgeslagen in een ruimte zonder voortdurend werkende ontstekingsbronnen bijv...

Страница 5: ...oezicht van een of meer personen die bekwaam zijn in het gebruik van brandbare koelmiddelen Stop het apparaat niet door het netsnoer uit het stopcontact te trekken terwijl het apparaat is ingeschakeld De warmte die hierbij ontstaat kan namelijk een elektrische schok of brand veroorzaken De enige situaties waarin u dit wel mag doen is als u vreemde geluiden hoort een vreemde geur ruikt of er rook u...

Страница 6: ...dienen moeten in het bezit te zijn van de juiste certificering die is verleend door een geaccrediteerde organisatie en die garandeert dat ze vaardig zijn in de omgang met koelmiddelen in overeenstemming met een specifieke evaluatie die wordt erkend door brancheverenigingen Reparaties moeten worden uitgevoerd op basis van de aanbevelingen van het productiebedrijf Onderhouds en reparatiewerkzaamhede...

Страница 7: ...middel draagt niet bij aan ozonafbraak maar is volgens het Kyotoprotocol wel een broeikasgas en kan daardoor bijdragen aan de opwarming van de aarde wanneer het in de atmosfeer terechtkomt Daarom mogen vul en leegwerkzaamheden alleen worden uitgevoerd door gekwalificeerde technici met een koelcertificaat Het apparaat hoeft niet opnieuw met koelmiddel te worden gevuld als het correct wordt gebruikt...

Страница 8: ... uit knop 2 Temperatuurknoppen 3 Modusknop 4 Regelknop voor ventilatorsnelheid 5 Timerknop aan uit AFSTANDSBEDIENING 1 Knop voor hogere temperatuur 2 Modusknop 3 Regelknop voor ventilatorsnelheid 4 Timerknop aan uit 5 Knop voor lagere temperatuur 6 Aan uit knop ...

Страница 9: ... verschijnt Druk op de knop of om de gewenste temperatuur voor de ruimte te selecteren Het duurt ongeveer 5 minuten voordat het koelen wordt gestart Druk op de knop voor de ventilatorsnelheid om de luchtstroom aan te passen Ontvochtigen Druk op de modusknop tot het lampje voor ontvochtiging begint te knipperen De temperatuur wordt automatisch geselecteerd De ventilatorsnelheid wordt automatisch ge...

Страница 10: ...erwachte hoogte bereikt gaat er een lampje branden om aan te geven dat het waterreservoir vol is Voer de bovenstaande stappen uit om het water af te voeren INSTALLATIE De airconditioner moet op een vlak en stabiel oppervlak worden geïnstalleerd Blokkeer de luchtuitlaat niet en houd minstens 30 cm ruimte vrij rond het apparaat De bedrading moet voldoen aan de lokale veiligheidsvoorschriften voor el...

Страница 11: ...ntact voordat u het reinigt Maak het oppervlak eerst schoon met een neutraal schoonmaakmiddel en een natte doek en vervolgens met een droge doek Gebruik geen benzine of andere chemicaliën om het apparaat schoon te maken Was het apparaat niet direct Luchtfilter Het luchtfilter moet om de twee weken worden gereinigd Open het rooster van de luchtinlaat en verwijder het luchtfilter Reinig het luchtfil...

Страница 12: ...n Reinig de luchtinlaat Het apparaat wordt automatisch uitgeschake ld in de verwarming smodus Warmtebescherming wanneer de temperatuur bij de luchtuitlaat stijgt tot meer dan 70 graden wordt het apparaat automatisch uitgeschakeld Laat de temperatuur in de ruimte afkoelen voordat u het apparaat opnieuw start Het apparaat maakt veel geluid De ondergrond is niet waterpas of niet vlak genoeg Het gelui...

Страница 13: ...ktrische en elektronische apparaten worden aangeboden Het symbool op het apparaat in de gebruiksaanwijzing en op de verpakking attendeert u hierop De in het apparaat gebruikte materialen kunnen worden gerecycled Met het recyclen van gebruikte huishoudelijke apparaten levert u een belangrijke bijdrage aan de bescherming van ons milieu Informeer bij uw lokale overheid naar het inzamelpunt NL ...

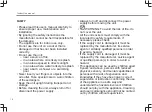
Страница 14: ...r supply Always turn off and disconnect the power supply before moving the unit WARNING To avoid the risk of fire do not cover the unit All the unit sockets must comply with the local electric safety requirements If necessary please check If the supply cord is damaged it must be replaced by the manufacturer its service agent or similarly qualified persons in order to avoid a hazard If the supply c...

Страница 15: ...or an operating electric heater Do not pierce or burn Be aware that refrigerants may not contain an odor The appliance should be installed operated and stored in a room with a floor area larger than X m2 X 4 for 5000Btu h 7000Btu h 8000Btu h X 7 7 for 9000Btu h 10000Btu h 10500Btu h Only contact an authorized service technician for repair or maintenance of this unit Do not pull deform or modify th...

Страница 16: ... not be stored in a room with continuously operating ignition sources for example open flames an operating gas appliance or an operating electric heater Do not puncture and do not burn Appliance shall be installed operated and stored in a room with a floor area larger than X m2 X 4 for 5000Btu h 7000Btu h 8000Btu h X 7 7 for 9000Btu h 10000Btu h 10500Btu h This appliance contains Y g see rating la...

Страница 17: ... there is a danger of short circuiting As a result of a short circuit batteries may heat up consider ably or even catch fire this may result in burns For your safety the battery poles should be covered with adhesive strips during transport Do not touch a ruptured and or leaking battery If the liquid from the battery gets into your eyes rinse your eyes as soon as possible with clean water without r...

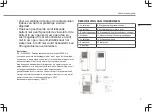
Страница 18: ...Air inlet 8 Hose connector window end 2 Air filter 9 Hot air exhaust hose 3 Control panel 10 Hose connector Air conditioner end 4 Power cord 11 Windows slider kit fixing plugs 5 Air outlet 12 Remote control 6 Castor 13 Batteries 7 Drainage hole ...

Страница 19: ...on off button 2 Temperature buttons 3 Mode button 4 Fan speed adjustment button 5 Timer on off button REMOTE CONTROL 1 Temperature up button 2 Mode button 3 Fan speed adjustment button 4 Timer on off button 5 Temperature down button 6 Power on off button EN ...

Страница 20: ...red room temperature Allow around 5 minutes for the cooling to start Press the fan speed button to adjust airflow Dehumidifying operation Press the Mode button until the dehumidify indicator lamp blinks The temperature will automatically be selected The fan speed will automatically be selected Timer operation Timer ON setting When the air conditioner is OFF press the Timer button and select a desi...

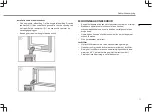
Страница 21: ... up Follow above steps to drain the water INSTALLATION The air conditioner should be installed on a flat and stable surface Do not block the air outlet and allow at least 30cm around the unit Socket wiring should be in accordance with the local electric safety requirements Exhaust Hose Installation Twist both ends of the hot air exhaust hose 9 into the hose connector window end 8 and the hose conn...

Страница 22: ...sconnect the unit from any electric supply outlet First clean the surface with a neutral detergent and wet cloth and then wipe it with a dry cloth Do not use gasoline or other chemicals to clean the unit Do not wash the unit directly Air filter The air filter should be cleaned once every two weeks Open the air inlet grille and take off air filter Clean the air filter with neural detergent in lukew...

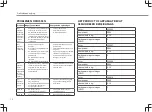
Страница 23: ...exhaust hose Reset the temperature Clean the air inlet Auto Power Off in heating mode Heating protection when the temperature at the air outlet exceeds 70 degrees the unit will power off automatically Allow room temperature to cool before re starting the unit Noisy The ground is not level or not flat enough The sound comes from the flowing of the refrigerant inside the air conditioner Place unit o...

Страница 24: ...tric and electronic domestic appliances This symbol on the appliance instruction manual and packaging puts your attention to this important issue The materials used in this appliance can be recycled By recycling of used domestic appliances you contribute an important push to the protection of our environment Ask your local authorities for information regarding the point of recollection ...

Страница 25: ...l appareil vers le haut pendant le transport et le stockage Toujours couper l alimentation ou déconnecter l appareil avant de le nettoyer Toujours couper l alimentation et le débrancher avant de déplacer l appareil AVERTISSEMENT Pour éviter tout risque d incendie ne pas couvrir l appareil Toutes les prises doivent être conformes aux exigences locales de sécurité électrique Vérifiez si nécessaire S...

Страница 26: ... de nettoyage recommandé par le fabricant Ne jamais accélérer le processus de décongélation ou de nettoyage autrement L appareil doit être entreposé dans un local sans source d inflammation permanente par exemple flammes nues appareil à gaz en fonctionnement ou chauffage électrique en fonctionnement Ne pas percer ou brûler Attention les réfrigérants ne doivent contenir aucun parfum L appareil doit...

Страница 27: ...a pourrait provoquer un choc électrique ou un incendie sous l effet de la chaleur à moins d entendre des bruits bizarres de sentir une odeur inhabituelle ou de voir de la fumée sortir de l appareil Informations spécifiques concernant les appareils avec un gaz réfrigérant R 290 Lisez attentivement tous les avertissements Pour dégivrer et nettoyer l appareil n utilisez pas d autres outils que ceux r...

Страница 28: ...ffectuées sur la base des recommandations du fabriquant L entretien et les réparations nécessitant l assistance d un autre personnel qualifié doivent être effectués sous la supervision de la personne compétente pour l utilisation des réfrigérants inflammables Batteries N exposez pas les batteries et piles à des températures élevées ou à la lumière directe du soleil Ne jetez pas les batteries et pi...

Страница 29: ...ontribuer au réchauffement planétaire s il est rejeté dans l atmosphère C est pourquoi seuls des techniciens qualifiés disposant d un certificat de réfrigérant peuvent effectuer un remplissage ou une vidange Votre appareil n a pas besoin d être rempli de réfrigérant s il est utilisé correctement et si son circuit de refroidissement n est pas endommagé PRP R290 3 DESCRIPTION DES PIÈCES 1 Entrée d a...

Страница 30: ...outon de mode 4 Bouton de réglage de vitesse du ventilateur 5 Bouton marche arrêt du minuteur TÉLÉCOMMANDE 1 Bouton d augmentation de la température 2 Bouton de mode 3 Bouton de réglage de vitesse du ventilateur 4 Bouton marche arrêt du minuteur 5 Bouton de diminution de la température 6 Bouton marche arrêt ...

Страница 31: ...tre la mise hors tension et la mise sous tension UTILISATION Refroidissement Appuyez sur le bouton mode jusqu à ce que l icône Cool apparaisse Appuyez sur le bouton ou pour sélectionner la température de la pièce souhaitée Attendre environ 5 minutes que le refroidissement démarre Appuyez sur le bouton de vitesse du ventilateur fan speed pour régler le débit d air Déshumidification Appuyez sur le b...

Страница 32: ...du trou de drainage situé au fond de l appareil Le drainage se mettra alors en route Une fois cette opération terminée vous pouvez insérer le bouchon de vidange Fonction d alarme de niveau d eau maximum dans le réservoir interne Le réservoir d eau interne du climatiseur est muni d un interrupteur de sécurité qui contrôle le niveau d eau Lorsque le niveau d eau atteint la hauteur prévue le témoin d...

Страница 33: ...accord de tuyau du climatiseur dans les ouvertures situées à l arrière du climatiseur Fixez 8 le raccord de tuyau côté fenêtre sur le rebord de fenêtre le plus proche Installation du kit coulissant pour fenêtre Ajustez la largeur image 1 ou la hauteur image 2 de la glissière de fenêtre 11 en fonction de l ouverture de fenêtre et fixez la glissière de fenêtre 11 avec les chevilles de fixation Faite...

Страница 34: ...ante est inférieure à la température de réglage Mode climatisation Vidangez le réservoir d eau Réglez la température L unité ne refroidit pas suffisamment Les portes ou fenêtres ne sont pas fermées Il y a des sources de chaleur à l intérieur de la pièce Le tuyau d évacuation d air chaud n est pas branché ou bloqué La température réglée est trop élevée L entrée d air est bloquée Assurez vous que to...

Страница 35: ...ssement R290 Quantité en kg 0 16 Potentiel de réchauffement planétaire 3 ENVIRONNEMENT Cet appareil ne doit pas être jeté avec les déchets ménagers à la fin de sa durée de vie il doit être remis à un centre de recyclage pour les appareils électriques et électroniques Ce symbole sur l appareil le manuel d utilisation et l emballage attire votre attention sur un point important Les matériaux utilisé...

Страница 36: ... Copyright 2019 Smartwares Jules Verneweg 87 5015 BH Tilburg The Netherlands ...

Отзывы: