background image

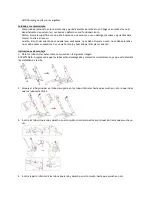
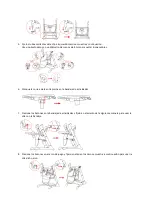
9.


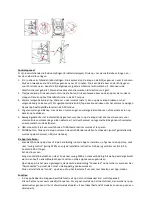
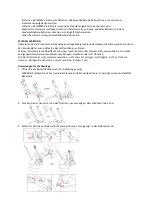
Coloque el reposapiés en las aberturas y presiónelo hacia abajo para fijarlo bien. El reposapiés tiene 3 

posiciones diferentes de altura, la funda del asiento se puede colocar cuando el reposapiés se usa en una 

posición más alta. 


10.


Fije la funda del asiento en el marco del asiento e inserte el arnés de seguridad en las aberturas 

proporcionadas. Sujetar los botones en el asiento y la tela. Pase las piezas elásticas por el reposapiés y 

fíjelas.


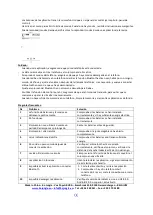
11.


Utilice un destornillador para quitar la tapa del compartimiento de la batería, coloque las baterías en el 

compartimiento de la batería de acuerdo con la polaridad indicada y vuelva a colocar la tapa en su posición. 


Instrucciones de uso 

1.


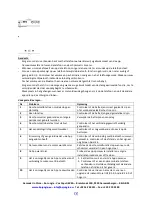
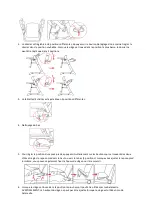
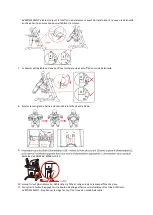
Para ajustar la posición de altura del asiento: presione los botones de ajuste en ambos lados del asiento y 

mueva el asiento hacia arriba o hacia abajo. El asiento se puede colocar en 6 posiciones diferentes. 

Asegúrese de que ambos lados del asiento estén colocados a la misma altura y que estén correctamente 

colocados en su lugar. 


2.


El respaldo se puede ajustar en 4 posiciones diferentes. Presione el botón de ajuste con una mano y 

ajústelo en la posición deseada. Cuando el asiento está en la posición más baja, el respaldo solo puede 

ajustarse en 2 posiciones. 

Содержание B720100

Страница 1: ...anleitung Instrucciones de uso Instru es de utiliza o Istruzioni per l uso N vod k pou it INSTRUKCJA U YTKOWANIA Made In China Bo Jungle Vox Populi BVBA Brambroek 23B 9500 GERAARDSBERGEN BELGIUM www b...

Страница 2: ...estro 6 Tubo oscillante destro 7 Cablaggio di sicurezza 8 Vassoio attivit 9 Poggiapiedi 10 Scomparto batteria 11 Tubi di base 12 Arco giochi DE PL CZ SK EL 1 Linkes Rohr 2 Linkes Schwenkrohr 3 Faltung...

Страница 3: ...nte sinistro 5 Tubo oscillante destro 6 Coprisedile 7 Set altalena 8 Vassoio a vit 9 Cingha spar gambe 10 Arco giochi 11 Base del poggiapiedi 12 Ada atore DE 1 Hauptrohr 2 St tzrohr 3 Rahmen unten 4 S...

Страница 4: ...10 Pulsante timer 11 Spia del timer 12 connettore USB DE 1 Beschleunigen 2 Vogelger usch 3 Wasserger usch 4 Anpassungsmodus 5 Sprachaktivierung 6 Geschwindigkeitsanzeige 7 Beschleunigen 8 Musik abspie...

Страница 5: ...azione 6 Lettore musicale 7 Canzone precedente 8 Volume gi 9 Modalit musica 10 Non disponibile 11 Controllo vocale 12 Abbassare velocit 13 Prossima canzone 14 Volume su DE 1 Timer Einstellung 2 Musik...

Страница 6: ...Sunet de pas re 4 Sunet de ap 5 Viteza de mi care 6 Music player 7 C ntecul anterior 8 Reduce i volumul 9 Comutator de mod muzical 10 Controlul juc riilor mobile 11 Control vocal 12 Viteza nclinat 13...

Страница 7: ...falls or access to dangerous objects ONLY use the high chair on flat even and stable floors NEVER use it on elevated surfaces ALWAYS ensure that the product is correctly assembled before placing your...

Страница 8: ...se a clean humid cloth to clean the seat Instructions for assembly 1 Open the leg tubes as shown in the picture below WARNING Make sure the tubes are correctly unfolded and positioned as this will aff...

Страница 9: ...n 4mm to remove the pins 6 Fit the crotch strap into the activity tray 7 Press the buttons on the activity tray and fix it onto the seat as follows to use the chair with the dinner tray 8 Press the bu...

Страница 10: ...battery compartment place batteries into the battery compartment in accordance with the indicated polarity and place the cover back in its position Instructions for use 1 To adjust the height position...

Страница 11: ...ootrest itself you can also attach the seat cover to shorten it 6 When the seat is in the lowest position it can be used as a swing WARNING The seat height cannot be adjusted when the chair is being u...

Страница 12: ...e power supply for this product should be 100 240V 50 60 Hz 0 3A en it is no longer needed disconnect the plug and store it in the b ery compartment 11 To fold the chair press the folding bu n and clo...

Страница 13: ...button When the voice control sensor detects continuous sounds the swing will start swing at the lowest speed and play music automatically 7 USB connector Connect a smartphone or USB device to play mu...

Страница 14: ...trical power 2 No functions Check if the batteries have been correctly installed 3 Swing will not be used for a longer period of time Take the batteries out before storage 4 The swing chair shakes Che...

Страница 15: ...kettingen elektriciteitskabels speenkettingen etc Hang NOOIT iets aan de stoel aangezien dit de stabiliteit zou kunnen be nvloeden Plaats het product NIET vlakbij vaste structuren of meubels om letse...

Страница 16: ...ak schoon met een vochtige doek of spons gebruik een milde detergent en warm water Droog af met een handdoek of laat aan de lucht drogen Zitkussen Het zitkussen is niet machinewasbaar geen droogkuis n...

Страница 17: ...en Gebruik een hard voorwerp met een diameter van minder dan 4mm om de pinnetjes te verwijderen 6 Maak de kruisgordel vast aan het tablet 7 Druk op de knoppen op het tablet en bevestig dit op het zitj...

Страница 18: ...of Breng de elastieken door de voetensteun en bevestig ze 11 Gebruik een schroevendraaier om het afdekplaatje van het batterijcompartiment te verwijderen Plaats de batterijen in het batterijcompartime...

Страница 19: ...an de voetensteun aan te passen drukt u gelijktijdig op de knoppen aan beide zijden Verstel de voetensteun dan naar boven of naar onderen 4 posities Wanneer u de voetensteun zelf verstelt kunt u ook h...

Страница 20: ...stekker uit het stopcontact wanneer deze niet langer nodig is en berg hem op in het b erijcompar ment 11 Om de stoel op te plooien druk u op de knop en vouwt u beide buizen van het onderstel gelijk jd...

Страница 21: ...emcontrole voortdurende geluiden detecteert zal de schommel op lage snelheid beginnen schommelen en automatisch muziek afspelen 6 USB connector Sluit een smartphone of USB toestel aan om muziek af te...

Страница 22: ...f de batterijen goed ge nstalleerd zijn 3 De schommel zal gedurende een langere periode niet gebruikt worden Verwijder de batterijen voor opslag 4 De schommel stoel staat niet stabiel Controleer of he...

Страница 23: ...de rideaux colliers cordons lectriques attache t tines etc NE RIEN attacher la chaise car cela aura un effet sur sa stabilit NE PAS placer le produit pr s de structures ou de meubles solides pour vit...

Страница 24: ...nditions mentionn es ci dessus sont observ es Cadre Essuyez la surface avec un chiffon ou une ponge humide utilisez un d tergent doux et de l eau ti de pour nettoyer Serviette ou s cher l air Si ge Le...

Страница 25: ...Utilisez un objet dur avec un diam tre inf rieur 4 mm pour retirer les goupilles 6 Ins rez la sangle d entrejambe dans la tablette d activ s 7 Poussez les boutons sur la tablette d activit s et fixez...

Страница 26: ...sur le si ge et le tissu Passez les parties lastiques travers le repose pieds et fixez les 11 Utiliser un tournevis pour retirer le couvercle du compartiment piles installez les piles dans le compart...

Страница 27: ...ntes 4 Nettoyage du bac 5 Pour r gler la position du repose pieds appuyez simultan ment sur les boutons qui se trouvent des deux c t s et r glez le repose pied vers le haut ou vers le le bas 4 positio...

Страница 28: ...n mode balancelle 8 Ajustez les sangles du harnais de s curit la taille de votre b b 9 10 Lorsqu il n est plus n cessaire d branchez la che et rangez la dans le compar ment piles 11 Pour plier le faut...

Страница 29: ...ecteur de commande vocale d tecte des sons continus la balancelle commencera se balancer la vitesse la plus basse et la musique s enclenchera automatiquement 7 Connecteur USB connectez un smartphone o...

Страница 30: ...V rifiez si les piles ont t correctement install es 3 La balancelle ne sera pas utilis pendant une p riode de temps prolong e Retirez les piles avant le rangement 4 La balancelle chaise n est pas sta...

Страница 31: ...lesiones por ca das o el acceso a objetos peligrosos SOLO use la silla alta en pisos planos parejos y estables NUNCA lo use en superficies elevadas SIEMPRE aseg rese de que el producto est correctame...

Страница 32: ...har no se debe secar en secadora Use un pa o limpio y h medo para limpiar el asiento Instrucciones de montaje 1 Abra los tubos de las patas como se muestra en la siguiente imagen ADVERTENCIA Aseg rese...

Страница 33: ...r los pasadores 6 Coloque la correa de la entrepierna en la bandeja de actividades 7 Presione los botones en la bandeja de actividades y f jelo en el asiento de la siguiente manera para usar la silla...

Страница 34: ...ter a coloque las bater as en el compartimiento de la bater a de acuerdo con la polaridad indicada y vuelva a colocar la tapa en su posici n Instrucciones de uso 1 Para ajustar la posici n de altura d...

Страница 35: ...jo 4 posiciones Cuando ajusta el reposapi s tambi n puede colocar la funda del asiento para acortarlo 6 Cuando el asiento est en la posici n m s baja se puede usar como columpio ADVERTENCIA La altura...

Страница 36: ...te el enchufe de CC 2 en la conexi n de alimentaci n 1 y luego inserte el extremo opuesto en una fuente de alimentaci n adecuada La fuente de alimentaci n para este producto debe ser 100 240V 50 60 Hz...

Страница 37: ...onido de aves y agua Puede elegir entre el sonido de las aves y el sonido del agua presionando este bot n una o varias veces 6 Detecci n de movimiento La luz indicadora se encender cuando presione est...

Страница 38: ...y la m sica se detienen repentinamente Compruebe si las bater as se han instalado correctamente y si hay suficiente energ a el ctrica 2 Sin funciones Compruebe si las bater as se han instalado correc...

Страница 39: ...ggetti per evitare lesioni da cadute o oggetti SOLO utilizzare il seggiolone su pavimenti piani uniformi e stabili NON usarlo mai su superfici elevate Assicurarsi SEMPRE che il prodotto sia correttame...

Страница 40: ...stirare non asciugare in asciugatrice Utilizzare un panno pulito e umido per pulire il sedile Instruzioni per il montaggio 1 Aprire i tubi delle gambe come mostrato nella figura qui sotto AVVERTENZA...

Страница 41: ...ilizzare un oggetto duro con un diametro inferiore a 4 mm per rimuovere i perni 6 Inserire lo spartigambe nel vassoio attivit 7 Premere i pulsanti sul sedile e sistema il vassoio sulla seduta 8 Premi...

Страница 42: ...elastiche attraverso il poggiapiedi e attaccarle 11 Utilizzare un cacciavite per rimuovere il coperchio del vano batteria Istruzioni per l uso 1 Per regolare l altezza del sedile premere il pulsante d...

Страница 43: ...asso 4 posizioni Quando regoli il poggiapiedi puoi anche fissare il sedile per accorciarlo 6 Quando il sedile nella posizione pi bassa pu essere usato come un altalena AVVERTENZA l altezza del sedile...

Страница 44: ...mensioni del tuo bambino 9 10 Quando non pi necessario scollegarlo 11 Per piegare il seggiolone premere il pulsante di chiusura e chiudere i tubi delle gambe contemporaneamente ATTENZIONE non piegare...

Страница 45: ...der quando si preme questo pulsante Quando il sensore del comando vocale rileva i suoni continui l altalena inizia a oscillare alla velocit pi bassa e riproduce automaticamente la musica 7 Connettore...

Страница 46: ...ate installate correttamente e se c abbastanza energia elettrica 2 Nessuna funzione Check if the batteries have been correctly insta Controllare se le batterie sono state installate correttamente 3 L...

Страница 47: ...Attrappen verursachen k nnte usw H ngen Sie nichts auf den Stuhl um die Stabilit t zu gew hrleisten Stellen Sie das Produkt NICHT in der unmittelbaren N he von Gegenst nde um Verletzungen durch St rz...

Страница 48: ...efekte oder Fehlfunktionen auftreten Rahmen Wischen Sie die Oberfl che mit einem feuchten Tuch oder Schwamm ab verwenden Sie ein mildes Reinigungsmittel und warmes Wasser zum Reinigen Handtuch oder Lu...

Страница 49: ...ngrohre wie unten gezeigt Verwenden Sie ein hartes Objekt mit einem Durchmesser von weniger als 4 mm um die Stifte zu entfernen 6 Stecken Sie das Zwischenbein St ck in die Aktivit tstablette 7 Dr cken...

Страница 50: ...und befestigen Sie sie 11 Verwenden Sie einen Schraubendreher um das Batteriefach in der Position des Batteriefachs zu entfernen Gebrauchsanweisung 1 Um die H he des Sitzes einzustellen Dr cken Sie d...

Страница 51: ...Positionen ein Wenn Sie die Fu st tze einstellen k nnen Sie den Sitzbezug auch anbringen um ihn zu verk rzen 6 Wenn sich der Sitz in der niedrigsten Position befindet kann er als Schaukel verwendet w...

Страница 52: ...romstecker 2 in den Stromanschluss 1 und stecken Sie das andere Ende in eine geeignete Stromversorgung Die Stromversorgung f r dieses Produkt sollte 100 240 V 50 60 Hz 0 3 A betragen enn es nicht mehr...

Страница 53: ...wung mit der geringsten Geschwindigkeit zu schwingen und Musik automatisch abzuspielen 7 USB Anschluss Schlie en Sie ein Smartphone oder ein USB Ger t an um Musik abzuspielen 8 MODE Taste Dr cken Sie...

Страница 54: ...berpr fen Sie ob die Batterien richtig eingesetzt wurden 3 Swing wird l ngere Zeit nicht verwendet Nehmen Sie die Batterien vor der Lagerung heraus 4 Die Schaukel der Stuhl wackelt Pr fen Sie ob sich...

Страница 55: ...h rodowisk aby nie uszkodzi p ytki drukowanej NIE umieszczaj tego produktu w pobli u innego produktu kt ry m g by stworzy niebezpiecze stwo uduszenia np Sznurki aluzje sznurki do zas on naszyjniki prz...

Страница 56: ...przypadku stwierdzenia wad lub usterek prosimy o kontakt z dzia em obs ugi posprzeda nej Rama Wytrzyj powierzchni wilgotn szmatk lub g bk do czyszczenia u yj agodnego detergentu i ciep ej wody Siedzi...

Страница 57: ...kowy w szczeline pod tack Doci nij trzpie a do jego zablokowania 7 Wci nij dwa przyciski znajduj ce si pod tack w celu odblokowania zaczep w Wsu mocowanie tackiw szczeliny z przodu siedziska a do zabl...

Страница 58: ...erk na j na kraw dzie siedziska zamocuj ko c wki pas w biodrowych w odpowiednich szczelinach nast pnie ko c wki pas w ramiennych I przymocuj tapicerk siedziska za pomoc nap 11 U yj rubokr ta aby otwor...

Страница 59: ...nych pozycjach Naci nij przycisk regulacji jedn r k i dostosuj do danej pozycji Gdy siedzisko znajduje si w najni szym po o eniu oparcie mo na regulowa tylko w 2 pozycjach 3 Tacka mo e by regulowana w...

Страница 60: ...hu tawki w wysokie krzese ko poniewa ma to wp yw na silnik 7 Oparcie mo na regulowa w dw ch pozycjach podczas gdy krzes o jest u ywane w trybie hu tawki 8 Dopasuj paski szelek bezpiecze stwa do wielk...

Страница 61: ...u tego przycisku Gdy czujnik kontroli g osu wykryje ci g e d wi ki hu tawka zacznie si obraca z najni sz pr dko ci i automatycznie odtwarza muzyk 7 Z cze USB pod cz smartfon lub urz dzenie USB aby odt...

Страница 62: ...zy baterie zosta y poprawnie zainstalowane 3 Swing nie b dzie u ywany przez d u szy czas Wyjmij baterie przed rozpocz ciem przechowywania 4 Potrz ni cia na hu tawce fotelu Sprawd czy z cze sk adane ca...

Страница 63: ...DY na idli ku nezav ujte dn jin p edm te mohlo by to ovlivnit jej stabilitu Nepou vejte idli ku v bl zkosti jin ch p edm t i n bytku kter by mohly znamenat nebezpe p du nebo p stupu k nebezpe n m p ed...

Страница 64: ...t edek a teplou vodu dn vysu te Sedadlo Potah sedadla nelze pr t v pra ce Ne ehlete jej nesu te v su i ce K i t n sedadla pou ijte ist vlhk had k Pokyny pro mont 1 Otev ete r my nohou jak je zn zorn n...

Страница 65: ...e 4 mm abyste odstranili kol ky 6 Nasa te mezino n p s 7 Stiskn te bo n tla tka na pult ku a upevn te jej na sedadlo 8 Stiskn te tla tka na hrazdi ce a upevn te ji na sedadlo jak je zn zorn no n e 9 N...

Страница 66: ...podle spr vn polarity a kryt op t p i roubujte N vod k pou it 1 Pro nastaven v ky sedadla stiskn te tla tko v kov ho nastaven Sedadlo m e b t um st no v 6 r zn ch poloh ch Ujist te se e ob strany sed...

Страница 67: ...m rem nahoru nebo dol 4 polohy Kdy nastav te op rku nohou m ete nastavit take d lku potahu sedadla 6 Je li sedadlo v nejni poloze m e b t pou ito jako houpa ka UPOZORN N V ku sedadla nelze nastavovat...

Страница 68: ...jej v prostoru pro baterie 11 Chcete li idli ku slo it s skn te a sou asn slo te nohy UPOZORN N idli ku neskl djte je li v re imu houp n r Power connecto 1 Pokyny pro nap jec kabel USB vlo te stejnos...

Страница 69: ...Konektor USB P ipojte smartphone nebo za zen USB k p ehr v n hudby 8 Tla tko MODE Stisknut m tla tka p epnete mezi r zn mi za zen mi p edem nainstalovan hudba na houpa ce USB smartphone Instalace apl...

Страница 70: ...uskladn n m vyjm te baterie 4 Chv n k esla idle Zkontrolujte zda se skl dac kloub zcela otev el 5 Kontrolka slab Zkontrolujte zda baterie st le maj dostatek energie 6 Po zapojen aplikace Zkontrolujte...

Страница 71: ...ilitu Nepou vajte stoli ku v bl zkosti in ch predmetov i n bytku ktor by mohli znamena nebezpe enstvo p du alebo pr stupu k nebezpe n m predmetom Pou vajte stoli ku iba na rovn ch a stabiln ch ploch c...

Страница 72: ...ke Ne ehlite ho nesu te v su i ke Na istenie sedadl pou ite ist vlhk handri ku Pokyny pre mont 1 Otvorte r m n h ako je zn zornen na nasleduj com obr zku UPOZORNENIE Uistite sa e je r m spr vne rozlo...

Страница 73: ...Upevn te lev a prav houpac r m jak je zn zorn no n e Pou ijte tvrd p edm t s pr m rem men m ne 4 mm abyste odstranili kol ky 6 Nasa te medzino n p s 7 Stla te bo n tla idl na pult ku a upevnite ho na...

Страница 74: ...opierkou n h a pripevnite ich 11 Pomocou skrutkova a otvorte priestor pre bat rie vlo te bat rie pod a spr vne polarity a kryt op priskrutkujte N vod na pou itie 1 Pre nastavenie v ky sedadla stla te...

Страница 75: ...ahor alebo nadol 4 polohy Ke nastav te opierku n h m ete nastavi take d ku po ahu sedadla 6 Ak je sedadlo v najni ej polohe m e by pou it ako hojda ka UPOZORNENIE V ku sedadl nemo no nastavova ke sa s...

Страница 76: ...pou vate adapt r odpojte a skladujte ho v priestore pre bat rie 11 Ak chcete stoli ku zlo i stla te a s asne zlo te nohy r Power connecto 1 Pokyny pre nap jac k bel USB vlo te z str ku DC 2 do nap jac...

Страница 77: ...je nepretr it zvuky hojda ka sa za ne hojda pri najni ej r chlosti a automaticky za ne prehr va hudbu 7 Konektor USB Pripojenie smartf nu alebo zariadenia USB na prehr vanie hudby 8 Tla idlo MODE Stla...

Страница 78: ...ntrolujte i s bat rie spr vne nain talovan 3 Swing sa nebude pou va dlh iu dobu Vyberajte bat rie pred uskladnen m 4 K vnutie k vania kresla Skontrolujte i sa skladac k b plne otvoril 5 Kontrolka slab...

Страница 79: ...EL 6 36 20 0 12 9 100 240V 50 60Hz 0 3A...

Страница 80: ...4 x D 1 2 3...

Страница 81: ...4 5 4mm 6...

Страница 82: ...7 8 9 3 10 11...

Страница 83: ...1 6 2 4 2 3 3 4...

Страница 84: ...5 4 6 7...

Страница 85: ...8 9 10 11 1 8 8 2 8 15 30 3 APP r Power connecto 1 USB 2 1 100 240V 50 60 Hz 0 3 DC plug 2...

Страница 86: ...4 12 APP 5 6 7 USB smartphone USB 8 MODE USB smartphone QR swing control swing 018A iOS 8 3 0 Android 4 3 0 Bluetooth swing 018A Bluetooth Connected 5 Bluetooth Bluetooth Bluetooth...

Страница 87: ...5 6 Bluetooth 7 8 9 Bluetooth 1 2 10 iOS 8 3 0 Android 4 3 0 Made In China Bo Jungle Vox Populi BVBA Brambroek 23B 9500 Geraardsbergen BELGIUM www bojungle eu info bojungle eu Tel 32 54 240 331 Fax 32...

Страница 88: ...sul n apropierea unor structuri sau mobilier solid pentru a evita accidentele cauzate de c derea sau accesul la obiecte periculoase Folosi i scaunul de masa numai pe podele plate stabile i stabile NIC...

Страница 89: ...or Utiliza i o c rp curat i umed pentru a cur a scaunul Instruc iuni pentru asamblare 1 Deschide i picioarele scaunului a a cum se arat n imaginea de mai jos AVERTISMENT Asigura i v ca picioarele sunt...

Страница 90: ...4 mm pentru a elimina bolturile 6 Monta i cureaua pentru picioare n tava de activit i 7 Ap sa i butoanele de pe tava de activit i i fixa i o pe scaun dup cum urmeaz pentru a utiliza scaunul cu tava p...

Страница 91: ...butoanele de pe scaun i de es tur Trece i piesele elastice prin picioare i fixa i le 11 Folosi i o urubelni pentru a scoate capacul compartimentului pentru baterii a eza i bateriile n compartimentul...

Страница 92: ...ntru picioare mpinge i simultan butoanele de pe ambele p r i i regla i n sus sau n jos 4 pozi ii C nd regla i nsu i suportul pentru picioare pute i ata a i capacul scaunului pentru a l scurta 6 C nd s...

Страница 93: ...ul i depozita i l n compar mentul bateriei 11 Pentru a plia scaunul ap sa i butonul de pliere i nchide i simultanpcioarele scaunului r Power connecto 1 Instruc iuni pentru cablul de alimentare USB int...

Страница 94: ...n o dat sau de mai multe ori 6 Detectarea mi c rii Indicatorul luminos se va aprinde c nd ap sa i acest buton C nd senzorul de control vocal detecteaz sunete continue oscila ia va ncepe s se nv rt la...

Страница 95: ...le au fost instalate corect i dac exist suficient energie electric 2 F r func ii Verifica i dac bateriile au fost instalate corect 3 Levierul nu va fi utilizat o perioad mai lung de timp Scoate i bate...

Отзывы: