-32-
Revision 5/F3534
©
Moffat Ltd, April 2005
Turbofan Convection Oven
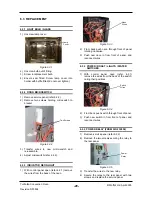
6.3.13 WATER SOLENOID (US/CAN ONLY)
1) Ensure water supply is turned off.
2) Inside the oven remove the baffle (refer
6.2.3), then unscrew the water injection
nozzle.
3) With the service panel removed (refer 6.2.2)
remove the wires from the solenoid.
4) Disconnect hose fitting.
5) Unscrew the three screws holding solenoid
bracket to the rear of unit and remove valve
assembly.
Figure 6.3.17
Figure 6.3.18
Water Injection
Nozzle
Three Screws
6) On suitable work surface, remove brass
piping connections (1/2” spanner) and two
screws (on bracket) and extract solenoid.
7) Secure new solenoid with screws, and
re-assemble. Check that flow direction as
marked on valve is correct (flow into spray
nozzle).
Brass
Connections
Two
Screws
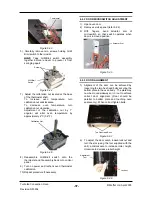
6.3.14 WATER SOLENOID CLEANING
(US/CAN
ONLY)
1) Remove water solenoid (refer 6.3.13).
2) Remove the two screws securing the bracket
to the solenoid.
Two Screws
3) Remove the valve assembly.
Figure 6.3.20
4) Clean the valve assembly, removing all dirt
and grime from the valve seat.
5) Reassemble the valve assembly and
solenoid.
Figure 6.3.21
Valve Assembly
Figure 6.3.19
Figure 6.3.15
1) Disconnect water supply from the water
solenoid.
2) Remove the sieve from the water valve
assembly by pulling firmly away from the
assembly with a pair of pliers.
Sieve
4) Clean the sieve, removing all dirt and grime.
5) Replace the sieve and reconnect the water
supply.
Units manufactured from S/N 258733
Units manufactured up to S/N 258732


