background image

11

MAINTENANCE

Maintenance

   WARNING

Disconnect the power supply to the appliance 

before cleaning or servicing. 

   CAUTION

Live steam and accumulated hot water in the 

compartment may be released when the door 

is opened.

   CAUTION

The appliance and its parts are hot.  Use care 

when operating, cleaning and servicing the 

appliance.

COLD WATER CONDENSER

The steamer is equipped with a cold water condenser 

in the rear of the cooking chamber which helps to con-

dense the steam prior to discharge into the drain.  The 

steamer freely vents itself by the negative pressure cre-

ated by the condensate water drainage.  This negative 

pressure prevents steam leakage around the door gasket 

and helps draw the steam through the cooking compart-

ment.  Steam leakage at the door may indicate a plugged 

or improperly installed drain.

REMOVAL OF SCALE DEPOSITS

It is recommended that your steamer be delimed once a 

month, or more often if necessary.  
Should your steamer develop a heavy buildup of lime 

scale deposits, use CLR.
Before beginning deliming procedures, ensure that water 

is not overflowing into the cooking compartment.  

The generator tank has a removable sealed tank cover.  

The main purpose of the removable cover is for inspec-

tion of the interior of the tank for lime build up and easy 

removal of large pieces of lime that will not flush out drain.  

Should the tank cover have to be removed, check condi-

tion of sealing gasket before replacing cover.  The hold 

down bolts are to be tightened to 160 inch pound torque 

each.  

 NOTICE

Contact the factory, the factory representative 

or local service company to perform mainte-

nance and repairs. 

 WARNING

Read and follow instructions on the CLR 

bottle.  Use plastic or rubber gloves to avoid 

skin contact.  If CLR comes in contact with 

skin, rinse with clean water.

1.  Drain steam generator by setting the main power 

switch to OFF.  Set cooking timer to “0FF”.

2.  Set the main power switch to DELIME.
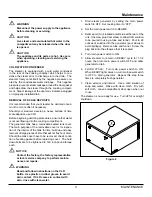
3.  Delime port (A) is located on left side at the rear of the 

unit.  Unscrew plug from elbow to allow CLR solution 

to be poured in using a tube and funnel.  Pour in 28 

ounces of solution into the generator (pour slowly to 

avoid spillage).  Remove tube and funnel.  Screw the 

plug back into the elbow so that it is sealed.

4.  Turn main power switch to ON.
5.  Allow steamer to remain in READY cycle for 1-1/2 

hours, then turn main power switch OFF and allow 

generator to drain.

6.  FLUSH CYCLE:  Turn main power switch to ON.  

When READY light comes on, turn main power switch 

to OFF to drain generator.  Repeat this step three 

times to completely flush generator.

7.  Clean exterior and interior.  Use a mild solution of 

soap and water.  Rinse with clean cloth.  Dry with 

soft cloth.  Leave compartment door open when not 

in use.

The steamer is now ready for use.  Turn off for overnight 

shutdown.

Figure 4 

Содержание SN-3E

Страница 1: ...COUNTER CONVECTION STEAMER INSTALLATION OPERATION MAINTENANCE 42 Allen Martin Drive Essex Junction Vermont 05452 USA Telephone 802 658 6600 Fax 802 864 0183 www blodgett PN S00059 Rev E 8 18 2018 G S...

Страница 2: ...Your Service Agency s Address Model Serial number Steamer installed by Installation checked by...

Страница 3: ...o Not Come On 13 Unit Shuts Down While in Operation 13 IMPORTANT WARNING Improper installa tion adjustment alternation service or maintenance can cause property damage in jury or death Read the instal...

Страница 4: ...IONS Drain 1 25mm IPS piped to open floor drain No solid connection 24 length before open air opening no bends or elbows Cold Water 3 8 10mm tubing at 25 50 PSI 170 345 kPa The drain piping must consi...

Страница 5: ...optional 4 adjustable legs are used remove the four levelling feet on the bottom of the steamer FEET Levelling Feet standard or 4 Adjustable Legs Op tional Thread the four 2 levelling feet shipped in...

Страница 6: ...ype drain Drain pipe should be copper DO NOT use PVC pipe PVC pipe may lose its rigidity or glue may fail Adjusting Screw Figure 3 WATER QUALITY The water supply connected to this steamer should con t...

Страница 7: ...echanical connec tions have been made thoroughly test the steamer before operation 1 Check that proper water drain and electrical connec tions have been made 2 Turn main power switch ON After approxim...

Страница 8: ...At the end of the cooking cycle the COOKING light goes off the buzzer sounds and steam stops being supplied to the cooking chamber To stop the buzzer turn the timer to OFF SHUTDOWN Turn the main power...

Страница 9: ...lly thaw overnight in a refrigerator This will reduce their cooking time PREPARATION Prepare vegetables fruits meats seafood and poultry normally by cleaning separating cutting removing stems etc Cook...

Страница 10: ...lid pan cover pasta with cold water Spaghetti Regular Vermicelli Macaroni Shells Elbows Noodles wide Lasagna Noodles 12 15 15 18 12 15 15 18 Frozen Casseroles Lasagna 35 Full Pan Meat Loaf 3 5 pounds...

Страница 11: ...1 6 Cut 8 5 lb Carrots Baby Whole Frozen Crinkle Cut Frozen Sliced Fresh 8 7 8 11 7 lb 4 lb 9 lb Cauliflower Florets Frozen Fresh 6 7 8 6 7 8 Celery 1 Diagonal Cut 7 5 lb Corn Yellow Whole Kernel Fro...

Страница 12: ...water with a cloth or sponge to clean exposed bead of door gasket rinse with warm clear water and wipe with a dry cloth 5 Wipe surfaces which touch door gasket with a cloth or sponge and warm soapy w...

Страница 13: ...ces of lime that will not flush out drain Should the tank cover have to be removed check condi tion of sealing gasket before replacing cover The hold down bolts are to be tightened to 160 inch pound t...

Страница 14: ...hrenheit just below water boiling point Howev er for high altitude locations an authorized servicer must adjust the steamer temperature lower To adjust 1 Remove side panel and turn control panel power...

Страница 15: ...probes check visually and clean or chip off scalant Replace probe This problem is an indication of severe harmful water conditions which should be corrected immediately to avoid damage to the componen...

Отзывы: