


READ THE USER'S MANUAL BEFORE INSTALLING THE UNIT.
www.blaubergventilatoren.de
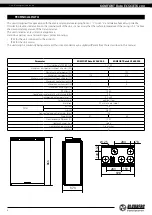
KoMFort roto ec S6(e)K 200
8
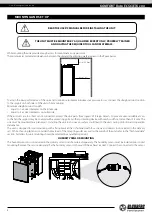
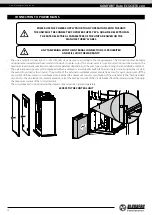
While mounting the unit provide enough access for maintenance or repair work.
The minimum recommended clearances between the unit and the adjoining walls are given in the figure below.
min 100 mm
min 1 m
To attain the best performance of the unit and to minimise turbulence-induced air pressure losses, connect the straight air duct section
to the spigots on both sides of the unit while mounting.
Minimum straight air duct length:
• equal to 1 air duct diameter on the intake side
• equal to 3 air duct diameters on outlet side
If the air ducts are too short or not connected, protect the unit parts from ingress of foreign objects. To prevent uncontrollable access
to the fan, the spigots may be covered with a protecting grille or other protecting device with mesh width not more than 12.5 mm. The
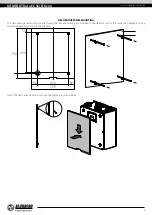
unit must be mounted on a plane wall. Installing the unit to an uneven surface could lead to the unit’s casing distortion and operation
disturbance.
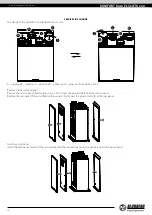
The unit is designed for wall mounting with a fixing bracket that is fastened with four screws and dowels (not included in the delivery
set). While choosing fasteners consider the material of the mounting surface as well as the weigh of the unit, refer to the “Technical data”
section. Fasteners for unit mounting should be selected by a qualified specialist.
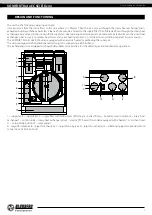
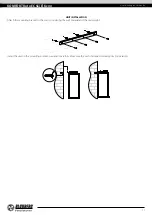
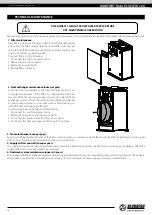
HUMIDITY SENSOR MOUNTING
The humidity sensor is not included in the delivery set and can be ordered separately. The humidity sensor must be installed prior to unit
mounting. Remove the service panel and fix the humidity sensor to the wall of the exhaust air duct. Connect the connector to the sensor.
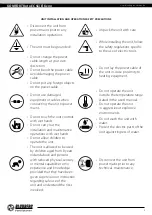
THE UNIT MUST BE MOUNTED BY A QUALIFIED EXPERT ONLY, PROPERLY TRAINED
AND HAVING THE REQUIRED TOOLS AND MATERIALS.
MOUNTING AND SET-UP