


Installing your Blackmagic Web Presenter HD into a Teranex Mini Rack Shelf is as easy as
removing the unit’s rubber feet, if installed, and fastening the unit to the base of the shelf using
the supplied screws. The Teranex Mini Rack Shelf ships with two original blank panels which
you can use to cover gaps if you don’t need to install additional Blackmagic Design equipment.
For more information check the Blackmagic Design website at
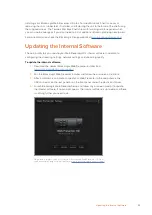
Updating the Internal Software
The setup utility lets you update your Web Presenter HD’s internal software in addition to
configuring the streaming settings, network settings and streaming quality.
To update the internal software:
1
Download the newest Blackmagic Web Presenter installer from
www.blackmagicdesign.com/support
.
2
Run the Blackmagic Web Presenter installer and follow the onscreen instructions.
3
After installation is complete, connect your Web Presenter to the computer via the
USB connector on the rear panel or on the front panel under the plastic dust cover.
4
Launch Blackmagic Web Presenter Setup and follow any onscreen prompt to update
the internal software. If no prompt appears, the internal software is up to date and there
is nothing further you need to do.
Download the latest setup utility for your Blackmagic Web Presenter HD from
the Blackmagic Design support center at
www.blackmagicdesign.com/support
22
Updating the Internal Software


