THE RGB TO DVI(/VGA) CONVERTER
THE RGB TO DVI(/VGA) CONVERTER
THE RGB TO DVI(/VGA) CONVERTER
1 Quick Setup
This section briefly describes how to install your RGB to DVI(/VGA) Converter and optimize the
video signals. Unless you are an experienced user, we recommend that you follow the full
procedures described in the manual.
1
Installation
For first-time users, we recommend that you carry out a test placement, confined to a single room,
before commencing full installation. This will allow you to identify and solve any cabling problems,
and experiment with the RGB to DVI(/VGA) Converter more conveniently.
1.1
Package Contents
You should receive the following items in your RGB to DVI(/VGA) Converter package:
•
RGB to DVI(/VGA) Converter unit.
•
RGB(S) to DVI-I cable
•
6V DC 12W universal power supply for RGB to DVI(/VGA) Converter.
•
DVI-I to VGA adaptor (DVI-I dual link male to HD15 female) connector.
•
Data Cable DSUB9male- DSUB9female
•
Programming cable (DB9 female to RJ11 4p4c).
•
User manual (Quick Setup).
•
US-type power cord.
•
Infrared Remote Control (IR-RC)
If anything is missing, please contact Technical Support
1.2
System Setup
To install your RGB to DVI(/VGA) Converter:
1.
Switch off all devices.
2.
Connect your TFT directly to the device; connect a VGA screen by using the equipped DVI-I
to VGA adapter.
Attention: Connect the VGA monitor cable to the adapter; then plug in the
adapter into the device. Otherwise, the VGA mode is not detected, DVI
output is generated and there will be no picture on the screen (see also on
page 1).
Under some circumstances, if your TFT supports both DVI and VGA
through a DVI-I cable, it might be necessary to use an additional DVI-I to
DVI-D adaptor to get a DVI output. Please contact technical support for this
accessory.
3.
RGB:
Connect the graphic source to the input connectors as shown in
Fehler! Verweisquelle
konnte nicht gefunden werden.
4, using the equipped 4xBNC-to-DVI adaptor. Please note, for
connecting a CGA or EGA source, connect the optional CGA-to-DVI adaptor or EGA-to-DVI
adaptor instead of the 4x BNC-to-DVI adaptor.
VGA:
Connect the graphic source to the input connectors as shown in Figure 4 using the VGA
to DVI-I Cable which is an optional feature.
TTL:
Connect the graphic source to the input connectors as shown in
Fehler! Verweisquelle
konnte nicht gefunden werden.
4, using the equipped Data Cable DSUB9male-
DSUB9female.
4.
Connect the 6V power supply to power the unit.
Only use the power supply originally supplied with this
equipment or a manufacturer-approved replacement.
5.
Power up the system.
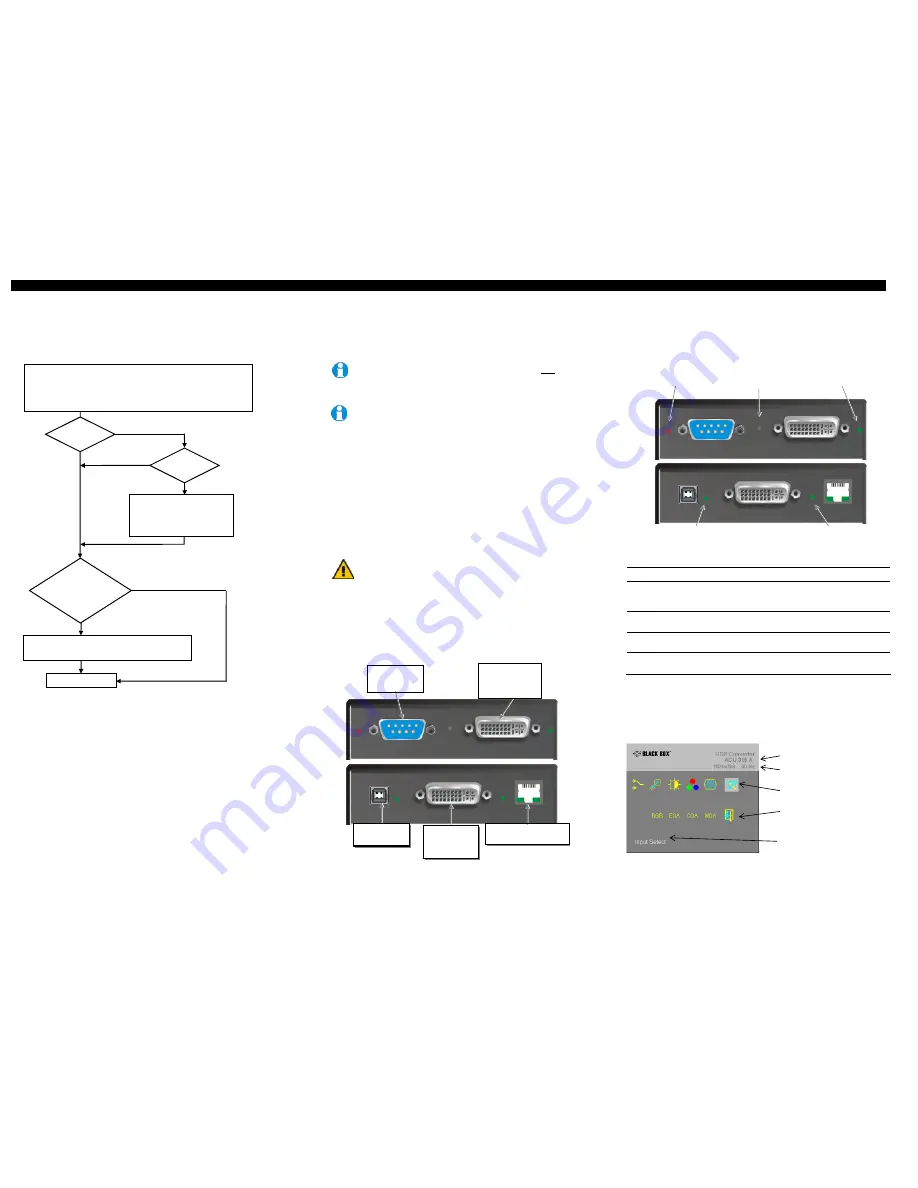
2 Device view
2.1
Diagnostic LEDs
Each RGB to DVI(/VGA) Converter is fitted with four indicator LEDs:
Monitor Detect
,
Device
Ready
and
Video Signal
and
Power
.
The
Monitor Detect
LED is to the right of the DVI output connector. The
Power
LED is to right of
the power supply connector. The
Device Ready
is left to the EGA/CGA/MDA connector and
Video
Signal
LEDs is right to the DVI Input connector.
The location of the LEDs is shown below:
Device Ready
IR-Receiver
Video Signal
(Red)
(Green)
Power
Monitor Detect
(Green)
(Green)
Figure 1
Diagnostic LEDs on RGB to DVI(/VGA) Converter
LED
Appearance
Diagnostics
Monitor Detect
(Green LED)
On
Flashing
Off
Attached DVI monitor (TFT) detected
Attached VGA monitor (CRT) detected
No monitor detected
Device Ready
(Red LED)
On
Off
Device ready
Device not ready
Video Signal
(Green LED)
On
Off
Attached and valid mode detected
No video signal or valid mode detected
Power LED
(Green LED)
On
Off
Device ready
Device not ready
3
Device Control
If you are using the CGA/EGA/MDA input or use an RGB format stored in the internal table, no
adjustment should be required. In other cases, you may need to optimize the output using the RGB
to DVI(/VGA) Converter’s on-screen display (OSD).
Figure 2
OSD Utility
Install system
1.
Connect the RGB to DVI(/VGA) Converter to the RGB (video) source.
2.
Connect a display to the RGB to DVI(/VGA) Converter.
3.
Connect the DVI(/VGA) Converter to the Power supply
4.
Power up the system.
Carry out the
Monitor Setup
procedure (please refer to the
monitor’s manual and see
page 35 in this manual).
Carry out
Setup of a new Video Mode
procedure
(please follow the instructions on page 37).
Done
Yes
No
Do you have a
DVI monitor?
Is the Video
mode in the list of
supported modes?
(see page 45)
Do you
have a flat screen
(TFT)?
No
No
Yes
Yes
Connect to the
DVI/VGA
Monitor resp.
TFT
Connect to
EGA/CGA/MDA
graphic source
Connect to RGB
or VGA source
(with RGB to DVI-
cable)
Connect to 6V
Power supply
Programming connector –
for firmware upgrades
Version information
Screen resolution and refresh rate
of the video source
Main menu icons
Submenu/command icons
Menu title


