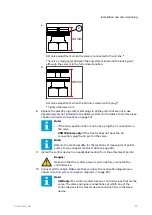
3. If the information on the display(s) is different, the system is not operating
correctly. Examine the cable connections.
Air bleeding procedure
In the air bleeding procedure the motor housing is fully filled with the hydraulic fluid.
The housing has air bleeding screws to remove the air from the housing. The control
system can help in the procedure. Refer to the CTR101 or CTR201 Operation manual
for the operation instructions.
Do the steps that follow:
1.
Set the parameters for the air bleeding procedure as follows. Write down the
initial values before you change them:
• Minimum pressure level [bar] value as low as possible
• Minimum pressure delay [ms] value as high as possible
• Drive activation ramp value as high as possible.
2. Set the other parameter values. Refer to the CTR101 or CTR201 Operation
manual. During this step, make sure that you select correct values for:
• Maximum pressure level [bar]
• 2-speed function.
3. Do the air bleeding procedure for one motor at a time.
• Find the air bleeding screws on the housing
• Turn the motor to a position in which the screw is at its topmost position. You
can use the control system to drive the motors to the correct position.
Note:
Use the 25 % power setting.
Keep the ATC function activated during the air bleeding procedure.
Note:
CTR201 only: Use the manual driving mode.
4. Loosen the air bleeding screw half a turn.
5. Drive the motor forward and rearward while you keep the air bleeding screw
approxi/- 45° of the topmost position.
Continue the movement until hydraulic fluid flows out of the screw while it is at
12 o’clock position.
Note:
It is usual that the Pressure low warning shows on the system display
during this procedure.
6. Tighten the screw. Make sure that the torque is correct. Refer to the product
manual of the motor for the correct torque value.
7. Do the steps 3 thru 6 again to the remaining motors.
8. To make sure that the air bleeding of each motor is correct, the manufacturer
recommends that you:
a. Drive each motor forward for one minute and rearward for one minute.
b. Repeat the air bleeding steps 3 thru 6.
6.3
Installation and commissioning
Product manual
31


