FIBER RACKMOUNT CABINET
3
3. Installation
1. Attach the two mounting brackets to the cabinet, and secure them with the four silver screws and four
washers.
2. Using the
10
⁄
32
or
12
⁄
24
cup-head screws, mount the Fiber Rackmount Cabinet in a 19" or 23" rack.
3. Open the back door by pulling, then releasing, the locking buttons.
4. Route multi-strand fiber cable (not included) through the rubber grommets on the cabinet’s top, bottom,
or side.
5. Use the Kevlar clamp to secure the multi-strand fiber to the cabinet. Loosen the Kevlar clamp’s two screws
and wrap the cable’s Kevlar yarn around the clamp. Tighten the screws to secure the multi-strand fiber to
the cabinet.
NOTE
The Kevlar clamp can be mounted on the cabinet’s rear left or right.
6. Install the cabinet’s PLEXIGLAS front door.
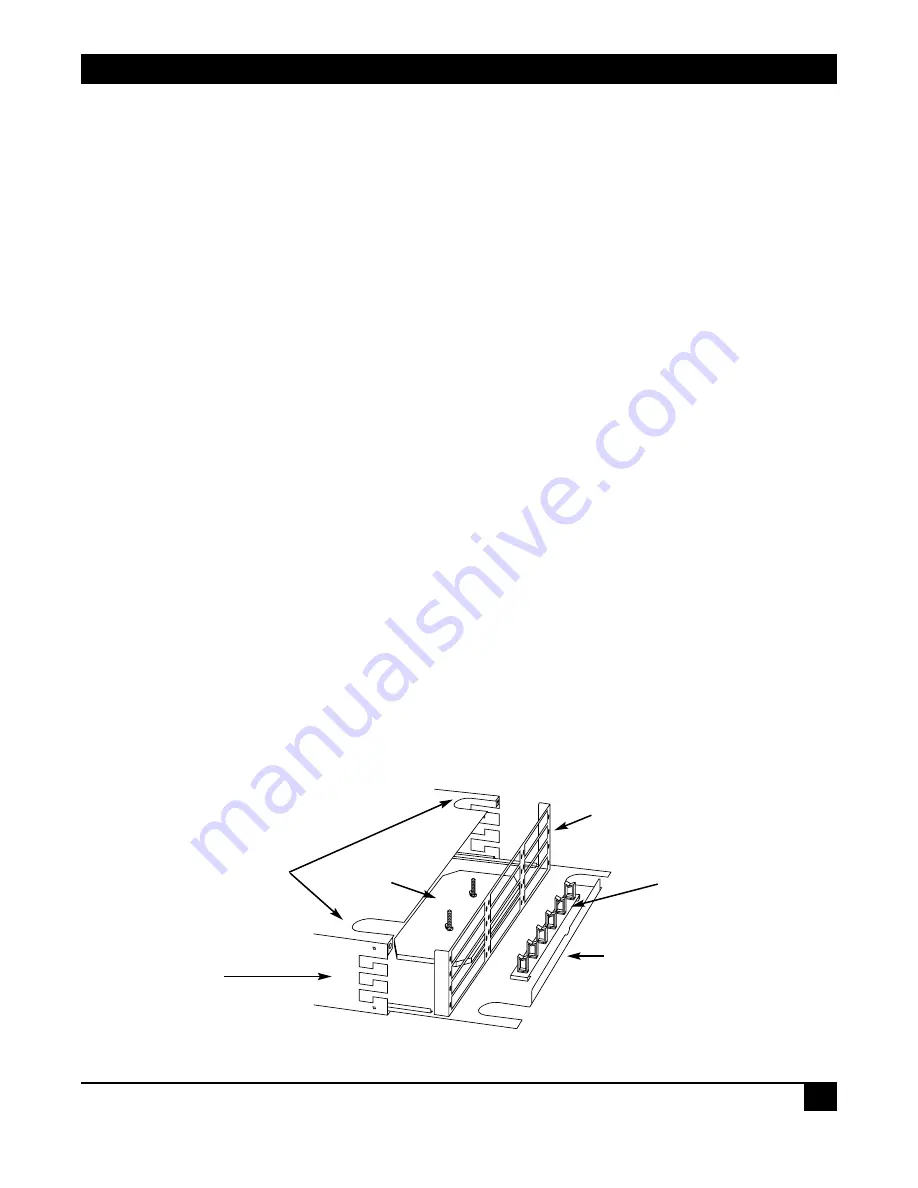
7. Pull out the tray (see Figure 1) to install a fiber adapter and splice tray (if needed). Up to 12 fiber adapters
can be installed in the JPM406A-R3; up to 6 can be installed in the JPM418A-R2.
8. Install the connectors on the multi-strand fiber cable, or make the splice as needed. (See Figure 2 for a
typical cable installation.) Connect the fiber cable to the fiber adapters.
9. Use the included rectangular plastic cable holders, cable ties, and black spool rings to hold the cable in
place inside the cabinet.
10. Slide the tray back into place inside the cabinet.
11. Close the cabinet’s rear door.
12. Snap in the 1" (2.5-cm) rectangular cable holder in the front of the inside tray. This helps organize the
fiber patch cables used in the front of the cabinet.
13. Close the cabinet’s front PLEXIGLAS door. Push the buttons in, then release, to lock.
14. Attach the “danger” sticker to the cabinet’s rear or top panel.
Figure 1. Fiber Rackmount Cabinet with tray pulled out.
Install the Kevlar
clamp on the side
Rectangular cable
holders
Inside
tray
Rubber grommets
Splice tray
Install the fiber
adapters here


