


◈
Information
This
installation
guide
contains
quick
information
required
for
the
product
installation.
Please
refer
to
the
Software
and
Documents
provided
on
the
Download
section
of
the
BIXOLON
Website(http://www.bixolon.com)
for
more
information
on
how
to
setup.
1.
Manual:
User’s
Manual,
Code
Table,
Control
Commands,
Software
manuals
2.
Driver:
Windows,
OPOS,
CUPS(Linux,
Mac),
VCOM(USB,
Ethernet)
3.
SDK:
UPOS
SDK(iOS)
4.
Utility:
Unified
POS
Utility,
Net
Configuration
Tool,
Android
Utility,
iOS
Utility
We
at
BIXOLON
maintain
ongoing
efforts
to
enhance
and
upgrade
the
functions
and
quality
of
all
our
products.
In
following,
product
specifications
and/or
user
manual
content
may
be
changed
without
prior
notice.
◈
Components
SRP-S200
Power
cord
Partition
Installation
Guide
USB
Cable
◈
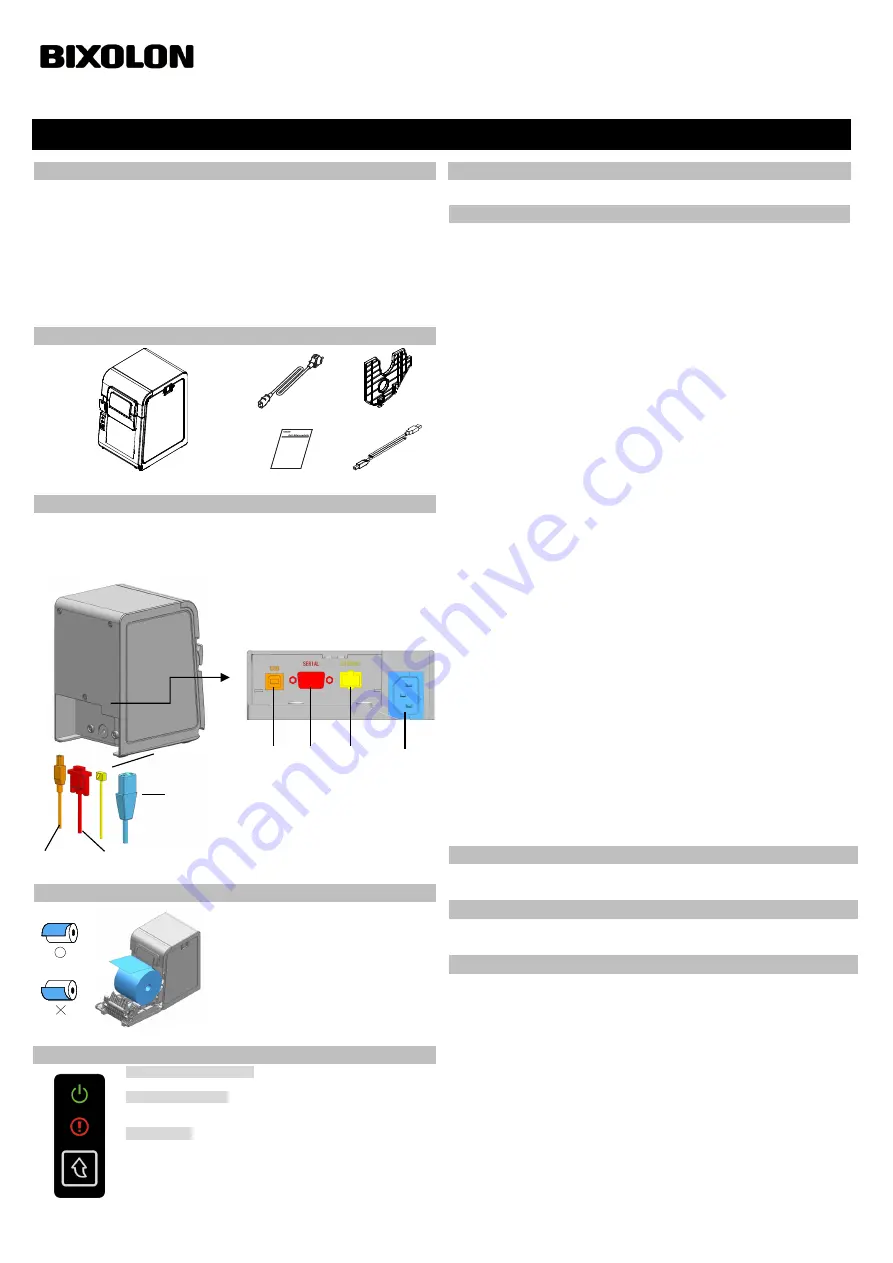
Cable
Connection
1.
Turn
off
the
printer
and
peripheral
devices.
2.
Connect
the
power
cord
to
the
adapter
and
connect
the
adapter
to
the
power
supply
connector
of
the
printer.
3.
Check
the
type
of
the
interfaces
at
the
back
of
the
printer
(USB,
Serial,
Ethernet)
and
connect
the
interface
cable.
◈
Installing
Paper
Roll
1.
Pull
the
Cover-Open
button
to
open
the
cover.
2.
Insert
new
roll
paper
in
the
correct
direction.
3.
Pull
the
paper
out
slightly
and
close
the
cover.
※
Note
When
closing
the
cover,
press
down
on
the
center
of
the
cover
to
ensure
that
the
paper
is
in
contact
with
the
roller.
Printing
quality
may
not
be
optimum
if
recommended
paper
is
not
used.
(Refer
to
the
User's
Manual.)
◈
Using
Control
Panel
•
Power
LED
(Indicatior
Lamp)
The
Power
light
is
on
whenever
the
printer
is
on.
•
Error
(Indicator
Lamp)
Red
light
will
be
on
in
various
error
conditions
such
as
out
of
paper,
cover
open,
etc
•
Feed
(Button)
Press
this
button
to
feed
the
paper
out.
Hold
down
this
button
to
feed
out
the
paper
continuously.
◈
Mounting
Partition(40mm)
Refer
to
the
user
manual
for
detailed
instruction.
◈
Self-Test
1.
Check
whether
paper
is
mounted
correctly.
2.
Turn
on
the
power
while
holding
down
the
Feed
button
and
the
self-test
procedure
will
begin.
3.
Printer
will
out
the
current
status
of
printer
including
the
version
of
ROM.
4.
After
printing
out
the
current
status
of
printer,
the
printer
will
following
lines
and
waits
for
the
next
step(paper
lamp
will
keep
blinking).
SELECT
MODES
BY
PRESSING
FEED
BUTTON.
Continuous
SELF-TEST
:
Less
than
1
second
VMSM
Selection
:
1
second
or
more
5.
Press
the
Feed
button
to
resume
printing
or
hold
down
the
button
for
at
least
one
second
to
change
the
VMSM
settings.
5-1
If
“Continuous
SELF-TEST”
is
selected
5-1-1
Press
the
Feed
button
for
less
than
one
second
to
the
preset
page.
5-1-2
The
self
test
ends
automatically
as
it
prints
the
following
line
and
cuts
the
paper.
***
COMPLETED
***
5-1-3
The
printer
goes
into
normal
mode
upon
completion
of
the
self
test.
5-2
If
“VMSM
Selection”
is
selected
5-2-1
The
following
lines
will
be
printed
when
the
VMSM
opens.
**
VMSM
Selection
**
0
:
Exit
and
reboot
printer
1
:
current
settings
2
:
Set
Density
3
:
Set
Speed
4
:
Set
Cutting
mode
5
:
Reserved
6
:
Reserved
7
:
Set
Black
Mark
Cut
Position
8
:
Maintenance
Counter
9
or
more
:
None
5-2-2
Press
the
Feed
button
to
run
the
above
function.
5-2-2-1
Step
1(Select
Options):
press
the
button
a
number
of
times
as
shown
by
each
menu.
5-2-2-2
Step
2(Enter
Options):
hold
down
the
button
for
at
least
one
second
to
apply
each
item
selected.
※
Note
If
you
select
any
items
not
listed
above,
the
list
of
“VMSM
Selection”
will
be
printed
again.
Setting
the
mode
will
be
canceled
if
no
item
is
selected
in
Step
1.
5-3
Hold
down
the
Feed
button
for
at
least
1
second
to
save
the
changes.
The
following
line
will
be
printed
before
cutting
the
paper.
※
Attention
If
“0:
Exit
and
reboot
printer”
is
not
executed,
the
new
settings
will
not
be
saved.
***
COMPLETED
***
6.
The
new
settings
will
be
automatically
applied
when
printer
resets.
※
Note
You
can
check
whether
printer
works
correctly
or
not
through
the
self-test.
Printing
quality,
ROM
version,
and
memory
switch
settings
can
be
checked
through
the
self-
test
function.
◈
Using
of
Taken
Sensor
Function
When
it
comes
to
Taken
Sensor,
it
will
detect
the
paper
not
to
feed
next
paper
before
user
detach
it.
Refer
to
the
user
manual
for
detailed
instruction.
◈
Reconfiguration
of
Printer
SRP-S200
does
not
support
Dip
Switch.
To
change
the
settings
of
the
printer,
use
the
virtual
memory
switch
utility
or
virtual
memory
switch
control
function
for
self-diagnosis.
◈
Recommended
Papers
Sticky(Restick),
-
Iconex
Sticky
Media(USA):
Classic:
9023-1823,
9023-1397(58mm),
9023-1233,
9023-1818(40mm)
Classic
High
Tack:
9023-1500(58mm),
9023-1258(40mm)
Ultralite:
9023-1410(58mm),
9023-1865(40mm)
-
MAX
International
Converters,
Inc.
MAXStick
Products
Ltd(USA)
※
Attention
Use
of
papers
other
than
those
recommended
above
may
damage
TPH
or
degrade
the
printing
quality
and
our
company.
Is
not
responsible
for
the
damage
caused
by
non-
recommended
papers.
Printer
Installation
Guide
&
Safety
Guide
KN04-00214A
(Ver.1.0)
LINERLESS
PRINTER
SRP-S200
USB
Cable
USB
Power
cord
Serial
Ethernet
Power
Serial
Cable
Ethernet
Cable


