background image

BV200 Plasma Viscometer Mk2/3 Customer User 
Manual 


Issue 9

th

 Sep 2020 - Rev 1.8 


Page 20 of 53   


5. 

Draft Standard Operating Procedure (SOP) 

5.1.  Before operating the viscometer 

  Empty and rinse the 4 litre waste bottle. 

1.

  Empty and rinse the condensation bottle. 

2.

  Ensure the wash container is emptied, rinsed and then refilled daily with fresh wash.  

3.

Wash = 2 litre distilled or de-ionised water with 1 barcoded wash additive. 

  All viscometer covers and panels should be fitted and closed. 

4.

  The control vac regulator (sample vacuum) should be between -0.4 and -0.45 bar. 

5.

  Do not adjust the regulator unless followed by a full manual calibration   

6.

  The vacuum on the waste bottle vac gauge should be a minimum of -0.7 bar. 

7.

(70% vacuum). 

  Make sure the cap on the waste bottle is fully tightened and the air tubes are fully 

8.

plugged in. 

5.2.  To test centrifuged EDTA plasma samples 

-


Ensure all samples to be tested are fully centrifuged (note 

– controls do not need to 

be centrifuged) 

-


Allow all samples and calibrators to stabilise their temperature to room 
temperature before testing. This will take longer if samples have arrived by post or 
from a courier.  

-


Do not store PV samples in a fridge. Plasma samples should be stored at room 
temperature and should never be stored in a fridge. If plasma is stored in a fridge, 
cryoproteins will precipitate out of the fluid, leading to incorrect results. 

-


All calibration and patient sample tubes should be inserted so that the bar code 
labels are aligned with the marker on the carriage tube holder.  

-


All tubes must be fully pressed down in the holder to avoid tube crashes in the test 
area.  

  Insert a charged 

CHECK

 tube with cap on in the first 

green


holder  

1.

  Place centrifuged sample tubes into the black holders, starting after the first 

CHECK


2.

tube. 

  Insert a charged 

CHECK

 tube in each 

green


tube holder as the viscometer is filled. 

3.

  Insert a charged 

CHECK

 tube in the 

green


tube holder after the last patient sample.  

4.

Note: If a known High-Risk sample/s are tested (run as a batch), follow it with a 

viscometer 

STERILISER

 tube placed before the stop flag. 


Insert a „stop flag‟ behind the last CHECK tube. 

5.

  To start sample analysis, left-click on the viscometer screen but

ton marked „Start‟.  Top 

6.

left 

  Samples and CHECK calibrators may be added at any time.  Move the stop flag to the 

7.

end of the sample line. 

  The viscometer can be set to automatically retest a CHECK which has not been 

8.

validated. 


Содержание BV200

Страница 1: ...samples so it is designed to handle bio hazardous materials safely All equipment is manufactured produced and supplied by Benson Viscometers Ltd in the UK Only reagents and viscometer cleaning produc...

Страница 2: ...ies please call us on 01646 650065 or e mail info bensonviscometers com Benson Viscometers Ltd Unit H North Estate Withybush Road Haverfordwest SA62 4BS Benson Viscometers Ltd 13 Greenwich Business Pa...

Страница 3: ...3 non electrical connection points on the side of the BV200 4mm tube push fit connector for the wash bottle 5mm tube push fit connector for the vacuum regulator 6mm tube push fit connector for the was...

Страница 4: ...t PSU viscometer is protected by two 3 15 amp fuses located in the IEC inlet socket The viscometer is also protected by an over voltage protection circuit located within the 36 volt PSU The BV200 110...

Страница 5: ...or R 300 Vacuum pump Vacuum Regulator Wash and Waste Bottle 4mm 5mm 6mm and 8mm connection hoses Grey PVC base plate with built in liquid level sensors PC A computer PC that consists of Monitor Compu...

Страница 6: ...o ensures viscometer result repeatability The second result is stored in the viscometer but marked as void for LIMs and it is not transmitted The 1 6mPa s check control is measured every ten patient s...

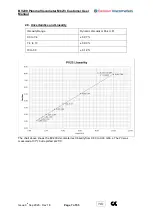
Страница 7: ...Rev 1 8 Page 7 of 53 2 8 Uncertainties and Linearity Viscosity Range Dynamic Viscosity mPa s cP 0 3 to 7 4 0 07 7 4 to 10 0 09 10 to 30 0 12 The chart above shows the BV200 viscometer test linearity...

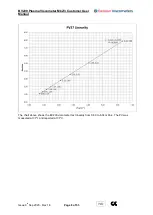
Страница 8: ...ma Viscometer Mk2 3 Customer User Manual Issue 9 th Sep 2020 Rev 1 8 Page 8 of 53 The chart above shows the BV200 viscometer test linearity from 0 69 to 6 34 mPa s The PV was measured at 37 and report...

Страница 9: ...e warning This symbol is essentially a safety symbol and should be used to highlight the fact that there are specific warnings or precautions associated with the device which are not otherwise found o...

Страница 10: ...Biological Growth Reagent is toxic if undiluted The anti biological growth reagent used comprises 0 02 Sodium Azide in the LOW HIGH and CHECK reagents so is not toxic at this level but users should be...

Страница 11: ...hazardous and handled according to your organisation s health and safety policy When carrying out the scheduled sterilise maintenance process on the waste bottle always wear suitable safety clothing a...

Страница 12: ...he viscometer with water could increase the hazard of an electric shock Only trained operators should clean the viscometer Cleaning fluid should never be used near the electrical components of the sys...

Страница 13: ...Warnings Type of Warning Precaution When removing and handling a cassette it must be considered to be a Biohazard Always switch the analyser off before removing replacing the cassette Always decontami...

Страница 14: ...e precautions to avoid becoming infected by blood products The Anti Biological Growth Reagent is toxic if undiluted The anti biological growth reagent used comprises 0 02 Sodium Azide in the LOW HIGH...

Страница 15: ...document Do not locate the viscometer next to an opening window or in direct sunlight as temperature variations can affect result repeatability 3 7 Transport considerations There is no standard packag...

Страница 16: ...e hand to support the rear of the unit can then be placed under the instrument Benson Viscometers will then safely relocate the viscometer to the required location 6 and connect and commission the ana...

Страница 17: ...e consult the Benson Support Desk Do not use this device in close proximity to sources of strong electromagnetic radiation e g unshielded intentional RF sources as these can interfere with the proper...

Страница 18: ...he Benson automated plasma viscometer uses a regulated vacuum to pull fluid samples through a calibrated capillary tube to determine a fluids viscosity The precise time of the fluid passage between tw...

Страница 19: ...BV200 Plasma Viscometer Mk2 3 Customer User Manual Issue 9 th Sep 2020 Rev 1 8 Page 19 of 53 4 3 Pump base 4 4 Viscometer...

Страница 20: ...ved by post or from a courier Do not store PV samples in a fridge Plasma samples should be stored at room temperature and should never be stored in a fridge If plasma is stored in a fridge cryoprotein...

Страница 21: ...play showing the distribution of all tubes that have been tested Empty tubes will have their symbol e g C flashing In the barcode column on the screen there is a number showing the number of dips take...

Страница 22: ...top the viscometer after samples have been processed Benson Viscometers recommends a stop flag is inserted into the black carriage after the last sample in that batch to be tested The system will perf...

Страница 23: ...azard Do not routinely use Sodium Hypochlorite or bleach products A trained user is required to perform the following daily weekly and monthly maintenance For all other maintenance issues please conta...

Страница 24: ...nson Viscometer cleaning agents are used a When using Benson Viscometers cleaning agents i Select Single or Bulk additive as appropriate ii Select Scan Barcode Then scan the barcode on the single use...

Страница 25: ...ls Insert 1 full mixed 3 ENZYME tube protein digestive cleaner immediately followed by 1 STERILISER tube For instructions on making up the Enzyme and Steriliser Solutions please see section 6 5 and 6...

Страница 26: ...ning agents are used However when not using Benson Viscometers barcoded cleaning agents you will need to seek approval to override this feature from a Senior within the laboratory This can be complete...

Страница 27: ...Customer User Manual Issue 9 th Sep 2020 Rev 1 8 Page 27 of 53 a When complete select Click to Finish The viscometer will then process the Enzyme and Steriliser tubes Note This process takes approxim...

Страница 28: ...ev 1 8 Page 28 of 53 6 2 Weekly maintenance Click in the Weekly days or due area from the cleaning activities section in the top bar 1 or from the maintenance manu Follow the on screen instructions to...

Страница 29: ...emove and clean the drain line filter 3 a When complete select Click to Proceed Follow the on screen instructions to inspect and clean the probe 4 Always remove the probe from the cassette before clea...

Страница 30: ...d up and down several times or until any deposit stops being forced through the aspiration hole iv Inspect the holes in the probe to ensure they are clear and clean if necessary using a pin Note do no...

Страница 31: ...pillary 5 When looking at the aspiration hole identify how much of the capillary is visible and is occupying the hole Ideally the capillary should only just be visible as in the top picture below If y...

Страница 32: ...the waste bottle cap with a cloth 6 soaked in laboratory sterilisation fluid Some staining of the rubber seal is normal and acceptable a When completed select Click to Proceed Follow the on screen in...

Страница 33: ...atively enter manually by selecting Manual Entry and use the keyboard to type the barcode from the single use tube or bulk additive iv When complete select Click to Finish a It is recommended that Ben...

Страница 34: ...the on screen instructions for Decontamination Clean Stage 1 once 9 a When complete select Press here to continue Follow the on screen instructions for Stage 2 10 a When complete select Press here to...

Страница 35: ...th Sep 2020 Rev 1 8 Page 35 of 53 Follow the on screen instructions for Stage 7 11 Note You do not need to empty and refill the wash and waste bottle if already completed as part of the weekly mainte...

Страница 36: ...stomer User Manual Issue 9 th Sep 2020 Rev 1 8 Page 36 of 53 6 3 Monthly maintenance Click in the Monthly cleaning from the top bar 1 Follow the on screen instructions to clean the carriages 2 a When...

Страница 37: ...reen instructions to rinse the base a To drain the fluid from the base area open the Sump Drain by clicking on the Sump Drain button This process can be repeated if necessary to fully drain all the fl...

Страница 38: ...BV200 Plasma Viscometer Mk2 3 Customer User Manual Issue 9 th Sep 2020 Rev 1 8 Page 38 of 53 Follow the on screen instructions and add any additional notes 5...

Страница 39: ...oded decontamination additive shown below From the Maintenance Menu on the main screen select do Decontamination Clean 1 The following popup will be displayed with the following text 2 Add the barcode...

Страница 40: ...e adaptor and re connect to the Wash Bottle Pour approx 100ml of tap water into the carriage area near the front of the BV200 unit so it drips down into the drainage channels below the carriages to fl...

Страница 41: ...BV200 Plasma Viscometer Mk2 3 Customer User Manual Issue 9 th Sep 2020 Rev 1 8 Page 41 of 53 Once complete click the Press here to continue button 5...

Страница 42: ...the enzyme is only mixed when it is needed this should not be an issue To Commence Enzyme Cleaning 2 An enzyme clean will commence when a tube displaying an ENZYME label is read by the barcode reader...

Страница 43: ...en has a 14 day use by date As the steriliser is only mixed when it is needed this should not be an issue To Commence a Steriliser Clean 2 A steriliser clean will be carried out when a tube displaying...

Страница 44: ...on the Drain Valve button whilst observing the waste vacuum gauge 7 The vacuum pressure should only drop by about 0 05 bar and then hold steady 8 If the vacuum level drops greater than 0 05 bar pleas...

Страница 45: ...Flush the entire contents of the syringe through the filter ensuring that the waste is 5 going in to a dirty sink If debris remains in the filter repeat steps 3 5 6 Fluid can pushed and sucked through...

Страница 46: ...available For 75 x 13 ml tubes transfer only a small amount of plasma 0 4 to 0 5 ml maximum to a 1 5 ml hanging cup or 1 5 ml mini tube using a Pasteur Place the hanging cup or mini tube in an empty p...

Страница 47: ...just the regulator so the runtime is 2 00 0 05 Vacuum on waste bottle vac gauge should be a minimum of 0 70 Make sure the cap on the waste bottle is fully tightened and the cap tubes are fully inserte...

Страница 48: ...into an Steriliser labelled empty collection tube Add 4 drops of the Steriliser Additive from the 30ml dropper to the tube Replace the cap of the tube and mix well Remove the cap and present the tube...

Страница 49: ...witch on power to the Viscometer 2 Open the front cover of the Viscometer 3 Sweep the barcode strips through the red barcode beam from set to end 4 As the barcode reader scans the set barcode the soun...

Страница 50: ...ic Shelf life 1 year from fill date the expiry date is shown on the box and on the tube 9 5 Control 2 5 6 dip units per Sarstedt 2 7 tube contains glycerine and Sodium Azide Toxic Shelf life 1 year fr...

Страница 51: ...uge If possible mark the 1 position of the needle on the gauge and the adjustment knob For regulators with a light grey regulator knob release the lock on the vacuum regulator 2 valve by gently liftin...

Страница 52: ...Untreated myeloma plasma frequently has viscosity values of 3 mPa s while plasma containing macroglobulins can have values 10 mPa s 11 1 Samples Required Plasma from EDTA anticoagulated peripheralven...

Страница 53: ...ition however when taken in conjunction with a clinical assessment a result in the range of 1 75 2 00 mPa s can give an indication of an underlying problem Malignant disease 3 Early stage malignancy m...

Отзывы: