background image

English

28

Connection

Before connecting

• 

Before connecting, carefully read the operating instructions for connecting the external device

• 

Turn off the power to all devices before connecting cables.

• 

Take note of the following before connecting cables. Failure to do so may result in 
malfunctions.

• 

Before connecting a cable to the projector or to a device that is connected to the 

projector, touch any nearby metallic objects to remove any static electricity from your 
body.

• 

Do not use unnecessarily long cables to connect the projector or a device to the projector. 

Using a longer cable that is wound makes it act like an antenna, making it more susceptible 

to noise.

•  When connecting cables, connect GND first and then insert the connecting terminal of the 

connecting device.

• 

Acquire any connection cables necessary to connect external devices to the system that are 
not supplied.

• 

The images on the screen may wobble if the video signal contains too much jitter. In this case, 

a time base corrector (TBC) must be connected.

• 

If synchronization signal outputs from computers or video equipment are disrupted due to 
changes in the video output settings or any other reasons, the colors of projected images may 

be temporarily disrupted.

•  The projector accepts video signals, Y/C signals, YCBCR/YPBPR signals, analog RGB signals 

(synchronization signals are TTL level), and digital signals.

• 

Some computer models are not compatible with the projector.

• 

Use a cable compensator when you connect devices to the projector with long cables. If a 
cable compensator is not used, the image may not display properly.

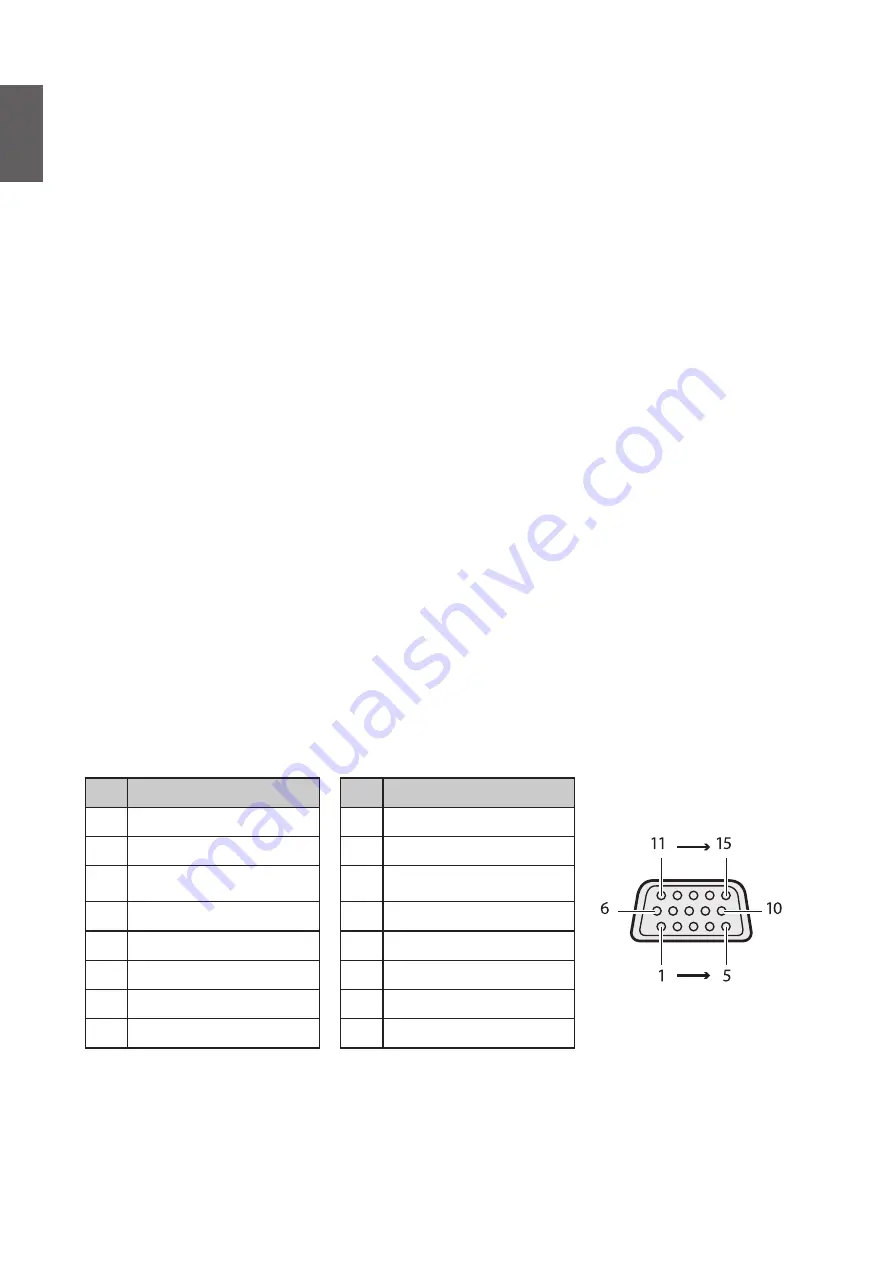
PC

No.

Serial

No.

Serial

1

R/PR

9

-

2

G/Y

10 GND

3

B/PB

11

GND

4

-

12

DDC data

5

GND

13

SYNC/HD

6

GND

14

VD

7

GND

15

DDC clock

8

GND

Содержание LU9245

Страница 1: ...Digital Projector User Manual LU9245 V1 01...

Страница 2: ...nq com for the latest version of this manual Statement regarding hyperlinks and third party websites BenQ is not responsible for the content of the websites or of similar resources which are maintaine...

Страница 3: ...14 Front and upper side view 14 Rear and upper side view 14 Controls and functions 15 Control panel 15 Control terminal 16 Remote control 17 Installation 21 Installing removing the optional lens 21 I...

Страница 4: ...48 Source menu 49 System Setup Basic menu 50 Menu Settings menu 51 Operation Settings menu 51 System Setup Advanced menu 53 Audio Settings menu 55 Light Settings menu 56 Security Settings menu 56 Clos...

Страница 5: ...ssword is incorrect 70 Specifications 71 Specifications 71 Dimensions 72 Attaching for ceiling mount 72 Appendix 73 Timing table 73 Supported timing for PC PC 2 input 73 Support timing for Component Y...

Страница 6: ...e control 5 Do not place this product on an unstable cart stand or table The product may fall sustaining serious damage 6 Do not attempt to disassemble this projector There are dangerous high voltages...

Страница 7: ...sely followed Laser class for USA This Laser Product is designated as Class 3R during all procedures of operation and complies with IEC EN 60825 1 2007 for WW This Laser Product is designated as Class...

Страница 8: ...LASER PRODUCT IEC EN 60825 1 2014 PRODUIT LASER DE CLASSE 1 IEC EN 60825 1 2014 Made in China Buatan China XXXXXX XX 1 Laser warning label 2 Spec label 326xxxxxxx IS 13252 Part 1 IEC 60950 1 R XXXXXXX...

Страница 9: ...Laser aperture Interlock switches This machine has 2 Top cover x 1 Lens x 1 Interlock switches to protect the laser light Leakage 1 Will power off the system individually when the top cover is remove...

Страница 10: ...emove the lens and attach the anti dust cap Anti dust cap 2 When the projector is not in use attach the lens cover supplied with the projector or the projection lens Lens cover Focus adjustment The hi...

Страница 11: ...7 inch for clearance around the exhaust vent Make sure no objects block air input within 30 cm 11 8 inch Keep the outlet at least 1 m away from the inlets of other projectors Air inlet Air inlet Air o...

Страница 12: ...do not recycle hot air from the exhaust vent When operating in an enclosed space make sure that the surrounding air temperature does not exceed the projector s operating temperature and that the air...

Страница 13: ...5J JDH37 011 WUXGA 1 1 1 3 Vertical 15 55 Horizontal 5 5 LS2SD2 Standard 5J JEN37 001 WUXGA 1 54 1 93 Vertical 15 55 Horizontal 5 5 LS2LT1 Semi long 5J JDH37 032 WUXGA 1 93 2 9 Vertical 15 55 Horizont...

Страница 14: ...OURCE indicator light 4 TEMPerature indicator light 5 POWER indicator light 6 Front vent cool air intake 7 Front adjuster foots 8 LENS RELEASE button 9 Projection lens 10 Side vent cool air intake Rea...

Страница 15: ...ne Arrow keys Down Manually corrects distorted images resulting from an angled projection AUTO Automatically determines the best picture timings for the displayed image See Auto adjusting the image on...

Страница 16: ...Standard 9 pin D sub interface for connection to PC control system and projector maintenance RS 232 OUT Connects to another projector same model for RS 232 control PC 2 R Pr G Y B Pb H V Connection to...

Страница 17: ...he desired menu items and to make adjustments See Using the menu on page 40 for details ENTER Selects an available picture setup mode Activates the selected On Screen Display OSD menu item MENU Turns...

Страница 18: ...l ID SET set the particular remote code Press to set remote ID Press ID SET for three seconds The POWER indicator on the remote control blinks then press 01 99 to designate an ID Note The remote contr...

Страница 19: ...emote control may not operate when the length of the cable exceeds 15 m 49 2 ft or when it is not properly shielded Remote control effective range Infra Red IR remote control sensor is located on the...

Страница 20: ...egative 3 Refit the cover by aligning it with the base and sliding it back down into position Stop when it clicks into place 2 3 1 Caution Avoid excessive heat and humidity There may be battery damage...

Страница 21: ...h the lens surface when removing or installing the lens Keep fingerprints dust or oil off the lens surface Do not scratch the lens surface Work on a level surface with a soft cloth under it to avoid s...

Страница 22: ...g the existing lens from the projector 1 Push the LENSE RELEASE button to the unlock position 2 Grasp the lens 3 Rotate the lens counterclockwise The existing lens will be disengaged 4 Pull out the ex...

Страница 23: ...1 18 55 1 40 65 1 66 82 2 08 60 1 52 51 1 29 32 0 81 1 6 0 040 17 5 0 444 56 1 42 66 1 68 78 1 99 98 2 49 80 2 03 68 1 72 42 1 08 2 1 0 054 23 3 0 592 75 1 90 88 2 24 104 2 65 131 3 33 100 2 54 85 2 1...

Страница 24: ...mi Throw LS2ST4 Throw ratio 0 77 1 1 1 25 1 60 Diagonal Image Width Image Height Offset A O Distance Distance Wide Tele Wide Tele Wide Tele Wide Tele Inch m Inch m Inch m Inch m Inch m Inch m Inch m I...

Страница 25: ...oom Lens Optional Lens Standard LS2SD2 Optional Lens Semi Long Throw LS2LT1 525 11 20 67 531 91 20 94 Standard Lens 546 53 21 51 Semi LongThrow Lens 525 11 20 67 Optional Lens Long Zoom LS2LT2 Optiona...

Страница 26: ...vertical image position The vertical image height can be adjusted between 55 and 15 for WUXGA of offset position Please consult the Lens Shift Range diagram below for further clarification Adjusting t...

Страница 27: ...o not use the projector in the following location In a building close to a construction site In a room where an air conditioner unit is working and it vibrates In a place where the temperature changes...

Страница 28: ...necting device Acquire any connection cables necessary to connect external devices to the system that are not supplied The images on the screen may wobble if the video signal contains too much jitter...

Страница 29: ...DS Data0 17 DDC CEC Ground 8 TMDS Data0 Shield 18 5 V Power max 50 mA 9 TMDS Data0 19 Hot Plug Detect 10 TMDS Clock DVI D No Serial No Serial 8 16 17 24 9 1 T M D S data 2 13 2 T M D S data 2 14 5 V 3...

Страница 30: ...English 30 Connecting with AV equipment VCR with built in TBC DVD player with HDMI terminal HDCP Blu ray disc player Connecting with computer Monitor Control Computer Computer...

Страница 31: ...Connecting with HDBaseT transmitter HDBaseT transmitter RS 232 RJ45 RJ45 LAN YPbPr VGA IN HDMI Hub Projector VGA Cable RS 232 RJ45 Cat5e or above DVD Player DVD Player Control PC Control PC Connectin...

Страница 32: ...the POWER indicator light on the projector lights orange after power has been applied Caution Please use the original accessories e g power cable only with the device to avoid possible dangers such a...

Страница 33: ...tart the projector and a start up tone sounds The POWER indicator light flashes green and stays green when the projector is on The start up procedure takes about 30 seconds In the later stage of start...

Страница 34: ...please set them to your familiar language first After this process is done this menu will not show up again after 1st time adjustment unless user presses Reset All Settings 1 Press ENTER on the proje...

Страница 35: ...nu 3 Press to highlight Language and press ENTER to select a preferred language 4 Press ENTER twice on the projector or remote control to leave and save the settings The first press leads you back to...

Страница 36: ...front of the screen Purchase the BenQ Projector Ceiling Mounting Kit from your dealer to mount your projector on the ceiling Set Front Ceiling in the SYSTEM SETUP Basic Projector Installation menu af...

Страница 37: ...rom distortion To display the test pattern open the OSD menu and go to the System Setup Advanced Test Pattern and press to select On Adjusting by corner fit Manually adjust four corners of the image b...

Страница 38: ...ality To do this press AUTO on the projector or remote control Within 3 seconds the built in Intelligent Auto Adjustment function will re adjust the values of Frequency and Clock to provide the best p...

Страница 39: ...nds the message will disappear 2 Press POWER or OFF a second time The POWER indicator light flashes orange the projection light source shuts down 3 Once the cooling process finishes a Power Off Ring T...

Страница 40: ...nu see Picture menu on page 45 3 Source menu see Source menu on page 49 4 System Setup Basic menu see System Setup Basic menu on page 50 5 System Setup Advanced menu see System Setup Advanced menu on...

Страница 41: ...altering the image s aspect ratio 15 9 picture 2 Real The image is projected as its original resolution and resized to fit within the display area For input signals with lower resolutions the project...

Страница 42: ...35 to 2 40 aspect as it displays them without aspect alteration 2 35 1 picture 2D Keystone Press ENTER and press to adjust horizontal or vertical distortion brought by the projection angle Corner Fit...

Страница 43: ...o correct the bottom left corner Bottom Right Press ENTER and press to correct the bottom right corner Digital Shrink Shift menu Digital Shrink Press ENTER and press to reduce the image to a desired s...

Страница 44: ...P Link and VESA 3D 3D Mode Press ENTER to enter the 3D Mode menu Press to select the 3D format The options are Auto Top Bottom Frame Sequential Frame Packing Side By Side and Off 3D Sync Invert Press...

Страница 45: ...eo clips from digital cameras or DVs through the PC input for best viewing in a blackened dimly lit environment Cinema mode Is appropriate for playing colorful movies video clips from digital cameras...

Страница 46: ...value the sharper the picture becomes The lower the value the softer the picture becomes Brilliant Color Press to adjust the brilliant color of the projected image This feature utilizes a new color p...

Страница 47: ...adjust the Green Gain B Gain Press to adjust the Blue Gain R Offset Press to adjust the Red Offset G Offset Press to adjust the Green Offset B Offset Press to adjust the Blue Offset To set a preferred...

Страница 48: ...can only be achieved under controlled and reproducible viewing conditions You will need to use a colorimeter color light meter and provide a set of suitable source images to measure color reproduction...

Страница 49: ...t its value at 0 only the saturation of pure red will be affected Source menu Quick Auto Search Press to enable or disable search the input source automatically HDMI Format Press to selects a suitable...

Страница 50: ...ic menu Language Press ENTER to enter the Language menu Press to select the language of OSD menu Projector Installation Press to select the projector installation The options are Front Table Rear Tabl...

Страница 51: ...d Always Menu Position Press to select the menu display position The options are Center Top Left Top Right Bottom Right and Bottom Left Reminder Message Press to enable or disable reminder message dis...

Страница 52: ...f The options are Disable 30 mins 1 hr 2 hrs 3 hrs 4 hrs 8 hrs and 12 hrs Filter Settings Press ENTER to enter the Filter Settings menu See Filter Settings menu on page 52 for more details Filter Sett...

Страница 53: ...of bright areas When 3D Sync Mode is DLP Link the Dynamic Dimming function is not available Audio Settings Press ENTER to enter the Audio Settings menu See Audio Settings menu on page 55 for more deta...

Страница 54: ...ern Press to select the test pattern The options are Off Grid White Red Green Blue Black RGB Ramps Color Bar Step Bars CheckBoard Horizental Lines Vertical Lines Diagonal Lines Horizontal Ramp and Ver...

Страница 55: ...tings and press ENTER The Audio Settings page displays 3 Highlight Mute and press to select On 4 To restore the sound repeat steps 1 3 and press to select Off Volume Press to adjust the volume of the...

Страница 56: ...jector Light Usage Time Press ENTER to enter the Light Source Information menu Security Settings menu Change Password Press ENTER to change the password Change Security Settings Press ENTER to change...

Страница 57: ...Settings menu Standby Mode Press to select the standby mode The options are Eco Network and Normal Auto Disable Network Standby Mode Press to enable or disable the auto switch from network standby mod...

Страница 58: ...disable the AMX device discovery function When the function is enabled the projector can be detected by an AMX controller Mac Address Displays the cureent MAC address of the projector Information menu...

Страница 59: ...when 3D Mode is enabled Color System Displays the input system format Light Usage Time Displays the number of hours the light has been used Projector ID Displays the current projector ID Firmware Vers...

Страница 60: ...op Bottom Side By Side Off 3D Sync Invert Disable Invert 3D Sync Out Delay 3D Sync Out Reference 3D VESA Bypass Save 3D Settings 3D Settings 1 3D Settings 2 3D Settings 3 Apply 3D Settings 3D Settings...

Страница 61: ...Low Middle High Higher Auto Sync On Off System Setup Basic Language Projector Installation Front Table Rear Table Rear Celling Front Ceiling Menu Settings Menu Display Time 5 sec 10 sec 20 sec 30 sec...

Страница 62: ...Economic Mode Dimming Mode Custom Mode Security Settings Change Password Change Security Settings Power On Lock On Off HDBaseT On Off Baud Rate 2400 4800 9600 14400 19200 38400 57600 115200 Test Patte...

Страница 63: ...P IP Address Subnet Mask Default Gateway DNS Server Apply AMX Device Discovery On Off Mac Address Reset All Settings Reset Cancel Information Current System Status Source Picture Mode Light Mode Resol...

Страница 64: ...er or moisten a soft cloth with lens cleaner and gently wipe the lens surface Caution Never use any type of abrasive pad alkaline acid cleaner scouring powder or volatile solvent such as alcohol benze...

Страница 65: ...projected image quality 1 Turn off the projector and unplug the AC power cord from the AC outlet 2 Cleaning the filter with a vacuum cleaner Caution Recommend avoiding dusty or smoky environments when...

Страница 66: ...e two captive screws that secure the filter cover 2 Flip up the filter cover 3 Remove the filter module from the projector 4 Align the holes on the new filter module with the captive screws on the fil...

Страница 67: ...ys asking if you want to reset the filter timer Highlight Reset and press ENTER The filter time will be reset to 0 1 Turn off the projector and unplug the power cord from the outlet Remove any dust on...

Страница 68: ...Green Red Color wheel start fail Green Red Flashing Phosphor wheel start fail Red Flashing Scaler shutdown fail Green Red Flashing Lens release Green Red Case open Light source error message Power Te...

Страница 69: ...hermal sensor 1 short error Green Green Flashing Thermal IC 1 I2C connection error Green Flashing Red Temperature 2 error Green Flashing Red Flashing Thermal sensor 2 open error Green Flashing Green T...

Страница 70: ...se Remedy The projection lens is not correctly focused Adjust the focus of the lens using the focus ring The projector and the screen are not aligned properly Adjust the projection angle and direction...

Страница 71: ...GER 12VDC Max 0 2 A x 1 LAN control RJ45 x 1 Wired Remote PC audio jack x 2 In Out Input terminals Computer input RGB input 3D Sync in x 1 D Sub 15 pin female x 1 BNC x 5 Digital input DVI D x 1 Video...

Страница 72: ...English 72 Dimensions 470 00 470 00 235 00 535 65 519 50 525 00 113 50 95 00 220 50 216 60 202 00 Attaching for ceiling mount Ceiling Mount Screws M6 Max L 12 Min L 10...

Страница 73: ...65 000 XGA_70 70 069 56 476 75 000 XGA_75 75 029 60 023 78 750 XGA_85 84 997 68 667 94 500 XGA_120 Reduce Blanking 119 989 97 551 115 500 1152 x 864 1152 x 864_75 75 000 67 500 108 000 1024 x 576 Ben...

Страница 74: ...Note There 3D timing showing depend the EDID file andVGA display card It is possible that user cannot choose the above 3D timings onVGA display card No available in PC 2 Support timing for Component...

Страница 75: ...2 809 37 861 31 500 VGA_75 75 000 37 500 31 500 VGA_85 85 008 43 269 36 000 720 x 400 720 x 400_70 70 087 31 469 28 3221 800 x 600 SVGA_60 60 317 37 879 40 000 SVGA_72 72 188 48 077 50 000 SVGA_75 75...

Страница 76: ...65 290 146 250 1920 x 1080 60Hz 1920 x 1080_60 Reduce Blanking 60 000 67 500 148 500 1920 x 1200 60Hz 1920 x 1200_60 Reduce Blanking 59 950 74 038 154 000 640 x 480 67Hz MAC13 66 667 35 000 30 240 832...

Страница 77: ...00 720 50p 1280 x 720 37 50 50 00 74 25 720 60p 1280 x 720 45 00 60 00 74 25 1080 24p 1920 x 1080 27 00 24 00 74 25 1080 25p 1920 x 1080 28 13 25 00 74 25 1080 30p 1920 x 1080 33 75 30 00 74 25 1080 5...

Страница 78: ...e Volume CR vol CR Write Volume level for customer CR vol value CR Read Volume Status CR vol CR Audio Source Select Write Audio pass Through off CR audiosour off CR Write Audio Computer1 CR audiosour...

Страница 79: ...e Warm CR ct warm CR Write Color Temperature Normal CR ct normal CR Write Color Temperature Cool CR ct cool CR Read Color Temperature Status CR ct CR Write Aspect 4 3 CR asp 4 3 CR Write Aspect 16 9 C...

Страница 80: ...erfitblx CR Write 4 Corners Bottom Left X Increase CR cornerfitblx CR Read 4 Corners Bottom Left X Status CR cornerfitblx CR Write 4 Corners Bottom Left Y Decrease CR cornerfitbly CR Write 4 Corners B...

Страница 81: ...atus CR menuposition CR Write Direct Power On on CR directpower on CR Write Direct Power On off CR directpower off CR Read Direct Power On Status CR directpower CR Write Signal Power On on CR autopowe...

Страница 82: ...CR up CR Write Down CR down CR Write Right CR right CR Write Left CR left CR Write Enter CR enter CR Write Back CR back CR Write Source Menu On CR sourmenu on CR Write Source Menu Off CR sourmenu off...

Страница 83: ...Brightness value CR hdrbri value CR Read Get HDR Brightness value CR hdibri CR Write Red Gain CR RGain CR Write Red Gain CR RGain CR Write Set Red Gain value CR RGain value CR Read Get Red Gain value...

Страница 84: ...ue CR Write Saturation CR saturation CR Write Saturation CR saturation CR Write Set Saturation value CR saturation value CR Read Get Saturation value CR saturation CR Write Gain CR gain CR Write Gain...

Отзывы: