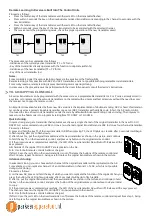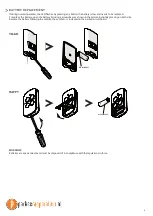
background image

6

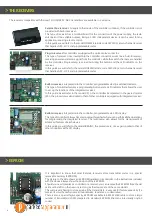
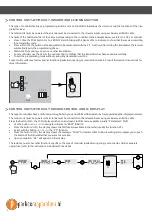
CONTROL UNITS WITH BUILT-IN RADIO AND LEARNING BUTTON

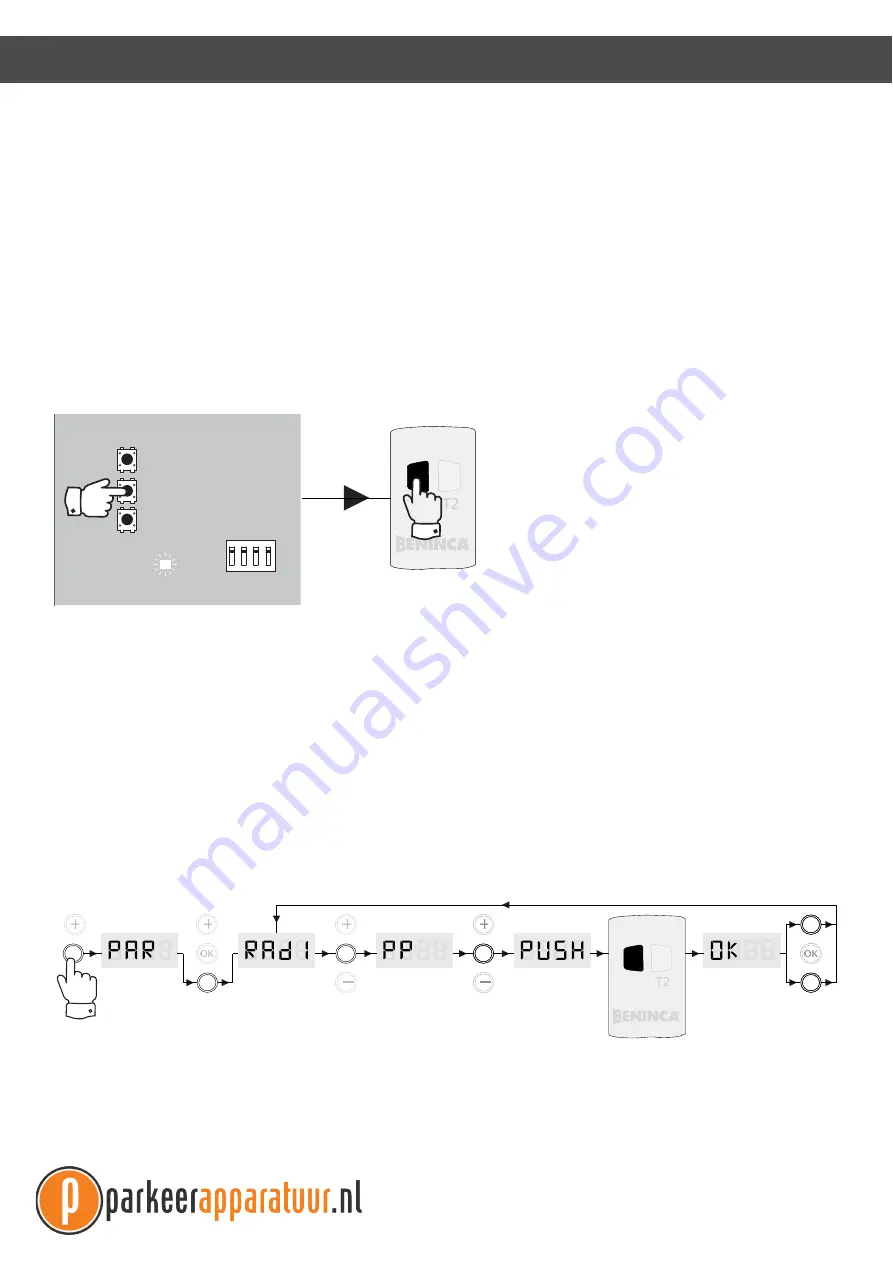
This type of controller features a programming button and a LED indicator that allows the user to set up the functions of the inte-
grated receiver.

The control unit must be powered, the antenna must be connected to the relevant inputs using exclusively an RG58 cable.

The name of the button and that of the LED vary depending on the controller. In the example below, we refer to a CP.J 3 controller:

Press 1 time the PGM button for 1s, LED DL1 starts blinking with a pause of 1s to indicate, to show that the receiver is waiting
for a transmitter code.

P ress within 10s the button of the transmitter to be memorised with the P .P . function. After storing the transmitter, the receiver
automatically exits the programming phase.

Within 10s from saving, you can save other transmitters.

S ome controllers use the LED or the assistive light to confirm that the transmitter has been saved successfully.

To exit the programming mode without saving any transmitter, wait 10s.

S ome control units may feature special functions (pedestrian opening, second radio channel). Consult the deviceʼs instructions for
more information.

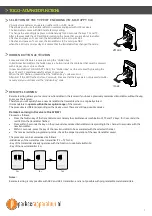
CONTROL UNITS WITH BUILT-IN RADIO CONTROL AND LCD DISPLAY

This type of controllers have a radio menu through which you can perform all the operations for programming the integrated receiver.

The control unit must be powered, the antenna must be connected to the relevant inputs using exclusively an RG58 cable.

P ress the button <OK>, the LCD display switches on and opens the first menu available (usually “P arameters” P AR).

Use the button <+>or <->to navigate in the menu “RADI” (RADIO).

P ress the button <OK>, the display shows the first function available in the menu (usually the function P P ).

S elect with the button <+>or <->the “PP” function.

Press the button <OK>, the display shows the message “PUS H” to indicate that a button is waiting and prompts you to push
the button of the transmitter that you want to associate.

Upon completion, “OK” will appear on the display.

The radio menu also has other functions specific to the type of controller (pedestrian opening, second radio channel, separate
open/close); refer to the instructions included with the device

T1

OK

OK

OK

+

-

+

-

-

OK

T1

DL1

1

2

3

4

P.P

PGM

CL

ON

>

>

Содержание HAPPY 2AK

Страница 1: ...PROGRAMMING GUIDE TO GO 2A TO GO 4A TO GO 2VA TO GO 4VA TO GO 2AS TO GO 4AS TO GO 2AK TO GO 4AK TO GO 4ASE TO GO 2QV HAPPY 2VA HAPPY 4VA HAPPY 2AK HAPPY 4AK ...

Страница 2: ...TECHNICAL SPECIFICATIONS TO GO 2A TO GO 4A TO GO 2VA TO GO 4VA TO GO 2AS TO GO 4AS TO GO 2AK TO GO 4AK TO GO 4ASE TO GO 2QV HAPPY 2AK HAPPY 4AK HAPPY 2VA HAPPY 4VA Power supply A23 type 12V alkaline battery Battery life 2 years with 10 transmissions per day Radio encoding rolling code 128bit ARC rolling code 128bit ARC rolling code 64bit HCS rolling code 128bit ARC Rolling code 64bit HCS rolling c...

Страница 3: ...tial and final serial numbers to use with the Advantouch programmer for storing a high number of transmitters by a single operation TO GO 4A SPECIAL EDITION with soft touch treatment TO GO 4ASE Rolling code transmitter 433 92 MHz with 4 channels with ARC code and special soft touch treatment that makes it soft to the touch and scratch resistant thus ensuring a longer service life Only for use with...

Страница 4: ...set up the functions of the integrated receiver In this guide we will refer to the model CPJ 3 the controller incorporated in the geared motors J M 3 the procedure is also similar to that of other controllers equipped with integrated receiver Built in receiver integrated into the controller programmable via LCD display This typeofcontrollers alwayshas a radiomenuthroughwhichyoucanperformalltheoper...

Страница 5: ...ice PLUG IN RECEIVER ONE 2WI AND EARLIER VERSIONS Insert the plug in receiver in the molex connector in the control unit The molex connector has a dedicated plug in side that must be observed The control unit must be powered the antenna must be connected to the relevant terminals using exclusively an RG58 cable The plug in receivers usually feature two transmission channels CH1 and CH2 to identify...

Страница 6: ...10s Some control units may feature special functions pedestrian opening second radio channel Consult the deviceʼs instructions for more information CONTROL UNITS WITH BUILT IN RADIO CONTROL AND LCD DISPLAY This type ofcontrollers have a radio menu through which you can performallthe operations forprogramming the integrated receiver The control unit must be powered the antenna must be connected to ...

Страница 7: ...dden Key code T1 T2 T4 LED REMOTE LEARNING Remote learning allows you to enter a new transmitter in the receiver if you have a previously memorized transmitter without having to access the receiver Therefore you will quickly have a new transmitter that resembles the one originally stored It is mandatory to operate within the reception range of the receiver The procedure is different depending on t...

Страница 8: ...t a transmitter that replicates exactly every single channel of the original transmitter in the new TO GO HAPPY AK we recommend using a 2AK to clone a two channel original transmitter and a 4AK to clone a four channel transmitter Proceed as follows 1 press and hold the key T1 of the new transmitter AK When pressing T1 the LED lights up steadily after 5 seconds it will begin to flash rapidly after ...

Страница 9: ...ttery open the battery lid using a screwdriver as shown in the picture by lightly pressing on both slits Replace the battery following the polarity the symbol is indicated in the printed circuit board TO GO HAPPY WARNING Batteries are special waste and must be disposed of in compliance with the regulations in force 12V ALCALINE A23 12V ALCALINE A23 ...

Страница 10: ...AUTOMATISMI BENINCÀ SpA Via Capitello 45 36066 Sandrigo VI ITALY Tel 0444 751030 r a Fax 0444 759728 www beninca com sales beninca it ...

Отзывы: