20900I01 - REV07 - 05/11/16
20900 - Hanging Sample Display
Assembly Instructions
Страница 1: ...20900I01 REV07 05 11 16 20900 Hanging Sample Display Assembly Instructions...
Страница 2: ...R I Sample Tray V2 08 20900W02V2 J Left Upper J Channel Weldment 01 210339W01L K Right Upper J Channel Weldment 01 210339W01R L Left Front Bottom J Channel 01 210339P01L M Right Front Bottom J Channel...
Страница 3: ...20900P07 Q Top Backer Board V3 02 20900P05V3 R Bottom Backer Board V3 02 20900P02V3 S Middle Graphic 01 20900P06 T Middle Insert Graphic 01 20900P09 U Lower Wing Right 01 20900P04R V Lower Wing Left...
Страница 4: ...ription Quantity Box Location Z Joint Connector Bolt 17mm Head 1 4 20 x 40mm 16 ASD30FUR2S AA Joint Connector Bolt 17mm Head 1 4 20 x 15mm 20 AB Joint Connector Bolt 13mm Head 1 4 20 x 15mm 10 ASD30HD...
Страница 5: ...rts A B D E Be sure the graphic channel is positioned towards the inside Note It may be helpful to keep the hardware loosely fit until the entire unit is assembled Then firmly tighten all fasteners E...
Страница 6: ...rdware just enough for Hanger Locks to drop in place 6 3 Connect the two Sample Hanger Frames with Hanger Locks F by partially unthreading the hardware as shown AA x4 4 Connect the Sample Rack C to th...
Страница 7: ...5 Attach the Sample Tray I with the hardware shown repeat for the remaining Trays AA x2 each AB 6 Connect the Graphic Supports parts G H to the inside of the Hangers using the hardware shown G H x2 e...
Страница 8: ...de AC Note Canoe Clip d should be installed with Bottom Backer Board Graphic for easiest assembly AB 8 7 Attach Left Front Bottom J Channel L and Left Upper J Channel Weldment J using hardware shown R...
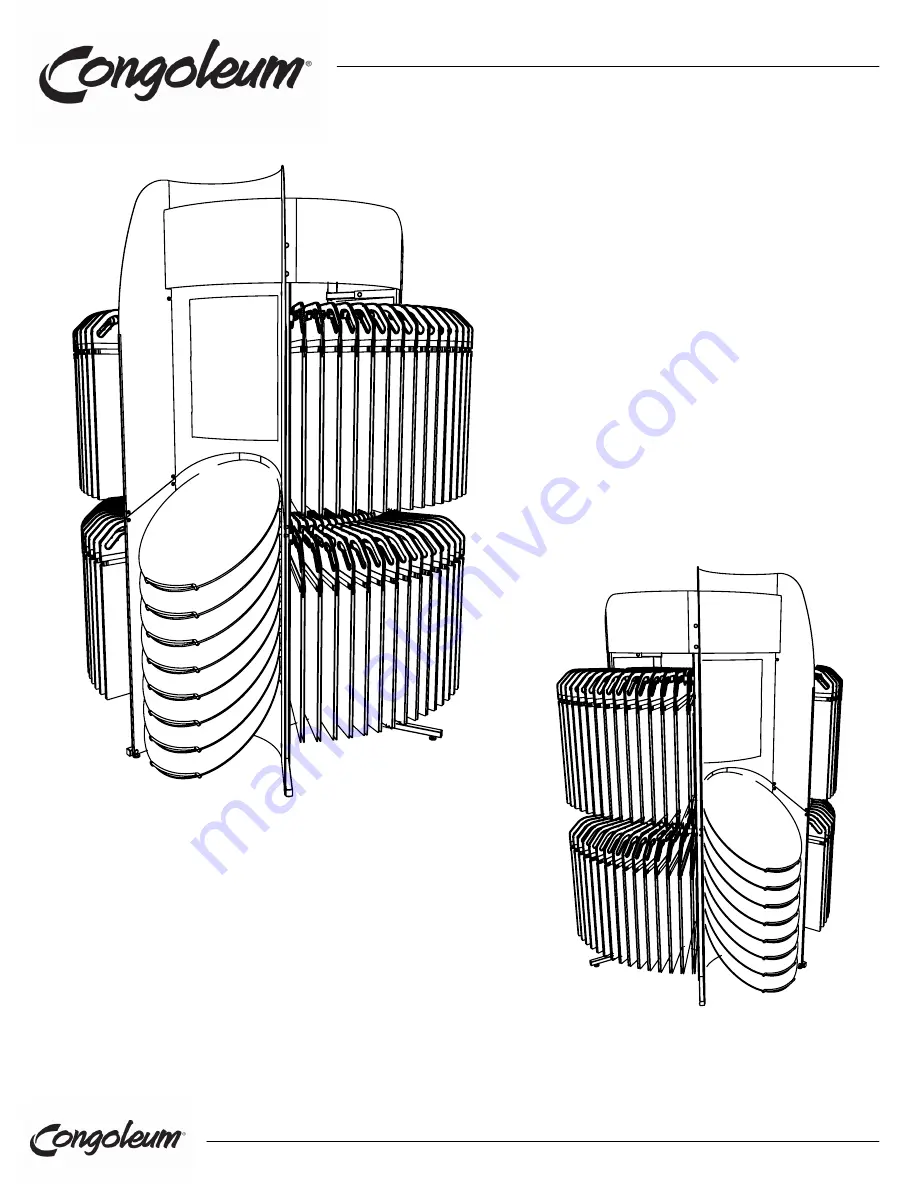
Страница 9: ...9 8 The Hanging Sample Display frame is now complete ready for graphics...
Страница 10: ...hardware shown AC x4 10 Repeat Step 8 for Top Backer Boards Q using the hardware shown Be sure to pin the top and bottom Backer Boards together Top Backer Board should overlap in front of Bottom Backe...
Страница 11: ...rt Middle Graphic S by latching the top into the Header notches attaching the four 4 joint connector bolts needed to hold it in place Once Graphic S is supported attach Middle Insert Graphic T into th...
Страница 12: ...Channel and secure the bottom by re using the top hardware installing the hardware shown AB 14 Install the Lower Wing Left Right items U V using the hardware shown Do not unthread the top bolt comple...
Страница 13: ...e where the band should engage on both ends of the hanger To install the flooring sample pull the band away from the hanger and slide the flooring sample into place Note Sample Hangers and Sample Band...
Страница 14: ...GREEN GREEN AQUA 14 16 Install the hanging samples according to the family groupings shown above Feature board layout will be included in the feature board carton The Hanging Sample Display is now com...
Страница 15: ...abrasives or chemicals Graphics For general dirt and dust removal use a dusting rag or wand to remove loose dirt and dust For a more thorough cleaning use mild soapy water or Windex Multi Surface spra...