background image

12 

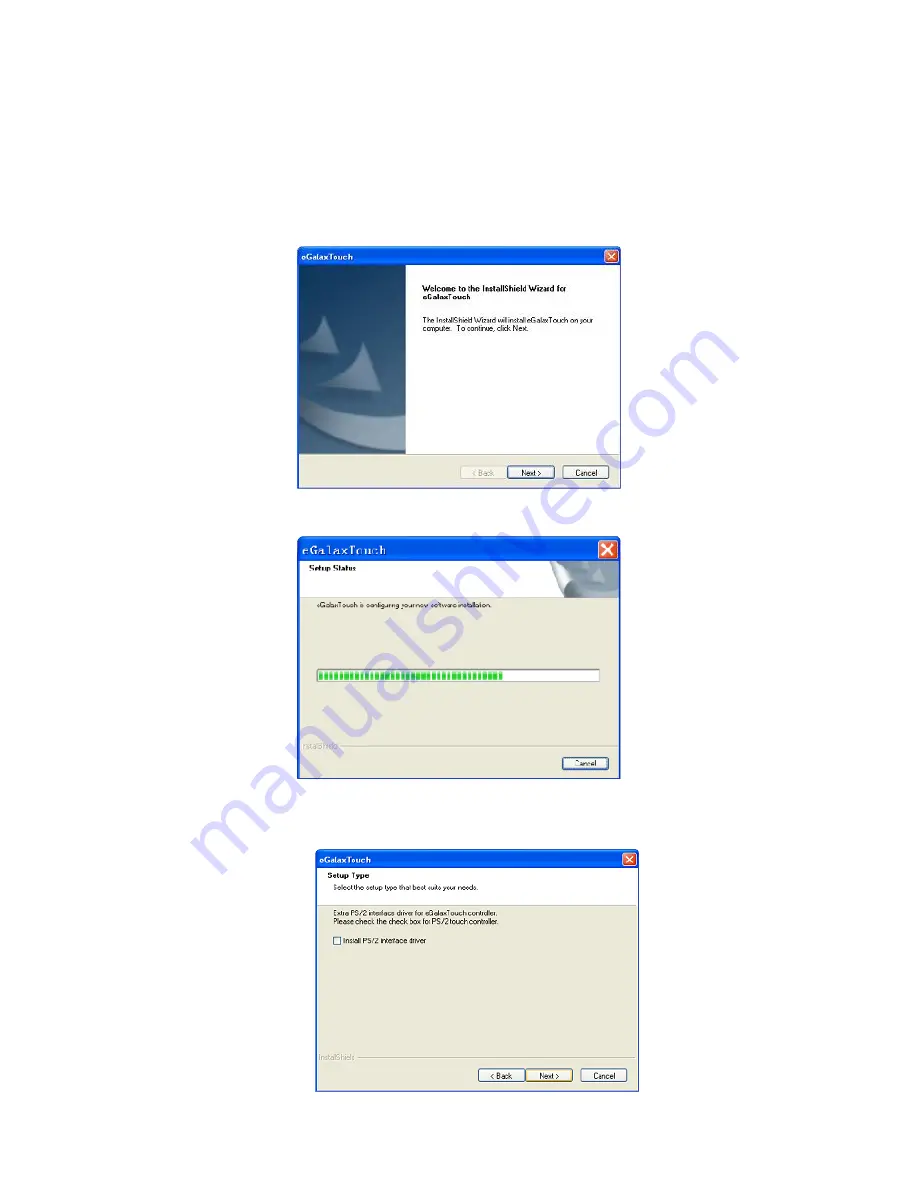
4.3  Touch screen driver installation 

 
4.3.1  Navigate  to  the  CDROM  or  installation  program  directory  to  find  the  file 

setup.exe.    Double-click on “setup.exe” to start installation. 


4.3.2  When installation starts, click [Next] to proceed to the next step. 


4.3.3  Installation in progress 


4.3.4  Uncheck  “Install  PS/2  interface  driver”  and  click  [Next]  to  continue 

installation. 


Содержание LE1015W

Страница 1: ...LE1015W 15 6 True flat Wide Screen LCD Touch Monitor USER MANUAL ...

Страница 2: ... Installation 5 3 1 Connections 5 3 2 Screw Specification for VESA Plate Stand or Wall Mount 6 3 3 Magnetic Stripe Reader Module Installation Optional 7 3 4 Second Display Installation Optional 8 4 Setup and Driver Installation 10 4 1 Control Buttons 10 4 2 On Screen Display Menu 11 4 3 Touch screen driver installation 12 5 Troubleshooting 17 6 Supported Timings 19 7 Specifications 20 ...

Страница 3: ... 1 1 Safety Information Do not place anything wet on the monitor or the power cord Be sure to turn the monitor off before plugging the power cord into the socket Be sure to check the power cord and other cords to be connected correctly Do not attempt to open the monitor You may be hurt by electric shock For service call your place of purchase 1 2 Precaution Do not expose the monitor to direct sunl...

Страница 4: ...Council Directive 89 336 EEC on the approximation of the laws of the Member States relating to electromagnetic compatibility Bematech Logic Controls cannot accept responsibility for any failure to satisfy the protection requirements resulting from a non recommended modification of the product This product has been tested and found to comply with the limits for Class A Information Technology Equipm...

Страница 5: ... Audio cable 6 USB cable 5 Quick Start Guide 7 Driver CD 2 2 Features True flat bezel free design Durable and sturdy base Support integrated MSR and second display Proven reliable performance Standard DB15 VGA connector Built in universal power supply Built in speakers USB touch interface ...

Страница 6: ... VGA port 2 Connect USB cable to computer USB port 3 Connect power cord to touch monitor 4 Plug power cord to wall AC power outlet Connectors 1 AC in AC power input 2 VGA port D Sub 15 pin VGA video input 3 Audio in Stereo phone jack audio input 4 Touch interface USB touch input 2 3 4 1 ...

Страница 7: ...Stand or Wall Mount B 5mm Screw Length A B 6mm Mechanical Screw 4 mm Caution Please follow the Screw Specification in diagram for assembling VESA plate stand or Wall mounts plate into monitor back cover Otherwise it may cause mechanical damage ...

Страница 8: ...r Module Installation Optional 1 Remove the MSR mount cover from the monitor 2 Insert the MSR module into the MSR USB port on the monitor 3 Make sure the MSR module is properly inserted and then install the 2 screws to secure it ...

Страница 9: ...8 3 4 Second Display Installation Optional 1 Connect USB cable to second display and Install VESA bracket set to the second display with 4x M4 screws 2 Remove the display mount cover from the monitor ...

Страница 10: ...9 3 Mount the second display set to the touch monitor and install screws to secure Plug USB cable into monitor USB port USB port ...

Страница 11: ...oke the OSD menu When OSD menu is displayed press this button to select the highlighted menu or function Adjust Increase volume When in OSD menu select next function When an OSD item is selected this button increase the option value Adjust Decrease volume When in OSD menu select previous function When an OSD item is selected this button decrease the option value A Auto Adjust Press this button to ...

Страница 12: ...phase of the PLL Auto color Adjust color automatically Color Temperature Adjust color temperature Red Adjust Red color Green Adjust Green color Blue Adjust Blue color Mute Select Mute Unmute Volume Adjust sound volume Language Select display language of the on screen display menu OSD time out Select desired time out for the on screen display menu to dismiss automatically Power Saving Select desire...

Страница 13: ...ion program directory to find the file setup exe Double click on setup exe to start installation 4 3 2 When installation starts click Next to proceed to the next step 4 3 3 Installation in progress 4 3 4 Uncheck Install PS 2 interface driver and click Next to continue installation ...

Страница 14: ...ll RS232 interface driver and click Next to continue installation 4 3 6 Select option NONE click Next to continue installation 4 3 7 If there are additional touch monitors connected please check Support multi monitor system ...

Страница 15: ...fault path is C Program Files eGalaxtouch Click Next to continue installation 4 3 9 Select the Program Folder to install the utility The default is eGalaxtouch Click Next to continue installation 4 3 10 Check the option to create a desktop shortcut icon Click Next to continue ...

Страница 16: ...15 After install the driver successfully identify the USB controller is installed as shown below 4 3 11 Click on Settings tab to change the touch function settings as needed ...

Страница 17: ...16 4 3 12 If necessary perform 4 point touch calibration and or 9 point 25 point linearization 4 3 13 Use Draw Test to check touch accuracy after calibration ...

Страница 18: ...nd make sure that the resolution or refresh rate match with the Display Mode 5 Touch screen is not accurate Run the touch screen calibration program with a 9 point linearization We also recommend doing this after changing the monitor resolution or refresh rate When running the calibration touch the center of calibration point to assure accuracy 6 The cursor moves opposite to the touch movement a R...

Страница 19: ...ation program to do a 4 point calibration and or 9 point 25 point linearization 7 Touch screen does not respond to touch operations Check and make sure that touch screen controller driver is installed properly in the computer and calibrate touch screen before using it ...

Страница 20: ... 800x600 56 250 35 156 Analog 7 VESA 800x600 60 317 37 879 Analog 8 VGA 800x600 72 188 48 077 Analog 9 XGA 800x600 75 000 46 875 Analog 10 VESA 1024x768 71 918 58 038 Analog 11 VESA 1024x768 75 029 60 023 Analog 12 VESA 1024x768 60 000 48 019 Analog 13 VESA 1024x768 60 000 47 700 Analog 14 VESA 1152x864 75 000 69 500 Analog 15 VESA 1280x800 59 800 49 702 Analog 16 VESA 1280x800 74 900 62 795 Analo...

Страница 21: ...n W x D x H 15 9 x 9 06 x 12 2 404 x 230 x 310mm Color Black ELECTRICAL Power supply Built in universal power supply Input 100 240VAC 50 60Hz Power consumption 30W max Power saving mode 1W max Power off mode 0 5W max ENVIRONMENTAL Operating temperature 5 C to 40 C Relative humidity 20 to 80 non condensing MISCELLANEOUS Plug Play DDC2B VESA wall mount compatible 100mm x 100mm Power management VESA ...

Страница 22: ...21 LE1015W True flat Wide Screen Touch Monitor ...

Отзывы: