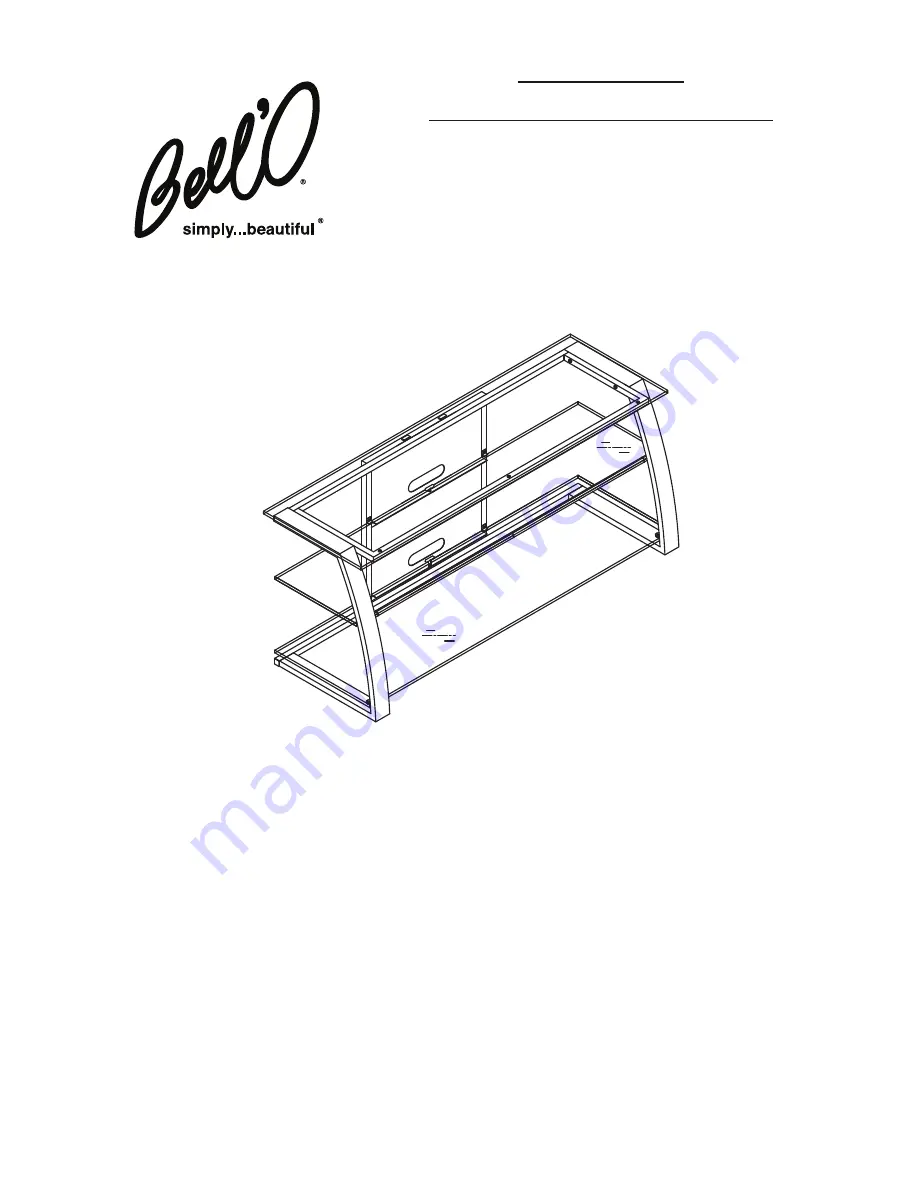
PVS4206HG
AUDIO/VIDEO TELEVISION SYSTEM
ASSEMBLY INSTRUCTIONS
Страница 1: ...PVS4206HG AUDIO VIDEO TELEVISION SYSTEM ASSEMBLY INSTRUCTIONS ...
Страница 2: ...AVIEST COMPONENTS ONTHE BOTTOM SHELF ALWAYS REMOVE THE TV AND OTHER EQUIPMENT FROM THE FURNITURE PRIOR TO MOVING THE ASSEMBLED UNIT DO NOT MOVE THE ASSEMBLED FURNITURE AFTER THE GLASS SHELVES HAVE BEEN INSTALLED AND OR WHEN THERE IS EQUIPMENT LOCATED ON THE FURNITURE AS THIS MAY CAUSE THE SHELVES AND OTHER ITEMS TO BECOME UNSECURED AND FALL WHEN IN USE THIS FURNITURE MUST BE PLACED ON A FLAT SOLID...
Страница 3: ...Parts List M1 M2 M3 M4 M5 M7 M8 M9 M10 M6 1 1 1 1 1 1 1 8 1 1 Quantity Part M11 M12 M13 M14 M15 M17 M18 M19 M20 M16 3 2 2 2 4 4 1 1 2 4 Quantity Part 25 mm 40 mm 35 mm 15 mm ...
Страница 4: ...pport Frame M3 to the Left Leg M1 and to the Right Leg M2 as shown using four 35 mm Bolts M10 assEMBLY iNstrUCtiONs NOTE 2 PEOPLE ARE RECOMMENDED TO ASSEMBLE THIS FURNITURE TO AVOID DAMAGE DURING ASSEMBLY IT SHOULD BE ASSEMBLED ON A SOFT SURFACE ...
Страница 5: ...d to the Right Leg M2 using four 40 mm Bolts M11 as shown Tighten fully 3 PLACE three Rubber Shelf Rings M13 evenly spaced on the Middle Shelf Support Bar M4 4 ATTACH the Middle Shelf Support Bar M4 to the Left Leg M1 and to the Right Leg M2 using two 25 mm Bolts M12 as shown Tighten fully M11 ...
Страница 6: ...ur 35 mm Bolts M10 Tighten all fully 6 Carefully MOVE the stand to the location it will occupy before attempting to add the Glass Shelves NOTE The stand MUST be on a flat surface and level before adding the Glass Shelves or any components There are leveling feet under the Left and Right Legs M1 M2 and Rear Stabilizing Bar M5 TURN to adjust to ensure the stand is level ...
Страница 7: ...astic T Pin M15 NOTE The Plastic T Pins M15 will help to keep the shelf in the correct position and help to prevent accidental movement of the Shelves They are NOT intended to LOCK the Shelves into place Always remove the Glass Shelves and all other items before attempting to move the stand 10 Carefully ATTACH the Top Glass Shelf M7 to the stand assembly and SECURE the Shelf using two 15 mm Bolts ...
Страница 8: ...FIG 5 M17 M17 M6 M18 11 For each lower Glass Shelf INSTALL the L Brackets M17 as shown above using the Small Screws M18 Make sure the L Brackets are above the Glass Shelves ...