

Quick Guide to setting up the Belkin Wireless LAN Card
Setting up the Belkin Wireless Notebook Network Card
If you have not used the
Belkin Wireless Notebook Network Card
previously, follow the manufacturer’s instructions to install the
Belkin
PCMCIA WLAN Monitor
software onto your computer.
This setup guide is based on a setup to a Windows 2000 platform.
There may be a variation to this guide if setting up on another
Windows platform.
Insert the
Belkin Wireless Notebook Network Card
into your
computer.
1.
2. Launch the
Belkin PCMCIA WLAN Monitor
software. If you have
installed this in the default Windows location, it is available by
clicking
Start
,
Programs
,
Belkin PCMCIA WLAN Utility
,
Belkin
PCMCIA WLAN Monitor
.
Alternatively, click on the
Belkin
PCMCIA WLAN Monitor
icon in the
System Tray
, which is
located at the bottom right of the screen. The
Belkin PCMCIA
WLAN Monitor
icon is the one shown to the left of the time in the
System Tray
illustration below, but on your system may be
adjacent to other
System Tray
icons. Depending on your Belkin
device settings, the icon may be coloured red or blue.
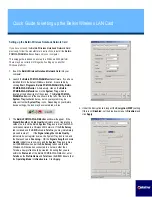
3. The
Belkin PCMCIA WLAN Monitor
window will appear. If the
Signal Strength
and
Link Quality
indicators are not registering a
value of zero, and the Belkin
System Tray
icon is blue, the WLAN
card is associated to a Wireless LAN network. If the
Site Survey
tab is clicked and the
SSID
shown is
Telstra
, you may immediately
proceed to step 11. If the
Signal strength
and
Link Quality
indicators do not register a value, the System Tray icon is red, and
the Status shown is
Scanning…
OR the
Signal strength
and
Link
Quality
indicators are non-zero and the
System Tray
icon is blue
but the
SSID
shown under the
Site Survey
tab shows that the
Wireless LAN device has connected to a network other than
Telstra, a new profile should be created. Ensuring that you are
within the
Status
tab of the Belkin PCMCIA WLAN Monitor, enter
Telstra
as the
Profile Name
and
Telstra
as the
SSID
. Ensure that
the
Operating Mode
is
Infrastructure
. Click
Apply
.
Under the Encryption tab, inspect the
Encryption (WEP)
setting.
If this is not
Disabled
, set the drop down menu to
Disabled
, and
click
Apply
.
4.