background image

GUIDE TO INSTALLATION AND OPERATION 
 

32

  |  HCO-1822 

3.4.16  User Presets 

 
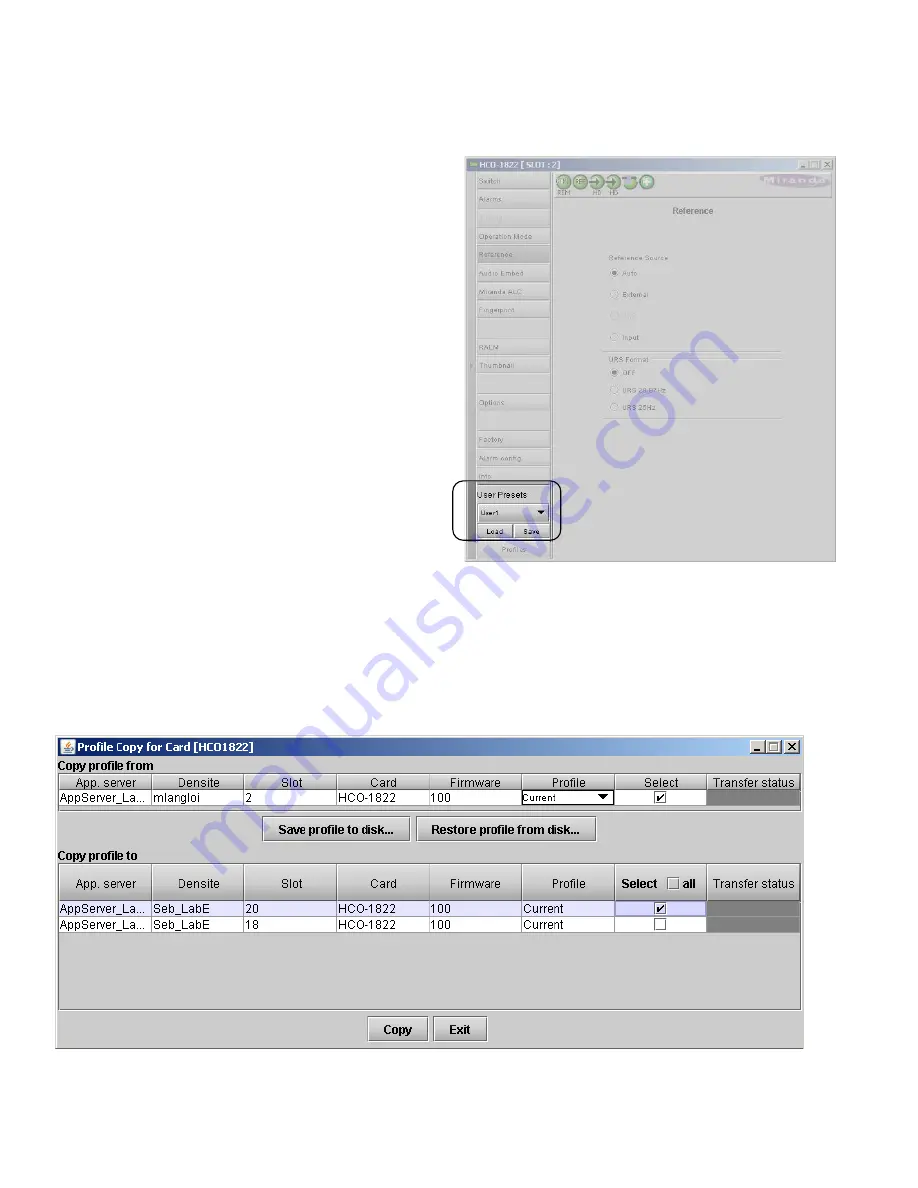
The User Preset controls allow the user to save and 
recover all configuration settings on the card. 
 
Select any one of the five presets using the pulldown list. 
The name of the currently-selected User Preset is shown 
on the on the pulldown icon (e.g. 

User1

User2

,… 

User5


Click 

Load

 to load the contents of the selected 

User Preset into the HCO-1822. All parameter 
settings and values will be replaced by the 
contents of the selected User Preset. 


Click 

Save

 to store the current parameter settings 

and values from the HCO-1822 into the selected 
User Preset. The existing contents of the preset 
will be overwritten.


3.4.17  Profiles 

 
This section provides the option to save and recover the entire card configuration (including user presets if desired) on 
an external disk, or to copy it to another HCO-1822 card. 
 
Click on the 

Profiles

 button at the bottom left corner of the control panel to open the Profile Copy window. 


Figure 3.44  Profile copy window 

Figure 3.43  User Presets 

Содержание Grass Valley HCO-1822

Страница 1: ...HCO 1822 HD SD ASI Change Over with Clean Switch and ALC Guide to Installation and Operation M955 9900 101 2015 08 10...

Страница 2: ...interference to radio communications Operation of this equipment in a residential area is likely to cause harmful interference in which case the user will be required to correct the interference at hi...

Страница 3: ...l 6 3 4 Remote control using iControl 7 3 4 1 The iControl graphic interface window 7 3 4 2 The Switch panel 8 3 4 3 The Alarms panel 11 3 4 4 The Timing panel 16 3 4 5 The Operation Mode panel 17 3 4...

Страница 4: ...GUIDE TO INSTALLATION AND OPERATION HCO 1822...

Страница 5: ...reaming fingerprints for the same signals an optional module in iControl can measure and report lip sync errors through the entire chain of a broadcast facility Grass Valley s new Automatic Loudness C...

Страница 6: ...unctionality of the HCO 1822 Figure 1 1 Functional block diagram HCO 1822 1 4 Front Card edge Interface The front card edge of the HCO 1822 incorporates two elements Status LED see section 3 2 Select...

Страница 7: ...signal to the BNC labeled REF IN NB The loop must be terminated if not used The reference input must conform to SMPTE 170M SMPTE 318M ITU 624 4 BUT 470 6 for standard definition signals and SMPTE 274M...

Страница 8: ...d switches to the input selected by the GPI 3 DO NOT TRIGGER BOTH GPI INPUTS AT THE SAME TIME OR ALLOW THE TRIGGER PULSES TO OVERLAP AS DAMAGE TO THE RELAY MAY RESULT 4 A GPI trigger pulse should have...

Страница 9: ...the HCO 1822 affect the LED status If a cell is gray the error condition cannot cause the LED to assume that status If more than one LED status is possible for a particular error condition the status...

Страница 10: ...rd flashes yellow The local control panel displays a menu that can be navigated using the four pushbuttons located beneath the display The functionality of the pushbuttons is as follows Used for menu...

Страница 11: ...the HCO 1822 is shown in figure 3 2 The window identification line gives the card type HCO 1822 and the slot number where the card installed in its Densit frame There are four main sections in the win...

Страница 12: ...t hand side of the panel contains a series of buttons that control the contents of the main window section 4 Click on one to access the indicated controls The selected button is highlighted darker and...

Страница 13: ...he HCO 1822 output over to the other source 2 Auto switch Auto switch uses Alarms based on the status of the selected input to determine whether the other input should be selected Click the Auto mode...

Страница 14: ...witches to the other input if it is valid when the alarm conditions trigger a switch It will stay on that input until an alarm condition appears for that input in which case it will switch to the othe...

Страница 15: ...anel see below An alarm that is enabled contributes to the switch decision process based on its LEVEL Is reflected in the device status as reported to iControl LEVEL has no bearing on this Each alarm...

Страница 16: ...r detection algorithm that will prevent switching when there are nearly coincident errors at the two inputs The LED color is not configurable NOTE This is the only error that can be triggered in the A...

Страница 17: ...n parameters for this error using two sliders Threshold mV sets the signal level below which Black will be considered to have been detected Set Duration sec sets the time interval over which Black mus...

Страница 18: ...continuously detected before the error is flagged The nominal range of durations is 0 5 to 90 seconds When durations 1 sec are selected there is an additional 0 5 seconds intrinsic to the error detect...

Страница 19: ...Flashing Red Global alarms The parameters found under the Global tab do not have individual control panels These alarms DO NOT CONTRIBUTE to the switch decision process but are included in the card s...

Страница 20: ...nction of the user programmed output timing The size of the window is 2 lines less 12 3 s for SD sources and 2 lines less 4 5 s for HD sources The following examples illustrate this concept Example a...

Страница 21: ...shown in blue If the measured input timing respects the supported input window this measurement will remain green If not the measurement will turn red Output Timing Use the Vertical pulldown to offse...

Страница 22: ...Timing panel section 3 4 4 for a display of the measured timing between the outputs and the reference and to set the output timing 3 4 7 The Audio Embed panel SD Audio Embed Input 1 SD Audio Embed In...

Страница 23: ...ossible as listed in the table above The 2 channel ALC supports only two independent programs either one 2 0 program or 2 mono programs All other ALC models supports up to 4 independent programs mono...

Страница 24: ...te which allows the ALC to follow the target output loudness quite well This preset is well suited for most types of audio content It is the factory preset loaded when loading the card default paramet...

Страница 25: ...educed following the rate set by the Speed pull down When the input loudness is under the Transient Mode Threshold loudness is increased again following the Speed pull down which ranges from Slow up t...

Страница 26: ...Inputs 1 and 2 can be adjusted independently The PGM Output window settings follow those of the selected input and are shown in the tab but cannot be adjusted there Zone Select the area of the image w...

Страница 27: ...n the RALM Remote Control section at the bottom of the panel to select the audio to be displayed on the meters The display window is divided into two sections of two meter pairs each The left hand sec...

Страница 28: ...shown in the pull down list depends on the type of meter selected Color samples the three samples show the current selected color for the upper middle and lower zones of the meter Click on the color s...

Страница 29: ...rmat Quality and Refresh Rate settings to the these thumbnails Mode select between Video mode and Test mode Use Video mode for normal operation Format choose the thumbnail size small medium large Qual...

Страница 30: ...format or reference mismatch are detected 5 During a switch the CSO performs a fade out fade in audio switch on 200 samples to prevent any pops or clicks only applicable to PCM audio 6 The following...

Страница 31: ...ndicate which is currently enabled e g HCO 1822 OPT ALC 8 for the 8 channel option If the currently enabled option is 2 6 or 8 channels the Enter key data box will be available to upgrade to a greater...

Страница 32: ...ilable levels then click on one to select it Overall Alarm This column allows configuration of the contribution of each individual alarm to the Overall Alarm associated with this card The Overall Alar...

Страница 33: ...e column simultaneously Log Events iControl maintains a log of alarm events associated with the card The log is useful for troubleshooting and identifying event sequences Click in the checkbox to enab...

Страница 34: ...ettings intact 3 4 15 The Info panel When the HCO 1822 is included in an iControl environment certain information about the card should be available to the iControl system The user can enter labels an...

Страница 35: ...h this HCO 1822 is registered Add Force the iControl service for this HCO 1822 to register itself on a user specified Jini lookup service using the following syntax jini ip_address where ip_address is...

Страница 36: ...parameter settings and values will be replaced by the contents of the selected User Preset Click Save to store the current parameter settings and values from the HCO 1822 into the selected User Preset...

Страница 37: ...aved correctly the Transfer Status box on the right of the Copy profile from line will indicate Succeeded against a green background If the file was not saved for some reason the Transfer Status box t...

Страница 38: ...column includes a checkbox to identify which HCO 1822 cards you wish to copy profiles into from the current card For convenience a Select all checkbox is provided in the column header Click Copy to c...

Страница 39: ...p50 RETURN LOSS 15 dB up to 1 5 GHz PGM out 15 dB up to 1 0 GHz 12 dB up to 1 5 GHz PVW out JITTER 0 2UI as per SMPTE 292M Reference input SIGNAL 1 SMPTE 170M SMPTE 318M ITU 624 4 BUT 470 6 or composi...

Страница 40: ...r 1 530 478 4148 To obtain a local phone number for the support center nearest you please consult the Contact Us section of Grass Valley s website www grassvalley com An online form for e mail contact...

Страница 41: ...LENCE CHANNEL 1 to 16 AUDIO GROUP PRESENCE 1 to USER 1 USER 5 USER 1 USER 5 AUTO MANUAL BYPASS IN1 IN2 N A AUTO EXT URS INPUT OFF 29 97 HZ 25 HZ HD SD ASI HCO 1822 XXX RESTORE Sets all parameters show...

Отзывы: